


一: 前言
1. 源码
在项目的实际开发中,根据用户的要求会遇到各种各样的需求。本功能就是在开发中所遇到的一个实际需求(这里有做简化,原需求会更麻烦一些)。于是本着学习与分享的思想,在这里对所写的代码进行分享。此代码是可以直接拿来用的,有需要源码的小伙伴可以从gitee获取,地址如下:
 https://gitee.com/qianchen12138/vue2-family-bucket-practice
2. 功能介绍
在项目开发中,上传文件未必是仅仅只上传一个文件那么简单,往往需要伴随着很多别的参数,诸如发件人等,这时候就需要传多个参数,而使用el-upload组件时,使用以下代码会直接上传文件,虽然可以使用拦截等,但是太过麻烦,这里介绍一个适合新手的写法。同时附带一个下载模板的功能写法。
this.$refs.upload.submit();二: 运行截图


三: 功能实现
1. HTML部分
这里主要放了upload组件的写法,因为是从项目里取下来的,所以写法可能有所不同
<el-upload  ref="upload"
            :limit="1"
            accept=".xls"
            :headers="upload.headers"
            action="upload.url"
            :disabled="upload.isUploading"
            :on-change="handleFileChange"
            :on-remove="handleFileRemove"
            :auto-upload="false"
            drag>
      <i class="el-icon-upload"></i>
      <div class="el-upload__text">将文件拖到此处,或<em>点击上传</em></div>
      <div class="el-upload__tip text-center" slot="tip">
        <div class="el-upload__tip" slot="tip">
        </div>
        <span>仅允许导入xls格式文件。</span>
        <el-link type="primary" :underline="false" style="font-size:12px;vertical-align: baseline;"
          @click="importTemplate">下载模板</el-link>
      </div>
    </el-upload>
2. JS部分
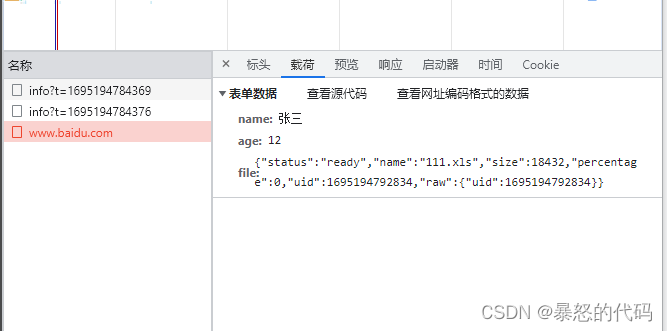
这里放的是上传功能的写法,由于时间问题,接口没有写,所以用了www.baidu.com
// 提交上传文件
      submitFileForm() {
        this.$refs.form.validate(valid => {
          if (valid) {
            this.upload.loading = this.$loading({
              lock: true,
              text: '文件处理中,请稍后',
              spinner: 'el-icon-loading',
              background: 'rgba(0, 0, 0, 0.7)'
            });
            this.upload.isUploading = true;
            this.info.failureSource = Number(this.info.failureSource)
            //最终传的其实就是这个data对象
            const data = new FormData()
            // 这里要上传file.raw,这个才是真正的文件
            data.append('file', this.info.file.raw)
            data.append('failureSource', this.info.failureSource)
            data.append('modelCode', this.info.modelCode)

            // 真正使用的时候,下面这些东西换成个方法就好了,然后记得设置upload里的状态
            //1、创建xhr的对象
            let xhr = new XMLHttpRequest()
            //2、调用open函数('请求类型','url')
            xhr.open('POST', 'http://www.baidu.com')
            //3、设置 Content-Type属性(固定写法)
            xhr.setRequestHeader('Content-Type', 'application/x-www-form-urlencoded')
            //4、调用send函数
            xhr.send(`name=${this.info.name}&age=${this.info.age}&file=${JSON.stringify(this.info.file)}`)
            //5、监听事件
            xhr.onreadystatechange = function() {
              if (xhr.readyState === 4 && xhr.status === 200) {
                this.upload.open = false;
                this.upload.isUploading = false;
                this.upload.loading.close();
                this.$refs.upload.clearFiles();
                this.$message.success("导入成功")
                this.loadTableData();
                this.search()
              }
            }
            // 正式就是用下面这个,接口换成自己的
            // uploadFile(data).then(res => {
            //   this.upload.open = false;
            //   this.upload.isUploading = false;
            //   this.upload.loading.close();
            //   this.$refs.upload.clearFiles();
            //   this.$message.success("导入成功")
            //   this.loadTableData();
            //   this.search()
            // })
          }
        })
      },
3. 完整代码
注意一下使用到自己项目里,上传方法里的接口要换成自己的哦!而且现在这个代码跑起来不报错,但是看不到结果的,因为http://www.baidu.com接口不可能同意你的上传,这时候我们在页面按下F12,在里面的网络查看你提交的数据就可以了。
等于说正式使用的时候接口换成自己的就可以了。
<template>
  <div style="width: 100%; background-color: white;padding: 25px;">
    <el-form ref="form" :model="info" :rules="rules">
      <el-form-item label="姓名" prop="name" style="width: 30%;">
        <el-input style="width: 80%;" size="small" v-model="info.name"></el-input>
      </el-form-item>
      <el-form-item label="年龄" prop="age" style="width: 30%;">
        <el-input style="width: 80%;" size="small" v-model="info.age"></el-input>
      </el-form-item>
    </el-form>
    <!-- 只允许上传.xls类型的文件,切最多只能上传一个 -->
    <el-upload ref="upload" :limit="1" accept=".xls" :headers="upload.headers" action="upload.url"
      :disabled="upload.isUploading" :on-change="handleFileChange" :on-remove="handleFileRemove" :auto-upload="false"
      drag>
      <i class="el-icon-upload"></i>
      <div class="el-upload__text">将文件拖到此处,或<em>点击上传</em></div>
      <div class="el-upload__tip text-center" slot="tip">
        <div class="el-upload__tip" slot="tip">
        </div>
        <span>仅允许导入xls格式文件。</span>
        <el-link type="primary" :underline="false" style="font-size:12px;vertical-align: baseline;"
          @click="importTemplate">下载模板</el-link>
      </div>
    </el-upload>
    <div slot="footer" class="dialog-footer">
      <el-button type="primary" @click="submitFileForm">确 定</el-button>
      <el-button @click="upload.open = false">取 消</el-button>
    </div>
  </div>
</template>

<script>
  export default {
    data() {
      return {
        info: {
          "name": "",
          "age": "",
          "file": {}
        },
        upload: {
          // 是否显示弹出层
          open: false,
          // 弹出层标题
          title: "导入故障报警",
          // 是否禁用上传
          isUploading: false,
          // 是否更新已经存在的用户数据
          updateSupport: 0,
          // 设置上传的请求头部
          // headers: { Authorization: getToken() },
          // 上传的地址
          url: process.env.VUE_APP_BASE_API + "/fault-center/failure/file/insert",
          // 全屏加载中
          loading: {},
        },
        rules: {
          name: [{
            required: true,
            message: '请输入姓名',
            trigger: 'blur'
          }, ],
          age: [{
            required: true,
            message: '请输入年龄',
            trigger: 'blur'
          }, ],
        },
      }
    },
    methods: {
      handleFileChange(file, fileList) {
        this.info.file = fileList[0]
      },
      handleFileRemove(file, fileList) {
        this.info.file = fileList[0]
      },
      /** 下载模板操作 */
      importTemplate() {
        // 下载模板的接口
        return
        downloadTemp().then(res => {
          download(res, `故障报警导入模板_${new Date().getTime()}.xls`)
        })
      },
      // 提交上传文件
      submitFileForm() {
        this.$refs.form.validate(valid => {
          if (valid) {
            this.upload.loading = this.$loading({
              lock: true,
              text: '文件处理中,请稍后',
              spinner: 'el-icon-loading',
              background: 'rgba(0, 0, 0, 0.7)'
            });
            this.upload.isUploading = true;
            this.info.failureSource = Number(this.info.failureSource)
            //最终传的其实就是这个data对象
            const data = new FormData()
            // 这里要上传file.raw,这个才是真正的文件
            data.append('file', this.info.file.raw)
            data.append('failureSource', this.info.failureSource)
            data.append('modelCode', this.info.modelCode)

            // 真正使用的时候,下面这些东西换成个方法就好了,然后记得设置upload里的状态
            //1、创建xhr的对象
            let xhr = new XMLHttpRequest()
            //2、调用open函数('请求类型','url')
            xhr.open('POST', 'http://www.baidu.com')
            //3、设置 Content-Type属性(固定写法)
            xhr.setRequestHeader('Content-Type', 'application/x-www-form-urlencoded')
            //4、调用send函数
            xhr.send(`name=${this.info.name}&age=${this.info.age}&file=${JSON.stringify(this.info.file)}`)
            //5、监听事件
            xhr.onreadystatechange = function() {
              if (xhr.readyState === 4 && xhr.status === 200) {
                this.upload.open = false;
                this.upload.isUploading = false;
                this.upload.loading.close();
                this.$refs.upload.clearFiles();
                this.$message.success("导入成功")
                this.loadTableData();
                this.search()
              }
            }
            // 正式就是用下面这个,接口换成自己的
            // uploadFile(data).then(res => {
            //   this.upload.open = false;
            //   this.upload.isUploading = false;
            //   this.upload.loading.close();
            //   this.$refs.upload.clearFiles();
            //   this.$message.success("导入成功")
            //   this.loadTableData();
            //   this.search()
            // })
          }
        })
      },
    }
  }
</script>

<style>
</style>
四: 总结
通过本次实践,是不是发现其实这个功能并没有想象的那么复杂?其实归根到底就是一些简单的逻辑判断,希望各位小伙伴通过这篇文章能够有所收获,欢迎大家讨论交流哦!最后再附一次gitee源码地址:


 4178
4178

 被折叠的 条评论
为什么被折叠?
被折叠的 条评论
为什么被折叠?
 到【灌水乐园】发言


