


 本文详细介绍了如何在Android中创建自定义头部Bar。首先,通过XML布局文件`navigation_bar.xml`定义了头部Bar的结构,包括左侧和右侧的ImageView以及中间的TextView。接着,定义了自定义控件的属性,如顶部栏标题、左右按钮的drawable资源等。然后,创建了`TopNavigationBar`类,处理点击事件并实现了接口。最后,展示了如何在布局文件中使用这个自定义控件。
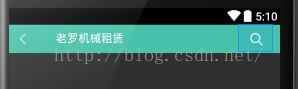
实现后的样式为:
定义XML布局:(navigation_bar.xml)
<?xml version="1.0" encoding="utf-8"?>
<RelativeLayout xmlns:android="http://schemas.android.com/apk/res/android"
    android:id="@+id/title_bar"
    style="@style/title_bar_style">

    <LinearLayout
        android:id="@+id/top_left_container"
        android:layout_width="50dip"
        android:layout_height="fill_parent"
        android:paddingLeft="10.0dip"
        android:paddingRight="10.0dip">

        <ImageView
            android:id="@+id/top_left"
            android:layout_width="19dip"
            android:layout_height="19dip"
            android:layout_gravity="center_vertical"
            android:padding="2.0dip"
            android:src="@mipmap/top_navigation_back" />
    </LinearLayout>

    <LinearLayout
        android:id="@+id/top_right_container"
        android:layout_width=
 最低0.47元/天 解锁文章


 1万+
1万+

 被折叠的 条评论
为什么被折叠?
被折叠的 条评论
为什么被折叠?
 到【灌水乐园】发言


