


博客🔗:https://blog.csdn.net/cPen_web
视频🔗:https://www.bilibili.com/video/BV1vK4y1o7jH
变量和标签
变量
- 视图函数中可以将Python变量封装到 字典 中传递到模板上
样例:
def xxx_view(request):
    dic = {
        "变量1": "值1",
        "变量2": "值2",
    }
    return render(request, 'xxx.html', dic)
- 能传递到模板中的 数据类型
str-字符串	int-整型
list-数组	tuple-元组
dict-字典	func-方法
obj-类实例化的对象
- 在模板中使用变量语法
- {{ 变量名 }}
- {{ 变量名.index }}
- {{ 变量名.key }}
- {{ 对象.方法 }}
- {{ 函数名 }}
- 演示:
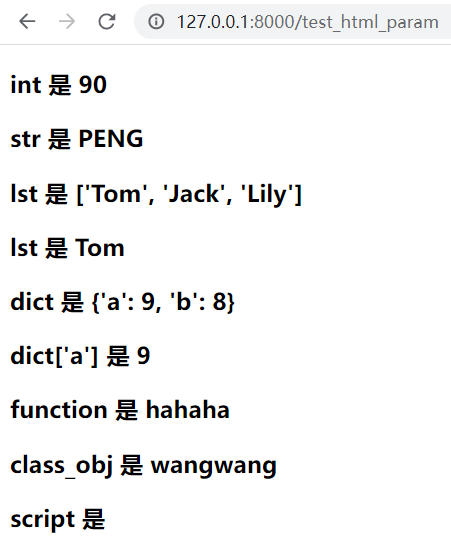
http://127.0.0.1:8000/test_html_param
# mysite1/mysite1/urls.py
urlpatterns = [
    ...
    path('test_html', views.test_html)
]


# mysite1/mysite1/views.py
def test_html_param(request):
    dic = {}
    dic['int'] = 88
    dic['str'] = 'peng'
    dic['lst'] = ['Tom', 'Jack', 'Lily']
    dic['dict'] = {'a':9, 'b':8}
    dic['func'] = say_hi
    dic['class_obj'] = Dog()
    dic['script'] = '<script>alert(1111)</script>'
    return render(request, 'test_html_param.html', dic)

def say_hi():
    return 'hahaha'

class Dog:
    def say(self):
        return 'wangwang'


# mysite1/templates/test_html_param.html
<h3>int 是 {{ int|add:"2" }}</h3>
<h3>str 是 {{ str|upper }}</h3>
<h3>lst 是 {{ lst }}</h3>
<h3>lst 是 {{ lst.0 }}</h3>
<h3>dict 是 {{ dict }}</h3>
<h3>dict['a'] 是 {{ dict.a }}</h3>
<h3>function 是 {{ func }}</h3>
<h3>class_obj 是 {{ class_obj.say }}</h3>
<h3>script 是 {{ script|safe }}</h3>
标签
模板标签
- 作用:将一些服务器端的功能嵌入到模板中,例如流程控制等
- 标签语法:
{% 标签 %}
...
{% 结束标签 %}
if标签
- 语法:
{% if 条件表达式1 %}
...
{% elif 条件表达式2 %}
...
{% elif 条件表达式3 %}
...
{% else %}
...
{% endif %}	- 需要有结束标签
- 注意:
- if条件表达式里可以用的运算符 ==, !=, <, > , <=, >=, in, not in, is, is not, not、and、or
- 在if标记中使用实际括号是无效的语法。如果需要它们指示优先级,则应使用嵌套的if标记。
官方文档:https://docs.djangoproject.com/zh-hans/2.2/ref/templates/builtins/#if
- 演示:
http://127.0.0.1:8000/test_if_for
# mysite1/mysite1/urls.py
urlpatterns = [
...
path('test_if_for', views.test_if_for),
]
# mysite1/mysite1/views.py
def test_if_for(request):
dic = {}
dic['x'] = 20
dic['lst'] = ['Tom', 'Jack', 'Lily']
return render(request, 'test_if_for.html', dic)
# mysite1/templates/test_if_for.html
{% if x > 10 %}
今天天气很好
{% else %}
今天天气非常好
{% endif %}
<br>
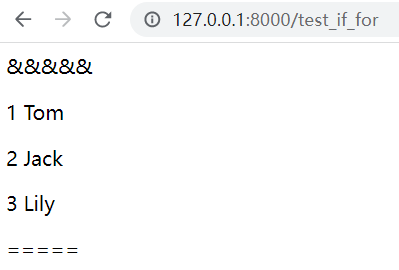
{% for name in lst %}
{% if forloop.first %} &&&&& {% endif %}
<p> {{ forloop.counter }} {{ name }}</p>
{% if forloop.last %} ===== {% endif %}
{% empty %}
当前没数据
{% endfor %}
-
模板标签 - if标签 - 练习
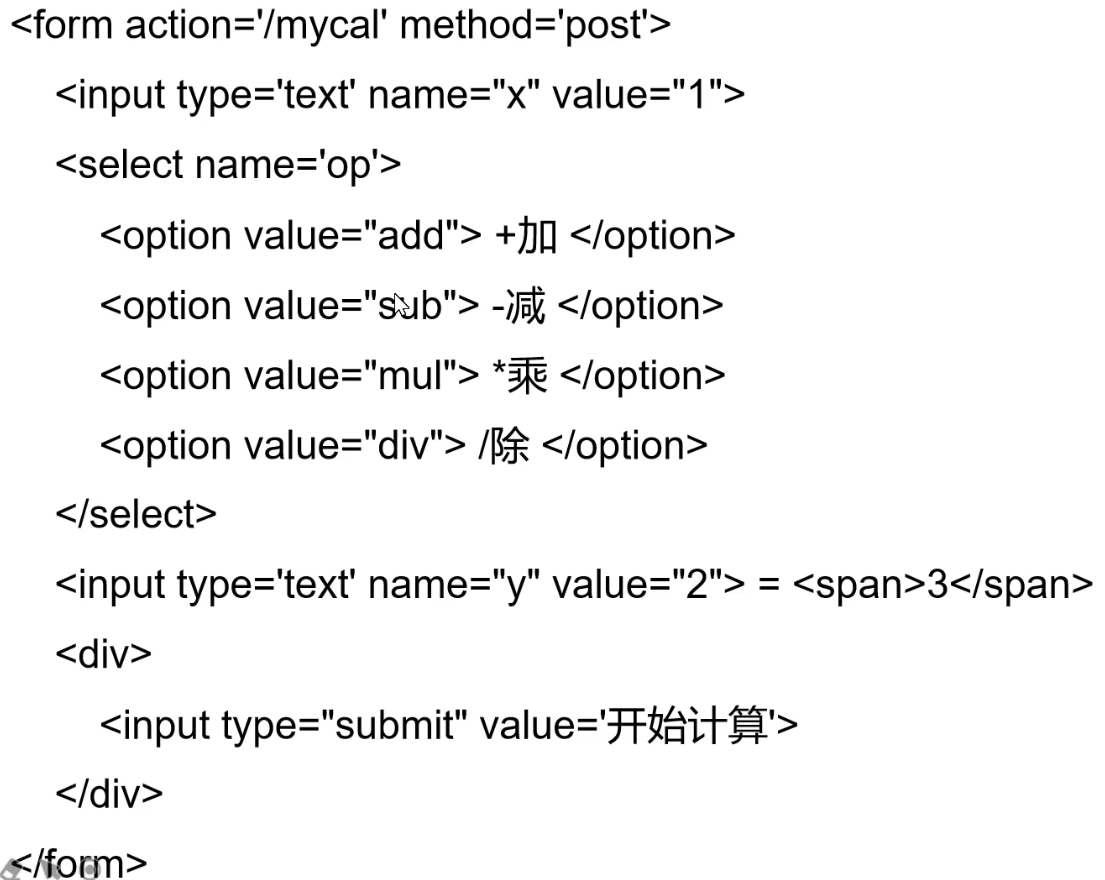
写一个简单的计算器页面,能够在服务端进行简单加减乘除计算(需记录用户上次填写状态、下拉列表选择状态)

-
前端参考代码:
-
演示:
http://127.0.0.1:8000/mycal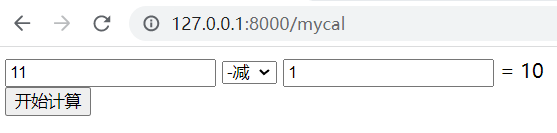
# mysite1/mysite1/urls.py urlpatterns = [ ... path('mycal', views.test_mycal), ] # mysite1/mysite1/views.py def test_mycal(request): if request.method == 'GET': return render(request, 'mycal.html') elif request.method == 'POST': #处理计算 x = int(request.POST['x']) y = int(request.POST['y']) op = request.POST['op'] result = 0 if op == 'add': result = x + y elif op == 'sub': result = x - y elif op == 'mul': result = x * y elif op == 'div': result = x / y #dic={'x':x, 'y':y, 'op':op} return render(request, 'mycal.html', locals()) # locals方法-局部变量直接封装成字典(Python自带方法) # mysite1/templates/mycal.html <form action='/mycal' method='post'> <input type='text' name="x" value="{{ x }}"> <select name='op'> <option value="add" {% if op == 'add' %}selected{% endif %} > +加</option> # ☆ 记录op状态,option selected属性,使用了if标签 <option value="sub" {% if op == 'sub' %}selected{% endif %}> -减</option> <option value="mul" {% if op == 'mul' %}selected{% endif %}> *乘</option> <option value="div" {% if op == 'div' %}selected{% endif %}> /除</option> </select> <input type='text' name="y" value="{{ y }}"> = <span>{{ result }}</span> <div><input type="submit" value='开始计算'></div> </form> -
for标签
-
语法:
{% for 变量 in 可迭代对象 %}
    ... 循环语句
{% empty %}
    ... 可迭代对象无数据时填充的语句
{% endfor %}
官方文档:https://docs.djangoproject.com/zh-hans/2.2/ref/templates/builtins/#for
-
内置变量 - forloop
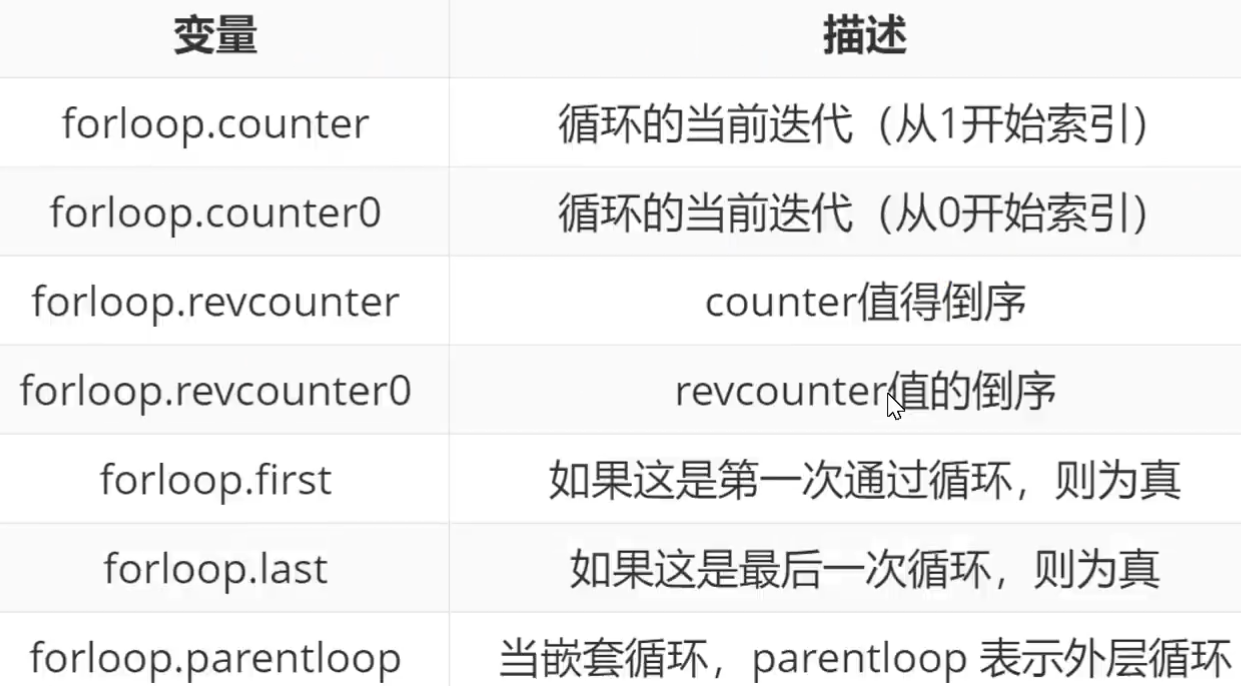
- 演示:
http://127.0.0.1:8000/test_if_for
# mysite1/mysite1/urls.py
urlpatterns = [
    ...
    path('test_if_for', views.test_if_for),
]

# mysite1/mysite1/views.py
def test_if_for(request):
    dic = {}
    dic['lst'] = ['Tom', 'Jack', 'Lily']
    return render(request, 'test_if_for.html', dic)

# mysite1/templates/test_if_for.html
{% for name in lst %}
    {% if forloop.first %} &&&&& {% endif %}
    <p> {{ forloop.counter }}  {{ name }}</p>
    {% if forloop.last %} ===== {% endif %}
{% empty %}
    当前没数据
{% endfor %}
小节
- 变量调用 - 点大法
- 标签语法 {% 标签 %} {% 结束标签 %}
过滤器和继承
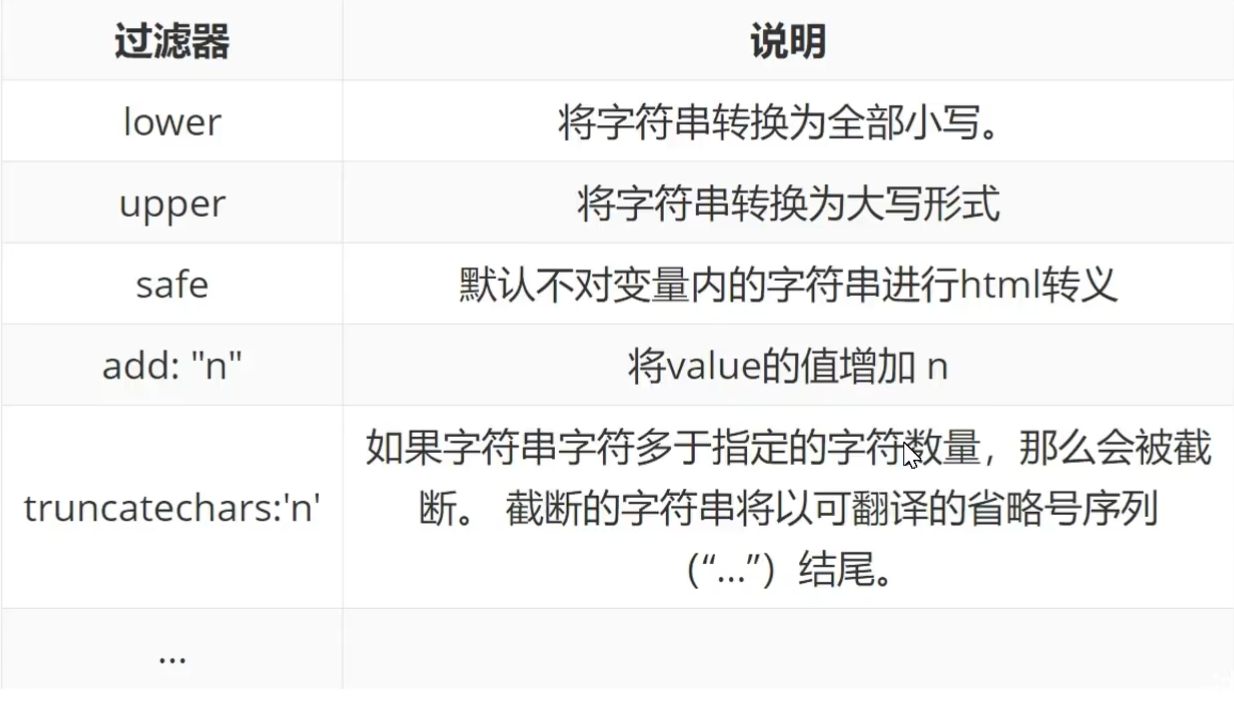
过滤器
- 定义:在变量输出时对变量的值进行处理
- 作用:可以通过使用 过滤器 来改变变量的输出显示
- 语法:{{ 变量 | 过滤器1:‘参数1’ | 过滤器2:‘参数2’ … }}
官方文档:https://docs.djangoproject.com/zh-hans/2.2/ref/templates/builtins/
-
常用过滤器:
-
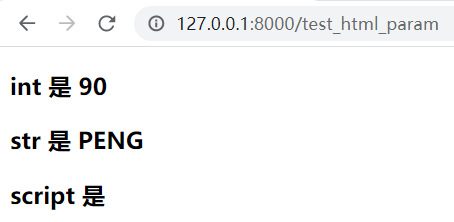
演示:
http://127.0.0.1:8000/test_html_param

# mysite1/mysite1/urls.py
urlpatterns = [
    ...
    path('test_html', views.test_html)
]


# mysite1/mysite1/views.py
def test_html_param(request):
    dic = {}
    dic['int'] = 88
    dic['script'] = '<script>alert(1111)</script>'
    return render(request, 'test_html_param.html', dic)

def say_hi():
    return 'hahaha'

class Dog:
    def say(self):
        return 'wangwang'


# mysite1/templates/test_html_param.html
<h3>int 是 {{ int|add:"2" }}</h3>
<h3>str 是 {{ str|upper }}</h3>
<h3>script 是 {{ script|safe }}</h3>
继承
模板的继承
如下样例:

-
模板继承可以使父模板的内容重用,子模板直接继承父模板的全部内容并可以覆盖父模板中相应的块
-
语法 - 父模板中:
- 定义父模板中的**块 block **标签
- 表时出哪些在子模块中是允许被修改的
- block 标签:在父模板中定义,可以在子模板中覆盖
-
语法 - 子模板中:
-
继承模板
extends标签(写在模板文件的第一行)例如
{% extends 'base.html' %} -
子模板 重写父模板中的内容块
{% block block_name %}
子模板块用来覆盖父模板中 block_name 块的内容
{% endblock block_name %}	- block_name 可写可不写
-
-
重写的覆盖规则
- 不重写,将按照父模板中的效果显示
- 重写,则按照重写效果显示
-
注意
- 模板继承时,服务器端的动态内容无法继承
-
演示:
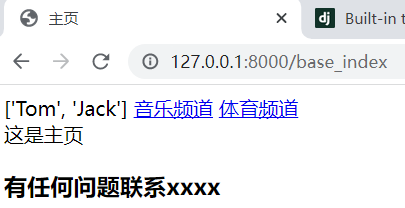
http://127.0.0.1:8000/base_index
# mysite1/mysite1/urls.py
urlpatterns = [
...
path('base_index', views.base_view, name='base_index'),
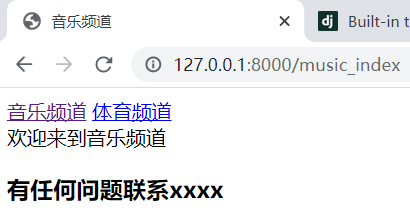
path('music_index', views.music_view),
path('sport_index', views.sport_view),
]
# mysite1/mysite1/views.py
def base_view(request):
lst = ['Tom', 'Jack']
return render(request, 'base.html', locals())
def music_view(request):
return render(request, 'music.html')
def sport_view(request):
return render(request, 'sport.html')
#-------------------------------------------------------------
# mysite1/templates/base.html # 父模板
<!DOCTYPE html>
<html lang="en">
<head>
<meta charset="UTF-8">
{% block mytitle %}
<title>主页</title> # 子模板能改的地方
{% endblock %}
</head>
<body>
{{ lst }} # 子模板无法继承变量(动态内容)
<a href="/music_index">音乐频道</a> # 子模板不能改
<a href="/sport_index">体育频道</a>
<br>
{% block info %}
这是主页 # 子模板能改的地方
{% endblock %}
<br>
<h3>有任何问题联系xxxx</h3> # 子模板不能改
# mysite1/templates/music.html # 子模板
{% extends 'base.html' %} # 继承父模板
{% block mytitle %}
<title>音乐频道</title> # 子模板重写block
{% endblock %}
{% block info %}
欢迎来到音乐频道
{% endblock %}
# mysite1/templates/sport.html
{% extends 'base.html' %}
{% block mytitle %}
<title>体育频道</title>
{% endblock %}
{% block info %}
欢迎来到体育频道
{% endblock %}
小节
-
过滤器
{
变量|过滤器1:‘参数值1’ | 过滤器2:‘参数值2’ … } -
模板的继承
父模板 -
定义可被修改的block子模板 - 继承
父模板;按需修改父模板中定义的block
url反向解析
-
代码中 url 出现位置
-
模板 【html中】
-
<a href=‘url’>超链接</a>
点击后 页面跳转至 url
-
<form action=‘url’ method=‘post’>
form表单中的数据 用post方法提交至 url
-
-
视图函数中 - 302跳转 HttpResponseRedirect(‘url’)
将用户地址栏中的地址跳转到 url
-
-
代码中 url 书写规范
-
绝对地址
http://127.0.0.1:8000/page/1
-
相对地址
- ‘==/==page/1’ - ‘/’ 开头的相对地址,浏览器会把当前地址栏里的 协议,ip 和 端口 加上这个地址,作为最终访问地址,即如果当前页面地址栏为 http://127.0.0.1:8000/page/3;当前相对地址最终结果为
http://127.0.0.1:8000+ /page/1 (☆ 高频使用) - ‘page/1’ - 没有 ‘/’ 开头的相对地址,浏览器会根据
当前 url 的最后一个 / 之前的内容 加上 该相对地址作为最终访问地址,例如当前地址栏地址为 ==http://127.0.0.1:8000/topic/==detail;则该相对地址最终结果为http://127.0.0.1:8000/topic/+ page/1
- ‘==/==page/1’ - ‘/’ 开头的相对地址,浏览器会把当前地址栏里的 协议,ip 和 端口 加上这个地址,作为最终访问地址,即如果当前页面地址栏为 http://127.0.0.1:8000/page/3;当前相对地址最终结果为
-
-
演示:
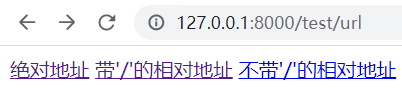
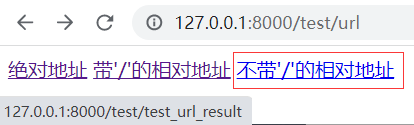
http://127.0.0.1:8000/test/url
# mysite1/mysite1/urls.py
urlpatterns = [
...
# http://127.0.0.1:8000/test/url
path('test/url', views.test_url),
path('test_url_result', views.test_url_result)
]
# mysite1/mysite1/views.py
def test_url(request):
return render(request, 'test_url.html')
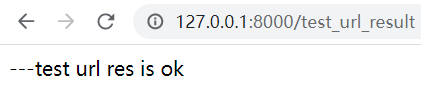
def test_url_result(request):
return HttpResponse('---test url res is ok')
# mysite1/templates/test_url.html
<a href="http://127.0.0.1:8000/test_url_result">绝对地址</a>
<a href="/test_url_result">带'/'的相对地址</a>
<a href="test_url_result">不带'/'的相对地址</a> # 浏览器解析为 http://127.0.0.1:8000/test/test_url_result
-
url 反向解析
-
url 反向解析是指在视图或者模板中,用 path 定义的名称来动态查找或计算出相应的路由
-
path 函数的语法
- path(route, views, name=“别名”)
- path(‘page’, views.page_view, name=“page_url”)
- 根据 path 中的 ‘name=’ 关键字传给 url 确定了个唯一确定的名字,在模板或视图中,可以通过这个名字反向推断出此 url 信息
-
模板中 - 通过 url 标签实现地址的反向解析
{% url '别名' %} {% url '别名' '参数值1' '参数值2' %} ex: {% url 'pagen' '400' %} --- 传参一律是 str {% url 'person' age='18' name='gxn' %}- 演示:在模板中使用
http://127.0.0.1:8000/test/url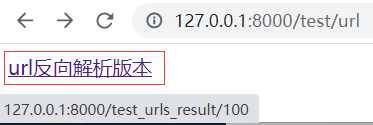
# mysite1/mysite1/urls.py urlpatterns = [ ... # http://127.0.0.1:8000/test/url path('test/url', views.test_url), path('test_urls_result/<int:age>', views.test_url_result, name='tr') # 起别名 tr ] # mysite1/mysite1/views.py def test_url(request): return render(request, 'test_url.html') def test_urls_result(request): return HttpResponse('---test url res is ok') # mysite1/templates/test_url.html <a href="{% url 'tr' '100' %}">url反向解析版本</a> # ☆ 模板中使用别名 -
在视图函数中 → 可调用 django 中的 reverse 方法进行反向解析
from django.urls import reverse reverse('别名', args=[], kwargs={}) ex: print(reverse('pagen', args=[300])) print(reverse('person', kwargs= {'name':'peng', 'age':23}))-
演示:
http://127.0.0.1:8000/test/url

# 302跳转 - 响应头里的 location 标记跳转地址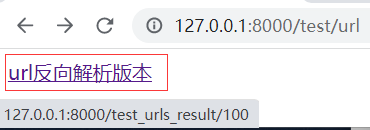
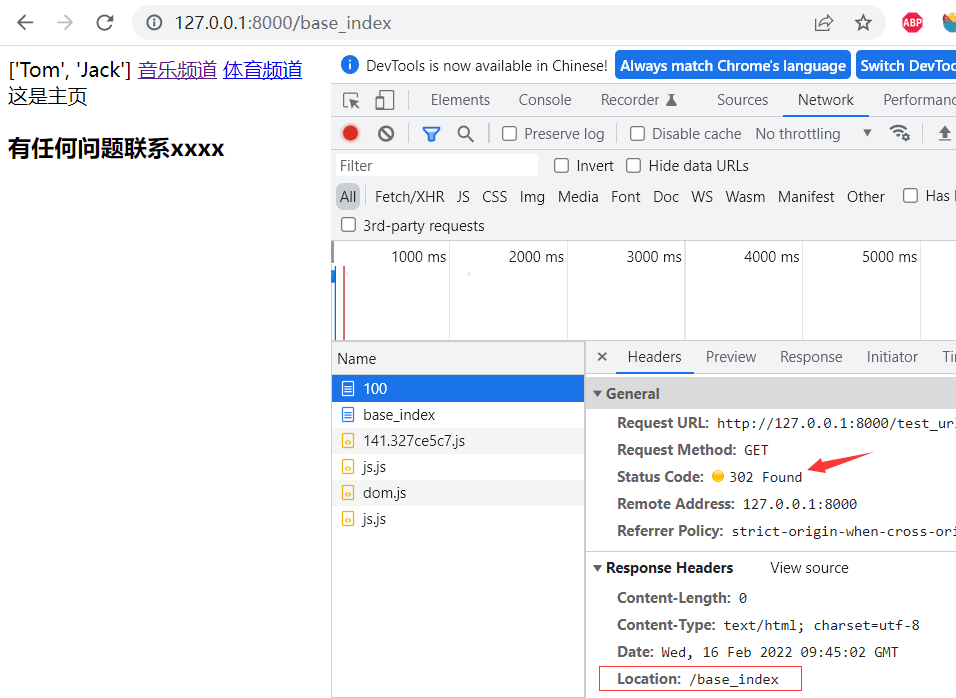
# mysite1/mysite1/urls.py
urlpatterns = [
    ...
    path('base_index', views.base_view, name='base_index'),						# 起别名 base_index
    # http://127.0.0.1:8000/test/url
    path('test/url', views.test_url),
    path('test_urls_result/<int:age>', views.test_url_result, name='tr')		# 起别名 tr
]


# mysite1/mysite1/views.py
def base_view(request):
    lst = ['Tom', 'Jack']
    return render(request, 'base.html', locals())

def test_url(request):
    return render(request, 'test_url.html')

def test_url_result(request, age):
    #302跳转
    from django.urls import reverse
    url = reverse('base_index')													# ☆ 视图函数中使用别名
    return HttpResponseRedirect(url)


#---------------------------------------------------------------
# mysite1/templates/test_url.html
<a href="{% url 'tr' '100' %}">url反向解析版本</a>

# mysite1/templates/base.html
略
-
-


 194
194


 被折叠的 条评论
为什么被折叠?
被折叠的 条评论
为什么被折叠?
 到【灌水乐园】发言


