


之前写了一篇SpringSecurity整合Redis实现单点登录及认证返回json数据,这个本来只是作为先来学习的总结笔记,但最近终于有用武之地了。
公司新项目成立,我临危受命负责web端项目的搭建和开发,安全框架选型正是SpringSecurity。但SpringSecurity登录操作默认的参数形式是url参数(就是http://xx.xx.xx:xx/login?username=xx&password=xx这样),我们需要将参数放到requestBody中,于是
登录参数放到requestBody中
经过一通盲试,并没有找到通过配置实现这种需求的方法,于是我决定面向百度编程。网上的资料没有想象的多,但是还是找到了解决办法。
我发现负责登录认证的filter类名称为UsernamePasswordAuthenticationFilter,其关键代码如下:
@Override
	public Authentication attemptAuthentication(HttpServletRequest request, HttpServletResponse response)
			throws AuthenticationException {
		if (this.postOnly && !request.getMethod().equals("POST")) {
			throw new AuthenticationServiceException("Authentication method not supported: " + request.getMethod());
		}
		String username = obtainUsername(request);
		username = (username != null) ? username : "";
		username = username.trim();
		String password = obtainPassword(request);
		password = (password != null) ? password : "";
		UsernamePasswordAuthenticationToken authRequest = new UsernamePasswordAuthenticationToken(username, password);
		// Allow subclasses to set the "details" property
		setDetails(request, authRequest);
		return this.getAuthenticationManager().authenticate(authRequest);
	}

	@Nullable
	protected String obtainPassword(HttpServletRequest request) {
		return request.getParameter(this.passwordParameter);
	}

	@Nullable
	protected String obtainUsername(HttpServletRequest request) {
		return request.getParameter(this.usernameParameter);
	}
我们可以看到,这个类获取参数的方式,就是getParameter,所以基本上我们只要重写obtainPassword和obtainUsername方法就能满足我们的需求了,如果还想丰富一下,那直接重写attemptAuthentication就好了,我选择的是后者,代码如下:
@Slf4j
public class CustomAuthenticationProcessingFilter extends UsernamePasswordAuthenticationFilter {
    @Override
    public Authentication attemptAuthentication(HttpServletRequest request, HttpServletResponse response) throws AuthenticationException {
        try {
            String bodyString = getBodyString(request);
            if (!StringUtils.hasText(bodyString)) {
                throw new IllegalArgumentException("用户名或密码不能为空");
            }
            Map<String, Object> map = new JacksonJsonParser().parseMap(bodyString);

            if (!request.getMethod().equals("POST")) {
                throw new AuthenticationServiceException("不支持该方法: " + request.getMethod());
            }
            String username = obtainUsername(map);
            username = username.trim();
            if (!StringUtils.hasText(username)) {
                throw new UsernameNotFoundException("用户名为空");
            }
            String password = obtainPassword(map);
            if (!StringUtils.hasText(password)) {
                throw new UsernameNotFoundException("密码为空");
            }
            UsernamePasswordAuthenticationToken authRequest = new UsernamePasswordAuthenticationToken(username, password);
            setDetails(request, authRequest);
            return this.getAuthenticationManager().authenticate(authRequest);
        } catch (IOException e) {
            log.error("解析登录参数时发生异常,{}", e.getMessage());
            e.printStackTrace();
            throw new RuntimeException(e.getMessage());
        }
    }

    private String obtainUsername(Map<String, Object> map){
        Object userName = map.get(UsernamePasswordAuthenticationFilter.SPRING_SECURITY_FORM_USERNAME_KEY);
        return userName == null ? "" : (String)userName;
    }

    private String obtainPassword(Map<String, Object> map){
        Object pwd = map.get(UsernamePasswordAuthenticationFilter.SPRING_SECURITY_FORM_PASSWORD_KEY);
        return pwd == null ? "" : (String)pwd;
    }

    /**
     * 接收传递的jsonBody类型的参数
     */
    private String getBodyString(HttpServletRequest request) throws IOException {
        StringBuilder sb = new StringBuilder();
        InputStream inputStream = null;
        BufferedReader reader = null;
        try {
            inputStream = request.getInputStream();
            reader = new BufferedReader(
                    new InputStreamReader(inputStream, StandardCharsets.UTF_8));

            char[] bodyCharBuffer = new char[1024];
            int len = 0;
            while ((len = reader.read(bodyCharBuffer)) != -1) {
                sb.append(new String(bodyCharBuffer, 0, len));
            }
        } catch (IOException e) {
            e.printStackTrace();
        } finally {
            if (inputStream != null) {
                try {
                    inputStream.close();
                } catch (IOException e) {
                    e.printStackTrace();
                }
            }
            if (reader != null) {
                try {
                    reader.close();
                } catch (IOException e) {
                    e.printStackTrace();
                }
            }
        }
        return sb.toString();
    }
}
这样我们就可以实现从requestBody中获取用户名密码的操作了。
类是写好了,那如何使其生效呢?
又一轮的面向百度,方法是用http.addFilterAt方法使其替代UsernamePasswordAuthenticationFilter,在SecurityConfigure类中的代码如下:
@Override
protected void configure(HttpSecurity http) throws Exception {
    http.authorizeRequests()
            .antMatchers("/").permitAll()
            .antMatchers("/swagger-ui.html").permitAll();
    http.logout().logoutUrl(apiPath + "/logout").logoutSuccessHandler(logoutSuccessHandler).deleteCookies("SESSION")
            .permitAll();

    /*http.formLogin().loginProcessingUrl(apiPath + "/login")
            .successHandler(authenticationSuccessHandler)
            .failureHandler(authenticationFailureHandler)
            .and().authorizeRequests()
            .anyRequest().authenticated()
            .and().exceptionHandling().authenticationEntryPoint(authenticationEntryPoint)
            .and().csrf().disable(); // 关闭跨域防护*/ //初代登录配置
    // 配置登录认证filter
    http.addFilterBefore(getAuthenFilter(), UsernamePasswordAuthenticationFilter.class); //二代登录配置
    http.authorizeRequests()
        .anyRequest()
        .authenticated()
        .and().exceptionHandling().authenticationEntryPoint(authenticationEntryPoint);
    http.csrf().disable();
    http.exceptionHandling().accessDeniedHandler(accessDeniedHandler);
    // 同一个用户只能有一个session
    http.sessionManagement()
            .maximumSessions(1)
            .sessionRegistry(sessionRegistry())
            .expiredSessionStrategy(new CustomizeSessionInfoExpiredStrategy());
}


private UsernamePasswordAuthenticationFilter getAuthenFilter() throws Exception {
    CustomAuthenticationProcessingFilter filter = new CustomAuthenticationProcessingFilter();
    filter.setFilterProcessesUrl(apiPath + "/login");
    filter.setAuthenticationFailureHandler(authenticationFailureHandler);
    filter.setAuthenticationSuccessHandler(authenticationSuccessHandler);
    filter.setAuthenticationManager(super.authenticationManager());
    return filter;
}
关键的代码是这句http.addFilterBefore(getAuthenFilter(), UsernamePasswordAuthenticationFilter.class);
经过测试,好使了
单点登录失效
完成了参数的需求,就这么愉愉又快快的过了一个月的日子,可在前两天做测试的时候,偶然间发现单点登录失效了,一个账号在各种地方各种可以同时登录,我慌了,面向百度没答案,没办法,只能自己调试源码解决问题。
问题其实很明显,就是我自定义的这个filter出的问题,因为其他的东西没动过,于是我就围绕着这个filter寻找问题。
通过调试我进入到了FilterChainProxy类的doFilter方法中,再进入到它的私有静态内部类VirtualFilterChain中的doFilter方法,我们可以看到,自定义filter所处的位置,如图:

我猜想,会不会是这个自定义的filter执行后没有再向后执行导致的呢?为了整明猜想继续调试程序进入自定义filter类的内部看看能发现点什么,于是程序执行到了AbstractAuthenticationProcessingFilter的doFilter方法中:

画红框的方法看着眼熟把,没错,那个就是自定义filter类中重写的方法,在执行完这个方法后,将判断是否继续执行filter链,而我们从图中可以明显的看到,这个条件是false的。啊…我的猜想被验证一半了,现在只要想办法把这个this.continueChainBeforeSuccessfulAuthentication值设置成true,就能看到我想的对不对了,于是我在SercurityConfigure类中的authenticationFilter()方法里,增加了authenProcessFilter.setContinueChainBeforeSuccessfulAuthentication(true);这样一行代码,整体如下:
private UsernamePasswordAuthenticationFilter authenticationFilter() throws Exception {
        CustomAuthenProcessFilter authenProcessFilter = new CustomAuthenProcessFilter();
        authenProcessFilter.setAuthenticationManager(super.authenticationManager());
        authenProcessFilter.setAuthenticationSuccessHandler(authenticationSuccessHandler);
        authenProcessFilter.setAuthenticationFailureHandler(authenticationFailureHandler);
        authenProcessFilter.setContinueChainBeforeSuccessfulAuthentication(true);
        return authenProcessFilter;
    }
重启,登录,好的,问题更严重了,登录直接报404了,我又调试了一边FilterChainProxy,发现这次filter是继续执行了,但是执行完最后一个filter后直接执行到DispatcherServlet中了,而控制器映射里没有登录地址的映射,所以报了404,这块就不贴代码了,有兴趣的可以自己尝试以下。
这可如何是好。
问题最终解决
冥思苦想而不得,一度接近放弃,想要用回最开始的登录参数形式。但怎么想堂堂SpringSecurity都不会没有应对之法。
也是拜想打回原形的想法所赐,我想到应该看看初代配置(不知道初代啥意思的可以看看前边配置代码里的注释)里都干了啥,于是我点开了http.formLogin()的源码,如下图:

我们先来看FormLoginConfigurer是什么,继续点:
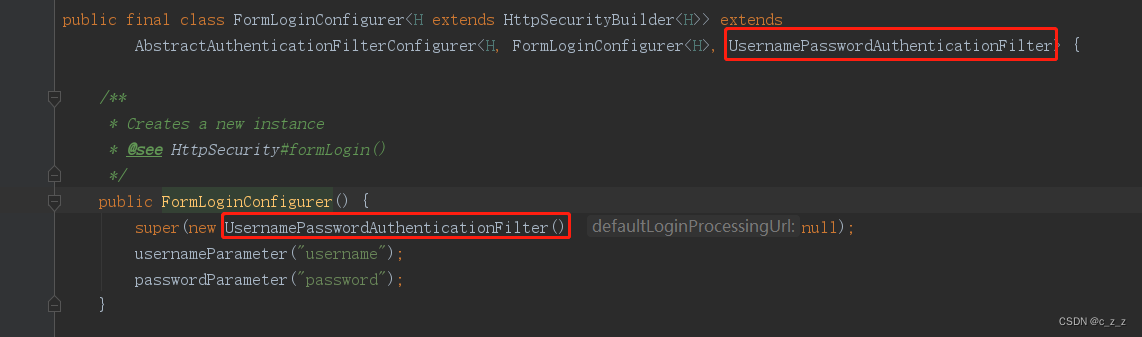
哦吼!这画红框的类是不是看着很眼熟?没错,这就是我们自定义的filter所继承的类,并且它就是默认的登录认证过滤器,再看FormLoginConfigurer这个名字,配置器,那这个组合的含义应该就是把UsernamePasswordAuthenticationFilter配置起来的意思了吧。好了,我们再看回http.formLogin()中的代码,getOrApply方法:

顾名思义,获取或应用,那根据这个方法里的代码来看,还真是不好判断到底是获取了还是应用了,最简单的办法还是调试,这段代码需要启动过程中调试,我们得到了如下结论:

我们可以看到,getConfigurer方法中并没有获取到这个配置器,也就是说使认证过滤器生效的,是http.formLogin()方法中创建的FormLoginConfigurer对象。
我灵光乍现,那我们是不是也可以通过这种方式使我们自定义的认证过滤器生效呢?可惜getOrApply方法使私有的,但是apply方法却是public的!喜大普奔!

也就是说,我再写一个配置器,将自定义的认证过滤器包起来,再调用http.apply方法应该就能生效了。
配置器如FormLoginConfigurer的法炮制,代码如下:
public class LoginConfigurer<H extends HttpSecurityBuilder<H>> extends
        AbstractAuthenticationFilterConfigurer<H, LoginConfigurer<H>, CustomAuthenProcessFilter> {
    public LoginConfigurer(){
        super(new CustomAuthenProcessFilter(), null);
    }
    @Override
    protected RequestMatcher createLoginProcessingUrlMatcher(String loginProcessingUrl) {
        return new AntPathRequestMatcher(loginProcessingUrl, "POST");
    }
}
然后再在配置代码中调用http.apply(new LoginConfigurer<>()),最终配置代码如下:
@Override
protected void configure(HttpSecurity http) throws Exception {
    http.authorizeRequests()
            .antMatchers("/").permitAll()
            .antMatchers("/swagger-ui.html").permitAll();
    http.logout().logoutUrl(apiPath + "/logout").logoutSuccessHandler(logoutSuccessHandler).deleteCookies("SESSION")
            .permitAll();

    /*http.formLogin().loginProcessingUrl(apiPath + "/login")
            .successHandler(authenticationSuccessHandler)
            .failureHandler(authenticationFailureHandler)
            .and().authorizeRequests()
            .anyRequest().authenticated()
            .and().exceptionHandling().authenticationEntryPoint(authenticationEntryPoint)
            .and().csrf().disable(); // 关闭跨域防护*/ //初代登录配置
    // 配置登录认证filter
    // http.addFilterBefore(getAuthenFilter(http), UsernamePasswordAuthenticationFilter.class); //二代登录配置
    http.apply(new LoginConfigurer<>()).loginProcessingUrl("/login") //三代登录配置
                .successHandler(authenticationSuccessHandler)
                .failureHandler(authenticationFailureHandler);
    http.authorizeRequests()
        .anyRequest()
        .authenticated()
        .and().exceptionHandling().authenticationEntryPoint(authenticationEntryPoint);
    http.csrf().disable();
    http.exceptionHandling().accessDeniedHandler(accessDeniedHandler);
    // 同一个用户只能有一个session
    http.sessionManagement()
            .maximumSessions(1)
            .sessionRegistry(sessionRegistry())
            .expiredSessionStrategy(new CustomizeSessionInfoExpiredStrategy());
}
重新启动,在不同地方使用同一账户登录,最终测试成功,单点登录功能恢复。
完结,撒花


 2117
2117


 被折叠的 条评论
为什么被折叠?
被折叠的 条评论
为什么被折叠?
 到【灌水乐园】发言


