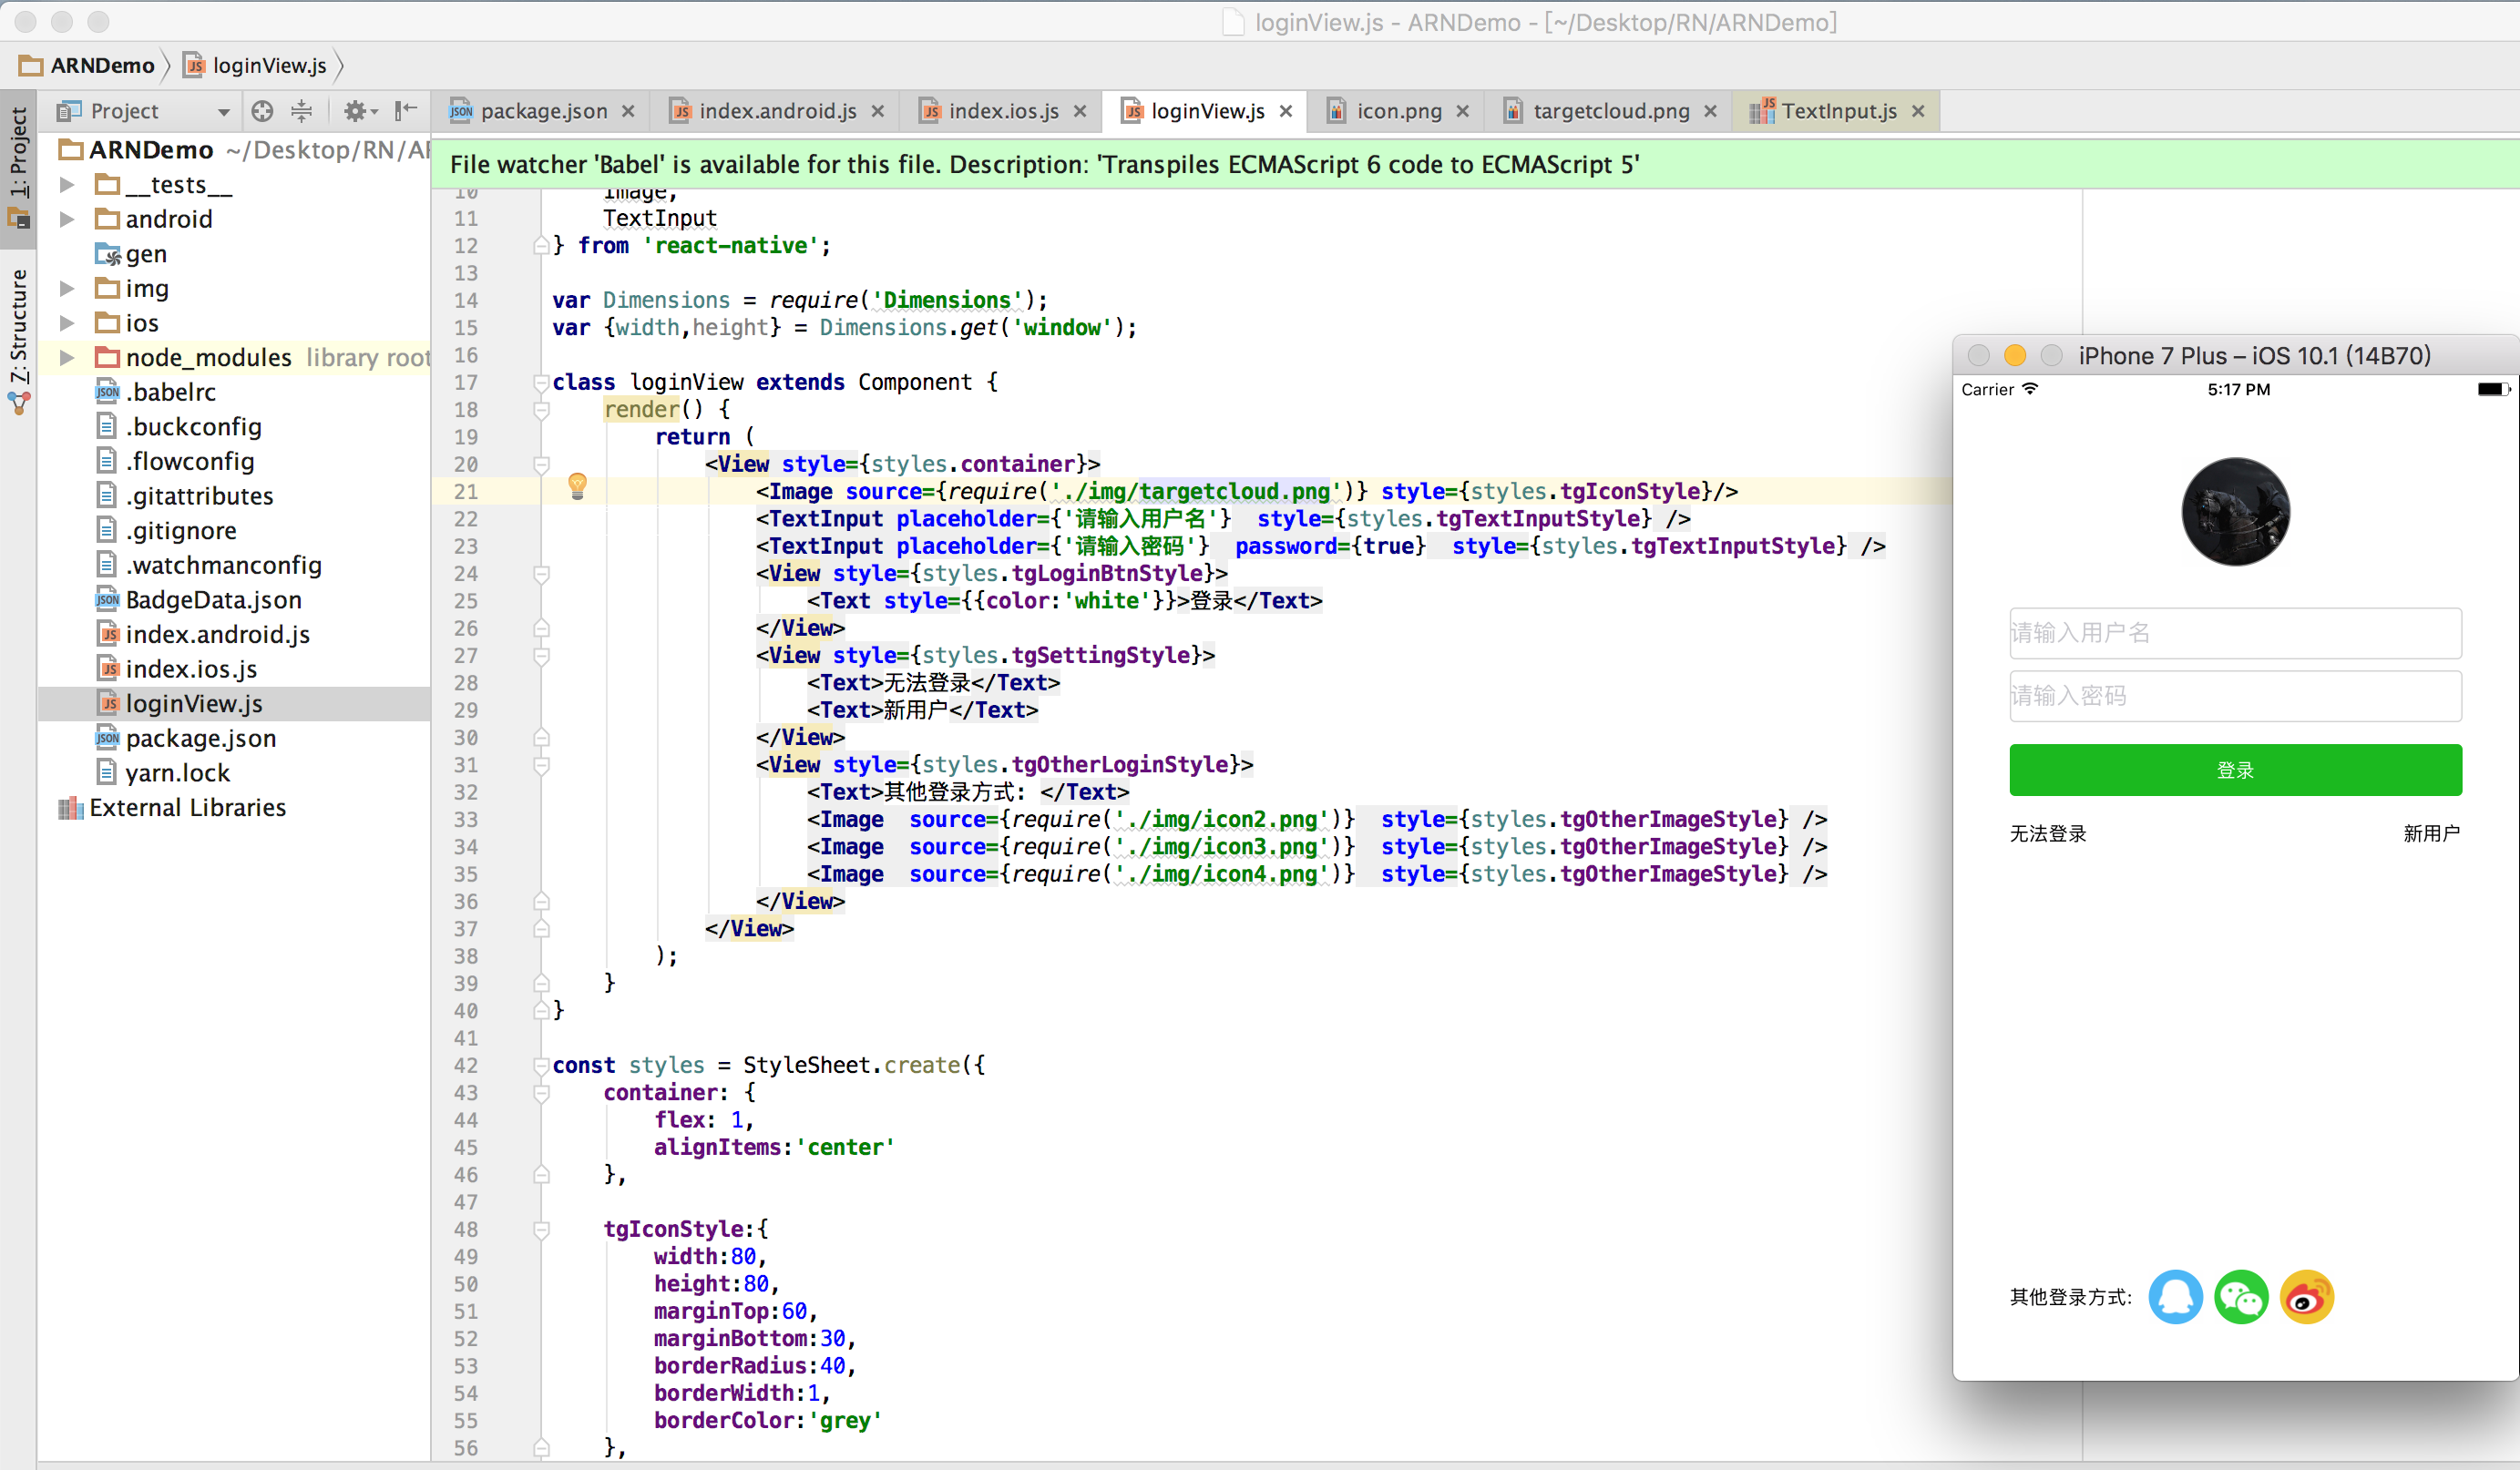
RN布局(登陆界面Demo)

/**
 * Created by targetcloud on 2016/12/17.
 */
import React, { Component } from 'react';
import {
    AppRegistry,
    StyleSheet,
    Text,
    View,
    Image,
    TextInput
} from 'react-native';

var Dimensions = require('Dimensions');
var {width,height} = Dimensions.get('window');

class loginView extends Component {
    render() {
        return (
            <View style={styles.container}>
                <Image source={require('./img/targetcloud.png')} style={styles.tgIconStyle}/>
                <TextInput placeholder={'请输入用户名'}  style={styles.tgTextInputStyle} />
                <TextInput placeholder={'请输入密码'}  password={true}  style={styles.tgTextInputStyle} />
                <View style={styles.tgLoginBtnStyle}>
                    <Text style={{color:'white'}}>登录</Text>
                </View>
                <View style={styles.tgSettingStyle}>
                    <Text>无法登录</Text>
                    <Text>新用户</Text>
                </View>
                <View style={styles.tgOtherLoginStyle}>
                    <Text>其他登录方式: </Text>
                    <Image  source={require('./img/icon2.png')}  style={styles.tgOtherImageStyle} />
                    <Image  source={require('./img/icon3.png')}  style={styles.tgOtherImageStyle} />
                    <Image  source={require('./img/icon4.png')}  style={styles.tgOtherImageStyle} />
                </View>
            </View>
        );
    }
}

const styles = StyleSheet.create({
    container: {
        flex: 1,
        alignItems:'center'
    },

    tgIconStyle:{
        width:80,
        height:80,
        marginTop:60,
        marginBottom:30,
        borderRadius:40,
        borderWidth:1,
        borderColor:'grey'
    },

    tgTextInputStyle:{
        width:width*0.8,
        height:38,
        borderColor: 'lightgrey',
        borderWidth: 1,
        marginBottom:8,
        borderRadius:4,
        textAlign:'left',
        alignSelf:'center'
    },

    tgLoginBtnStyle:{
        height:38,
        width:width*0.8,
        backgroundColor:'#00BB00',
        marginTop:8,
        marginBottom:20,
        justifyContent:'center',
        alignItems:'center',
        borderRadius:4
    },

    tgSettingStyle:{
        flexDirection:'row',
        width:width*0.8,
        justifyContent:'space-between'
    },

    tgOtherLoginStyle:{
        flexDirection:'row',
        alignItems:'center',
        position:'absolute',
        bottom:width*0.1,
        left:width*0.1
    },

    tgOtherImageStyle:{
        width:40,
        height:40,
        borderRadius:20,
        marginLeft:8
    }
});

module.exports = loginView;
/**
 * Sample React Native App
 * https://github.com/facebook/react-native
 * @flow
 */
import React, { Component } from 'react';
import {
    AppRegistry,
    StyleSheet,
    Text,
    View,
    Image,
    TextInput
} from 'react-native';

var LoginView = require('./loginView');

export default class ARNDemo extends Component {
  render() {
    return (
        <LoginView />
    );
  }
}

AppRegistry.registerComponent('ARNDemo', () => ARNDemo);


  • 1
    点赞
  • 4
    收藏
    觉得还不错? 一键收藏
  • 0
    评论
要实现在 Android 界面中任意拖动布局的功能,可以使用 onTouchEvent() 方法来实现。以下是一个简单的代码示例: 首先,在 layout.xml 文件中添加一个 LinearLayout: ```xml <LinearLayout android:id="@+id/linearLayout" android:layout_width="match_parent" android:layout_height="match_parent"> <!-- 在这里添加其他的控件 --> </LinearLayout> ``` 然后,在 Activity 中添加以下代码: ```java public class MainActivity extends AppCompatActivity { private LinearLayout linearLayout; private float startX, startY; private int lastAction; @Override protected void onCreate(Bundle savedInstanceState) { super.onCreate(savedInstanceState); setContentView(R.layout.activity_main); linearLayout = findViewById(R.id.linearLayout); linearLayout.setOnTouchListener(new View.OnTouchListener() { @Override public boolean onTouch(View v, MotionEvent event) { switch (event.getActionMasked()) { case MotionEvent.ACTION_DOWN: startX = linearLayout.getX() - event.getRawX(); startY = linearLayout.getY() - event.getRawY(); lastAction = MotionEvent.ACTION_DOWN; break; case MotionEvent.ACTION_MOVE: linearLayout.setX(event.getRawX() + startX); linearLayout.setY(event.getRawY() + startY); lastAction = MotionEvent.ACTION_MOVE; break; case MotionEvent.ACTION_UP: if (lastAction == MotionEvent.ACTION_DOWN) Toast.makeText(MainActivity.this, "Clicked!", Toast.LENGTH_SHORT).show(); break; default: return false; } return true; } }); } } ``` 在代码中,我们使用了 setOnTouchListener() 方法来监听 LinearLayout 的触摸事件。在触摸事件中,我们使用了 switch-case 语句来处理不同的事件类型。在 ACTION_DOWN 事件中,我们记录了起始的触摸点位置,并设置 lastAction 变量为 ACTION_DOWN。在 ACTION_MOVE 事件中,我们计算了手指移动的距离,并将 LinearLayout 的位置设置为手指的当前位置加上起始的偏移量。在 ACTION_UP 事件中,我们检查 lastAction 变量是否为 ACTION_DOWN,如果是,就认为用户单击了 LinearLayout。 这样,就可以实现在 Android 界面中任意拖动布局的功能了。

“相关推荐”对你有帮助么?

  • 非常没帮助
  • 没帮助
  • 一般
  • 有帮助
  • 非常有帮助
提交
评论
添加红包

请填写红包祝福语或标题

红包个数最小为10个

红包金额最低5元

当前余额3.43前往充值 >
需支付:10.00
成就一亿技术人!
领取后你会自动成为博主和红包主的粉丝 规则
hope_wisdom
发出的红包
实付
使用余额支付
点击重新获取
扫码支付
钱包余额 0

抵扣说明:

1.余额是钱包充值的虚拟货币,按照1:1的比例进行支付金额的抵扣。
2.余额无法直接购买下载,可以购买VIP、付费专栏及课程。

余额充值