


1. kong简介
kong网关基于nginx,但是比nginx更加强大,nginx一般用来实现反向代理和负载均衡,但是nginx无法实现动态配置,也就是说如果我们扩展了机器或者添加路由配置,需要手动修改nginx的配置文件并重启nginx才能生效。但是kong是可以实现动态配置的,如果我们在kong中注册service或者添加route,只需要调用kong的API即可,对应的会把相关配置持久化到postgresql数据库,不需要重启kong也能即时生效,实现动态配置。
另外,kong作为API网关,不仅仅能实现nginx具备的反向代理和负载均衡功能,还可以基于插件化实现更多功能,比如身份认证、请求限流、黑白名单配置等,都可以基于kong的插件非常方便的实现。网关一个最大的作用就是可以将一些通用的操作都提取到网关层来实现,让底层的后端服务只需要关注具体的业务即可。
kong虽然基于nginx,但是有些概念却和nginx略有差异,比如kong中有target、upstream、service、route几个概念。
upstream主要是和target做绑定,然后service又和upstream绑定,这样就可以实现负载均衡,比如一个upstream绑定了三台服务器,然后某个service又和这个upstream关联上,那么当请求来到service进行处理时,就会将请求均衡的分发到upstream下的多个target。
kong默认有四个端口,8000、8001、8443、8444。其中8000和8001是http请求的端口(常用);8443和8444是https请求的端口。
- 8000/8443是外部请求访问的端口,即进行反向代理请求的端口
- 8001/8444是kong admin的端口,即调用kong的api使用的端口
2. kong常用API
2.1. 举例
以下举例kong的常用API:
(jq命令的作用是将返回结果进行json格式化,可通过yum命令安装jq)
- 查看所有的upstream
curl -XGET localhost:8001/upstreams | jq .
{
  "next": null,
  "data": [
    {
      "hash_on_header": null,
      "name": "ApiServer",
      "algorithm": "round-robin",
      "id": "c6c38821-a08c-4c05-b282-f63c501240a0",
      "hash_on_cookie": null,
      "hash_on_cookie_path": "/",
      "host_header": null,
      "hash_fallback_header": null,
      "tags": null,
      "hash_fallback": "none",
      "healthchecks": {
        "active": {
          "https_verify_certificate": true,
          "http_path": "/",
          "https_sni": null,
          "type": "http",
          "healthy": {
            "successes": 0,
            "http_statuses": [
              200,
              302
            ],
            "interval": 0
          },
          "unhealthy": {
            "tcp_failures": 0,
            "timeouts": 0,
            "http_failures": 0,
            "http_statuses": [
              429,
              404,
              500,
              501,
              502,
              503,
              504,
              505
            ],
            "interval": 0
          },
          "timeout": 1,
          "concurrency": 10
        },
        "passive": {
          "healthy": {
            "successes": 0,
            "http_statuses": [
              200,
              201,
              202,
              203,
              204,
              205,
              206,
              207,
              208,
              226,
              300,
              301,
              302,
              303,
              304,
              305,
              306,
              307,
              308
            ]
          },
          "unhealthy": {
            "http_statuses": [
              429,
              500,
              503
            ],
            "tcp_failures": 0,
            "timeouts": 0,
            "http_failures": 0
          },
          "type": "http"
        },
        "threshold": 0
      },
      "client_certificate": null,
      "hash_on": "none",
      "sl505
            ],
            "interval": 0
          },
          "timeout": 1,
          "concurrency": 10
        },
        "passive": {
          "healthy": {
            "successes": 0,
            "http_statuses": [
              200,
              201,
              202,
              203,
              204,
              205,
              206,
              207,
              208,
              226,
              300,
              301,
              302,
              303,
              304,
              305,
              306,
              307,
              308
            ]
          },
          "unhealthy": {
            "http_statuses": [
              429,
              500,
              503
            ],
            "tcp_failures": 0,
            "timeouts": 0,
            "http_failures": 0
          },
          "type": "http"
        },
        "threshold": 0
      },
      "client_certificate": null,
      "hash_on": "none",
      "slots": 10000,
      "created_at": 1660789714
    }
  ]
}
- 查看某个upstream下关联的target
curl -XGET localhost:8001/upstreams/c6c38821-a08c-4c05-b282-f63c501240a0/targets | jq .
{
  "next": null,
  "data": [
    {
      "id": "7d57a020-cec7-49c8-9dc6-387532e98c22",
      "tags": null,
      "target": "192.168.1.1:8080",
      "created_at": 1666681580.184,
      "upstream": {
        "id": "c6c38821-a08c-4c05-b282-f63c501240a0"
      },
      "weight": 100
    },
    {
      "id": "a64e44c2-50fe-49cb-8cc9-6df0265dd2e6",
      "tags": null,
      "target": "192.168.1.2:8080",
      "created_at": 1660789905.537,
      "upstream": {
        "id": "c6c38821-a08c-4c05-b282-f63c501240a0"
      },
      "weight": 100
    },
    {
      "id": "4f0f77d6-31cb-4f29-ae93-0f15c443d507",
      "tags": null,
      "target": "192.168.1.3:8080",
      "created_at": 1660789812.133,
      "upstream": {
        "id": "c6c38821-a08c-4c05-b282-f63c501240a0"
      },
      "weight": 100
    }
  ]
}
- 查看所有service
curl -XGET localhost:8001/services | jq .
{
  "next": null,
  "data": [
    {
      "connect_timeout": 10000,
      "tls_verify": null,
      "read_timeout": 10000,
      "name": "CA70B82CCB4E4BE494AC8E3DA6A17084",
      "tags": null,
      "ca_certificates": null,
      "created_at": 1668656595,
      "updated_at": 1668656595,
      "protocol": "http",
      "port": 80,
      "id": "a976b162-1c1f-4200-b2c4-357ab6ece8e6",
      "client_certificate": null,
      "host": "ApiServer",
      "path": "/dataservice/customize/api",
      "write_timeout": 10000,
      "retries": 5,
      "tls_verify_depth": null
    }
  ]
}
- 查看某个service信息
curl -XGET localhost:8001/services/a976b162-1c1f-4200-b2c4-357ab6ece8e6 | jq .
{
  "connect_timeout": 10000,
  "tls_verify": null,
  "read_timeout": 10000,
  "name": "CA70B82CCB4E4BE494AC8E3DA6A17084",
  "tags": null,
  "ca_certificates": null,
  "created_at": 1668656595,
  "updated_at": 1668656595,
  "protocol": "http",
  "port": 80,
  "id": "a976b162-1c1f-4200-b2c4-357ab6ece8e6",
  "client_certificate": null,
  "host": "ApiServer",
  "path": "/dataservice/customize/api",
  "write_timeout": 10000,
  "retries": 5,
  "tls_verify_depth": null
}
- 查看所有route
curl -XGET localhost:8001/routes | jq .
{
  "next": null,
  "data": [
    {
      "protocols": [
        "http",
        "https"
      ],
      "name": "CA70B82CCB4E4BE494AC8E3DA6A17084",
      "snis": null,
      "tags": null,
      "request_buffering": true,
      "response_buffering": true,
      "created_at": 1668656595,
      "updated_at": 1668656595,
      "sources": null,
      "preserve_host": false,
      "destinations": null,
      "strip_path": false,
      "methods": [
        "GET"
      ],
      "id": "dfb4baec-aaa5-4463-992c-fa45bc3c68f4",
      "path_handling": "v0",
      "headers": {
        "API-ID": [
          "CA70B82CCB4E4BE494AC8E3DA6A17084"
        ]
      },
      "https_redirect_status_code": 426,
      "regex_priority": 0,
      "paths": [
        "/test1"
      ],
      "hosts": null,
      "service": {
        "id": "a976b162-1c1f-4200-b2c4-357ab6ece8e6"
      }
    }
  ]
}
- 查看某个route信息
curl -XGET localhost:8001/routes/dfb4baec-aaa5-4463-992c-fa45bc3c68f4 | jq .
{
  "protocols": [
    "http",
    "https"
  ],
  "name": "CA70B82CCB4E4BE494AC8E3DA6A17084",
  "snis": null,
  "tags": null,
  "request_buffering": true,
  "response_buffering": true,
  "created_at": 1668656595,
  "updated_at": 1668656595,
  "sources": null,
  "preserve_host": false,
  "destinations": null,
  "strip_path": false,
  "methods": [
    "GET"
  ],
  "id": "dfb4baec-aaa5-4463-992c-fa45bc3c68f4",
  "path_handling": "v0",
  "headers": {
    "API-ID": [
      "CA70B82CCB4E4BE494AC8E3DA6A17084"
    ]
  },
  "https_redirect_status_code": 426,
  "regex_priority": 0,
  "paths": [
    "/test1"
  ],
  "hosts": null,
  "service": {
    "id": "a976b162-1c1f-4200-b2c4-357ab6ece8e6"
  }
}
kong网关对于每个请求的处理逻辑是:
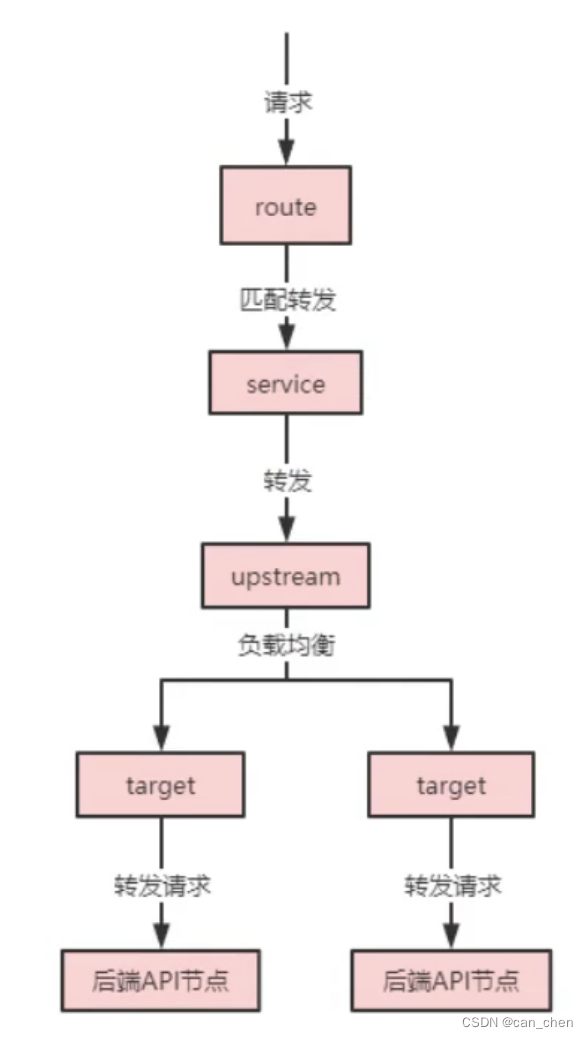
基于上述kong命令示例查询出来的关于target、upstream、service、route信息理解kong处理请求的过程。假设现在调用一个请求是:http://localhost:8080/test1,那么首先会根据/test1(route)找到对应的service,即id为a976b162-1c1f-4200-b2c4-357ab6ece8e6的service,由于该service的path还指定了"/dataservice/customize/api",所以请求地址变成:/dataservice/customize/api/test1,然后再根据service绑定的upstream,即ApiServer,找到ApiServer这个upstream绑定的target,对应到后端服务是有三台服务器的,可以实现负载均衡,所以经过kong代理之后的实际请求地址变成http://192.168.1.1:8080/dataservice/customize/api/test1,会由192.168.1.1这台服务器的后端服务进行处理,当然也可能是192.168.1.2、192.168.1.3这两台机器。
2.2. GET请求相关API(查看服务、查看路由等)
# 1. 查看所有的upstream
curl -XGET localhost:8001/upstreams

# 2. 查看某个upstream下关联的target
curl -XGET localhost:8001/upstreams/UPSTREAM_ID/targets

# 3. 查看所有service
curl -XGET localhost:8001/services

# 4. 查看某个service详细信息
curl -XGET localhost:8001/services/SERVICE_ID

# 5. 查看所有route
curl -XGET localhost:8001/routes

# 6. 查看某个route详细信息
curl -XGET localhost:8001/routes/ROUTE_ID

# 7. 查看已添加的kong插件
curl -XGET localhost:8001/plugins

# 8. 查看所有消费者
curl -XGET localhost:8001/consumers

# 9. 查看某个消费者详细信息
curl -XGET localhost:8001/consumers/CONSUMER_ID
2.3. POST请求相关API(添加服务、注册路由等)
# 1. 创建upstream
curl -X POST localhost:8001/upstreams --data "name=test-upstream"

# 2. 给某个upstream绑定多个target
curl -X POST localhost:8001/upstreams/test-upstream/targets --data "target=192.168.1.1:8080" --data "weight=100"
curl -X POST localhost:8001/upstreams/test-upstream/targets --data "target=192.168.1.2:8080" --data "weight=100"

# 3. 添加service,并且指定该service关联的target(path参数可选)
curl -X POST localhost:8001/services --data "name=test-service" --data "host=test-upstream" --data "path=/pms"

# 4. 注册route到某个service下
curl -X POST localhost:8001/services/test-service/routes --data "name=test-route" --data "paths[]=/test1"
3. kong添加官方插件
kong官方提供了丰富的插件,基于插件可以实现很多网关层的功能,例如身份认证、请求限流、黑白名单配置等。都可以基于kong的插件快速的实现。
kong插件的作用粒度可以是service、route、consumer或者全局生效。
关于kong官方提供的插件可参考官网:https://docs.konghq.com/hub/
3.1. 配置Basic Auth插件
Basic Auth插件是官方提供的身份认证插件,插件的作用粒度可以是service、route或者全局;即可以配置访问某个service/某个route或者经过kong代理的所有请求都需要进行身份认证。
配置Basic Auth插件可参考官方文档:https://docs.konghq.com/hub/kong-inc/basic-auth/
主要包含以下几个步骤:
- 为service/route/全局添加Basic Auth插件
注意:插件的名称需要从官网的插件库中获取
# 在service上配置插件
curl -X POST http://localhost:8001/services/SERVICE_NAME|SERVICE_ID/plugins \
    --data "name=basic-auth"  \
    --data "config.hide_credentials=true"

# 在route上配置插件
curl -X POST http://localhost:8001/routes/ROUTE_NAME|ROUTE_ID/plugins \
  --data "name=basic-auth"  \
  --data "config.hide_credentials=true"

# 在全局上配置插件
curl -X POST http://localhost:8001/plugins/ \
  --data "name=basic-auth"  \
  --data "config.hide_credentials=true"
- 创建一个消费者
 curl -i -X POST http://localhost:8001/consumers/ \
   --data "username=Jason"
- 在该消费者下创建用户
curl -X POST http://localhost:8001/consumers/Jason/basic-auth \
  --data "username=test" \
  --data "password=123456"
- 配置完成后,调用相关的API需要带上用户名密码或者在请求头加上Authorization参数
4. kong添加自定义插件
安装kong之后,系统会自带一些内置插件,插件的路径在/usr/local/share/lua/5.1/kong/plugins目录下,每个插件是一个单独的文件夹,插件的开发都是基于lua语言编写实现的。
如果官方的插件不满足我们的需求,我们还可以自己开发插件,自己开发的插件主要就是实现两个脚本,handler.lua和schema.lua,然后放到一个文件夹(文件夹的命名就是自定义插件的名称),并拷贝到/usr/local/share/lua/5.1/kong/plugins目录下,最后调用kong的API将自开发的插件添加到对应的service或者route即可。
自定义插件的开发可以参考官网:https://docs.konghq.com/gateway/latest/plugin-development/
补充关于正向代理和反向代理的区别:
- 正向代理:对于客户端来说是已知的,对于服务端是透明的。
- 反向代理:对于服务端来说是已知的,对于客户端是透明的。例如nginx,比如我们访问百度,百度后台是有很多台服务器的,但是对于客户端来说只需要访问www.baidu.com这个地址,然后由nginx帮我们代理到对应的某台百度服务器上,对于服务端来说是可知的,但是对于客户端来说是透明的,客户端只知道请求了百度的地址,不知道具体的请求是被哪台百度服务器处理。


 1058
1058


 被折叠的 条评论
为什么被折叠?
被折叠的 条评论
为什么被折叠?
 到【灌水乐园】发言


