转载请注明出处:http://blog.csdn.net/yangyu20121224/article/details/8989063
从这一篇文章开始,我们将进入到一个应用程序主界面UI的开发和设计中了,底部菜单栏在Android的应用开发当中占有非常重要的地位。几乎所有的手机应用程序都有底部菜单栏这样的控件,主要是因为手机的屏幕大小有限,这样一种底部菜单栏实现起来的效果可以很方便的为用户切换自己所需要的界面,具有更强的交互性。底部菜单栏的样式和效果也是五花八门,多的数不胜数,但是实现的基本原理都是一样的。
这个专题的几篇文章将更加详细的介绍几种大家比较常见的和效果比较炫的实例来进行讲解。话不多说,进入正题。
一、TabActivity之感叹
1、TabActivity的现状
打开Google的API文档搜索TabActivity,在介绍这个类时会发现有这么一句话,
大概的意思是说:这个类已经在Android4.0的系统中被弃用了,新的应用程序应该使用Fragment来代替该类的开发大家可以查看:Google开发文档
2、TabActivity是否还有存在的必要性
其实谷歌有此举动,我们也应该早就想到了,为什么会这么说呢?那就要从TabActivity的原理开始说起了。
做个假定先: 比如我们最外面的Activity是MainActivity, 第一个tab是FirstActivty, 第二个tab是SecondActivity。
相信大家都用过TabActivity, 它是一个特殊的Activity,它特殊的地方在哪里?有以下几点为证:
<1> 它看起来违反了Activity的单一窗口的原则。因为它可以同时加载几个activity, 当用户点击它上面的tab时,就会跳到相应的Activity上面去。
<2> 用户首先进去FirstActivity,然后进去SecondActivity,再点击返回键的时候。它返回的界面不是FirstActivity,而是退出我们的应用程序。
<3> 当用户在FirstActivity按返回键的时候,如果MainActivity和FirstActivity通过重写onKeyDown()方法,那么收到事件回调的只有FirstActivity。
3、谷歌当时的困扰
<1> 首先我们要明白一点,android系统是单窗口系统,不像windows是多窗口的(比如在windows系统上,我们可以一边聊QQ,一边斗地主等等)。也就是说,在一个时刻,android里面只有一个activity可以显示给用户。这样就大大降低了操作系统设计的复杂性(包括事件派发等等)。
<2> 但是像TabActivity那种效果又非常必要,用户体验也比较好。所以我觉得当时google开发人员肯定很纠结,于是,一个畸形的想法产生了,就是在单窗口系统下加载多个activity,它就是TabActivity。
4、TabActivity实现加载多个Activity原理
<1> 找到一个入口,这个入口可以访问到ActivityThread类(这个类是隐藏的,应用程序是访问不到的),然后调用ActivityThread里面的启动activity方法
<2> 绕开ams,就是我们TabActivity加载的FirstActivity和SecondActivity是不能让ams知道的。
所以,一个新的类诞生了 ---- LocalActivityManager , 它的作用如下:
<1> 这个类和ActivityThread处于一个包内,所以它有访问ActivityThread的权限。
<2> 这个类提供了类似Ams管理Activity的方法,比如调用activity的onCreate方法,onResume()等等,维护了activity生命周期。
也正如其名字一样,它是本地的activity管理。就是说它运行的进程和它管理的Activity是在一个进程里面。所以,当TabActivity要启动一个activity的时候,会调用到LocalActivityManager的创建activity方法,然后调用ActivityThread.startActivityNow(),这个方法绕过了ams,就是说ams此时根本不知道LocalActivityManager已经在暗渡陈仓的启动了一个activity(所以ams的task列表里面没有新启动activity的记录,所以用户按back键就直接退出我们的应用)。然后和正常启动activity一样,初始化activity,在初始化activity的时候,有个方法非常重要:activity.attch()
- final void attach(...){
- ....
- mWindow.setCallback(this);
- .....
- }
- final Callback cb = getCallback();
- final boolean handled = cb != null && mFeatureId < 0 ? cb.dispatchKeyEvent(event) : super.dispatchKeyEvent(event);
5、TabActivity小结
二、TabActivity实现方法
如下图所示:
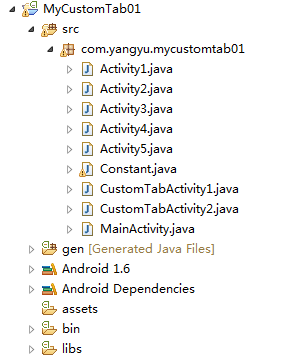
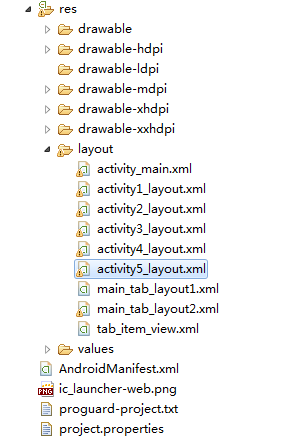
三、程序的目录结构
四、具体的编码实现
- <?xml version="1.0" encoding="utf-8"?>
- <TabHost xmlns:android="http://schemas.android.com/apk/res/android"
- android:id="@android:id/tabhost"
- android:layout_width="fill_parent"
- android:layout_height="fill_parent">
- <LinearLayout
- android:orientation="vertical"
- android:layout_width="fill_parent"
- android:layout_height="fill_parent">
- <FrameLayout
- android:id="@android:id/tabcontent"
- android:layout_width="fill_parent"
- android:layout_height="0.0dip"
- android:layout_weight="1.0" />
- <TabWidget
- android:id="@android:id/tabs"
- android:layout_width="fill_parent"
- android:layout_height="wrap_content"
- android:padding="2dip"
- android:background="@drawable/tab_widget_background"
- android:layout_weight="0.0"/>
- </LinearLayout>
- </TabHost>
- <?xml version="1.0" encoding="utf-8"?>
- <LinearLayout xmlns:android="http://schemas.android.com/apk/res/android"
- android:layout_width="wrap_content"
- android:layout_height="wrap_content"
- android:gravity="center"
- android:orientation="vertical" >
- <ImageView
- android:id="@+id/imageview"
- android:layout_width="wrap_content"
- android:layout_height="wrap_content"
- android:focusable="false"
- android:padding="3dp" >
- </ImageView>
- <TextView
- android:id="@+id/textview"
- style="@style/tab_item_text_style"
- android:layout_width="wrap_content"
- android:layout_height="wrap_content" >
- </TextView>
- </LinearLayout>
- <style name="tab_item_text_style">
- <item name="android:textSize">10.0dip</item>
- <item name="android:textColor">#ffffffff</item>
- <item name="android:ellipsize">marquee</item>
- <item name="android:singleLine">true</item>
- </style>
- <style name="tab_item_background">
- <item name="android:textAppearance">@style/tab_item_text_style</item>
- <item name="android:gravity">center_horizontal</item>
- <item name="android:background">@drawable/selector_tab_background2</item>
- <item name="android:layout_width">fill_parent</item>
- <item name="android:layout_height">wrap_content</item>
- <item name="android:button">@null</item>
- <item name="android:drawablePadding">3.0dip</item>
- <item name="android:layout_weight">1.0</item>
- </style>
- <?xml version="1.0" encoding="utf-8"?>
- <selector xmlns:android="http://schemas.android.com/apk/res/android">
- <item android:drawable="@drawable/tab_item_p" android:state_pressed="true"/>
- <item android:drawable="@drawable/tab_item_d" android:state_selected="true"/>
- </selector>
- <?xml version="1.0" encoding="utf-8"?>
- <LinearLayout xmlns:android="http://schemas.android.com/apk/res/android"
- android:layout_width="fill_parent"
- android:layout_height="fill_parent" >
- <ImageView
- android:id="@+id/imageview"
- android:layout_width="fill_parent"
- android:layout_height="fill_parent"
- android:scaleType="fitCenter"
- android:src="@drawable/xianjian01" >
- </ImageView>
- </LinearLayout>
- package com.yangyu.mycustomtab01;
- /**
- * @author yangyu
- * 功能描述:常量工具类
- */
- public class Constant {
- public static final class ConValue{
- /**
- * Tab选项卡的图标
- */
- public static int mImageViewArray[] = {R.drawable.tab_icon1,
- R.drawable.tab_icon2,
- R.drawable.tab_icon3,
- R.drawable.tab_icon4,
- R.drawable.tab_icon5};
- /**
- * Tab选项卡的文字
- */
- public static String mTextviewArray[] = {"主页", "关于", "设置", "搜索", "更多"};
- /**
- * 每一个Tab界面
- */
- public static Class mTabClassArray[]= {Activity1.class,
- Activity2.class,
- Activity3.class,
- Activity4.class,
- Activity5.class};
- }
- }
- package com.yangyu.mycustomtab01;
- import android.app.TabActivity;
- import android.content.Intent;
- import android.os.Bundle;
- import android.view.LayoutInflater;
- import android.view.View;
- import android.widget.ImageView;
- import android.widget.TabHost;
- import android.widget.TabHost.TabSpec;
- import android.widget.TextView;
- import com.yangyu.mycustomtab01.Constant.ConValue;
- /**
- * @author yangyu
- * 功能描述:第一种实现方法,自定义TabHost
- */
- public class CustomTabActivity1 extends TabActivity{
- //定义TabHost对象
- private TabHost tabHost;
- //定义一个布局
- private LayoutInflater layoutInflater;
- public void onCreate(Bundle savedInstanceState) {
- super.onCreate(savedInstanceState);
- setContentView(R.layout.main_tab_layout1);
- initView();
- }
- /**
- * 初始化组件
- */
- private void initView(){
- //实例化TabHost对象,得到TabHost
- tabHost = getTabHost();
- //实例化布局对象
- layoutInflater = LayoutInflater.from(this);
- //得到Activity的个数
- int count = ConValue.mTabClassArray.length;
- for(int i = 0; i < count; i++){
- //为每一个Tab按钮设置图标、文字和内容
- TabSpec tabSpec = tabHost.newTabSpec(ConValue.mTextviewArray[i]).setIndicator(getTabItemView(i)).setContent(getTabItemIntent(i));
- //将Tab按钮添加进Tab选项卡中
- tabHost.addTab(tabSpec);
- //设置Tab按钮的背景
- tabHost.getTabWidget().getChildAt(i).setBackgroundResource(R.drawable.selector_tab_background);
- }
- }
- /**
- * 给Tab按钮设置图标和文字
- */
- private View getTabItemView(int index){
- View view = layoutInflater.inflate(R.layout.tab_item_view, null);
- ImageView imageView = (ImageView) view.findViewById(R.id.imageview);
- if (imageView != null){
- imageView.setImageResource(ConValue.mImageViewArray[index]);
- }
- TextView textView = (TextView) view.findViewById(R.id.textview);
- textView.setText(ConValue.mTextviewArray[index]);
- return view;
- }
- /**
- * 给Tab选项卡设置内容(每个内容都是一个Activity)
- */
- private Intent getTabItemIntent(int index){
- Intent intent = new Intent(this, ConValue.mTabClassArray[index]);
- return intent;
- }
- }
- public TabHost.TabSpec setIndicatior(CharSwquence label,Drawable icon).指定tab的标题和图标。
- public TabHost.TabSpec (View view)通过View来自定义tab
- public TabHost.TabSpec(CharSequence label) 指定tab的标题,此时无图标。
- public TabHost.TabSpec setContent(TabHost.TabContentFactory )
- public TabHost.TabSpec setContent(int ViewId)
- public TabHost.TabSpec setContent(Intent intent)
- package com.yangyu.mycustomtab01;
- import android.app.Activity;
- import android.os.Bundle;
- import android.util.Log;
- public class Activity1 extends Activity{
- private final static String TAG = "Activity1";
- public void onCreate(Bundle savedInstanceState) {
- super.onCreate(savedInstanceState);
- setContentView(R.layout.activity1_layout);
- Log.i(TAG, "=============>onCreate");
- }
- @Override
- protected void onResume() {
- super.onResume();
- Log.i(TAG, "=============>onResume");
- }
- @Override
- protected void onDestroy() {
- super.onDestroy();
- Log.i(TAG, "=============>onDestroy");
- }
- }
这种方式更漂亮,也更灵活,大部分的应用程序基本都是使用这种方式,通过setCurrentTabByTag()方法来切换不同的选项卡。
- <?xml version="1.0" encoding="utf-8"?>
- <TabHost xmlns:android="http://schemas.android.com/apk/res/android"
- android:id="@android:id/tabhost"
- android:layout_width="fill_parent"
- android:layout_height="fill_parent" >
- <LinearLayout
- android:layout_width="fill_parent"
- android:layout_height="fill_parent"
- android:orientation="vertical" >
- <FrameLayout
- android:id="@android:id/tabcontent"
- android:layout_width="fill_parent"
- android:layout_height="0.0dip"
- android:layout_weight="1.0" />
- <TabWidget
- android:id="@android:id/tabs"
- android:layout_width="fill_parent"
- android:layout_height="wrap_content"
- android:layout_weight="0.0"
- android:visibility="gone" />
- <RadioGroup
- android:id="@+id/main_radiogroup"
- android:layout_width="fill_parent"
- android:layout_height="wrap_content"
- android:layout_gravity="bottom"
- android:background="@drawable/tab_widget_background"
- android:gravity="center_vertical"
- android:orientation="horizontal"
- android:padding="2dip" >
- <RadioButton
- android:id="@+id/RadioButton0"
- style="@style/tab_item_background"
- android:drawableTop="@drawable/tab_icon1"
- android:text="主页" />
- <RadioButton
- android:id="@+id/RadioButton1"
- style="@style/tab_item_background"
- android:drawableTop="@drawable/tab_icon2"
- android:text="关于" />
- <RadioButton
- android:id="@+id/RadioButton2"
- style="@style/tab_item_background"
- android:drawableTop="@drawable/tab_icon3"
- android:text="设置" />
- <RadioButton
- android:id="@+id/RadioButton3"
- style="@style/tab_item_background"
- android:drawableTop="@drawable/tab_icon4"
- android:text="搜索" />
- <RadioButton
- android:id="@+id/RadioButton4"
- style="@style/tab_item_background"
- android:drawableTop="@drawable/tab_icon5"
- android:text="更多" />
- </RadioGroup>
- </LinearLayout>
- </TabHost>
- <?xml version="1.0" encoding="utf-8"?>
- <LinearLayout xmlns:android="http://schemas.android.com/apk/res/android"
- android:layout_width="fill_parent"
- android:layout_height="fill_parent" >
- <ImageView
- android:id="@+id/imageview"
- android:layout_width="fill_parent"
- android:layout_height="fill_parent"
- android:scaleType="fitCenter"
- android:src="@drawable/xianjian01" >
- </ImageView>
- </LinearLayout>
- <?xml version="1.0" encoding="utf-8"?>
- <selector xmlns:android="http://schemas.android.com/apk/res/android">
- <item android:drawable="@drawable/tab_item_p" android:state_pressed="true"/>
- <item android:drawable="@drawable/tab_item_d" android:state_checked="true"/>
- </selector>
- package com.yangyu.mycustomtab01;
- import android.app.TabActivity;
- import android.content.Intent;
- import android.os.Bundle;
- import android.widget.RadioButton;
- import android.widget.RadioGroup;
- import android.widget.RadioGroup.OnCheckedChangeListener;
- import android.widget.TabHost;
- import android.widget.TabHost.TabSpec;
- import com.yangyu.mycustomtab01.Constant.ConValue;
- /**
- * @author yangyu
- * 功能描述:第二种实现方式,自定义RadioGroup
- */
- public class CustomTabActivity2 extends TabActivity{
- //定义TabHost对象
- private TabHost tabHost;
- //定义RadioGroup对象
- private RadioGroup radioGroup;
- public void onCreate(Bundle savedInstanceState) {
- super.onCreate(savedInstanceState);
- setContentView(R.layout.main_tab_layout2);
- initView();
- initData();
- }
- /**
- * 初始化组件
- */
- private void initView(){
- //实例化TabHost,得到TabHost对象
- tabHost = getTabHost();
- //得到Activity的个数
- int count = ConValue.mTabClassArray.length;
- for(int i = 0; i < count; i++){
- //为每一个Tab按钮设置图标、文字和内容
- TabSpec tabSpec = tabHost.newTabSpec(ConValue.mTextviewArray[i]).setIndicator(ConValue.mTextviewArray[i]).setContent(getTabItemIntent(i));
- //将Tab按钮添加进Tab选项卡中
- tabHost.addTab(tabSpec);
- }
- //实例化RadioGroup
- radioGroup = (RadioGroup) findViewById(R.id.main_radiogroup);
- }
- /**
- * 初始化组件
- */
- private void initData() {
- // 给radioGroup设置监听事件
- radioGroup.setOnCheckedChangeListener(new OnCheckedChangeListener() {
- @Override
- public void onCheckedChanged(RadioGroup group, int checkedId) {
- switch (checkedId) {
- case R.id.RadioButton0:
- tabHost.setCurrentTabByTag(ConValue.mTextviewArray[0]);
- break;
- case R.id.RadioButton1:
- tabHost.setCurrentTabByTag(ConValue.mTextviewArray[1]);
- break;
- case R.id.RadioButton2:
- tabHost.setCurrentTabByTag(ConValue.mTextviewArray[2]);
- break;
- case R.id.RadioButton3:
- tabHost.setCurrentTabByTag(ConValue.mTextviewArray[3]);
- break;
- case R.id.RadioButton4:
- tabHost.setCurrentTabByTag(ConValue.mTextviewArray[4]);
- break;
- }
- }
- });
- ((RadioButton) radioGroup.getChildAt(0)).toggle();
- }
- /**
- * 给Tab选项卡设置内容(每个内容都是一个Activity)
- */
- private Intent getTabItemIntent(int index){
- Intent intent = new Intent(this, ConValue.mTabClassArray[index]);
- return intent;
- }
- }
- package com.yangyu.mycustomtab01;
- import android.app.Activity;
- import android.os.Bundle;
- import android.util.Log;
- public class Activity1 extends Activity{
- private final static String TAG = "Activity1";
- public void onCreate(Bundle savedInstanceState) {
- super.onCreate(savedInstanceState);
- setContentView(R.layout.activity1_layout);
- Log.i(TAG, "=============>onCreate");
- }
- @Override
- protected void onResume() {
- super.onResume();
- Log.i(TAG, "=============>onResume");
- }
- @Override
- protected void onDestroy() {
- super.onDestroy();
- Log.i(TAG, "=============>onDestroy");
- }
- }
(三)这里为了演示方便,我把两种效果放到了一个应用程序里

2、主布局界面activity_main.xml:
- <RelativeLayout xmlns:android="http://schemas.android.com/apk/res/android"
- xmlns:tools="http://schemas.android.com/tools"
- android:layout_width="fill_parent"
- android:layout_height="fill_parent"
- android:background="@drawable/main_background" >
- <Button
- android:id="@+id/button2"
- android:layout_width="fill_parent"
- android:layout_height="wrap_content"
- android:layout_alignRight="@+id/button1"
- android:layout_below="@+id/button1"
- android:background="@drawable/selector_btn"
- android:padding="10dp"
- android:text="RadioGroup"/>
- <Button
- android:id="@+id/button1"
- android:layout_width="fill_parent"
- android:layout_height="wrap_content"
- android:layout_alignParentLeft="true"
- android:layout_alignParentTop="true"
- android:layout_marginTop="186dp"
- android:background="@drawable/selector_btn"
- android:padding="10dp"
- android:text="CustomTab" />
- </RelativeLayout>
- <selector xmlns:android="http://schemas.android.com/apk/res/android">
- <item android:drawable="@drawable/btn_press" android:state_pressed="true"/>
- <item android:drawable="@drawable/btn_background"/>
- </selector>
- package com.yangyu.mycustomtab01;
- import android.app.Activity;
- import android.content.Intent;
- import android.os.Bundle;
- import android.view.View;
- import android.view.View.OnClickListener;
- import android.widget.Button;
- public class MainActivity extends Activity {
- //定义Button按钮对象
- private Button btn1,btn2;
- @Override
- protected void onCreate(Bundle savedInstanceState) {
- super.onCreate(savedInstanceState);
- setContentView(R.layout.activity_main);
- initView();
- }
- /**
- * 初始化组件
- */
- private void initView(){
- //实例化按钮对象
- btn1 = (Button)findViewById(R.id.button1);
- btn2 = (Button)findViewById(R.id.button2);
- //设置监听,进入CustomTab界面
- btn1.setOnClickListener(new OnClickListener() {
- @Override
- public void onClick(View v) {
- startActivity(new Intent(MainActivity.this,CustomTabActivity1.class));
- }
- });
- //设置监听,进入RadioGroup界面
- btn2.setOnClickListener(new OnClickListener() {
- @Override
- public void onClick(View v) {
- startActivity(new Intent(MainActivity.this,CustomTabActivity2.class));
- }
- });
- }
- }
今天就写到这里吧,下一篇继续给大家带来底部菜单栏的实例讲解,希望大家可以继续支持,晚安了。


 957
957

 被折叠的 条评论
为什么被折叠?


