首先创建一个新文件:
import
class hello {
  public  static  void mainString args[]){
      File  file = new File("E: \\hello.txt");
      try{
              file.creatNewfile();
              /*
               当且仅当不存在具有此抽象路径名指定名称的文件时,不可分地创建一个新的空文件。检查文件是否存在,若不存在则创建该文件,这是单个操作,对于其他所有可能影响该文件的文件系统活动来说,该操作是不可分的。
              */
     }catch(Exception e){}
}
}
【运行结果】
程序运行之后,在e盘下会有一个名字为hello.txt的文件。
File类的两个常量
System.out.println("File.separator");//与系统有关的默认名称分隔符,为了方便,它被表示为一个字符串。此字符串只包含一个字符
//UNIX 系统上,此字段的值为 ‘/’;在 Microsoft Windows 系统上,它为 ‘\’
//与系统有关的路径分隔符,为了方便,它被表示为一个字符串。此字符串只包含一个字符
所以为了更好的使得Java代码能够跨平台:一般在使用File是分割符使用File.separator表示分格符:
File file =  new File("E:"+File.separator+"hello.txt");
file.exists();   //判断一个文件是否存在。返回boolean
file.delete();    //删除
创建一个文件夹:
File  file  = new File("D:"+File.separator+"hello");
file.mkdir();
在创建文件夹和文件的时候也可以定义一个表示路径的字符串。然后把该字符串做实参传递给File
list() listFiles()的区别
调用list();返回一个字符串数组。这个字符串数组就是你用File类封装的文件下的文件夹名称和文件名称
       File f = new File( "f:\\");
       String name[] = f.list();
       for(String str : name){
       System. out.println(str );
       }
listFiles():
返回抽象路径名的定义中表示此抽象路径名的目录中的文件的数组。File[]
File f = new File( "f:\\");
       File[]  f1= f.listFiles();
       for(File file : f1){
           System. out.println(file );
           }
//返回的绝对路径或者相对路径名(根据封装的为什么路径)
注意一个重点:listFiles()的参数,此参数是一个过滤器
例:遍历f盘所以目录:输出包含java的文件
使用过滤器:
File f = new File( "f:\\");
       File[]  f1= f.listFiles( new FilenameFilter() {

         public boolean accept(File dir, String name) {
             if(name .contains(".java"))
             return true ;
             return false ;
        }
    });
       for(File file : f1){
           System. out.println(file );   //只会打印出.java文件
           }
不使用过滤器:
     File f = new File("f:\\" );
        File[]  f1= f.listFiles();
           for(File file : f1 ){
              if(file .isFile()){
              if(file .getName().contains("Java"))
                  System. out.println(file );
          }
       }
例:
查看一个目录下的全部文件 (递归实现):
public static void main(String[] args) {
        File file = new File("f:\\" );
         // 封装目录
         show(file);
    }

    public static void show(File file) {
         // // 获取目录下所有的文件或者文件夹的File数组。
        File fileArray[] = file .listFiles();
         // 遍历这个数组
         for (File f : fileArray ) {
             // 判断是否为文件夹,是的话递归调用
             if (f .isDirectory())
                 show(f);
             else
                 // 不是。输出绝对路径
                System. out.println(f .getAbsolutePath());
        }
    }
列出指定目录的全部文件(包括隐藏文件):
/**
*使用list列出指定目录的全部文件
**/
public class hello{
   public static void main(String args[]){
   String f = "D:"+File.separator;  //  注意这里不是创建一个文件或者文件夹
   File file = new File(f);
   String[]  str=file.list();   //使用list()返回的是 String类型的数组
   for(int i=0;i<10;i++)
   System.out.println(str[i]);  //输出每个文件的文件名,没有路径  如  abc
}
}
如果要输出完整路径,则要使用listFiles(); 返回为File类型的数组
File[] str =file.listFiles(); //输出 为 D:\ abcjava 写入读取文件:
1)字节流与字符流
我们主要学 字节输入输出和 字符输入输出类
IO流的基类:
- 字节流
- 字节输入流 读取数据 InputStream
- 字节输出流 写出数据 OutputStream
- 字符流
- 字符输入流 读取数据 Reader
字符输出流 写出数据 Writer
1, 字符输入流 Writer类
通过查看API文档。我们发现Writer是一个抽象方法。一般使用它的子类 FileWriter();
FileWriter()的常用构造方法:public FileWriter(File file);
public FileWriter(String fileName);
     File file = new File( "d:\\test4.txt");
         //会自动为你创建这个文件
        Writer  w = new FileWriter(file );
        w.write( "Hello world");
这时候当你打开d盘会发现文件压根没有写入:为什么呢?
因为字符流在操作的时候是会用到缓冲区的,是通过缓冲区来操作文件的。
此时通过.flush();刷新缓冲区可以写入!
w.flush(); 一般在操作完流之后要关闭流,w.close()。关闭流的时候会强制刷新缓存。
如果文件不存在,就创建文件。如果文件存在,就直接覆盖掉文件
增加内容:
Writer write = new Writer(file,true); // 增加 true参数,则写入的内容会增加到后面
windows下的换行符:w.write(“\r\n” );
2,字符输出流: Reader类
  Reader r = new FileReader( file);
         int ch = 0;
         while((ch =r .read())!=-1){
             System. out.print((char )ch );
         }
使用IO字符流复制文件:
    File fileCope = new File( "d:\\test4.txt");
    File filePase = new File("d:\\test.txt" );
    Reader r = new FileReader(fileCope );
    Writer w = new FileWriter(filePase );
    int ch = 0;
    while((ch =r .read())!=-1){
         System. out.print((char )ch );
         w.write( ch);
     }
     w.flush();
     w.close();
     r.close();
上面复制的效率比较低:现在介绍另一种写出操作
public int read(char[] c)
注意:在使用read(char[] c)写出数据时。最后一行一定要判断写入了多长字节的数据:
char cha[] = new char[1024];
int len =r.read(cha);
System.out.println(String.valueOf(cha,0,len));
File fileCope = new File( "d:\\test4.txt");
         Reader r = new FileReader(fileCope );
         int ch = 0;
         char cha []  = new char[1024];
         while((ch = r .read(cha ))!=-1)
         System.out.print(String.valueOf( cha,0, ch));
         r.close();
使用IO复制文件升级版:
File fileCope = new File( "d:\\test4.txt");
        File filePaste = new File("d:\\test.txt" );
         Reader r = new FileReader(fileCope );
         Writer w = new FileWriter(filePaste );
         int len = 0;
         char cha []  = new char[1024];
         while((len = r .read(cha ))!=-1){
         System.out.print(String.valueOf( cha,0, len));
         w.write( cha,0, len);
         }
         w.close();
         r.close();
标准的io异常处理:
FileWriter fw = null;
          try {
               fw = new FileWriter("fw.txt");
               fw.write("helloworld");
               // fw.close(); 不合理,可能在执行到这里前,已经出问题了,所以,这个必须放到finally代码里面
          } catch (IOException e) {
               e.printStackTrace();
               // System.out.println("写数据出问题了");
          } finally {
               // 为了避免空指针一次,加入if判断
               if (fw != null) {
                    try {
                         fw.close();
                    } catch (IOException e) {
                         e.printStackTrace();
                         // System.out.println("释放资源失败");
                    }
               }
          }
FileReader fr = null;
FileWriter fw = null;
try {
// 封装数据源
fr = new FileReader("IODemo.java" );
// 封装目的地
fw = new FileWriter("d:\\Copy.java" );
// 读取数据并写出数据
int ch = 0;
while ((ch = fr .read()) != -1) {
fw.write( ch);
}
} catch (FileNotFoundException e) {
// e.printStackTrace();
System. out.println("找不到文件" );
} catch (IOException e ) {
// e.printStackTrace();
System. out.println("读写文件失败" );
} finally {
// 释放资源
if (fw != null) {
try {
fw.close();
} catch (IOException e ) {
// e.printStackTrace();
System. out.println("释放输出流失败" );
}
}
if (fr != null) {
try {
fr.close();
} catch (IOException e ) {
// e.printStackTrace();
System. out.println("释放输入流失败" );
}
}
} B:为什么要刷新缓冲区?
C:为什么要释放流资源?
D:刷新和释放有什么区别?
3 OutputStream类: 字节输入流
抽象类。一般使用FileOutputStream 类
通过查看API文档。我们发现FileOutputStream的write方法不能写入字符串。。。
但是。我们可以通过String类提供的getBytes()方法来转换为字符数组
     OutputStream out = new FileOutputStream("f://test.txt" );
         out.write( 'h');
         //out.write("hello");  错误,不能写入字符串
         //通过getBytes()方法
         out.write( "hello" .getBytes());
         out.write( "hello" .getBytes(),0,3);
         out.close();
4 InputStream类 :字节输出流
InputStream in = new FileInputStream("d://test.txt" );
         int bu = 0;
         while ((bu =in .read())!=-1){
            System. out .println(( char) bu);
        }


InputStream in = new FileInputStream("d://test.txt" );
         byte bu [] = new byte[1024];
         int len =0;
         while ((len =in .read(bu ))!=-1){
             //此处不能使用String.valueOf( bu,0,len );
            System. out .println(new String(bu ,0,len ));
        }
4)JAVA中的高效IO传输:
IO:
* 低级流(基本流):FileReader,FileWriter,FileInputStream,FileOutputStream
* 高级流(处理流):针对基本的流进行进一步的操作。BufferedWriter BufferedReader
BufferedWriter的构造方法:
BufferedWriter(Writer out) //参数一般传一个FileWriter
BufferedXxx仅仅是提供高效的操作,真正的读写还得需要基本的流来完成。
 //参数的传递。匿名类
 BufferedWriter bw = new BufferedWriter(new FileWriter("d://test.txt" ));
 bw.write( "ahsbajhflasjflajflja");
 bw.close();
 BufferedReader bw = new BufferedReader( new FileReader( "d://test.txt" ) );
 int len =0;
 char ch [] = new char [1024];
 while((len =bw .read( ch ))!=-1){
 System. out..println(String.valueOf ( ch,0, len));
 }
 bw.close();
使用高效流完成复制文件操作:
BufferedReader br = new BufferedReader( new FileReader("d://test.txt" ));
    BufferedWriter bw = new BufferedWriter(new FileWriter("d://test4.txt" ));
     int len =0;
     char ch [] = new char[1024];
     while((len =br .read(ch ))!=-1){
      bw.write( ch,0, len);
    }
     bw.close();
     br.close();
字符缓冲流的特有功能:
* BufferedWriter:
* public void newLine():根据系统来决定写入不同的换行符。
* BufferedReader :
* public String readLine():一次读取一行数据 。但不读换行符。如果读到末尾,返回null
注意: BufferedInputStream 和BufferedOutputStream没有这两个方法
   BufferedReader bw = new BufferedReader( new FileReader("d://test4.txt" ));
        BufferedWriter br = new BufferedWriter(new FileWriter("d://test.txt" ));
         //定义输入的保存位置
        String s = null;
         //判断结束的输入的临界条件
         while((s =bw .readLine())!=null){
         //输出到指定位置
             br.write( s);
             //换行
             br.newLine();
             //刷新。必不可少
             br.flush();
        }
         bw.close();
题目:键盘输入字符串。并保持到指定文件中
BufferedWriter br = new BufferedWriter( new FileWriter("d://test.txt" ));
        Scanner sc = new Scanner(System.in);
         //定义输入的保存位置
        String s = null;
         //判断结束的输入的临界条件
         while((s =sc .nextLine())!=null){
             if ("end" .equals(s )) {
                 break;
            }
            //输出到指定位置
             br.write( s);
             //换行
             br.newLine();
             //刷新。必不可少
             br.flush();
        }
         br.close();
复制一个文件夹的所以文件:
    File  srcFile = new File( "d://文档");
        File  tarFile = new File("d://123" );
         //判断目标文件是否存在,如果不存在就创建一下
         if(!tarFile .exists()){
             tarFile.mkdir();
        }
        File file[] = srcFile.listFiles();
         for(File f :file ){
             //遍历获取每个文件的名称
            String name = f.getName();
             //使用File的一种构造方法创建File对象,此对象与原文件同名
            File tarFileName = new File(tarFile,name );
             copy(tarFileName, f);
        }

    }
    public static void copy(File tar,File src) throws IOException{
         //定义写入的目标
        BufferedOutputStream bo = new BufferedOutputStream(new FileOutputStream(tar));
         //定义写出的目标
        BufferedInputStream bi = new BufferedInputStream(new FileInputStream(src));
         int len =0;
         byte by [] = new byte[1024];
         //具体的复制操作
         while((len =bi .read(by ))!=-1){
             bo.write( by,0, len);
        }
         bo.close();
         bi.close();
在上述案例中我们使用的字节缓存都是byte[] 还有一种字节缓存很常见:
ByteBuffer (此方法的array()方法返回对应的byte[]数组)
ByteBuffer nbf = ByteBuffer.allocate(int 容量) //创建指定大小的缓存区
这个缓存一般用在向mysql数据库中存取二进制文件时使用:
File file = new File(picturePath);
byte  buf[] = new byte[1024];
ByteBuffer nbf = ByteBuffer.allocate((int)file.length());
int nbflength=0;
int len=0;
while(len=bufferInputStream.read(buf)>0){
         if(len!=1024){
          nbf.put(buf,0,len);
         } else{
          nbf.put(buf);
         }
       nbflength+=len;
}
//将ByteBuffer转为数组
byte[]  fullBuf = nbf.array();    //这样这个fullBuf就是整个图片的二进制数据
打印流:只有写数据的,没有读取数据。只有操作目的地的,没有操作数据数据源的。
* PrintStream:打印字节流
* PrintWriter:打印字符流
我们以前一直使用的 System.out.println();
其实System类的out方法返回的是printStream
public static final PrintStreamout
特点:
* A:可以往文件中写任意类型的数据。
* B:可以实现自动刷新,但是要先启动它。而且,只有在调用println()方法有效。
* C:打印流也是可以直接操作文件的。
* 问题:哪些流可以直接操作文件。
* 看构造方法,如果可以同时接受File和String类型的构造参数,那么,这种流就可以操作文件。
    public static void main(String[] args)throws IOException{
    //构造printWriter方法 ,注意参数的传递后面的true为启动自动刷新
    PrintWriter pw = new PrintWriter(new FileWriter("f://a.txt"),true);
    //写入元素,通过查看源码,我们方法printWriter底层其实也是之前接触的基本Writer和OutputStream流
    //使用也存在  write()这些方法,但我们一般不去使用打印流调用这些方法
    PrintStream ps = new PrintStream(new FileOutputStream("f://a.txt"),true);
    pw.println(1);
    pw.println("hello world");
   ```
高效的复制文件
// 创建高效字符流用来写出数据,以行的形式
  BufferedReader br = new BufferedReader(new FileReader("f://test.txt"));
  // 创建打印流用来写入数据
  PrintWriter pw = new PrintWriter(new FileWriter("f://a.txt"), true);
  String line = null;
  // 写入
  while ((line = br.readLine()) != null) {
   pw.println(line);
  }
  // 关闭流
  pw.close();
  br.close();
把对象按照流一样的方式操作:序列化流。
* 序列化:把对象按照流一样的方式操作。
* 反序列化:把文件中的流对象的数据还原成对象。
*
* 序列化:
* ObjectOutputStream
* public final void writeObject(Object obj)
* 反序列化:
* ObjectInputStream
* public final Object readObject()
类通过实现 java.io.Serializable 接口以启用其序列化功能。
* 未实现此接口的类将无法使其任何状态序列化或反序列化。
import java.io.Serializable;
//注意实现了Serializable接口以启用其序列化功能。
public class Student implements Serializable{
 //注意此处定义的ID,如果没有指定ID,则当你修改jvm版本后,.class和.java文件ID
//值会不一样,则流会出现错误
//因为如果不加将采用jvm默认的算法计算ID值,jvm版本的变化会有改变(尤其是在不同jvm,如sun,jrocket之间个别版本就有区别)
 //private static final long serialVersionUID = 5061154393647412285L;
//
 * 记住的结论:
 * 如果看到一个类实现Serializable接口,就要知道,该类的对象可以被序列化流操作,也可以被反序列化。
 * 而且,可以给类文件产生了一个固定的id值。
 * 这样做的好处是:对java文件做了一些简单的修改,也不会对我以前的数据产生影响。
 private String name;
 private int age;
 public Student(String name,int age){
  this.name = name;
  this.age =age;
 }

 public String getName() {
  return name;
 }
 public void setName(String name) {
  this.name = name;
 }
 public int getAge() {
  return age;
 }
 public void setAge(int age) {
  this.age = age;
 }
 @Override
 public String toString() {
  return "Student [name=" + name + ", age=" + age + "]";
 }

}

public class test {
 public static void main(String[] args) throws IOException, ClassNotFoundException {
  //创建Student类的实例
  Student s = new Student("wang",19);
  //创建序列化流
  ObjectOutputStream oos = new ObjectOutputStream(new FileOutputStream("f://b.txt"));
     //public final void writeObject(Object obj)
        //调用序列化流的写入方法,当写入完成后打开文件发现根本看不懂
  oos.writeObject(s);
        oos.close();
        创建反序列化流
        ObjectInputStream ois = new ObjectInputStream(new FileInputStream("f://b.txt"));
     //调用反序列化流的读取方法
        Object o=ois.readObject();
     ois.close();
     //打印该实例。此实例的类重写了toString()方法
     System.out.println(o);
 }
}
一个可序列化的类有多个父类(直接或者间接),当要序列化这些流的时候。这些父类要么也是可序列化的,要么就是有无参构造器的,否则,反序列化会出错
因为反序列化对象时,无须通过构造器来初始化Java对象。而我们知道,初始化子类时父类也要初始化。所以父类要么可以序列化要么有无参构造。如果,父类不可序列化。只有无参构造,那么父类的Filed值不会流入序列化二进制文件中
Java序列化机制采用了一种特殊的序列化算法:
每个保存到磁盘中的对象都有一个序列化编号。
每次序列化某个对象时程序先检查此对象是否被序列化过,如果已经序列化过了,就直接输一个序列化编号,而不是再次重新序列化一次。
这儿有一个潜在的问题:当序列化某个可变对象时,只有第一次使用writeObject()方法输出时会将该对象转换成字节码序列输出,当程序再次调用writeObject()方法时,程序只是输出前面的序列化编号,即使后面对象的Filed值变了,改变的值也不会被输出.
自定义序列化:
一个类有某些信息是敏感的如银行账户信息等,我们不希望它被序列化的时候在该Filed前加transient关键字修饰。此时反序列化时它为0
private transient double password;每次通过反序列化来恢复Java对象时,不会再执行它的构造方法。反序列化出来的对象与之前的对象有相同的实例变量但他们并不是同一个对象。
在类中增加readResolve()方法,当程序反序列化的时候生成的对象为同一个对象。在创建单例类时要注意
private Object readResolve(){
return instance //单例类中肯定申明了一个此类的实例 作为这个方法返回这个实例
}
关于字节流和字符流的区别
实际上字节流在操作的时候本身是不会用到缓冲区的,是文件本身的直接操作的,但是字符流在操作的 时候下后是会用到缓冲区的,是通过缓冲区来操作文件的。
比如你将字符流的.close();注释掉,则在此实例下的使用内容都不能写入,但通过 .flush();刷新缓冲区可以写入!而使用字节流的话,文件依然存在。
使用字节流好还是字符流好呢?
答案是字节流。首先因为硬盘上的所有文件都是以字节的形式进行传输或者保存的,包括图片等内容。但是字符只是在内存中才会形成的,所以在开发中,字节流使用广泛。
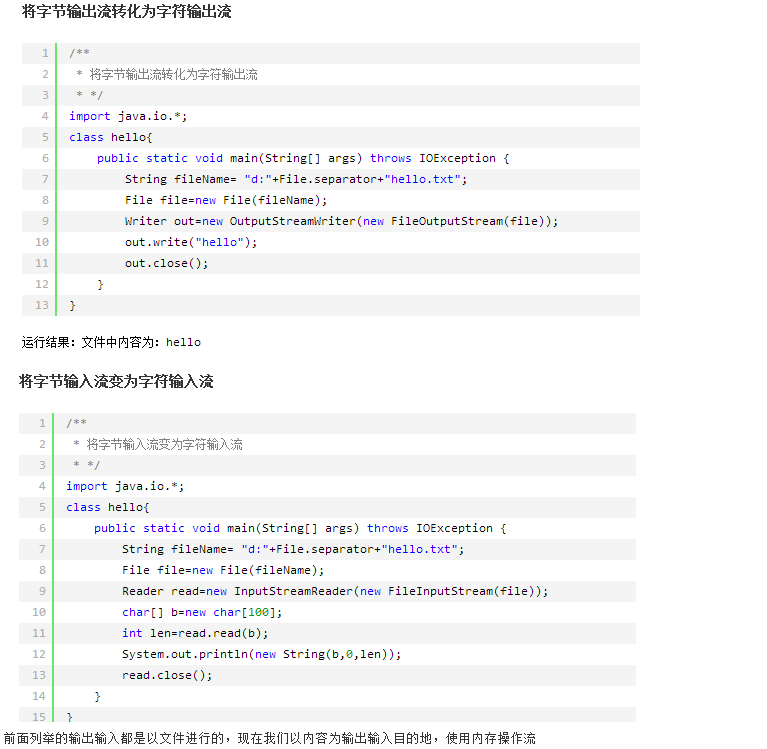
OutputStreramWriter 和InputStreamReader类
转换流:
* InputStreamReader 是字节流通向字符流的桥梁
* OutputStreamWriter 是字符流通向字节流的桥梁。
BufferedReader br = new BufferedReader(new InputStreamReader(System.in));
OutputStreramWriter将输出的字符流转化为字节流
InputStreamReader 将输入的字节流转换为字符流
但是不管如何操作,最后都是以字节的形式保存在文件中的。

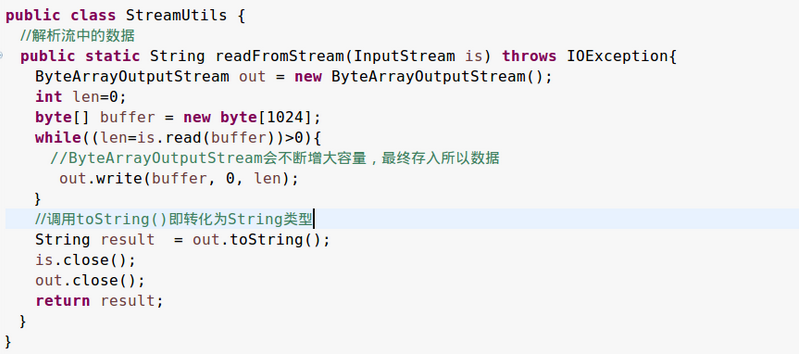
ByteArrayInputStream 主要将内容写入内容
ByteArrayOutputStream 主要将内容从内存输出
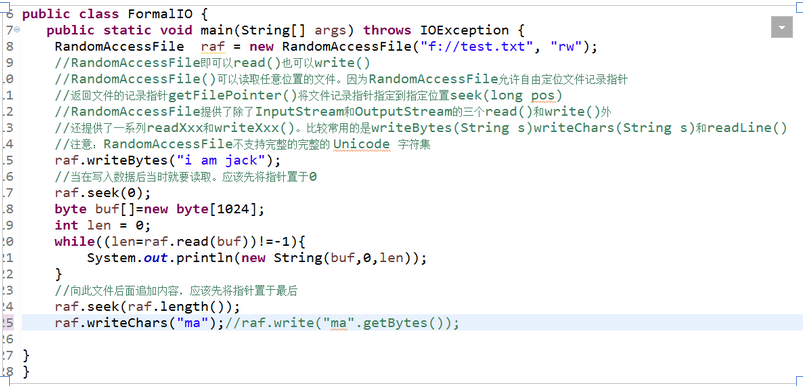
1)使用RandomAccessFile写入文件:
RandomAccessFile此类的实例支持对随机访问文件的读取和写入:
构造方法:
  RandomAccessFile(File fileName,String mode);
  RandomAccessFile(String fileName,String mode);
public class Test{
public static void main(String args[]) throws IOException{
File file = new File("D:"+File.separator+"hello.txt");
RandomAccessFile demo = new RandomAccessFile(file,"rw");
demo.writeBytes("Hello world");
demo.close();
}
}
注意:RandomAccessFile不能向文件的指定位置处追加内容。因为追加的内容会覆盖掉后面的
因此,我们要实现追加功能就必须先追加位置后面的元素保存在一个临时缓冲区内,最后在进行写入:
public class ToAppend {
    public static void main(String[] args) throws IOException {
     //通过File类的创建临时文件createTempFile(String prefix, String suffix)
   File f = File.createTempFile("tmp", null);
   //当jvm退出时,删除此文件
   f.deleteOnExit();
   //生成要追加到指定位置文件的RandomAccessFile类的实例
   RandomAccessFile raf= new RandomAccessFile("f://test.txt", "rw");
   //使用seek(long pos)将指针移动到要追加的指定地点
   raf.seek(3);
   //生成临时文件的RandomAccessFile  其实这个也可以使用FileInputStream和FileOutputStream来完成
   RandomAccessFile temp = new RandomAccessFile(f,"rw");
   //将指定位置后的数据全部取出然后写入到指定的临时文件中
      byte buf[]=new byte[1024];
   int lin = 0;
      while((lin=raf.read(buf))!=-1){
       temp.write(buf,0,lin);
       System.out.println(new String(buf,0,lin));
      }
      //此时源文件的指针也移动到了最后,要重新seek(long pos)移动指针到要追加的指定位置
      raf.seek(3);
      //添加要追加的数据,此时,此位置后面的相同长度的数据都被此数据覆盖
      raf.write("love".getBytes());
      //由于之前我们向临时文件中写入了数据。指针位置移动到了最后,此时我们需要将临时文件的指针设置为0
   temp.seek(0);
   //将临时文件中的内容写入到源文件中
      raf.seek(raf.length());
      while((lin=temp.read(buf))!=-1){
       raf.write(buf,0,lin);
       System.out.println(new String(buf,0,lin));
      }

 }
}
上面这个程序还有个小问题,那就是。插入的时候只会覆盖插入的长度,而我们在插入之后追加了全部是元素。


 285
285

 被折叠的 条评论
为什么被折叠?


