


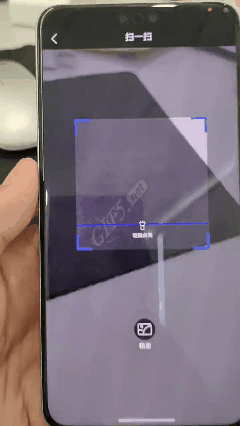
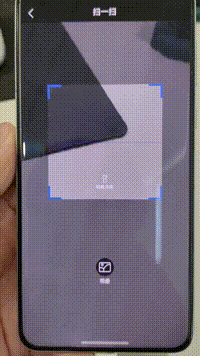
简述:在开发项目的过程中,系统给我们提供的的很多ui界面经常不满足我们的业务需求,这样就需要我们自己来定义很多ui组件。目前我在开发鸿蒙(api 11)项目的时候就发现鸿蒙官网提供的原生扫码页面并不能满足我们的业务需求,这就需要们自己自定义扫码页面。先来看看我自己写的自定义扫码页面的效果:
实现步骤:
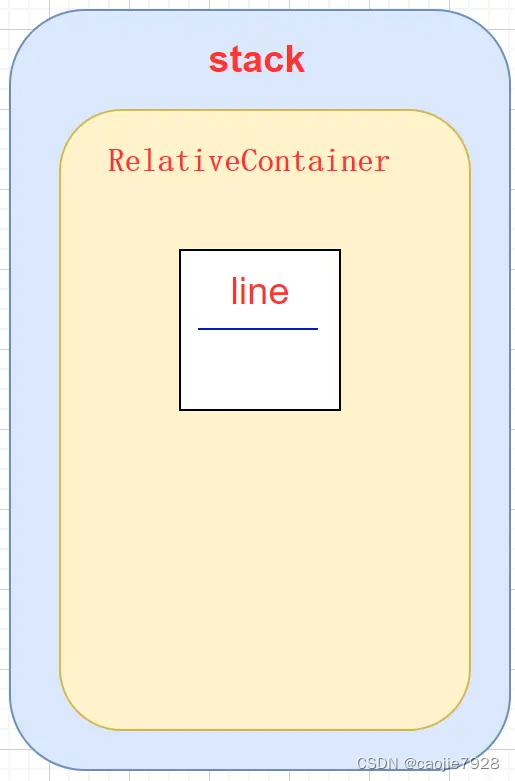
1.绘制页面相机数据预览组件和遮罩组件
先说明下页面的整体层级,直接上图:
大致代码如下:
 Stack() {


    XComponent({
      id: 'componentId',
      type: 'surface',
      controller: this.mXComponentController
    }).onLoad(() => {

      // 获取XComponent的surfaceId
      this.surfaceId = this.mXComponentController.getXComponentSurfaceId();

      // 设置ViewControl相应字段
      this.viewControl = {
        width: 1080,
        height: 1920,
        surfaceId: this.surfaceId,
      };
      this.isLoaded = true;
      // customScan.start(this.viewControl, this.callback);
      this.alpha = 0;
      this.translateXY = {
        x: 0,
        y: px2vp(this.screenWidth * this.scanRectSize),
        z: 0
      }
    }).backgroundColor(Color.Transparent)
      .position({ x: 0, y: 0 })


    RelativeContainer() {

      Row()
        .width("100%")
        .height(this.scanRectMarginTop * px2vp(this.screenHeight))
        .backgroundColor("#60000000")
        .alignRules({
          top: { anchor: '__container__', align: VerticalAlign.Top },
          left: { anchor: '__container__', align: HorizontalAlign.Start }
        })
        .id("topRect")


      Row()
        .width(((1 - this.scanRectSize) / 2.0) * px2vp(this.screenWidth))
        .height(this.scanRectSize * px2vp(this.screenWidth))
        .backgroundColor("#60000000")
        .alignRules({
          top: { anchor: 'topRect', align: VerticalAlign.Bottom },
          left: { anchor: 'topRect', align: HorizontalAlign.Start }
        })
        .id('leftRect')
      Row()
        .width(((1 - this.scanRectSize) / 2.0) * px2vp(this.screenWidth))
        .height(this.scanRectSize * px2vp(this.screenWidth))
        .backgroundColor("#60000000")
        .alignRules({
          top: { anchor: 'topRect', align: VerticalAlign.Bottom },
          right: { anchor: 'topRect', align: HorizontalAlign.End }
        })
        .id('rightRect')

      Row()
        .width("100%")
        .height("100%")
        .backgroundColor("#60000000")
        .alignRules({
          top: { anchor: 'topRect', align: VerticalAlign.Bottom },
          left: { anchor: 'topRect', align: HorizontalAlign.Start }
        })
        .margin({ top: this.scanRectSize * px2vp(this.screenWidth) })
        .id("bottomRect")
      if (this.scanAnimation == ScanAnimation.OPACITY) {
        Line()
          .width(this.scanRectSize * px2vp(this.screenWidth))
          .height(1)
          .backgroundColor(Color.Blue)
          .alignRules({
            top: { anchor: 'topRect', align: VerticalAlign.Bottom },
            middle: { anchor: '__container__', align: HorizontalAlign.Center },
          })
          .margin({ top: (this.scanRectSize * px2vp(this.screenWidth)) / 2 })
          .opacity(this.alpha)
          .animation({
            duration: 800,
            iterations: (this.onShow ? -1 : 0), // 设置-1表示动画无限循环
            curve: Curve.FastOutLinearIn,
            playMode: PlayMode.Normal,

          })
          .id("line")
      } else {
        Line()
          .width(this.scanRectSize * px2vp(this.screenWidth))
          .height(1.5)
          .backgroundColor(Color.Blue)
          .alignRules({
            top: { anchor: 'topRect', align: VerticalAlign.Bottom },
            middle: { anchor: '__container__', align: HorizontalAlign.Center },
          })
          .translate(this.translateXY)
          .animation({
            duration: 1500,
            iterations: (this.onShow ? -1 : 0), // 设置-1表示动画无限循环
            curve: Curve.Linear,
            playMode: PlayMode.Alternate,

          })
          .id("line")
      }


      ScanTopLeftRect().alignRules({
        top: { anchor: 'topRect', align: VerticalAlign.Bottom },
        left: { anchor: 'leftRect', align: HorizontalAlign.End }
      }).id('scanTopLeftRect')

      ScanTopRightRect().alignRules({
        top: { anchor: 'topRect', align: VerticalAlign.Bottom },
        right: { anchor: 'rightRect', align: HorizontalAlign.Start }
      }).id('scanTopRightRect')

      ScanBottomLeftRect().alignRules({
        bottom: { anchor: 'bottomRect', align: VerticalAlign.Top },
        left: { anchor: 'leftRect', align: HorizontalAlign.End }
      }).id('ScanBottomRightRect')

      ScanBottomRightRect().alignRules({
        bottom: { anchor: 'bottomRect', align: VerticalAlign.Top },
        right: { anchor: 'rightRect', align: HorizontalAlign.Start }
      }).id('scanBottomRightRect')

      Column() {
        Image($r('app.media.icon_scan_lamp'))
          .width(20)
          .height(20)

        Text(this.lampIsOpen ? "轻触关灯" : "轻触点亮")
          .margin({
            top: 4
          })

          .fontColor(Color.White)
          .fontSize(10)
      }.alignRules({
        top: { anchor: 'topRect', align: VerticalAlign.Bottom },
        middle: { anchor: '__container__', align: HorizontalAlign.Center },

      })
      .margin({
        top: 0.78 * this.scanRectSize * px2vp(this.screenWidth),

      })
      .id("lamp")
      .onClick(() => {
        this.lampIsOpen = !this.lampIsOpen;
      })

    }.backgroundColor(Color.Transparent)
  }.alignContent(Alignment.Top)

}
以上代码大思路就是先用最底层运用Stack容器最为最底部容器 ,然后在stack容器上面盖上相机数据预览预览组件XComponent ,再接着用在预览组件
上面铺上透明的RelativeContainer容器,最后在RelativeContainer容器上拼接遮罩层来空出扫码区域,这样就简单的实现了上面扫一扫页面绘制,流程比较简单这里就不过多阐述。
这里需要注意一个点就是XComponent UI组件的.onLoad()的执行是有延时的,有点类似Android的SurfaceViewde 初始化,所以我们一定要在
XComponent的onLoad()组件方法调用完毕后才能启动扫码相机,不然surfaceId可能就是undefine了。
2.初始化相机
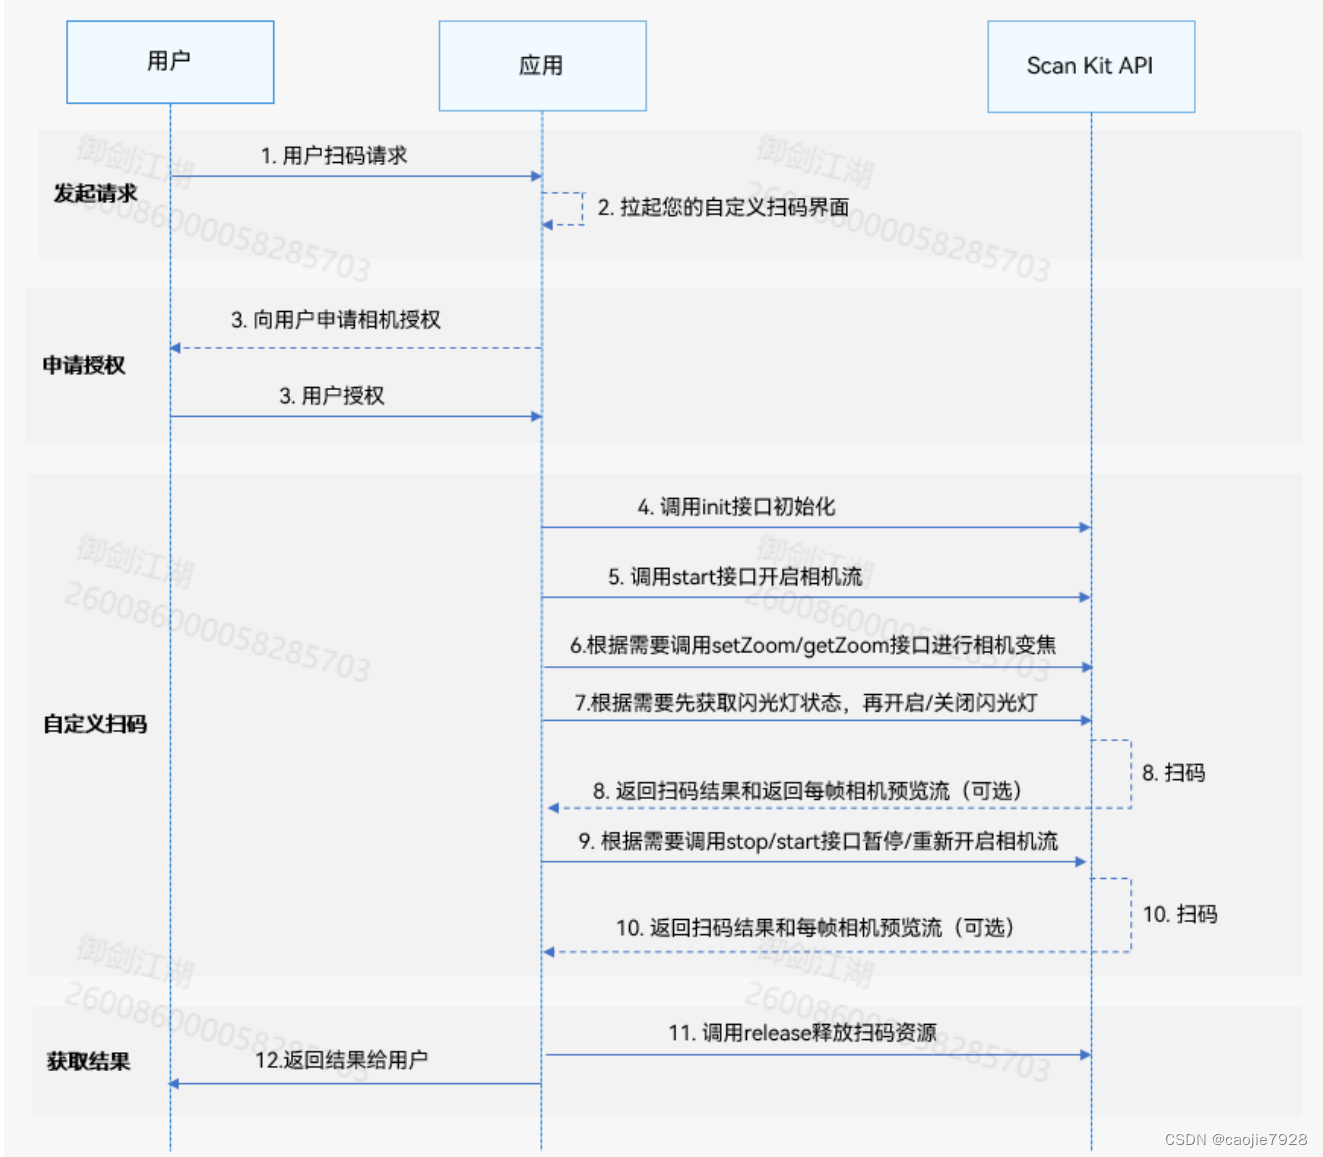
扫码相机的大体工作流程如下(来源于鸿蒙官网)
相机的初始化比较简单 大致代码如下:
if (canIUse('SystemCapability.Multimedia.Scan.Core')) {
  let options: scanBarcode.ScanOptions = {
    scanTypes: [scanCore.ScanType.ALL],
    enableMultiMode: false,
    enableAlbum: true
  };
  //初始化相机
  customScan.init(options)
  //打开相机
  customScan.start(this.viewControl, this.callback);
} else {
  promptAction.showToast({message:'该设备不支持扫码能力',duration:1000});

  return
}
开启相机前需要动态获取Camera权限
3.启动相机并设置回调参数并识别扫码区域
由于本人在鸿蒙的官网上找了很久并没有找到扫码区域的识别api,好在鸿蒙系统在二维码识别成功后返回的结果中给了二维码在屏幕中的坐标位置,
这里我就用了一种比较笨的方式实现了在扫码范围内识别二维码的功能,只是这种方式对性能不太友好,如果哪位大佬有更好的实现方式欢迎告知。
具体代码如下
private callback: AsyncCallback<scanBarcode.ScanResult[]> =
  async (error: BusinessError, result: scanBarcode.ScanResult[]) => {

    if (error) {
      hilog.error(0x0001, TAG, `callback failed, code: ${error.code}, message: ${error.message}`);
      if (this.resultCallback != undefined) {
        this.resultCallback(error.message, error.code);
      }
      this.restartScanCamera()
      return;
    }

    hilog.info(0x0001, TAG, `Succeeded in callback, result: ${JSON.stringify(result)}`);
    if (result != undefined) {
      let scanCodeRect = result[0]?.scanCodeRect;
      if (scanCodeRect != undefined && this.isInScanRect(scanCodeRect.left, scanCodeRect.top, scanCodeRect.right, scanCodeRect.bottom)) {
        YTLog.info("SCANRECT", "" + this.isInScanRect(scanCodeRect.left, scanCodeRect.top, scanCodeRect.right, scanCodeRect.bottom))
        YTLog.info("SCANRECT", "letf:" + this.scanRectLeftBoundary + ",top:" + this.scanRectTopBoundary + ",right:" + this.scanRectRightBoundary + ",bottom:" + this.scanRectBottomBoundary)
        YTLog.info("SCANRECT", "" + JSON.stringify(result))
        this.avPlay.avPlayerFdSrc("beep.ogg")
        if (this.resultCallback != undefined) {
          if (result[0]?.originalValue != undefined) {

            this.resultCallback(result[0]?.originalValue, 0);
          } else {
            this.resultCallback("scan error", -1);
          }

        }
      } else {

        // this.restartScanCamera()

        // customScan.stop().then(() => {
        //   hilog.info(0x0001, '[Scan Sample]', 'stop succeeded!');
        //
        //   customScan.start(this.viewControl, this.callback);
        //
        //
        // }).catch((error: BusinessError) => {
        //   hilog.error(0x0001, '[Scan Sample]', `stop failed business error, code: ${error.code}, message: ${error.message}`);
        // });
      }
    } else {

      // this.restartScanCamera()
      // customScan.stop().then(() => {
      //   hilog.info(0x0001, '[Scan Sample]', 'stop succeeded!');
      //   customScan.start(this.viewControl, this.callback);
      // }).catch((error: BusinessError) => {
      //   hilog.error(0x0001, '[Scan Sample]', `stop failed business error, code: ${error.code}, message: ${error.message}`);
      // });
    }

    this.restartScanCamera()
  }
这段代码大体思路是扫码回调函数中获取二维码在屏幕中的位置,如果识别的二维码在我们绘制的扫码识别区内,那么我们就将这个二维码的信息通过回调函数传递出去,反之我们过滤掉本次扫码结果,然后关闭扫码相机然后重新启动扫码相机,如此循环,直到找到区域内的二维码为止。这种方式对性能不太友好,如果各位有什么更好的实现方式,欢迎告知。
最后附上源码的地址:harmony_scan: 鸿蒙的自定义扫一扫


 924
924

 被折叠的 条评论
为什么被折叠?
被折叠的 条评论
为什么被折叠?
 到【灌水乐园】发言


