


http://blog.csdn.net/tsyj810883979/article/details/6876594
一.基本概念
IO 是主存和外部设备 ( 硬盘、终端和网络等 ) 拷贝数据的过程。 IO 是操作系统的底层功能实现,底层通过 I/O 指令进行完成。
所有语言运行时系统提供执行 I/O 较高级别的工具。在java编程中,标准低版本IO使用流的方式完成I/O操作,所有的I/O都被视为单个的字节流动,称为一个Stream的对象一次移动一个字节。
NIO是在JDK1.4之后出现的一种新的IO,sun官方标榜的nio有如下特性:
- 为所有的原始类型提供(Buffer)缓存支持;
- 字符集编码解决方案(Charset);
- Channel : 一个新的原始I/O抽象;
- 支持锁和内存映射文件的文件访问接口;
- 提供多路(non-bloking)非阻塞式的高伸缩性网路I/O。
NIO包(java.nio.*)引入了四个关键的抽象数据类型,它们共同解决传统的I/O类中的一些问题。
1. Buffer:它是包含数据且用于读写的线形表结构。其中还提供了一个特殊类用于内存映射文件的I/O操作。
2. Charset:它提供Unicode字符串影射到字节序列以及逆影射的操作。
3. Channels:包含socket,file和pipe三种管道,它实际上是双向交流的通道。
4. Selector:它将多元异步I/O操作集中到一个或多个线程中。
二.Buffer & Channel(缓冲区与通道)
缓冲区和通道是NIO中的核心对象,通道Channel是对原IO中流的模拟,所有数据都要通过通道进行传输;Buffer实质上是一个容器对象,发送给通道的所有对象都必须首先放到一个缓冲区中。
1. Bufer是什么?类图结构?JDK中如何实现?方法介绍?
(1)Buffer是什么?
Bufer是一个对象,它包含要写入或者刚读出的数据。这是NIO与IO的一个重要区别,在面向流的I/O中您将数据直接写入或者将数据直接读到stream中。在 NIO 库中,所有数据都是用缓冲区处理的。在读取数据时,它是直接读到缓冲区中的。在写入数据时,它是写入到缓冲区中的。任何时候访问 NIO 中的数据,您都是将它放到缓冲区中。
缓冲区实质上是一个数组。通常它是一个字节数组,但是也可以使用其他种类的数组。但是一个缓冲区不仅仅是一个数组。缓冲区提供了对数据的结构化访问,而且还可以跟踪系统的读/写进程。
简单的说Buffer是:一块连续的内存块,是NIO数据读或写的中转地。
(2)Buffer的类图结构
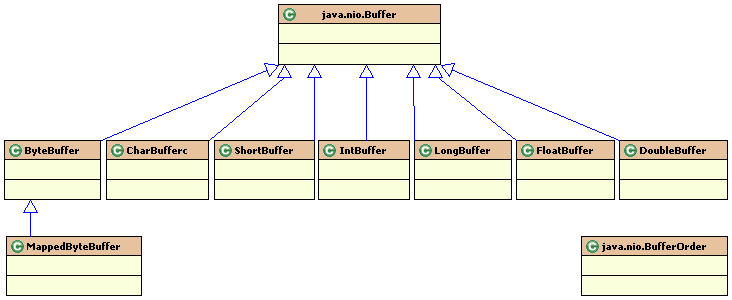
从类图可以看出NIO为所有的原始数据类型实现了Buffer缓存的支持。并且看JDK_API可以得知除了ByteBuffer中的方法有所不同之外,其它类中的方法基本相同。
可以看出MappedByteBuffer是ByteBuffer的直接子类,并且在API中可以看到这样一句话A direct byte buffer whose content is a memory-mapped region of a file.支持文件内存映射。
(3)Buffer在JDK中是如何实现的?
查看JDK源码可以知道,Buffer类是一个抽象类,其中有五个属性,分别是mark、position、limit、capacity、address。并且可以看到这样一行注释:
//Invariants:mark<=position<=limit<=capacity
一个 buffer 主要由 position、limit、capacity 三个变量来控制读写的过程。这三个变量在读和写时分别代表的含义如下:
| 参数 | 写模式 | 读模式 |
| position | 当前写入的单位数据的数量 | 当前读入的单位数据的数量 |
| limit | 代表最多能写多少单位的数据量,默认和capacity一致 | 代表最多能读多少单位的数据量,和之前写入的数据量一致 |
| capacity | Buffer的容量 | Buffer的容量 |
Buffer抽象类并没有指定Buffer的实现方式,看其子类可以发现,比如ByteBuffer中多出几个属性,其中有个final byte[]类型的属性,可知Buffer其实是用数组实现的。
(4)Buffer中的一些方法?
最基本的对应属性操作的方法,在JDK中不是使用set和get方法,查看源码知道要得到当前Buffer的limit值使用public final int limit()方法,设定limit的值使用public final Buffer limit(int)方法,其它属性有对应的方法。
public final Buffer flip() : 用于将写模式转换成读模式
limit = position; //将limit设置为刚才写入的位置
position = 0; //将position设置为0从头开始读
mark = -1;
return this;
public final Buffer clear() : 用于清空缓冲区,准备再次被写入,limit设置为capacity,position设置为0
public final Buffer rewind() : 源码实现为position=0,mark=-1。目的是为了重复读。
public final int remaining() : 一句代码return limit - position;
public final int hasRemaining() : 一句代码return limit > position;
继承自Buffer的重要类ByteBuffer类中的方法:
首先可以看到在ByteBuffer类中多了三个属性,一个byte数组型的,一个int型的offset,还有一个boolean型的isReadOnly,两个构造函数均是Package-private型的。
可以使用一下方法产生一个ByteBuffer对象:
方法一:ByteBuffer bbuf = ByteBuffer.allocate(1024);
查看源码知道allocate执行这样一句话:
return new HeapByteBuffer(int capacity, int capacity);
而HeapByteBuffer又是ByteBuffer的子类,并且在HeapByteBuffer的构造方法中执行的是这样一个语句:
super(-1, 0, lim, cap, new byte[cap], 0);
也就是说调用的还是ByteBuffer中的构造方法,包范围内使用。这个方法做了如下工作,首先调用Buffer的构造方法,依次初始化mark、position、limit、capacity,然后初始化ByteBuffer的属性byte数组,接着初始offset,这样使用allocate方法就可以构造出一个ByteBuffer对象了。
方法二:ByteBuffer bbuf = ByteBuffer.wrap(new Byte[1024] array, 0, 1024);
这个方法比较好用的一点是当这个Byte数组已经存在的话,直接传入这个Byte数组,然后传入起始值和结束值即可。默认wrap实现是初始值传入为0,结束值传入为Byte数组的长度array.length。
ByteBuffer类中其它重要方法:
get(byte[] dst) 或者 get(byte[] dst, int offset, int len)
(该方法是用来获取当前ByteBuffer中的指定位置的数据并赋值给dst,最终返回当前对象本身。方法实现时第一步检查参数是否合法,调用的是checkBounds静态包范围私有方法。然后检查len是否大于remaining,接着对dst数组循环赋值,最终返回该对象。)
put(byte[] src) 或者 put(byte[] src, int offerset, int len)
(该方法和上面的一对get方法类似,功能是将已有的byte数组从0位置开始放入当前的ByteBuffer中,最终返回ByteBuffer本身。)
put(ByteBuffer src)
(该方法将src的remaining逐个放入当前ByteBuffer中,最终返回当前ByteBuffer。)
除此之外还有类型化的get方法,例如getInt(), getFloat(), getShort()等。
(5)Buffer的更多内容?
缓冲区分片:slice()方法根据现有的缓冲区创建一种子缓冲区,新的缓冲区与原缓冲区共享部分数据。
只读缓冲区:可以通过调用缓冲区的 asReadOnlyBuffer() 方法,将任何常规缓冲区转换为只读缓冲区,这个方法返回一个与原缓冲区完全相同的缓冲区(并与其共享数据),只不过它是只读的。只读缓冲区对于保护数据很有用。没有办法将只读缓冲区改变为可写的。
下面例子对缓冲区进行分片,并操作数据:
//产生一个ByteBuffer实例
ByteBuffer buffer = ByteBuffer.allocate( 10 );
//对该ByteBuffer实例进行初始化
for (int i=0; i<buffer.capacity(); ++i) {
buffer.put( (byte)i );
}
//修改buffer的position(起点)和limit(终点)
buffer.position( 3 );
buffer.limit( 7 );
//对缓冲区进行分片
ByteBuffer slice = buffer.slice();
//对分片的数据进行操作
for (int i=0; i<slice.capacity(); ++i) {
byte b = slice.get( i );
b *= 11;
slice.put( i, b );
}
//重新定位并输出结果
buffer.position( 0 );
buffer.limit( buffer.capacity() );
while (buffer.remaining()>0) {
System.out.println( buffer.get() );
}
直接或者间接缓冲区:直接缓冲区可以加快I/O的读写速度,使用allocateDirect(int capacity)产生一个直接缓冲区。
内存映射文件:下面代码将一个 FileChannel (它的全部或者部分)映射到内存
中。将文件的前1024个字节映射到内存中:
MappedByteBuffer mbb = fc.map( FileChannel.MapMode.READ_WRITE, 0, 1024 );
1. Channel是什么?类图结构?JDK中如何实现?方法介绍?
(1)Channel是什么?
Channel 是一个对象,可以通过它读取和写入数据。拿 NIO 与原来的 I/O 做个比较,通道就像是流。
正如前面提到的,所有数据都通过 Buffer 对象来处理。您永远不会将字节直接写入通道中,相反,您是将数据写入包含一个或者多个字节的缓冲区。同样,您不会直接从通道中读取字节,而是将数据从通道读入缓冲区,再从缓冲区获取这个字节。
简单的说Channel是:数据的源头或者数据的目的地,用于向buffer提供数据或者读取buffer数据,并且对I/O提供异步支持。
(2)Channel的类图结构?

java.nio.channels.Channel是一个公共的接口,所有子Channel均实现了该接口,在java.nio.channels包中还实现了Channels、FileLock、SelectionKey、Selector、Pipe等比较好用的类。包含socket,file和pipe三种管道,它实际上是双向交流的通道。
(3)Channel在JDK中是如何实现的?
在Channel接口中共定义了两个方法
public boolean isOpen(); //Tells whether or not this channel is open
public void close() throws IOException(); //Close this channel
FileChannel : 使用以下三个方法可以得到一个FileChannel的实例
FileInputStream.getChannel()
FileOutputStream.getChannel()
RandomAccessFile.getChannel()
上面提到Channel是数据的源头或者数据的目的地,用于向bufer提供数据或者从buffer读取数据。那么在实现了该接口的子类中应该有相应的read和write方法。
在FileChannel中有以下方法可以使用:
public long read(ByteBuffer[] dsts)
Reads a sequence of bytes from this channel into the given buffers.
public long write(ByteBuffer[] srcs)
Writes a sequence of bytes to this channel from the given buffers.
附加:文件锁定
FileChannel提供两种方法获得FileLock
FileLock lock();
FileLock lock(long position, long size, boolean size);
使用方法举例:
要获取文件的一部分上的锁,您要调用一个打开的 FileChannel 上的 lock() 方法。注意,如果要获取一个排它锁,您必须以写方式打开文件。
RandomAccessFile raf = new RandomAccessFile( "filelocks.txt", "rw" );
FileChannel fc = raf.getChannel();
FileLock lock = fc.lock( start, end, false );
在拥有锁之后,您可以执行需要的任何敏感操作,然后再释放锁:
lock.release();
SocketChannel : 使用以下两个方法得到一个SocketChannel的实例
SocketChannel.open(); //打开一个socket channel
SocketChannel.open(SocketAddress remote);
//调用上面的方法,并connect(remote)
例子代码:
InetSocketAddress socketAddress = new InetSocketAddress(“www.baidu.com”,80);
SocketChannel sc = SocketChannel.open(socketAddress);
sc.read(buffer);
buffer.flip();
buffer.clear();
sc.write(bufer);
DatagramChannel : 与其它的Channel有相同或者相似的方法。
http://blog.csdn.net/tsyj810883979/article/details/6876599
三.Charset(字符集)
在java.nio.charset包中共提供了Charset、CharsetDecoder、CharsetEncoder、CodeResult、CodingErrorAction五个类,均继承自Object类,其中Charset实现了Comparable接口,其它类均为自身实现。
Java中的字符使用unicode编码,每个字符占用两个字节。字节码本身只是一些数字,放在正确的上下文中可以被正确的解析。向ByteBuffer中存放数据时需要考虑字符集的编码方式,从中读取时需要考虑字符集的解码。
要读和写文本需要分别使用CharsetDecoder(解码器)和CharsetEncoder(编码器)。
编码:百科中这样定义,编码(coding)是在一个主题或单元上为数据存储,管理和分析的目的而转换信息为编码值(典型地如数字)的过程。在密码学中,编码是指在编码或密码中写的行为。n位二进制数可以组合成2的n次方个不同的信息,给每个信息规定一个具体码组,这种过程也叫编码。数字系统中常用的编码有两类,一类是二进制编码,另一类是二—十进制编码。
(1)如何得到一个CharSet?
在JDK源码中提供两种方式得到一个CharSet实例:
CharSet cs = CharSet.forName(“编码方式”);
CharSet cs = CharSet.defaultCharSet();
第一种方法返回一个指定字符格式的CharSet,第二种方法返回当前虚拟机默认的字符编码格式的CharSet。
(2)如何使用CharSet?
得到一个CharSet实例后,我们需要创建一个编码器和一个解码器,使用下面方法进行创建:
CharSetDecoder decoder = cs.newDecoder();
CharSetEncoder encoder = cs.newEncoder();
接着我们把ByteBuffer传递给decoder进行编码,返回一个CharBuffer:
CharBuffer cb = decoder.decode(inputData);
然后我们可以使用encoder进行解码返回一个ByteBuffer:
ByteBuffer outputData = encoder.encode(cb);
接下来可以进行写等其它操作。
四.Selector(异步IO)
异步IO是一种没有阻塞的读写数据的方法,通常,在代码进行 read() 调用时,代码会阻塞直至有可供读取的数据。同样,write() 调用将会阻塞直至数据能够写入。
异步 I/O 的一个优势在于,它允许您同时根据大量的输入和输出执行 I/O。同步程序常常要求助于轮询,或者创建许许多多的线程以处理大量的连接。使用异步 I/O,您可以监听任何数量的通道上的事件,不用轮询,也不用额外的线程。
异步 I/O 中的核心对象名为 Selector。Selector 就是您注册对各种 I/O 事件的地方,而且当那些事件发生时,就是这个对象告诉您所发生的事件。
第一步:创建一个Selector
Selector selector = Selector.open();
第二步:打开一个远程连接
InetSocketAddress socketAddress =
new InetSocketAddress("www.baidu.com", 80);
SocketChannel sc = SocketChannel.open(socketAddress);
sc.configureBlocking(false);
第三步:选择键,注册
SelectionKey key = sc.register(selector, SelectionKey.OP_CONNECT);
注册时第一个参数总是当前的这个selector。
注册读事件:SelectionKey key = sc.register(selector, SelectionKey.OP_READ);
注册写事件:SelectionKey key = sc.register(selector, SelectionKey.OP_WRITE);
第四步:内部循环处理
int num = selector.select();
Set selectedKeys = selector.selectedKeys();
Iterator it = selectedKeys.iterator();
while (it.hasNext()) {
SelectionKey key = (SelectionKey)it.next();
// ... deal with I/O event ...
}
首先,我们调用 Selector 的 select() 方法。这个方法会阻塞,直到至少有一个已注册的事件发生。当一个或者更多的事件发生时, select() 方法将返回所发生的事件的数量。该方法必须首先执行。
接下来,我们调用 Selector 的 selectedKeys() 方法,它返回发生了事件的 SelectionKey 对象的一个 集合 。
我们通过迭代 SelectionKeys 并依次处理每个 SelectionKey 来处理事件。对于每一个 SelectionKey,您必须确定发生的是什么 I/O 事件,以及这个事件影响哪些 I/O 对象。
第五步:监听事件并做出处理
SelectionKey中共定义了四种事件,OP_ACCEPT(socket accept)、OP_CONNECT(socket connect)、OP_READ(read)、OP_WRITE(write)。
第六步:删除处理过的SelectionKey
在处理 SelectionKey 之后,我们几乎可以返回主循环了。但是我们必须首先将处理过的 SelectionKey 从选定的键集合中删除。
如果我们没有删除处理过的键,那么它仍然会在主集合中以一个激活的键出现,这会导致我们尝试再次处理它。
我们调用迭代器的 remove() 方法来删除处理过的 SelectionKey:it.remove();
实现一:使用nio实现文件复制
- package study.nio;
- import java.io.File;
- import java.io.FileInputStream;
- import java.io.FileOutputStream;
- import java.io.FileNotFoundException;
- import java.io.IOException;
- import java.nio.channels.FileChannel;
- import java.nio.ByteBuffer;
- public class TestCopyFile {
- public static void main(String[] args) throws IOException {
- //调用FileManager类的copyFile静态方法
- FileManager.copyFile(new File("src.txt"), new File("dst.txt"));
- }
- }
- class FileManager {
- //把可能出现的异常抛给上层调用者处理
- public static void copyFile(File src, File dst)
- throws FileNotFoundException, IOException {
- //得到一个源文件对应的输入通道
- FileChannel fcin = new FileInputStream(src).getChannel();
- //得到一个目标文件对应的输出通道
- FileChannel fcout = new FileOutputStream(dst).getChannel();
- //生成一个1024字节的ByteBuffer实例
- ByteBuffer buf = ByteBuffer.allocate(1024);
- while(fcin.read(buf) != -1) {
- buf.flip(); //准备写
- fcout.write(buf);
- buf.clear(); //准备读
- }
- }
- }
package study.nio;
import java.io.File;
import java.io.FileInputStream;
import java.io.FileOutputStream;
import java.io.FileNotFoundException;
import java.io.IOException;
import java.nio.channels.FileChannel;
import java.nio.ByteBuffer;
public class TestCopyFile {
	public static void main(String[] args) throws IOException {
		//调用FileManager类的copyFile静态方法
		FileManager.copyFile(new File("src.txt"), new File("dst.txt"));
	}
}
class FileManager {
	//把可能出现的异常抛给上层调用者处理
	public static void copyFile(File src, File dst)
			throws FileNotFoundException, IOException {
		//得到一个源文件对应的输入通道
		FileChannel fcin = new FileInputStream(src).getChannel();
		//得到一个目标文件对应的输出通道
		FileChannel fcout = new FileOutputStream(dst).getChannel();
		//生成一个1024字节的ByteBuffer实例
		ByteBuffer buf = ByteBuffer.allocate(1024);
		while(fcin.read(buf) != -1) {
			buf.flip();		//准备写
			fcout.write(buf);
			buf.clear();		//准备读
		}
	}

}
还可以使用下面方式进行操作,在FileChannel中有两个特殊方法可以允许我们直接将两个通道相连:
long transferFrom(ReadableByteChannel src, long position, long count);
long transferTo(long position, long count, WriteableByteChannel targets);
上面while循环可以替换为:
fcin.transferTo(0, fcin.size(), fcout); 或者 fcout.transferFrom(fcin, 0, fcin.size());
实现二:向一个空文件中写入some text,再以只读方式打开该文件,在尾部追加some more,最终将该文件内容输出。
- package study.nio;
- import java.io.File;
- import java.io.FileInputStream;
- import java.io.FileOutputStream;
- import java.io.RandomAccessFile;
- import java.nio.ByteBuffer;
- import java.nio.channels.FileChannel;
- public class GetChannel {
- //为了使代码明晰,暂不处理异常
- public static void main(String[] args) throws Exception {
- FileChannel fc = null;
- //向一个文件中写入文本
- fc = new FileOutputStream(new File("data.txt")).getChannel();
- fc.write(ByteBuffer.wrap("some text".getBytes()));
- fc.close();
- //以读写方式打开文件,并在尾部追加内容
- fc = new RandomAccessFile("data.txt", "rw").getChannel();
- fc.position(fc.size());
- fc.write(ByteBuffer.wrap("some more".getBytes()));
- fc.close();
- //将文件里的内容读出来
- fc = new FileInputStream("data.txt").getChannel();
- ByteBuffer buf = ByteBuffer.allocate(1024);
- fc.read(buf);
- buf.flip();
- while(buf.hasRemaining()) {
- System.out.print((char)buf.get());
- }
- }
- }
package study.nio;
import java.io.File;
import java.io.FileInputStream;
import java.io.FileOutputStream;
import java.io.RandomAccessFile;
import java.nio.ByteBuffer;
import java.nio.channels.FileChannel;

public class GetChannel {
	//为了使代码明晰,暂不处理异常
	public static void main(String[] args) throws Exception {
		FileChannel fc = null;
		//向一个文件中写入文本
		fc = new FileOutputStream(new File("data.txt")).getChannel();
		fc.write(ByteBuffer.wrap("some text".getBytes()));
		fc.close();
		//以读写方式打开文件,并在尾部追加内容
		fc = new RandomAccessFile("data.txt", "rw").getChannel();
		fc.position(fc.size());
		fc.write(ByteBuffer.wrap("some more".getBytes()));
		fc.close();
		//将文件里的内容读出来
		fc = new FileInputStream("data.txt").getChannel();
		ByteBuffer buf = ByteBuffer.allocate(1024);
		fc.read(buf);
		buf.flip();
		while(buf.hasRemaining()) {
			System.out.print((char)buf.get());
		}
	}
}
以上均使用的是字节操作流,与nio相一致。Reader和Writer这些字符模式类不能用于产生通道,但是java.nio.channels.Channels类中提供了实用方法,可以在通道中产生Reader和Writer。
Channels.newReader();
Channels.newWriter();
实现三:将一个大文件映射到内存并查找指定的文本内容是否在该文件中(曾记得李开复与微软的故事,当然李开复是从邮件中查找信息,并且邮件被截成了图片,⊙﹏⊙b汗)
- public class LargeMappedFiles {
- public static void main(String args[]) {
- try {
- File[] files = new File[] {new File("src1.txt"), new File("src2.txt")};
- ArrayList<String> ls = search(files, "something is wrong");
- for(int i=0; i<ls.size(); i++) {
- System.out.println(ls.get(i));
- }
- } catch (FileNotFoundException e) {
- e.printStackTrace();
- } catch (Exception e) {
- e.printStackTrace();
- }
- }
- //实现简单的内容检索
- private static ArrayList<String> search(File[] files, String text) throws Exception {
- //把检索结果放到一个list中
- ArrayList<String> result = new ArrayList<String>();
- //循环遍历文件
- for(File src : files) {
- //将整个文件映射到内存
- MappedByteBuffer dst = new RandomAccessFile(src, "rw")
- .getChannel()
- .map(FileChannel.MapMode.READ_WRITE, 0, src.length());
- //对字符进行解码
- String str = Charset.forName("UTF-8").decode(dst).toString();
- //准备进行读
- dst.flip();
- if(str.indexOf(text) != -1) {
- result.add(src.getName());
- }
- //准备写
- dst.clear();
- }
- return result;
- }
- }
public class LargeMappedFiles {
    public static void main(String args[]) {
        try {
        	File[] files = new File[] {new File("src1.txt"), new File("src2.txt")};
          ArrayList<String> ls = search(files, "something is wrong");
          for(int i=0; i<ls.size(); i++) {
          	System.out.println(ls.get(i));
          }
        } catch (FileNotFoundException e) {
            e.printStackTrace();
        } catch (Exception e) {
            e.printStackTrace();
        }
    }
    //实现简单的内容检索
    private static ArrayList<String> search(File[] files, String text) throws Exception {
    	//把检索结果放到一个list中
    	ArrayList<String> result = new ArrayList<String>();
    	//循环遍历文件
    	for(File src : files) {
    		//将整个文件映射到内存
    		MappedByteBuffer dst = new RandomAccessFile(src, "rw")
            .getChannel()
            .map(FileChannel.MapMode.READ_WRITE, 0, src.length());
        //对字符进行解码
        String str = Charset.forName("UTF-8").decode(dst).toString();
        //准备进行读
        dst.flip();
        if(str.indexOf(text) != -1) {
        	result.add(src.getName());
        }
        //准备写
        dst.clear();
    	}
    	return result;
    }
}
实现四:在前面的学习中了解到nio为所有原始数据类型提供了Buffer支持,并且在ByteBuffer中实现了asXBuffer()方法直接将一个ByteBuffer转换成其它类型的Buffer。本例实现数据类型的转换。
- import java.nio.IntBuffer;
- import java.nio.FloatBuffer;
- import java.nio.ByteBuffer;
- import java.util.Arrays;
- public class CastBuffer {
- static byte[] bytes = new byte[] {0, 1, 2, 3, 4, 5, 'a', 'b', 'c'};
- public static void main(String[] args) {
- ByteBuffer bBuf = ByteBuffer.wrap(bytes);
- System.out.println(Arrays.toString(bBuf.array()));
- //转换成IntBuffer
- IntBuffer iBuf = ((ByteBuffer)bBuf.rewind()).asIntBuffer();
- while(iBuf.hasRemaining()) {
- System.out.print(iBuf.get()+",");
- }
- //转换成FloatBuffer
- FloatBuffer fBuf = ((ByteBuffer)bBuf.rewind()).asFloatBuffer();
- while(fBuf.hasRemaining()) {
- System.out.print(fBuf.get()+",");
- }
- }
- }
import java.nio.IntBuffer;
import java.nio.FloatBuffer;
import java.nio.ByteBuffer;
import java.util.Arrays;

public class CastBuffer {
	static byte[] bytes = new byte[] {0, 1, 2, 3, 4, 5, 'a', 'b', 'c'};

	public static void main(String[] args) {
		ByteBuffer bBuf = ByteBuffer.wrap(bytes);
		System.out.println(Arrays.toString(bBuf.array()));
		//转换成IntBuffer
		IntBuffer iBuf = ((ByteBuffer)bBuf.rewind()).asIntBuffer();
		while(iBuf.hasRemaining()) {
			System.out.print(iBuf.get()+",");
		}
		//转换成FloatBuffer
		FloatBuffer fBuf = ((ByteBuffer)bBuf.rewind()).asFloatBuffer();
		while(fBuf.hasRemaining()) {
			System.out.print(fBuf.get()+",");
		}
	}
}
其它类型转换与上面方法类似,各种方法都相似。
实现五:统计一个单词可重复的英文文件(假设4G)中每个单词出现的次数,把结果按照英文排序放入一个文件中。并能够检索特定单词的出现次数。由于文件过大,不重复单词总数有限,需要考虑到执行速度和内存使用情况。(淘宝笔试技术题)
- import java.io.File;
- import java.io.FileNotFoundException;
- import java.io.FileOutputStream;
- import java.io.IOException;
- import java.io.RandomAccessFile;
- import java.nio.ByteBuffer;
- import java.nio.MappedByteBuffer;
- import java.nio.channels.FileChannel;
- import java.nio.channels.FileLock;
- import java.nio.charset.Charset;
- import java.util.HashMap;
- import java.util.Map;
- import java.util.StringTokenizer;
- import java.util.TreeMap;
- public class TestCountWords {
- public static void main(String[] args) {
- File wf = new File("words.txt");
- final CountWords cw1 = new CountWords(wf, 0, wf.length()/2);
- final CountWords cw2 = new CountWords(wf, wf.length()/2, wf.length());
- final Thread t1 = new Thread(cw1);
- final Thread t2 = new Thread(cw2);
- //开辟两个线程分别处理文件的不同片段
- t1.start();
- t2.start();
- Thread t = new Thread() {
- public void run() {
- while(true) {
- //两个线程均运行结束
- if(Thread.State.TERMINATED==t1.getState() && Thread.State.TERMINATED==t2.getState()) {
- //获取各自处理的结果
- HashMap<String, Integer> hMap1 = cw1.getResult();
- HashMap<String, Integer> hMap2 = cw2.getResult();
- //使用TreeMap保证结果有序
- TreeMap<String, Integer> tMap = new TreeMap<String, Integer>();
- //对不同线程处理的结果进行整合
- tMap.putAll(hMap1);
- tMap.putAll(hMap2);
- //打印输出,查看结果
- for(Map.Entry<String,Integer> entry : tMap.entrySet()) {
- String key = entry.getKey();
- int value = entry.getValue();
- System.out.println(key+":\t"+value);
- }
- //将结果保存到文件中
- mapToFile(tMap, new File("result.txt"));
- }
- return;
- }
- }
- };
- t.start();
- }
- //将结果按照 "单词:次数" 格式存在文件中
- private static void mapToFile(Map<String, Integer> src, File dst) {
- try {
- //对将要写入的文件建立通道
- FileChannel fcout = new FileOutputStream(dst).getChannel();
- //使用entrySet对结果集进行遍历
- for(Map.Entry<String,Integer> entry : src.entrySet()) {
- String key = entry.getKey();
- int value = entry.getValue();
- //将结果按照指定格式放到缓冲区中
- ByteBuffer bBuf = ByteBuffer.wrap((key+":\t"+value).getBytes());
- fcout.write(bBuf);
- bBuf.clear();
- }
- } catch (FileNotFoundException e) {
- e.printStackTrace();
- } catch (IOException e) {
- e.printStackTrace();
- }
- }
- }
- class CountWords implements Runnable {
- private FileChannel fc;
- private FileLock fl;
- private MappedByteBuffer mbBuf;
- private HashMap<String, Integer> hm;
- public CountWords(File src, long start, long end) {
- try {
- //得到当前文件的通道
- fc = new RandomAccessFile(src, "rw").getChannel();
- //锁定当前文件的部分
- fl = fc.lock(start, end, false);
- //对当前文件片段建立内存映射,如果文件过大需要切割成多个片段
- mbBuf = fc.map(FileChannel.MapMode.READ_ONLY, start, end);
- //创建HashMap实例存放处理结果
- hm = new HashMap<String,Integer>();
- } catch (FileNotFoundException e) {
- e.printStackTrace();
- } catch (IOException e) {
- e.printStackTrace();
- }
- }
- @Override
- public void run() {
- String str = Charset.forName("UTF-8").decode(mbBuf).toString();
- //使用StringTokenizer分析单词
- StringTokenizer token = new StringTokenizer(str);
- String word;
- while(token.hasMoreTokens()) {
- //将处理结果放到一个HashMap中,考虑到存储速度
- word = token.nextToken();
- if(null != hm.get(word)) {
- hm.put(word, hm.get(word)+1);
- } else {
- hm.put(word, 1);
- }
- }
- try {
- //释放文件锁
- fl.release();
- } catch (IOException e) {
- e.printStackTrace();
- }
- return;
- }
- //获取当前线程的执行结果
- public HashMap<String, Integer> getResult() {
- return hm;
- }
- }
import java.io.File;
import java.io.FileNotFoundException;
import java.io.FileOutputStream;
import java.io.IOException;
import java.io.RandomAccessFile;
import java.nio.ByteBuffer;
import java.nio.MappedByteBuffer;
import java.nio.channels.FileChannel;
import java.nio.channels.FileLock;
import java.nio.charset.Charset;
import java.util.HashMap;
import java.util.Map;
import java.util.StringTokenizer;
import java.util.TreeMap;

public class TestCountWords {
	public static void main(String[] args) {
		File wf = new File("words.txt");
		final CountWords cw1 = new CountWords(wf, 0, wf.length()/2);
		final CountWords cw2 = new CountWords(wf, wf.length()/2, wf.length());
		final Thread t1 = new Thread(cw1);
		final Thread t2 = new Thread(cw2);
		//开辟两个线程分别处理文件的不同片段
		t1.start();
		t2.start();
		Thread t = new Thread() {
			public void run() {
				while(true) {
					//两个线程均运行结束
					if(Thread.State.TERMINATED==t1.getState() && Thread.State.TERMINATED==t2.getState()) {
						//获取各自处理的结果
						HashMap<String, Integer> hMap1 = cw1.getResult();
						HashMap<String, Integer> hMap2 = cw2.getResult();
						//使用TreeMap保证结果有序
						TreeMap<String, Integer> tMap = new TreeMap<String, Integer>();
						//对不同线程处理的结果进行整合
						tMap.putAll(hMap1);
						tMap.putAll(hMap2);
						//打印输出,查看结果
					    for(Map.Entry<String,Integer> entry : tMap.entrySet()) {
					        String key = entry.getKey();
					        int value = entry.getValue();
					        System.out.println(key+":\t"+value);
					    }
					    //将结果保存到文件中
					    mapToFile(tMap, new File("result.txt"));
					}
					return;
				}
			}
		};
		t.start();
	}
	//将结果按照 "单词:次数" 格式存在文件中
	private static void mapToFile(Map<String, Integer> src, File dst) {
	    try {
	    	//对将要写入的文件建立通道
	    	FileChannel fcout = new FileOutputStream(dst).getChannel();
	    	//使用entrySet对结果集进行遍历
			for(Map.Entry<String,Integer> entry : src.entrySet()) {
		        String key = entry.getKey();
		        int value = entry.getValue();
		        //将结果按照指定格式放到缓冲区中
		        ByteBuffer bBuf = ByteBuffer.wrap((key+":\t"+value).getBytes());
		        fcout.write(bBuf);
		        bBuf.clear();
		    }
		} catch (FileNotFoundException e) {
			e.printStackTrace();
		} catch (IOException e) {
			e.printStackTrace();
		}
	}
}

class CountWords implements Runnable {

	private FileChannel fc;
	private FileLock fl;
	private MappedByteBuffer mbBuf;
	private HashMap<String, Integer> hm;

	public CountWords(File src, long start, long end) {
		try {
			//得到当前文件的通道
			fc = new RandomAccessFile(src, "rw").getChannel();
			//锁定当前文件的部分
			fl = fc.lock(start, end, false);
			//对当前文件片段建立内存映射,如果文件过大需要切割成多个片段
			mbBuf = fc.map(FileChannel.MapMode.READ_ONLY, start, end);
			//创建HashMap实例存放处理结果
			hm = new HashMap<String,Integer>();
		} catch (FileNotFoundException e) {
			e.printStackTrace();
		} catch (IOException e) {
			e.printStackTrace();
		}
	}
	@Override
	public void run() {
		String str = Charset.forName("UTF-8").decode(mbBuf).toString();
		//使用StringTokenizer分析单词
		StringTokenizer token = new StringTokenizer(str);
		String word;
		while(token.hasMoreTokens()) {
			//将处理结果放到一个HashMap中,考虑到存储速度
			word = token.nextToken();
			if(null != hm.get(word)) {
				hm.put(word, hm.get(word)+1);
			} else {
				hm.put(word, 1);
			}
		}
		try {
			//释放文件锁
			fl.release();
		} catch (IOException e) {
			e.printStackTrace();
		}
		return;
	}

	//获取当前线程的执行结果
	public HashMap<String, Integer> getResult() {
		return hm;
	}
}
以上代码是我自己实现的,主要思想是:
1.使用具有键值对结构的HashMap来快速存取;
2.由于文件过大,用一个线程处理可能结果较慢,使用到并发机制;
3.IO操作比较耗时,所以使用了nio的相关内容;
4.最终结果要有序的话,可以使用TreeMap。
望同行给予批评指导,相信有更好的解决办法和思路,如果能帮着优化以上代码,请给予留言,或者发邮件至bluesky_taotao@163.com,真诚欢迎各位编程爱好者与我讨论相关技术问题。
Java nio SocketChannel ServerSocketChannel 以及Selector实现的echo服务器和客户端(暂时有问题)
服务器端代码:
- import java.io.IOException;
- import java.net.InetSocketAddress;
- import java.nio.ByteBuffer;
- import java.nio.channels.SelectionKey;
- import java.nio.channels.Selector;
- import java.nio.channels.ServerSocketChannel;
- import java.nio.channels.SocketChannel;
- import java.util.Calendar;
- import java.util.Iterator;
- public class TestServer {
- public static void main(String[] args) {
- new Thread(new EchoServer(1982)).start();
- }
- }
- class EchoServer implements Runnable {
- //要监听的端口号
- private int port;
- //生成一个信号监视器
- private Selector s;
- //读缓冲区
- private ByteBuffer r_bBuf = ByteBuffer.allocate(1024);
- public EchoServer(int port) {
- this.port = port;
- try {
- s = Selector.open();
- } catch (IOException e) {
- e.printStackTrace();
- }
- }
- @Override
- public void run() {
- try {
- //生成一个ServerScoket通道的实例对象,用于侦听可能发生的IO事件
- ServerSocketChannel ssc = ServerSocketChannel.open();
- //将该通道设置为异步方式
- ssc.configureBlocking(false);
- //绑定到一个指定的端口
- ssc.socket().bind(new InetSocketAddress(port));
- //注册特定类型的事件到信号监视器上
- ssc.register(s, SelectionKey.OP_ACCEPT);
- System.out.println("The server has been launched...");
- while(true) {
- //将会阻塞执行,直到有事件发生
- System.out.println("监听新事件...");
- s.select();
- Iterator<SelectionKey> it = s.selectedKeys().iterator();
- while(it.hasNext()) {
- SelectionKey key = it.next();
- //key定义了四种不同形式的操作
- switch(key.readyOps()) {
- case SelectionKey.OP_ACCEPT :
- dealwithAccept(key);
- break;
- case SelectionKey.OP_CONNECT :
- break;
- case SelectionKey.OP_READ :
- dealwithRead(key);
- break;
- case SelectionKey.OP_WRITE :
- break;
- }
- //处理结束后移除当前事件,以免重复处理
- it.remove();
- }
- }
- } catch (IOException e) {
- e.printStackTrace();
- }
- }
- //处理接收连接的事件
- private void dealwithAccept(SelectionKey key) {
- try {
- System.out.println("deal with new accept...");
- ServerSocketChannel server = (ServerSocketChannel)key.channel();
- SocketChannel sc = server.accept();
- sc.configureBlocking(false);
- //注册读事件
- sc.register(s, SelectionKey.OP_WRITE);
- System.out.println("deal with new accept2...");
- } catch (IOException e) {
- e.printStackTrace();
- }
- }
- //处理客户端发来的消息,处理读事件
- private void dealwithRead(SelectionKey key) {
- try {
- SocketChannel sc = (SocketChannel)key.channel();
- System.out.println("读入数据");
- r_bBuf.clear();
- sc.write(r_bBuf);
- r_bBuf.flip();
- System.out.println(r_bBuf.asCharBuffer().toString());
- r_bBuf.clear();
- System.out.println("处理完毕...");
- try {
- Thread.currentThread().sleep(1000);
- } catch (InterruptedException e) {
- e.printStackTrace();
- }
- } catch (IOException e) {
- e.printStackTrace();
- }
- }
- private String getCurrentTime() {
- return Calendar.getInstance().toString();
- }
- }
import java.io.IOException;
import java.net.InetSocketAddress;
import java.nio.ByteBuffer;
import java.nio.channels.SelectionKey;
import java.nio.channels.Selector;
import java.nio.channels.ServerSocketChannel;
import java.nio.channels.SocketChannel;
import java.util.Calendar;
import java.util.Iterator;


public class TestServer {
	public static void main(String[] args) {
		new Thread(new EchoServer(1982)).start();
	}
}

class EchoServer implements Runnable {
	//要监听的端口号
	private int port;
	//生成一个信号监视器
	private Selector s;
	//读缓冲区
	private ByteBuffer r_bBuf = ByteBuffer.allocate(1024);

	public EchoServer(int port) {
		this.port = port;
		try {
			s = Selector.open();
		} catch (IOException e) {
			e.printStackTrace();
		}
	}

	@Override
	public void run() {
		try {
			//生成一个ServerScoket通道的实例对象,用于侦听可能发生的IO事件
			ServerSocketChannel ssc = ServerSocketChannel.open();
			//将该通道设置为异步方式
			ssc.configureBlocking(false);
			//绑定到一个指定的端口
			ssc.socket().bind(new InetSocketAddress(port));
			//注册特定类型的事件到信号监视器上
			ssc.register(s, SelectionKey.OP_ACCEPT);
			System.out.println("The server has been launched...");
			while(true) {
				//将会阻塞执行,直到有事件发生
				System.out.println("监听新事件...");
				s.select();
				Iterator<SelectionKey> it = s.selectedKeys().iterator();
				while(it.hasNext()) {
					SelectionKey key = it.next();
					//key定义了四种不同形式的操作
					switch(key.readyOps()) {
					case SelectionKey.OP_ACCEPT :
						dealwithAccept(key);
						break;
					case SelectionKey.OP_CONNECT :
						break;
					case SelectionKey.OP_READ :
						dealwithRead(key);
						break;
					case SelectionKey.OP_WRITE :
						break;
					}
					//处理结束后移除当前事件,以免重复处理
					it.remove();
				}
			}
		} catch (IOException e) {
			e.printStackTrace();
		}
	}
	//处理接收连接的事件
	private void dealwithAccept(SelectionKey key) {
		try {
			System.out.println("deal with new accept...");
			ServerSocketChannel server = (ServerSocketChannel)key.channel();
			SocketChannel sc = server.accept();
			sc.configureBlocking(false);
			//注册读事件
			sc.register(s, SelectionKey.OP_WRITE);
			System.out.println("deal with new accept2...");
		} catch (IOException e) {
			e.printStackTrace();
		}
	}
	//处理客户端发来的消息,处理读事件
	private void dealwithRead(SelectionKey key) {
		try {
			SocketChannel sc = (SocketChannel)key.channel();
			System.out.println("读入数据");
			r_bBuf.clear();
			sc.write(r_bBuf);
			r_bBuf.flip();
			System.out.println(r_bBuf.asCharBuffer().toString());
			r_bBuf.clear();
			System.out.println("处理完毕...");
			try {
				Thread.currentThread().sleep(1000);
			} catch (InterruptedException e) {
				e.printStackTrace();
			}
		} catch (IOException e) {
			e.printStackTrace();
		}
	}

	private String getCurrentTime() {
		return Calendar.getInstance().toString();
	}
}
client 端代码:
- import java.io.BufferedReader;
- import java.io.IOException;
- import java.io.InputStreamReader;
- import java.net.InetSocketAddress;
- import java.nio.ByteBuffer;
- import java.nio.channels.SocketChannel;
- public class TestClient {
- public static void main(String[] args) {
- new MiniClient("localhost", 1982);
- }
- }
- class MiniClient {
- private SocketChannel sc;
- private ByteBuffer w_bBuf;
- public MiniClient(String host, int port) {
- try {
- InetSocketAddress remote = new InetSocketAddress(host, port);
- sc = SocketChannel.open();
- sc.connect(remote);
- if(sc.finishConnect()) {
- System.out.println("已经与服务器成功建立连接...");
- }
- while(true) {
- if(!sc.isConnected()) {
- System.out.println("已经与服务器失去了连接...");
- }
- BufferedReader br = new BufferedReader(new InputStreamReader(System.in));
- String str = br.readLine();
- System.out.println("读入一行数据,开始发送...");
- w_bBuf = ByteBuffer.wrap(str.getBytes());
- w_bBuf.flip();
- //向缓冲区中写入数据
- sc.write(w_bBuf);
- System.out.println("数据发送成功...");
- w_bBuf.clear();
- try {
- Thread.currentThread().sleep(1000);
- } catch (InterruptedException e) {
- e.printStackTrace();
- }
- }
- } catch (IOException e) {
- // TODO Auto-generated catch block
- e.printStackTrace();
- }
- }
- }
import java.io.BufferedReader;
import java.io.IOException;
import java.io.InputStreamReader;
import java.net.InetSocketAddress;
import java.nio.ByteBuffer;
import java.nio.channels.SocketChannel;
public class TestClient {
public static void main(String[] args) {
new MiniClient("localhost", 1982);
}
}
class MiniClient {
private SocketChannel sc;
private ByteBuffer w_bBuf;
public MiniClient(String host, int port) {
try {
InetSocketAddress remote = new InetSocketAddress(host, port);
sc = SocketChannel.open();
sc.connect(remote);
if(sc.finishConnect()) {
System.out.println("已经与服务器成功建立连接...");
}
while(true) {
if(!sc.isConnected()) {
System.out.println("已经与服务器失去了连接...");
}
BufferedReader br = new BufferedReader(new InputStreamReader(System.in));
String str = br.readLine();
System.out.println("读入一行数据,开始发送...");
w_bBuf = ByteBuffer.wrap(str.getBytes());
w_bBuf.flip();
//向缓冲区中写入数据
sc.write(w_bBuf);
System.out.println("数据发送成功...");
w_bBuf.clear();
try {
Thread.currentThread().sleep(1000);
} catch (InterruptedException e) {
e.printStackTrace();
}
}
} catch (IOException e) {
// TODO Auto-generated catch block
e.printStackTrace();
}
}
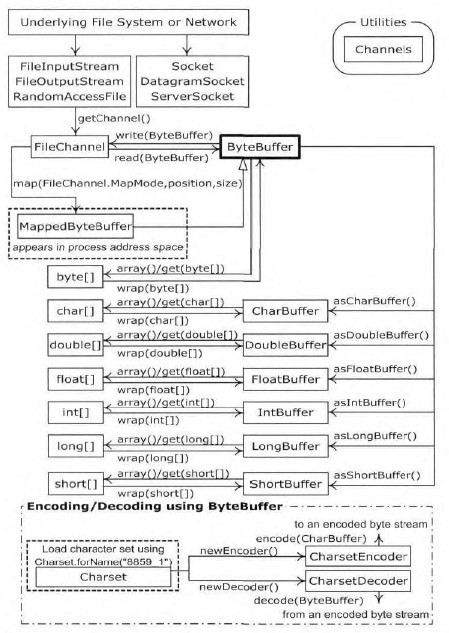
}Thinking in java中的一个图片,刚找到的,比较清楚关系图。


 4160
4160

 被折叠的 条评论
为什么被折叠?
被折叠的 条评论
为什么被折叠?
 到【灌水乐园】发言


