


一、 简单安装
1)下载并安装 JDK1.5
1、 下载并安装 Windows Platform J2SE(TM) Development Kit 5.0 Update ,下载网址 http://java.sun.com/j2se/1.5.0/download.jsp
2、 在控制面板 --> 系统 --> 高级选项 --> 环境变量,新增一个用户变量 JAVA_HOME 并指向 JDK 的安装目录
2) 下载并安装 Liferay Portal
1. 下载并安装 Liferay Portal Professional 4.0.0 (Bundled with Tomcat and JDK 5.0), 下载网址 http://www.liferay.com/web/guest/download
2. 解压缩到一个目录,并确保硬盘上有足够的空间,我们称这个目录为 TOMCAT_HOME
3) 启动 TOMCAT
到 TOMCAT/bin 目录下,运行 startup.bat 。
你的 Apache Tomcat server 能够编译并运行 Liferay Portal 。默认情况下, portal 使用自带的 HSQL 数据库。在浏览器中输入 http://localhost:8080 ,将会看见 portal 首页。
二、 专业安装
1) 下载并安装 JDK1.5
1、 下载并安装 Windows Platform J2SE(TM) Development Kit 5.0 Update ,下载网址 http://java.sun.com/j2se/1.5.0/download.jsp
2、 在控制面板 --> 系统 --> 高级选项 --> 环境变量,新增一个用户变量 JAVA_HOME 并指向 JDK 的安装目录
2) 下载并安装 TOMCAT
1、 下载 apache-tomcat-5.5.17.zip 并解压缩到一个目录,我们称这个目录为 TOMCAT 。
3) 下载并安装 Liferay Portal
1、 下载 liferay-portal-4.0.0.war, 下载网址 http://www.liferay.com/web/guest/download
2、 解压缩 liferay-portal-4.0.0.war 到 TOMCAT 目录下并改名为 liferay ,然后将 liferay/WEB-INF/lib 下除 util-taglib.jar 外的其他 jar 包剪切到 TOMCAT/common/lib/ext 下
3、 在 TOMCAT/conf/Catalina/localhost 目录下,删除该目录下已有的文件,然后新建 ROOT.xml 文件(这里的 ROOT 必须是大写)
ROOT.xml :
 < Context path = "" docBase = " ../liferay " debug = " 0 " reloadable = " true " crossContext = " true " >
< Resource
name = " jdbc/LiferayPool "
auth = " Container "
type = " javax.sql.DataSource "
driverClassName = " org.hsqldb.jdbcDriver "
url = " jdbc:hsqldb:test "
username = " sa "
password = ""
maxActive = " 20 "
/>
< Resource
name = " mail/MailSession "
auth = " Container "
type = " javax.mail.Session "
mail.transport.protocol = " smtp "
mail.smtp.host = " localhost "
/>
< Realm
className = " org.apache.catalina.realm.JAASRealm "
appName = " PortalRealm "
userClassNames = " com.liferay.portal.security.jaas.PortalPrincipal "
roleClassNames = " com.liferay.portal.security.jaas.PortalRole "
debug = " 99 "
useContextClassLoader = " false "
/>
</ Context >
< Context path = "" docBase = " ../liferay " debug = " 0 " reloadable = " true " crossContext = " true " >
< Resource
name = " jdbc/LiferayPool "
auth = " Container "
type = " javax.sql.DataSource "
driverClassName = " org.hsqldb.jdbcDriver "
url = " jdbc:hsqldb:test "
username = " sa "
password = ""
maxActive = " 20 "
/>
< Resource
name = " mail/MailSession "
auth = " Container "
type = " javax.mail.Session "
mail.transport.protocol = " smtp "
mail.smtp.host = " localhost "
/>
< Realm
className = " org.apache.catalina.realm.JAASRealm "
appName = " PortalRealm "
userClassNames = " com.liferay.portal.security.jaas.PortalPrincipal "
roleClassNames = " com.liferay.portal.security.jaas.PortalRole "
debug = " 99 "
useContextClassLoader = " false "
/>
</ Context >
4、 在TOMCAT/conf目录下,新建jaas.config文件
jaas.config :
PortalRealm {
com.liferay.portal.security.jaas.PortalLoginModule required;
};
5、 修改 TOMCAT/conf 目录下 catalina.properties 文件中的下面一段:
common.loader=${catalina.home}/common/classes,${catalina.home}/common/i18n/*.jar,${catalina.home}/common/endorsed/*.jar,${catalina.home}/common/lib/*.jar,${catalina.home}/common/lib/ext/*.jar
6、 修改 TOMCAT/bin 目录下 catalina.bat 文件,增加下面内容:
rem ----- Execute The Requested Command ---------------------------------------
set JAVA_OPTS=-Xms128m -Xmx512m -Dfile.encoding=UTF8 -Duser.timezone=GMT+08 -Djava.security.auth.login.config=%CATALINA_HOME%/conf/jaas.config
7、 到 TOMCAT/bin 目录下,运行 startup.bat 。在浏览器中输入 http://localhost:8080 ,将会看见 portal 首页。
三、 连接数据库
1) 连接 HSQLDB
修改 TOMCAT/conf/Catalina/localhost/ROOT.xml 文件并将 SQL SERVER 驱动包 hsql.jar 拷贝到 TOMCAT/common/lib/ext 下
<Resource
name="jdbc/LiferayPool"
auth="Container"
type="javax.sql.DataSource"
driverClassName="org.hsqldb.jdbcDriver"
url="jdbc:hsqldb:test"
username="sa"
password=""
maxActive="20"
/>
2) 连接 SQL SERVER
修改 TOMCAT/conf/Catalina/localhost/ROOT.xml 文件并将 SQL SERVER 驱动包 jtds-1.2.jar 拷贝到 TOMCAT/common/lib/ext 下
<Resource
name="jdbc/LiferayPool"
auth="Container"
type="javax.sql.DataSource"
driverClassName="net.sourceforge.jtds.jdbc.Driver"
url="jdbc:jtds:sqlserver://localhost:1433;DatabaseName=lportal4"
username="sa"
password="sa"
maxActive="100"
/>
Liferay Portal 的 CMS(Content Manage System) 提供了两大功能:文档管理和文章发布。文档管理包括文档库和图片集两个 portlets ,能够提供对 Microsoft Office 文档、 PDFs 、文本文件和图片的管理;文章发布功能依靠 Liferay Portal 中的 Journal portlet 完成,它的特性是能够将数据( data entry )和版面设计( Layout Design )很轻易的分开,这就使得 content 能够复合一致的“ look and feel ”,另外, Journal portlet 提供了 content 的版本跟踪和发布流程的功能。
Liferay Portal的CMS功能是通过Journal Portlet实现的,在介绍怎样使用Journal Portlet之前,有必要理解structures、templates和articles的概念,它们是Journal portlet功能的基础。
l Structures:定于了content的类型和数量,content的类型包括text、text area、images、selection lists等
l Templates:确定content怎样排列或摆放
l Articles:确定每个content包含的实际的text和images
我们以下图为例定义一个content,分为三个步骤:

第一步、创建Structure,包含一下元素:一个text元素名为“headline”(对应图片1区域)、三个text area元素为名称分别为“body-text”(对应4区域)“caption-1”(对应2区域)“caption-2”(对应6区域)、两个image元素名称分别为“image-1”(对应3区域)和“image-2”(对应5区域)
添加完这些元素后的界面如下:

点击Launch Editor按钮,可以看到XML定义,也可以在此增删或修改元素及类型,内容如下:
<root>
<dynamic-element name='headline' type='text'></dynamic-element>
<dynamic-element name='body-text' type='text_area'></dynamic-element>
<dynamic-element name='caption-1' type='text_area'></dynamic-element>
<dynamic-element name='caption-2' type='text_area'></dynamic-element>
<dynamic-element name='image-1' type='image'></dynamic-element>
<dynamic-element name='image-2' type='image'></dynamic-element>
</root>
第二步、创建 Template ,添入 ID 、 Name 、 Description 信息后,在 Structure 一栏选择上一步创建的 Structure (这里为 test )

然后点击 Launch Editor 按钮,打开 Template 编辑窗口,按照所需要的格式定义 Template ,如下:
<? xml version = " 1.0 " ?>
< xsl:stylesheet xmlns:xsl = " http://www.w3.org/1999/XSL/Transform " version = " 1.0 " >
< xsl:output method = " html " omit - xml - declaration = " yes " />
< xsl:template match = " / " >
< table cellpadding = " 0 " cellspacing = " 0 " border = " 0 " width = " 100% " >
< tr >
< td colspan = " 2 " >
< xsl:value - of
disable - output - escaping = " yes " select = " root/dynamic-element[@name='headline']/dynamic-content " />
</ td >
</ tr >
< tr >
< td >
< img >
< xsl:attribute name = " src " >
< xsl:value - of
disable - output - escaping = " yes " select = " root/dynamic-element[@name='image-1']/dynamic-content " />
</ xsl:attribute >
</ img >
</ td >
< td >
< xsl:value - of
disable - output - escaping = " yes " select = " root/dynamic-element[@name='caption-1']/dynamic-content " />
</ td >
</ tr >
< tr >
< td colspan = " 2 " >
< xsl:value - of
disable - output - escaping = " yes " select = " root/dynamic-element[@name='body-text']/dynamic-content " />
</ td >
</ tr >
< tr >
< td >
< xsl:value - of
disable - output - escaping = " yes " select = " root/dynamic-element[@name='caption-2']/dynamic-content " />
</ td >
< td >
< img >
< xsl:attribute name = " src " >
< xsl:value - of
disable - output - escaping = " yes " select = " root/dynamic-element[@name='image-2']/dynamic-content " />
</ xsl:attribute >
</ img >
</ td >
</ tr >
</ table >
</ xsl:template >
</ xsl:stylesheet >
下面对该文件进行说明:
1 、这里的 @name=’ 名称 ’ 必须要和第一步中创建 Structure 中的元素名称一致,页面格式根据需求使用 HTML 语言定义即可。
2 、对 text 、 text area 类型的元素输出时的格式如下:
<xsl:value-of
disable-output-escaping="yes" select="root/dynamic-element[@name='caption-2']/dynamic-content"/>
1、 对 image 类型的元素输出时的格式如下:
<img>
<xsl:attribute name="src">
<xsl:value-of
disable-output-escaping="yes" select="root/dynamic-element[@name='image-2']/dynamic-content"/>
</xsl:attribute>
</img>
第三步、创建 Article ,添写基本信息后,在 Structure 一栏选择 test ,对应的 Template 一栏也选择 test 即可,然后在对应的元素域里添入合适的文本或者图片,点击预览即可以看到如下界面,确定无问题后,点击保存或者保存并发布按钮即可完成 content 的定制。

通过以上三个步骤,我们就实现了定制content的功能。使用Journal Portlet,我们可以定制任何不同风格的content来展示必要的信息。
Liferay Portal 4.0 为我们提供了几种不同的页面布局,我们可以通过 Add Content 中的 Template 参数来指定不同的页面布局,但是,但我们利用 CMS 来定制文章内容的时候,仅有的几种页面布局并不能满足我们的需求,所以我们需要开发能够满足特定需求的页面布局。
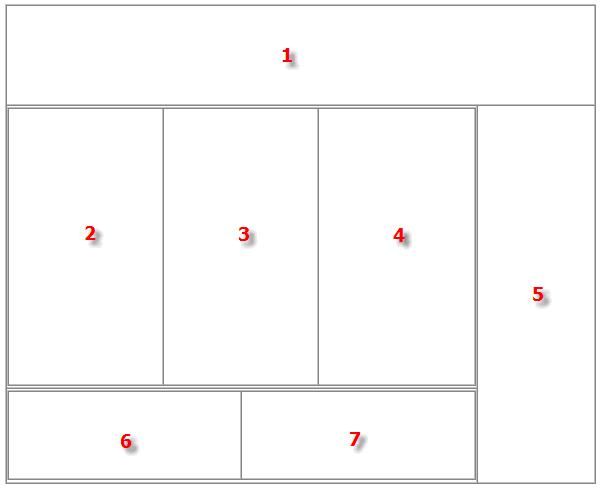
我们将开发一个具有下图风格的页面布局,该布局中我们指定了7个区域来分别装配portlet实现独特的页面风格。
一、编写模板文件
我们将该页面风格名称定义为1_2_3_2 Columns,在Liferay/html/layouttpl/custom目录下新建1_2_3_2_columns.tpl文件,内容如下:
<div id="layout-content-outer-decoration">
<div id="layout-content-inner-decoration">
<div id="layout-content-container">
<table border="0" cellpadding="0" cellspacing="0" width="100%">
<tr>
<td colspan="3" valign="top">
$processor.processColumn("column-1")
</td>
</tr>
<tr>
<td width="79%" valign="top">
<table border="0" cellpadding="0" cellspacing="0" width="100%">
<tr>
<td width="26%" valign="top">
$processor.processColumn("column-2")
</td>
<td class="layout-column-spacer" width="1%">
<div> </div>
</td>
<td width="26%" valign="top">
$processor.processColumn("column-3")
</td>
<td class="layout-column-spacer" width="1%">
<div> </div>
</td>
<td width="26%" valign="top">
$processor.processColumn("column-4")
</td>
</tr>
</table>
</td>
<td class="layout-column-spacer" width="1%">
<div> </div>
</td>
<td width="20%" rowspan="2" valign="top">
$processor.processColumn("column-5")
</td>
</tr>
<tr>
<td colspan="2">
<table border="0" cellpadding="0" cellspacing="0" width="100%">
<tr>
<td width="50%" valign="top">
$processor.processColumn("column-6")
</td>
<td width="50%" valign="top">
$processor.processColumn("column-7")
</td>
</tr>
</table>
</td>
</tr>
</table>
</div>
</div>
</div>
文件中前三行定义的 <div> 和最后三行 </div> 是固定的模板格式,从第四行开始就是我们需要定制的页面风格的 HTML 格式,我们需要将输出 portlet 区域的 HTML 语句用 $processor.processColumn("column-1") 来替换,“ column-1 ”是该区域的名称,并且每个区域的名字不能重复,这样系统在生成模板的时候会自动生成不同的区域来存放我们指定的 portlet 。
二、编写属性文件
我们需要在 liferay-layout-templates.xml 文件中配置我们自定义的页面布局文件 1_2_3_2_columns.tpl ,为了和系统自带的布局文件区分开,我们创建扩展文件 liferay-layout-templates-ext.xml ,在该文件中指定我们的页面布局文件,当然也可以在 liferay-layout-templates.xml 文件直接增加定义。
liferay-layout-templates-ext.xml :
<? xml version = " 1.0 " ?>
<! DOCTYPE layout - templates PUBLIC " -//Liferay//DTD Layout Templates 4.0.0//EN " " http://www.liferay.com/dtd/liferay-layout-templates_4_0_0.dtd " >
< layout - templates >
< custom >
< layout - template id = " 1_2_3_2_columns " name = " 1-2-3-2 Columns " >
< template - path >/ html / layouttpl / custom / 1_2_3_2_columns.tpl </ template - path >
</ layout - template >
</ custom >
</ layout - templates >
参数 id 定义该 template 的 ID 号, name 定义该 template 在 Add Content 中显示的名称, template-path 定义该 template 的路径名。
三、定制页面
定制好页面风格后,需要重新启动TOMCAT,登陆系统,进入GUEST频道,点击Add Content ,在Template中将会显示我们自定义的页面布局名称1-2-3-2 Columns,选择该Template,然后在页面中添加Journal Content,按照我们自定义的布局将portlet拖拉到合适的位置,再为每个Journal Content指定Article,最后就完成了各种风格页面的定制过程。使用这个的方法,我们可以定制各种满足不同需求的页面。
当我们再对 liferay 源代码进行研究或者对某个类进行修改的时候很不方便,所以我们需要搭建一个开发环境,这样在修改 liferay 源代码的时候就更加方便。下面我们会一步步搭建 liferay 的开发环境。
一、 准备工作
1 、下载下列文件,下载步骤这里省略:
jdk-1_5_0_06-windows-i586-p.exe
liferay-portal-tomcat-jdk5-4.0.0.zip
liferay-portal-src-4.0.0.zip
liferay-portal-sql-4.0.0.zip
2 、安装 JDK ,具体的安装及配置过程这里省略。
3 、我们假定 Eclipse 及 Tomcat 插件都已安装,若还没有安装,请参考相关文档准备好开发工具,这里省略该步骤。
4 、如果对 liferay 安装过程有疑问,可参考作者的另一篇文章。
二、 搭建开发环境
1、 在 Eclipse 中新建项目 liferayPortal ,并设置源文件夹为 src ,输入文件夹名为 liferay/WEB-INF/classes 。
2、 将 liferay-portal-tomcat-jdk5-4.0.0.zip 解压缩后并拷贝到项目 liferayPortal 根目录下,然后改名为 tomcat 。
3、 将 liferayPortal/tomcat 目录下的 liferay 目录剪切到项目 liferayPortal 根目录下覆盖原目录。
4、 将 liferay-portal-src-4.0.0.zip 解压缩,然后将 liferay-4.0.0-src/portal-ejb/src 目录下的 com 文件夹拷贝到项目 liferayPortal/src 目录下。
5、 将 liferay-4.0.0-src/util-jsf/src/com/liferay 目录下的 util 文件夹拷贝到项目 liferayPortal/src/com/liferay/ 目录下。
6、 拷贝 liferay-4.0.0-src/portal-ejb/classes 目录下除 com 文件夹外其他全部的文件夹及文件到项目 liferayPortal/src 目录下。
7、 拷贝 liferay-4.0.0-src/portal-ejb/classes/com/liferay/portal 下的 definitions 文件夹到项目 liferayPortal/src/com/liferay/portal 目录下。
8、 修改 liferayPortal/tomcat/conf/Catalina/localhost 目录下的 ROOT.xml 文件中的 docBase 路径,指向 liferayPortal/liferay 目录。
9、 将 liferay-4.0.0-src/lib 目录下的所有 jar 包全部添加到项目 liferayPortal 中。
10、 将 liferayPortal/liferay/WEB-INF/lib 下的 compression-filter.jar 、 counter-ejb.jar 、 documentlibrary-ejb.jar 、 ext-ejb.jar 、 lock-ejb.jar 、 mail-ejb.jar 、 secure- filter.jar 、 strip-filter.jar 、 util-java.jar 、 util-taglib.jar 、 util-wsrp.jar 共 11 个包加到项目中。
11、 将 liferayPortal/tomcat/common/lib/ext 目录下的 portal-shared.jar 包加到项目中。
12、 在 liferayPortal/src 目录下新建文件 portal-ext.properties ,内容为:
portal.release=professional
13、 在“首选项- >Java — > 已安装的 JRE ”里选择之前安装的 jre1.5.0_06 。

14、 在“首选项- >Tomcat ”项中指定 tomcat 的版本为 Version 5.x ,并且指定“ Tomcat home ”路径为项目 liferayPortal/tomcat 目录。

15、 在“首选项- >Tomcat - >JVM Settings ”项,设定 JRE 的版本为“ jre1.5.0_06”,并且添加如下几个JVM Parameters :
-Xms128m
-Xmx512m
-Dfile.encoding=UTF8
-Duser.timezone=GMT+08
-Djava.security.auth.login.config=D:\devtool\eclipse\workspace\liferayPortal\tomcat\conf\jaas.config
这里最后一个参数一定要指明 jaas.config 文件的路径

三、创建数据库
1 、本例中我们已 SQL Server 数据库为例,介绍怎样连接数据库。
2 、解压缩 liferay-portal-sql-4.0.0.zip 文件后,导入目录 liferay-portal-sql-4.0.0/create 下的 create-sql-server.sql 文件即可建立 liferay 应用在 SQL Server 上的数据库,数据库名为 lportal 。
(导入 sql 文件命令参见 C:\Program Files\Microsoft SQL Server\80\Tools\Binn\osql.exe )
3 、修改 liferayPortal/tomcat/conf/Catalina/localhost 目录下的 ROOT.xml 文件,指定连接 SQLServer 的驱动类名称、数据库 URL 及用户和密码,修改结果如下:
| <Resource name="jdbc/LiferayPool" auth="Container" type="javax.sql.DataSource" driverClassName="net.sourceforge.jtds.jdbc.Driver" url="jdbc:jtds:sqlserver://localhost:1433;DatabaseName=lportal" username="sa" password="sa" maxActive="100" /> |
4 、拷贝 liferay-4.0.0-src/lib 目录下的 jtds.jar 包到 liferayPortal/tomcat/common/lib/ext 目录下。
四、启动服务器
在 Eclipse 中启动 Tomcat ,当出现如下画面时,表示 Tomcat 启动成功。

在浏览器中访问:http://localhost:8080即可出现liferay界面。
到此,我们的开发环境已经搭建完成。
Liferay Portal为我们提供了非常灵活的主题风格定制功能,自身带了四种风格的theme,在官方网站上提供了很多风格theme的下载,这无疑大大增强了主题风格定制的功能。但是,我们完全可以开发具有自己风格的theme,这里,我们将讨论怎样来开发个性的theme。
第一步:我们将以现有风格classic为模板文件创建新的theme,我们将新theme命名为coldtear
1、将liferay/html/themes目录下的classic文件夹copy一份副本,并修改副本的文件夹名为coldtea
2、在liferay/web-inf目录下新建liferay-look-and-feel-ext.xml文件,文件liferay-look-and-feel.xml是定义主题风格theme的配置文件,为了加以区分,我们在这里新建了该文件的扩展文件liferay-look-and-feel-ext.xml,该文件内容如下:
<?
xml version
=
"
1.0
"
?>
<!
DOCTYPE look
-
and
-
feel PUBLIC
"
-//Liferay//DTD Look and Feel 4.0.0//EN
"
"
http://www.liferay.com/dtd/liferay-look-and-feel_4_0_0.dtd
"
>
<
look
-
and
-
feel
>
<
compatibility
>
<
version
>
4.0
.
0
</
version
>
</
compatibility
>
<
company
-
limit
>
<
company
-
includes
/>
<
company
-
excludes
/>
</
company
-
limit
>
<
theme id
=
"coldtear
"
name
=
"ColdTear
"
>
<
root
-
path
>/
html
/
themes
/
coldtear
</
root
-
path
>
<
templates
-
path
>/
html
/
themes
/
coldtear
/
templates
</
templates
-
path
>
<
images
-
path
>/
html
/
themes
/
coldtear
/
images
</
images
-
path
>
<
template
-
extension
>
jsp
</
template
-
extension
>
<
color
-
scheme id
=
"
01
"
name
=
"
Blue
"
>
<!
[CDATA[ body
-
bg
=
#FFFFFF layout
-
bg
=
#FFFFFF layout
-
text
=
#
000000
layout
-
tab
-
bg
=
#E0E0E0 layout
-
tab
-
text
=
#
000000
layout
-
tab
-
selected
-
bg
=
#6699CC layout
-
tab
-
selected
-
text
=
#4A517D portlet
-
title
-
bg
=
#6699CC portlet
-
title
-
text
=
#4A517D portlet
-
menu
-
bg
=
#B6CBEB portlet
-
menu
-
text
=
#
000000
portlet
-
bg
=
#FFFFFF portlet
-
font
=
#
000000
portlet
-
font
-
dim
=
#C4C4C4 portlet
-
msg
-
status
=
#
000000
portlet
-
msg
-
info
=
#
000000
portlet
-
msg
-
error
=
#FF0000 portlet
-
msg
-
alert
=
#FF0000 portlet
-
msg
-
success
=
#007F00 portlet
-
section
-
header
=
#
094170
portlet
-
section
-
header
-
bg
=
#ADBDFB portlet
-
section
-
subheader
=
#
405278
portlet
-
section
-
subheader
-
bg
=
#91AEE8 portlet
-
section
-
body
=
#000000
portlet
-
section
-
body
-
bg
=
#E2E7FA portlet
-
section
-
body
-
hover
=
#FFFFFF portlet
-
section
-
body
-
hover
-
bg
=
#AC6CFA portlet
-
section
-
alternate
=
#
000000
portlet
-
section
-
alternate
-
bg
=
#CFD7FB portlet
-
section
-
alternate
-
hover
=
#FFFFFF portlet
-
section
-
alternate
-
hover
-
bg
=
#AC6CFA portlet
-
section
-
selected
=
#7AA0EC portlet
-
section
-
selected
-
bg
=
#FAFCFE portlet
-
section
-
selected
-
hover
=
#00329A portlet
-
section
-
selected
-
hover
-
bg
=
#C0D2F7 ]]
>
</
color
-
scheme
>
</
theme
>
</
look
-
and
-
feel
>
这里,注意的是修改theme的id和name,以及root-path、templates-path和images-path的路径,这样,我们就可以在主题风格页面看到我们新的theme了。
第二步、分析classic的主题布局的划分
1、打开liferay/html/theme/coldtear/templates目录,该目录下存放着很多jsp文件,打开portal_normal.jsp文件可以看到,该文件是整个页面的主体,通过<liferay-util:include />标签和<%@ include>方法包含了很多jsp文件,其中top.jsp文件定义了头部信息,navigation.jsp定义了导航菜单,bottom.jsp定义了底部语言标签信息,而页面的主体信息是由<liferay-theme:box />标签定义的,top="portlet_top.jsp"定义了portlet的标题栏信息,bottom="portlet_bottom.jsp"定义了portlet下面的阴影线,portlet的内容则是由<liferay-util:include page="<%= Constants.TEXT_HTML_DIR + tilesContent %>" />定义的。所有的css样式信息是定义在css_cached.jsp文件中的。
2、liferay portal的页面定义大部分地方都采用了DIV+CSS的方式,下面将以classic的整个DIV定义框架给出,以说明classic风格的定义方法。
<
div id
=
"
layout-outer-side-decoration
"
>
<
div id
=
"
layout-inner-side-decoration
"
>
<
div id
=
"
layout-box
"
>
<!--
定义头部信息 top.jsp
-->
<
div id
=
"
layout-top-banner
"
>
<
div id
=
"
layout-user-menu
"
style
=
"
text-align: right;
"
>
<
div
class
=
"
font-small
"
style
=
"
margin-top: 5px;
"
>
<
div id
=
"
layout-my-places
"
>
<
div id
=
"
p_p_id_49_
"
class
=
"
portlet-boundary
"
>
<
div
class
=
"
portlet-borderless-container
"
>
</
div
>
</
div
>
</
div
>
</
div
>
</
div
>
</
div
>
<!--
定义导航菜单 navigation.jsp
-->
<
div id
=
"
layout-nav-container
"
>
<
div
class
=
"
layout-nav-tabs-box
"
>
<
div
class
=
"
layout-tab
"
></
div
>
<
div
class
=
"
layout-tab
"
></
div
>
<
div
class
=
"
layout-tab-selected
"
></
div
>
<
div
class
=
"
layout-tab
"
></
div
>
</
div
>
<
div id
=
"
layout-global-search
"
></
div
>
</
div
>
<
div
class
=
"
portlet-bottom-decoration-2
"
><
div
><
div
></
div
></
div
></
div
>
<!--
定义主体portlet信息部分
-->
<
div id
=
"
layout-content-outer-decoration
"
>
<
div id
=
"
layout-content-inner-decoration
"
>
<
div id
=
"
layout-content-container
"
>
<
div id
=
"
layout-column_column-1
"
>
<
div id
=
"
p_p_id_73_INSTANCE_9Q28_
"
class
=
"
portlet-boundary
"
>
<
div
class
=
"
portlet-container
"
>
<!--
定义portlet标题栏信息 portlet
-
top.jsp
-->
<
div
class
=
"
portlet-header-bar
"
id
=
"
portlet-header-bar_73_INSTANCE_9Q28
"
onmouseover
=
"
PortletHeaderBar.show(this.id)
"
onmouseout
=
"
PortletHeaderBar.hide(this.id)
"
>
<
div
class
=
"
portlet-wrap-title
"
>
</
div
>
<
div
class
=
"
portlet-small-icon-bar
"
style
=
"
display: none;
"
>
</
div
>
</
div
>
<!--
定义portlet内容信息
-->
<
div
class
=
"
portlet-box
"
>
<
div
class
=
"
portlet-minimum-height
"
>
<
div id
=
"
p_p_body_73_INSTANCE_9Q28
"
>
<
div
class
=
"
slide-maximize-reference
"
>
<
div id
=
"
p_p_content_73_INSTANCE_9Q28_
"
style
=
"
margin-top: 0; margin-bottom: 0;
"
>
</
div
>
</
div
><!--
slide
-
maximize
-
reference
-->
</
div
>
</
div
>
</
div
><!--
end portlet
-
box
-->
<!--
定义portlet底部阴影线 portlet
-
bottom.jsp
-->
<
div
class
=
"
portlet-bottom-decoration-2
"
><
div
><
div
></
div
></
div
></
div
>
</
div
><!--
End portlet
-
container
-->
</
div
>
<!--
定义一个空的portlet区域
-->
<
div
class
=
"
layout-blank-portlet
"
></
div
>
</
div
>
</
div
>
</
div
>
</
div
>
<!--
定义底部信息 bottom.jsp
-->
<
div id
=
"
layout-bottom-container
"
></
div
>
</
div
><!--
End layout
-
box
-->
</
div
>
</
div
><!--
End layout
-
outer
-
side
-
decoration
-->
这里我们可以看到classic的整体DIV定义框架,注释部分对每个部分的定义都做了区分。
第三步、根据这样一个结构,我们可以设计自定义theme风格的结构,然后将各个区域细化到各个jsp文件中,并配以特定的图片和样式就可以实现自定义theme,为了达到更好的显示效果,需要教好的掌握CSS的各个属性和使用方法。
在这里将我手头一些Liferay Portal的学习资料共享一下,希望能够帮助到更多的初学者。
LiferayPortal二次开发指南.rar


 被折叠的 条评论
为什么被折叠?
被折叠的 条评论
为什么被折叠?
 到【灌水乐园】发言


