


锋哥原创的PyQt6视频教程:
信号槽是 Qt 框架引以为豪的机制之一。所谓信号槽,实际就是观察者模式。当某个事件发生之后,比如,按钮检测到自己被点击了一下,它就会发出一个信号(signal)。这种发出是没有目的的,类似广播。如果有对象对这个信号感兴趣,它就会使用连接(connect)函数,意思是,将想要处理的信号和自己的一个函数(称为槽(slot))绑定来处理这个信号。也就是说,当信号发出时,被连接的槽函数会自动被回调。
一个信号可以连接到多个槽函数上,也可以将多个信号连接到同一个槽函数。
这个槽的话,也分两种,一种是不同控件内置的槽函数,还有一种是我们自己定义的槽函数。
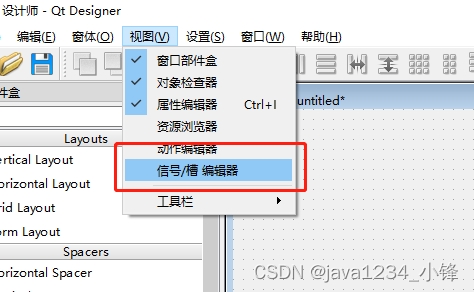
控件内置的槽编辑器,我们菜单 视图 - > 信号/槽 编辑器 点开。
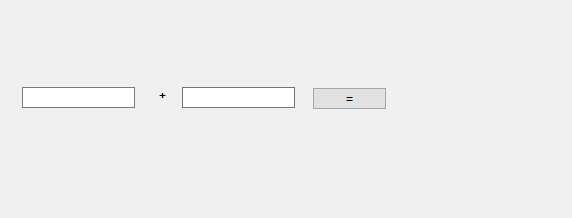
加法实现案例:
UI生成代码:
from PyQt6 import QtCore, QtGui, QtWidgets


class Ui_Form(object):
    def setupUi(self, Form):
        Form.setObjectName("Form")
        Form.resize(748, 279)
        self.lineEdit = QtWidgets.QLineEdit(parent=Form)
        self.lineEdit.setGeometry(QtCore.QRect(30, 100, 113, 21))
        self.lineEdit.setObjectName("lineEdit")
        self.label = QtWidgets.QLabel(parent=Form)
        self.label.setGeometry(QtCore.QRect(160, 100, 21, 16))
        self.label.setObjectName("label")
        self.lineEdit_2 = QtWidgets.QLineEdit(parent=Form)
        self.lineEdit_2.setGeometry(QtCore.QRect(190, 100, 113, 21))
        self.lineEdit_2.setObjectName("lineEdit_2")
        self.pushButton = QtWidgets.QPushButton(parent=Form)
        self.pushButton.setGeometry(QtCore.QRect(320, 100, 75, 23))
        self.pushButton.setObjectName("pushButton")
        self.lineEdit_3 = QtWidgets.QLineEdit(parent=Form)
        self.lineEdit_3.setGeometry(QtCore.QRect(420, 100, 113, 21))
        self.lineEdit_3.setObjectName("lineEdit_3")

        self.retranslateUi(Form)
        self.pushButton.clicked.connect(self.lineEdit_3.show) # type: ignore
        QtCore.QMetaObject.connectSlotsByName(Form)

    def retranslateUi(self, Form):
        _translate = QtCore.QCoreApplication.translate
        Form.setWindowTitle(_translate("Form", "Form"))
        self.label.setText(_translate("Form", "<html><head/><body><p align=\"center\"><span style=\" font-weight:700;\">+</span></p></body></html>"))
        self.pushButton.setText(_translate("Form", "="))
Main测试代码:
"""
    python加载ui文件
    作者 : 小锋老师
    官网 : www.python222.com
"""
import sys

from PyQt6.QtWidgets import QApplication, QLabel, QLineEdit, QPushButton
from PyQt6 import uic


def cal(a: int, b: int, lineEdit_3: QLineEdit):
    lineEdit_3.setText(str(a + b))


def style(lineEdit_3: QLineEdit):
    lineEdit_3.setStyleSheet("background-color:red")


if __name__ == '__main__':
    app = QApplication(sys.argv)

    ui = uic.loadUi("./信号与槽.ui")
    lineEdit: QLineEdit = ui.lineEdit
    lineEdit_2: QLineEdit = ui.lineEdit_2
    lineEdit_3: QLineEdit = ui.lineEdit_3

    lineEdit_3.setHidden(True)

    pushButton: QPushButton = ui.pushButton
    pushButton.clicked.connect(lambda: cal(int(lineEdit.text()), int(lineEdit_2.text()), lineEdit_3))
    pushButton.clicked.connect(lambda: style(lineEdit_3))
    ui.show()

    sys.exit(app.exec())
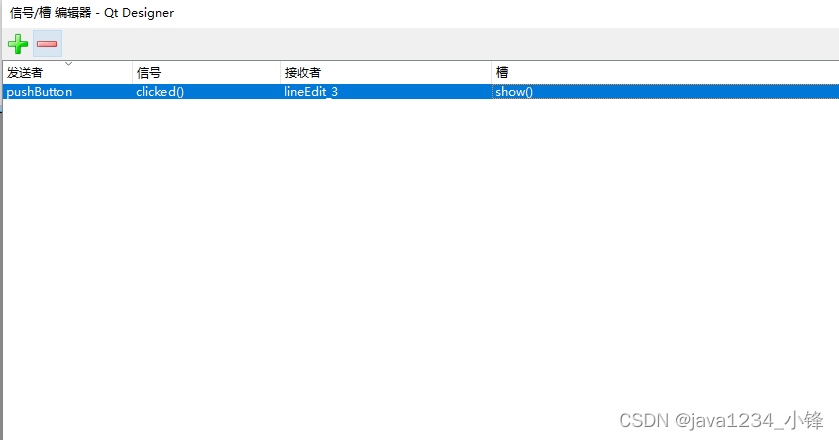
内置槽函数使用,点击按钮,显示出结果文本框。


 42万+
42万+


 被折叠的 条评论
为什么被折叠?
被折叠的 条评论
为什么被折叠?
 到【灌水乐园】发言


