


CYMDelegateChain@github
An implement of delegate chain and broadcast. 实现delegate链/广播
WHY
Delegate是IOS中普通使用的设计模式,通常只能指定一级delegate。但有的时候,比如使用UITableView,如果业务比较复杂,每个section有独立的数据和展示方式,很自然的就会想到把不同的section逻辑封装成不同的类,这时你可能就会希望每个section有自己的delegate。而CYMDelegateChain恰好能帮你做这些事。
WHAT
CYMDelegateChain实现了delegate链,消息会在链上逐级传递,直到到达链表末尾,或者遇到实现了此消息的方法。默认情况下,消息命中第一个方法后不再向下传递,但可以通过在被调用方法内执行CYMDelegateChainContinue(), 设置消息继续向下传递。
- CYMDelegateChainInsert: 在链表前端插入delegate
//将section1插入列表前端
CYMDelegateChainInsert(self.dataSource, section1, self);- CYMDelegateChainRemove: 从链表中删除已存在的delegate
//将section1从链表中删除
CYMDelegateChainRemove(self.dataSource, section1, self);- CYMDelegateChainReplace: 从替换已存在的delegate
//将section1从链表中删除
//将section1替换section2
CYMDelegateChainReplace(self.dataSource, section1, section2, self);- CYMDelegateChainContinue: 设置continue标志,指定当前delegate方法返回后,当前调用结束后,继续调用下一个Delegate,可以实现广播
CYMDelegateChainContinue();HOW
为便于说明,举一个简单的例子:利用CYMDelegateChain,将UITableView的section逻辑独立开来。
下面是关键部分的代码,完整代码请下载源码查看。
封装类,处理section数据
@interface TestTableViewSectionData : NSObject<UITableViewDataSource>
@property NSInteger sectionId;
@end

@implementation TestTableViewSectionData
- (UITableViewCell *)tableView:(UITableView *)tableView
         cellForRowAtIndexPath:(NSIndexPath *)indexPath{
    if (_sectionId == indexPath.section) { //只处理本section的消息
        //作一些与本section相关的事情
        ...
        return cell;
    }else{
        //非本section的消息,交给其他delegate处理
        CYMDelegateChainContinue();
        return nil;
    }

}
- (NSInteger)tableView:(UITableView *)tableView numberOfRowsInSection:(NSInteger)section{
    if (_sectionId == section) { //只处理本section的消息
        //作一些与本section相关的事情
        ...
    }else{
        //非本section的消息,交给其他delegate处理
        CYMDelegateChainContinue();
        return 0;
    }
}
@end
封装类,处理TableView数据,如section数量
@interface TestTableViewData : NSObject<UITableViewDataSource>
@property NSMutableArray* sections;
@end

@implementation TestTableViewData

-(instancetype) init
{
    self = [super init];
    if(self){
        _sections = [[NSMutableArray alloc]init];
    }
    return self;
}

- (NSInteger)numberOfSectionsInTableView:(UITableView *)tableView{
    return _sections.count;
}
@end
扩展UITableView,方便对section的管理
@implementation UITableView(TestSection)

/** 添加section,返回sectionid */
-(NSInteger) addTestSection:(TestTableViewSectionData*) section{

    TestTableViewData*data = objc_getAssociatedObject(self, @"__testdata");
    NSInteger sectionId = 0;
    if(!data){
        data = [[TestTableViewData alloc]init];
        objc_setAssociatedObject(self, @"__testdata", data, OBJC_ASSOCIATION_RETAIN_NONATOMIC);
        //在链中插入新section,只处理numberOfSectionsInTableView
        CYMDelegateChainInsert(self.dataSource, data, self);
    }
    sectionId = data.sections.count;

    section.sectionId = sectionId;
    //在链中插入新section,每个section只处理自己的事件
    CYMDelegateChainInsert(self.dataSource, section, self);

    [data.sections addObject:section];
    return sectionId;
}
@end
操作UITableView,插入多个section
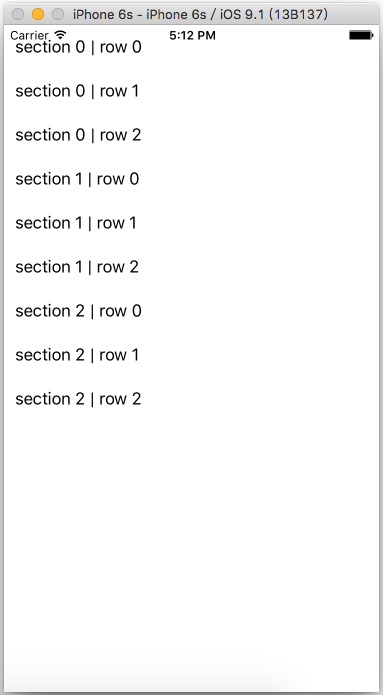
- (void)viewDidLoad { [super viewDidLoad]; //测试section TestTableViewSectionData* sec0 = [[TestTableViewSectionData alloc]init]; TestTableViewSectionData* sec1 = [[TestTableViewSectionData alloc]init]; TestTableViewSectionData* sec2 = [[TestTableViewSectionData alloc]init]; [_tabView addTestSection:sec0]; [_tabView addTestSection:sec1]; [_tabView addTestSection:sec2]; }- 运行查看效果


 1086
1086

 被折叠的 条评论
为什么被折叠?
被折叠的 条评论
为什么被折叠?
 到【灌水乐园】发言


