


 本文详细介绍了Python多线程编程,包括线程原理、线程工作模式、全局锁的概念以及threading模块的使用。通过实例展示了如何创建和管理线程,探讨了线程同步中的锁机制和信号量,并引出了线程池技术,特别是ThreadPoolExecutor的运用,以及Future对象在异步编程中的作用。
由浅入深掌握Python多线程编程
转载本文,务必注明作者与CSDN原文连接地址
一、 Python多线程编程原理
1. 什么是线程
多线程(multithreading),是指从软件或者硬件上实现多个线程并发执行的技术。具有多线程能力的计算机因有硬件支持而能够在同一时间执行多于一个线程,进而提升整体处理性能。在一个程序中,这些独立运行的程序片段叫作“线程”(Thread),使用线程编程的概念就叫作“多线程处理”
先通过比较两组概念来加深理解多线程处理。
概念:并发(concurrency) 与 并行(Parallelism) 区分
- 并发,是指1个CPU同时启动两个或更多任务。多线程属于并发概念范畴。
- 并行,是指同时启动两个或更多任务,每个任务运行在各自独立CPU上。 多进程是并行概念范畴。
注:如果只有1个CPU核,多进程是伪并行,无法执行真正的并行运算。
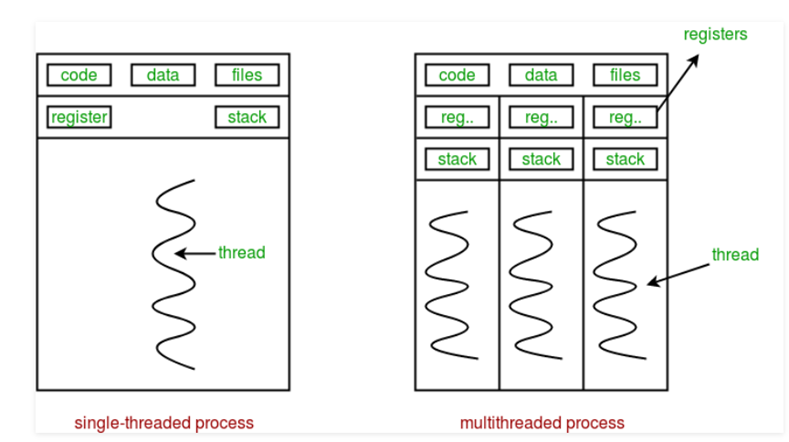
如何区别进程与线程?
1个进程有自己的地址空间、内存区、数据堆栈区. 而线程依附于进程,多个线程共享地址空间,指令区,但有自己的寄存区、堆栈指针、内存变量等。 如下图所示。
2. 线程工作原理
线程有开始、顺序执行和结束三部分。线程内部有1个指令指针,记录自己运行到什么地方。线程的运行可能被抢占(中断),或暂时的被挂起(也叫睡眠),让其他的线程运行,这叫做让步。一个进程中的各个线程之间共享同一片数据空间,所以线程之间可以比进程之间更方便地共享数据以及相互通讯。线程一般都是并发执行的,正是由于这种并行和数据共享的机制使得多个任务的合作变为可能。
几乎每个程序代码运行时,都会有各种I/O操作,由于I/O的完成时间不可确定性,那么程序在等待期间,阻塞了后续任务的执行,降低了程序总体运行速度。
1个典型的实例是网络服务器程序,可能许多客户同时访问,每条客户连接绝大部分时间其实都是在等待客户端发送请求,服务器进程为每个客户的网络连接开启1个子线程,这样服务器就可以同时处理很多连接,还可以保持良好的实时性。如果没有应用多线程,那么服务器1次只能处理1个客户,其它客户就必须等待,这是无法接受的。
3. Python全局锁与线程关系
什么是全局解释器锁(GIL)
Python代码的执行由Python虚拟机(也叫解释器主循环)来控制。Python在设计之初就考虑到要在主循环中,同时只允许一个线程在执行,如同单CPU的系统中可以运行多个进程,内存中可以存放多个程序,但在任意时刻,只有一个程序在CPU中运行。同样地,虽然Python解释器中可以“运行”多个线程,但在任意时刻,只有一个线程在解释器中运行。
对Python虚拟机的访问由全局解释器锁(global interpreter lock, GIL)来控制,正是这个锁能保证同一时刻只有一个线程在运行。在多线程环境中,Python虚拟机按以下方式执行:
- 设置GIL。
- 切换到一个线程去运行。
- 运行:
- 指定数量的字节码的指令,
- 或者 b.线程主动让出控制(如调用time.sleep(0))
- 把线程设置为睡眠状态。
- 解锁GIL。
- 再次重复以上所有步骤。
每个线程轮流执行,每次执行的时间片都非常短。如果某个线程执行时间片内遇到I/O调用, GIL会被释放,以允许其他的线程在这个线程等待I/O的时候运行。如果某线程并未使用很多I/O操作,它会用完自己的时间片才归还GIL。
来看两个典型例子:
例1:当编写网络通信服务程序时,服务器监听到1个连接请求后,相关操作包含接收请求,接收消息,发送消息,关闭连接,客户端的处理要花时间,网络传输也要花时间。如果同时有几十个用户连接,则服务器上后面的连接都要被阻塞,或排队等待,对于实时性业务是无法接受的。采用多线程方式的话,服务器监听到1个连接请求就创建1个线程来执行与用户通信任务,多个线程并发处理,那么就不会出现阻塞状况了。
例2:编写带GUI界面(如QT)的程序时,当渲染界面时,中间有个任务加载耗时较长,就会造成主线程阻塞,致使画面卡顿,或不能响应用户操作,给用户带来较差的体验。如果将此类任务放进1个后台子线程中执行,就可避免渲染GUI页面的主线程被阻塞。
因此,尽管有全局锁的限制,I/O密集型的程序采用多线程编程仍然具备明显优势。
4. Python 支持多线程的模块
Python提供了几个用于多线程编程的模块,包括thread、threading等。thread和threading模块允许程序员创建和管理线程。thread模块提供了基本的线程和锁的支持,而threading提供了更高级别,功能更强的线程管理的功能。Python官网推荐使用threading 模块编程。
此外,标准库的 concurrent.future 模块还提供一种异步线程池的实现类ThreadPoolExecutor,适用于高并发的场景。
二、由简单的示例初步了解多线程编程步骤
先通过1个简单示例来演示创建1个线程的实现过程,本示例采用函数式编程方法
- 首先要定义1个任务函数,本例任务函数带1个参数,
- 其次使用 threading模块创建1个线程对象,在线程构造方法中,传入任务函数名,以及参数
- 执行线程
# th_test.py
import logging
import threading
import time

#定义任务函数
def thread_function(name):
    logging.info("Thread %s: starting", name)
    time.sleep(2)
    logging.info("Thread %s: finishing", name)

if __name__ == "__main__":
    format = "%(asctime)s: %(message)s"
    logging.basicConfig(format=format, level=logging.INFO,
                        datefmt="%H:%M:%S")

    logging.info("Main    : before creating thread")
    th_obj = threading.Thread(target=thread_function, args=(1,))
    logging.info("Main    : before running thread")
    th_obj.start()
    logging.info("Main    : wait for the thread to finish")
    logging.info("Main    : all done")
上述代码中最关键的语句是下面这两句。
th_obj = threading.Thread(target=thread_function, args=(1,))
th_obj.start()
其表示,创建1个线程,执行任务函数 thread_function(), 并传入1个参数。
th_obj.start() 表示启动线程。
下面运行th_test.py ,输出如下:
Main    : before creating thread
Main    : before running thread
Thread 1: starting
Main    : wait for the thread to finish
Main    : all done
Thread 1: finishing
但你可能注意到,主线程打印了" all done" 后,子线程才打印出"finishing", 似乎子线程在主线程之后结束,
再看下面这个例子,我们创建了2个线程,在调用start()方法后,又立即调用join()方法,意味着主线程暂停运行,等待子线程运行结束后再继续。
#!/usr/bin/python
# -*- coding: UTF-8 -*-

import threading    #导入threading 模块
import time

# 线程函数
def print_time ( threadName ,delay ):
    count = 0
    while count < 5:
        time.sleep(delay)
        count += 1
        print("%s: %s \n" % (threadName,time.ctime(time.time())))

#线程函数
def print_cube(num):
    #pring cube
    print("Cube:{} \n".format(num*num*num))

# 创建两个线程
if __name__ == "__main__":
        # create sub threads
        t1 = threading.Thread( target=print_cube,args=(10,))
        t2 = threading.Thread( target=print_time,args=("Thread-2",4,))
        #start threads
        t1.start()
        t2.start()
        #join 命令:让当前主线程暂停运行,等待子线程运行完
        t1.join()
        t2.join()
        print("All done") # The statement is executed after sub threads done
为了更深入掌握多线程编程,还需要进一步了解 threading模块有哪些属性与方法。
三、标准库 threading 模块介绍
1. threading 模块的主要属性、方法,以及公共函数
thread 模块是python 低阶多线程编程接口模块,threading模块则封装了thread, 使用更方便,因此,多线程编程推荐使用threading模块,而threading模块中最重要类为 Thread类。
threading.Thread 对象构造方法
构造方法的格式:
threading.Thread(target=None, name=None, args=(), kwargs={}, daemon=None)
参数说明
- target 任务函数名称
- args 元组方式的参数表。
- kwargs[] 可变参数
- daemon 是否为后台运行
如下例,将创建1个线程对象,任务函数为myfunc, 传入参数 10, 为后台运行。
th_obj = threading.Thread(myfunc, (10, ), daemon=True )
threading.Thread类的主要属性
- name 线程名字
- native_id 线程id(系统分配)
- daemon bool类型(是否为后台线程)
threading.Thread类的方法:
- start(), 启动线程
- join(), 告知主线程等待
- setName(), 设置线程名
- getName() 获取线程名
- get_native_id()
- is_alive() 线程状态是否为active
- isDaemon(), setDaemon() 获取、设置后台状态
2. threading模块提供的公共函数
函数是模块提供的公共方法,不属于类方法
threading.active_count(),   #返回当前活动状态的线程对象列表
threading.current_thread()  #返回当前线程对象
threading.get_native_id()   #获取线程id
threading.enumerate()       #返回当前活动状态线程的迭代器
threading.main_thread()     #返回主线程对象
四、用类的方式来创建多线程
创建步骤:
- 使用threading.Thread创建你的线程子类,
- 重写
__init__()方法和run()方法, 需要在线程中执行的代码放在run()方法内。 - 在主线程中,创建子线程对象,调用start() 启动线程,join() 等待子线程执行完成。
示例:
#!/usr/bin/python
# -*- coding: UTF-8 -*-

import threading
import time

class myThread(threading.Thread):
    def __init__(self,threadID,name,counter):    # 有3个参数
        super(myThread,self).__init__()     # 调用父类构造方法
        self.threadID = threadID
        self.name = name
        self.counter =counter

	def print_time( threadName ,delay ):  #功能方法
	    count = 0
	    while count < 3:
	        time.sleep(delay)
	        count += 1
	        print("%s: %s \n" % (threadName,time.ctime(time.time())))

    def run(self):                           # 重写run方法
        print("Starting " + self.name)
        print_time(self.name,self.counter)   # 调用功能方法
        print("Exiting " + self.name)

th1 = myThread(1,"Thread-1",2 )           # 创建基于类的线程
th1.start()
th1.join()

print("Done -- main thread")
运行结果:

五. 线程生命周期管理
线程生命周期管理,包含线程启动,状态查询,线程关闭等操作,以及处理线程异常。
1. 线程管理的基本操作
线程启动,当线程对象一旦被创建,其活动必须通过调用线程的 start() 方法开始, 在内部会调用该对象的run()方法。
th1 = threading.Thread(taraget=myfunc,name="thread_1", (10,))
th1.start()   #启动线程
th1.join()    #指示主线程暂时挂起,等待子线程运行结束
查看线程状态
一旦线程活动开始,该线程会被认为是 ‘存活的’ 。当它的 run() 方法终结了(不管是正常的还是抛出未被处理的异常),就不是’存活的’。 is_alive() 方法用于检查线程是否存活。
if th1.is_alive():
    print('Still running')
else:
    print('Completed')
子线程关闭方式,通常有几种情况:
- 子线程启动后,主线程也不等待子线程,子线程运行结束后自行关闭
- 子线程启动后,调用 join()方法,主线程等待子线程运行结束。
- 子线程是耗时任务,启动后,主线程不等待子线程,但主线程通过全局变量或Event信号来关闭子线程
2. 如何关闭执行耗时任务的线程
思路:在线程内添加状态变量,线程循环时同时检测状态变量,主线程关闭线程时,把状态变量置为False.
示例:
class CountdownTask:

      def __init__(self):
          self._running = True   # 定义线程状态变量

def terminate(self):
    self._running = False

def run(self, n):
    # run方法的主循环条件加入对状态变量的判断
    while self._running and n > 0:
        print('T-minus', n)
        n -= 1
        time.sleep(5)
    print("thread is ended")

c = CountdownTask()
th = Thread(target = c.run, args =(10, ))
th.start()

#对于耗时线程,没必要再用join()方法了
# … any code …
# Signal termination
Q = input("please press any key to quit ")
c.terminate()
对于函数式编程,可以用全局变量做状态变量,用于通知关闭线程
import threading
import time

def run():
    while True:
        print('thread running')
        global stop_threads
        if stop_threads:
            break

stop_threads = False
t1 = threading.Thread(target = run)
t1.start()
time.sleep(1)
stop_threads = True
t1.join()
print('thread killed')
3. 如何处理子线程异常
threading定义了一些默认异常处理回调方法。如果子线程发生异常,则默认 threading.excepthook回调方法会处理异常,不至于造成主线程退出。但是子线程如果抛出1个非预期的异常,则可能会造成系统终止。
解决方法: 定义1个接收异常的回调函数 exception hook(也可以称为钩子函数),替换系统默认的excepthook。
首先,自定义1个hook函数,简单地将收到的异常信息打印出来,
# custom exception hook
def custom_hook(args):
    # report the failure
    print(f'Thread failed: {args.exc_value}')
然后在主线程中,将 threading.excepthook 指向自定义的异常处理回调函数,无论收到什么异常都会调用这个函数。
# set the exception hook
threading.excepthook = custom_hook
完整示例代码如下
# example of an unhandled exception in a thread
from time import sleep
import threading

# target function that raises an exception
def work():
    print('Working...')
    sleep(1)
    # rise an exception
    raise Exception('Something bad happened')

# 自定义异常处理回调函数
def custom_hook(args):
    # report the failure
    print(f'Thread failed: {args.exc_value}')

# 将 threading.excepthook 指向自定义的异常处理回调函数
threading.excepthook = custom_hook
# create a thread
thread = threading.Thread(target=work)
# run the thread
thread.start()
# wait for the thread to finish
thread.join()
# continue on
print('Continuing on...')
六、线程间同步
1. 多线程的同抢问题
当多个线程同时访问1个数据资源 (如全局变量)时,thread1 在刚修改完,还未读取,马上又被 thread3修改,这时thread1显示了错误的数据。多个线程同时对数据库表进行操作时,也会遇到同样问题。 解决方法是添加同步锁

2. threading.Lock 解决资源同抢问题
Threading 模块提供了Lock 类来解决这个资源同抢问题。 在低层,Lock 使用OS的Semaphore(信号量) object 来实现的。
Lock对象使用方式:
1) 当线程需要在读写数据前,使用 acquire() 方法加锁,其它线程将无法操作。
2) 使用完成后,使用release() 释放锁。
注意:
如果lock没有正确释放,则其它线程可能永久等待状态而吊死,
示例 :
import threading

x = 0         # 定义1个全局变量 x

def increment():
    global x
    x += 1

def thread_task(lock):
    #task for thread
    for _ in range(100000):
        lock.acquire()  # 申请锁,数据不能被其它线程修改了
        increment()
        lock.release()  # 释放锁

def main_task():
    global x
    # setting global variable x as 0
    x = 0

    # creating a lock
    lock = threading.Lock()

    # creating threads
    t1 = threading.Thread(target=thread_task, args=(lock,))
    t2 = threading.Thread(target=thread_task, args=(lock,))

    # start threads
    t1.start()
    t2.start()

    # wait until threads finish their job
    t1.join()
    t2.join()

if __name__ == "__main__":
    for i in range(10):
        main_task()
        print("Iteration {0}: x = {1}".format(i, x))
在python新版本里,推荐通过with 语句以上下文管理器方式来使用 lock同步锁, 使得代码更简洁,且不容易出错。
with some_lock:
    # do something...
等同于:
some_lock.acquire()
try:
    # do something...
finally:
    some_lock.release()
3. 信号量的使用
有时我们允许同时多个线程访问某个资源,Lock就不适合了。这时可以使用Semaphore,其可以控制访问数,在它的内部维护了一个计数器,每一次acquire操作都会让计数器减1,每一次release操作都会让计数器加1,当计数器为0时,任何线程的acquire操作都不会成功,Semaphore确保对资源的访问有一个上限, 这样,就可以控制并发量。
import threading
import time

semaphore = threading.Semaphore(2)

def worker(id):
    print('thread {id} acquire semaphore'.format(id=id))
    semaphore.acquire()
    print('thread {id} get semaphore do something'.format(id=id))
    time.sleep(2)
    semaphore.release()
    print('thread {id} release semaphore'.format(id=id))


for i in range(10):
    t = threading.Thread(target=worker, args=(i, ))
    t.start()
当然还有其它线程间通信方式,如 Event 等,此文不做深入讨论,将在单独的博文中介绍。
七、高并发编程–线程池技术
当需要很多任务同时执行时,如果用前面的方法逐个来创建线程,代码量比较大。可以使用线程池来简化操作。
concurrent.futures提供了ThreadPoolExecutor()方法创建线程池,其创建的线程与线程是异步执行的。
注意:不要用ThreadPoolExecutor创建的线程去执行long-run的任务。
1. 创建线程池:
语法:
concurrent.futures.ThreadPoolExecutor(
max_workers=None,
thread_name_prefix=“”
)
如 executor = ThreadPoolExecutor(max_workers=10)
2. 向线程池添加线程
方式一:通过map() 将任务线程加入线程池
# call a function on each item in a list and process results
# items is parameter tuple list
for result in executor.map(task, items):
	# process result...
方式二: 通过submit提交
每一次submit,ThreadPoolExecutor会返回1个future object。
这时task可能执行完,也可能还没执行,可以通过future对象 来查询 任务状态,也可以获得执行结果。
# submit a task to the pool and get a future immediately
future = executor.submit(task, item)
# get the result once the task is done
result = future.result()
在executor.submit()返回的future 对象非常有用,后有介绍。
3. 关闭线程池
线程池执行后,可以用shutdown()方法关闭
# shutdown the thread pool
executor.shutdown()
也可以使用上下文方式,线程池会自动关闭
..
# create a thread pool
with ThreadPoolExecutor(max_workesr=10) as executor:
	# call a function on each item in a list and process results
	for result in executor.map(task, items):
		# process result...
	# ...
# shutdown is called automatically
4. 线程池实例
import requests
import time
from concurrent.futures import ThreadPoolExecutor

img_urls =  [
    'https://media.example.com/wp-content/uploads/20190623210949/download21.jpg',
    'https://media.example.com/wp-content/uploads/20190623211125/d11.jpg',
    'https://media.example.com/wp-content/uploads/20190623211655/d31.jpg',
    'https://media.example.com/wp-content/uploads/20190623212213/d4.jpg',
    'https://media.example.com/wp-content/uploads/20190623212607/d5.jpg',
    'https://media.example.com/wp-content/uploads/20190623235904/d6.jpg',
]


t1 = time.perf_counter()
def download_image(img_url):
    img_bytes = requests.get(img_url).content
    print("Downloading...")

# Fetching images concurrently thus speeds up the download.
with ThreadPoolExecutor(10) as executor:
    executor.map(download_image, img_urls)

t2 = time.perf_counter()
print(f'MultiThreaded Code Took:{t2 - t1} seconds')
output:
Downloading...
Downloading...
Downloading...
Downloading...
Downloading...
Downloading...
MultiThreaded Code Took:1.7290295 seconds
5. Future 对象介绍
5.1 什么是 Future 对象?
Future对象是并发、异步编程中一个重要概念。由于没有找到合适的中文用词,暂时使用Future英文单词。从功能上,可以将Future 对象理解为:一个指向线程对象的全局变量,其内部保存着指向子线程对象的指针。主线程可通过Future 对象获取子线程的状态及子线程返回结果,也可以通过 Futrue 来添加回调函数处理线程返回结果。
正确理解Future的含义,并掌握其使用方式,对于提高多线程编程很有必要。
在线程池编程中,executor.submit() 提交线程后返回 Future 对象。
5.2 Future 对象的主要方法及示例
- cancel() 中止线程
- cancelled(), 如果线程已中止,返回true,
- running() 返回运行状态
- done() 子线程调用已完成,返回true, 否则 false
- result() 线程返回值
- add_done_callback(fn), 添加回调函数,传入参数为线程返回结果
- exception() 获取线程产生的异常
使用示例 :
with ThreadPoolExecutor(max_workers=1) as executor:
    future = executor.submit(pow, 323, 1235)
    print(future.result())


 4540
4540

 被折叠的 条评论
为什么被折叠?
被折叠的 条评论
为什么被折叠?
 到【灌水乐园】发言


