


在vue中我们通常使用template进行模板的设计,但是在某些时候无法使用template进行渲染,此时需要使用render函数。实际在vue源码中,template会被转化成render函数。
1、render函数的简单用法
render函数接收1个参数(createElement函数),返回值是createElement函数的返回值(实际就是一个虚拟DOM)。createElement函数接收3个参数,分别代表HTML标签名(也可以是组件对象或者resolve 了上述任何一种的一个 async 函数)、数据对象和子级虚拟节点(由 createElement() 构建而成,也可以使用字符串来生成文本虚拟节点)。其中数据对象和子级虚拟节点是可选项。
首先看个小例子,假如需要渲染下面的HTML:
<div>hello, world!</div>
使用template如下:
new Vue({
	template: `<div>hello, world!</div>`
})
如果使用render函数:
new Vue({
	render(h) {
		// h 是 createElement 函数的简写,h 是 hyper 的首字母
		// 类似于 HTML(超文本标记语言)和 http(超文本传输协议)
		// 中的 h。
		return h("div", "hello, world!"); // "hello, world!"会被转换为文本虚拟节点
	}
})
稍微复杂一点:
<div>
	<p>hello, world!</p>
</div>
使用template:
new Vue({
 template: `<div><p>hello, world!</p></div>`
})
使用render:
new Vue({
	render(h) {
		return h("div", [
			h("p", "hello, world!") // 注意这里再次使用了h函数,并且放在了一个数组中,实际是生成了虚拟DOM,因为子节点通常不止一个,所以需要一个数组。而文本节点不需要使用h函数是因为vue内部做了处理
		]);
	}
})
再复杂点,给标签添加一些属性:
<div id="app">
	hello, world!
</div>
使用template:
new Vue({
	template: `<div id="app">hello, world!</div>`
})
使用render:
new Vue({
	render(h) {
		return h("div", {
			attrs: { // 数据对象中的 attrs 表示 attributes,也就是我们常见的html标签属性,如 id,class,style等,但是class和style在数据对象中单独有一个字段描述,具体请看vue官方文档 https://cn.vuejs.org/v2/guide/render-function.html
				id: "app"
			}
		}, "hello, world!");
	}
})
上述代码表明,数据对象其实就是一个用来描述标签的对象,包含attributes、props、class、style、slots、scopedSlots等,实际就是我们在vue项目中常见的那些值。
2、使用render函数渲染插槽
要使用render函数渲染插槽,首先需要知道vue给我们提供的两个API:$slots和$scopedSlots,分别用来获取插槽和作用域插槽。
例如:
<div id="app">
	<Com>
	    <p>我是默认插槽</p>
	    <template v-slot:footer>我是具名插槽</template>
  	</Com>
</div>
const log = console.log;
const dir = console.dir;

const Com = {
  template: `<p><slot></slot><slot name="footer"></slot></p>`,
  mounted() {
    log(this.$slots) // 打印插槽内容
  }
};

const vm = new Vue({
  el: "#app",
  components: {
    Com
  }
});
打印输出如下:
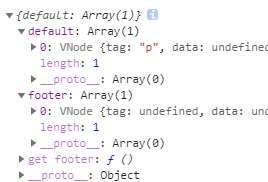
可以发现返回结果是一个对象,属性名是插槽的名字,属性值是一个数组,数组的每个元素就是插槽的内容的转化后的虚拟DOM。
作用域插槽的用法类似,不同的是属性值是一个函数,函数返回值是一个数组,数组的每个元素就是插槽的内容的转化后的虚拟DOM
<div id="app">
    <Com>
      <template v-slot="scoped"><p>{{ scoped }}</p></template>
      <template v-slot:footer="scoped">{{ scoped }}</template>
    </Com>
</div>
const log = console.log;
const dir = console.dir;

const Com = {
  template: `<p><slot :msg="msg"></slot><slot name="footer" :footer="footer"></slot></p>`,
  data() {
    return {
      msg: "hello, world",
      footer: "footer name"
    };
  },
  mounted() {
    const scopedSlots = this.$scopedSlots;
    for (const key in scopedSlots) {
      log(scopedSlots[key]());
    }
  }
};

const vm = new Vue({
  el: "#app",
  components: {
    Com
  }
});
打印输出如下:

那么怎样使用render函数达到这样的效果?首先看匿名插槽:
<div>
	<slot></slot>
</div>
通过前面对$slots的描述知道,其返回的对象的属性值是一个含有虚拟DOM的数组,正好是我们需要的。
render(h) {
	return h("div", this.$slots.default);
}
具名插槽类似:
<div>
	<slot name="footer"></slot>
</div>
render(h) {
	return h("div", this.$slots.footer);
}
作用域插槽也类似,只不过需要多一次函数调用:
<div id="app">
   <Com>
     <template v-slot="scoped"><p>{{ scoped }}</p></template>
     <template v-slot:footer="scoped">{{ scoped }}</template>
   </Com>
</div>
const Com = {
	 template: `<p><slot :msg="msg"></slot><slot name="footer" :footer="footer"></slot></p>`,
	 data() {
	   return {
	     msg: "hello, world",
	     footer: "footer name"
	   };
	 }
};
const Com = {
  data() {
    return {
      msg: "hello, world",
      footer: "footer name"
    };
  },
  render(h) {
    return h("p", [
      this.$scopedSlots.default({
        msg: this.msg
      }), // 注意这里传入函数的对象其实就是上面的scoped的值
      this.$scopedSlots.footer({
        footer: this.footer
      })
    ]);
  }
};
由于render函数相对抽象,再举几个例子,比如说要渲染下面的子组件:
// 子组件 child
<script type="x-template" id="child">
	<div>
		<p>
			<slot :text="text"></slot>
		</p>
	</div>
</script>
const child = {
	template: "#child",
	data() {
		return {
			text: "hello, world!"
		};
	}
};
使用render函数如下:
const child = {
	data() {
		text: "hello, world!"
	},
	render(h) {
		return h("div", [
			h("p", this.$slots.default)
		]);
	}
};
为了便于理解,可以将this.$slots.default理解成<slot></slot>,将this.$slots.footer理解成<slot name="footer"></slot>,然后放置插槽的位置就和template一样的思路即可。例如想要在p标签放置默认插槽,则将this.$slots.default当做p标签的子元素即可。具名插槽和作用域插槽类似。
但是要注意的是,由于this.$scopedSlots的属性值是函数,如果调用不存在的函数则会报错,如下:
<com></com>
const Com = {
  data() {
    return {
      msg: "hello, world",
      footer: "footer name"
    };
  },
  render(h) {
    return h("ul", [
      h("li", this.$scopedSlots.default({
        msg: this.msg
      })),
    ]);
  }
};

const vm = new Vue({
  el: "#app",
  components: {
    Com
  }
});
上面代码中,由于并未使用作用域插槽,所以this.$scopedSlots.default是undefined,所以会报错:
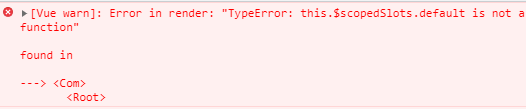
这里可以做个判断,利用es6的新语法?.即可。?.的用法很简单,就是判断对象是否存在,如果存在则取出.号后面的属性对应的值。
例如,过去我们这么写:
const obj = {
	a: "123",
	b: "456"
};
const c = obj && obj.c;
现在可以这样写:
const c = obj?.c;
还可以连续使用:
const cc = obj?.c?.cc;
因此上述render函数可以改成:
render(h) {
  return h("ul", [
    h("li", this.$scopedSlots.default?.call(this, {
      msg: this.msg
    })),
  ]);
}
利用这个方法,也可以给插槽设置默认值:
render(h) {
	return h("div", this.$slots.default ?? "我是默认值"); // ?? 也是新语法,用于替代 || ,它限定当 ?? 前为 null 或者 undefined 时返回 ?? 后面的值,否则一律返回 ?? 前面的值。相比 || 更加精确
}
通过上面的描述,使用render函数实现大部分的插槽已经不是问题了。那么假如有一个child组件,现在需要在child组件中使用插槽该怎么办呢?
例如:
// 子组件 child
<script type="x-template" id="child">
	<div>
		<p>
			<slot :text="text"></slot>
		</p>
		<p>
			<slot name="footer" :msg="msg"></slot>
		</p>
	</div>
</script>
const child = {
	template: "#child",
	data() {
		return {
			text: "hello, world!",
			msg: "你好,世界!"
		};
	}
};
默认插槽和具名插槽和前面一样,不过是子元素换成组件,并且需要给数据对象里面的slot选项指定名字,表明插入的值是放在哪个插槽中。
render(h) {
	return h("div", [
		h(child, [h("header", { slot: "default" }, "我是从父组件传入子组件默认插槽的内容")]),
		h(child, [h("footer", { slot: "footer" }, "我是从父组件传入子组件具名插槽的内容")]),
	]);
}
效果等价于:
<div>
	<child>
		<template>
			<header>我是从父组件传入子组件默认插槽的内容</header>
		</template>
	</child>
	<child>
		<template v-slot:footer>
			<footer>我是从父组件传入子组件具名插槽的内容</footer>
		</template>
	</child>
</div>
我们发现使用这种方式没办法同时给具名插槽和默认插槽赋值。相信从前面已经发现,所有使用$slots的均可以使用$scopedSlots替代,且这也是官方推荐的。因为函数易于扩展,且vue3已经全部改成函数形式了,利于代码更新迭代。给子组件的插槽赋值也类似。
使用作用域插槽如下:
render(h) {
	return h(child, {
		scopedSlots: {
			default(props) {
				// 这里 props 是一个对象,包含子组件里面插槽上绑定的属性值
				return h("header", "我是从父组件传入子组件默认插槽的内容");
			},
			footer(props) {
				return h("footer", "我是从父组件传入子组件具名插槽的内容");
			}
		}
	});
}
效果等价于:
<div>
	<child>
		<template>
			<header>我是从父组件传入子组件默认插槽的内容</header>
		</template>
		<template v-slot:footer>
			<footer>我是从父组件传入子组件具名插槽的内容</footer>
		</template>
	</child>
</div>
对于作用域插槽,只要使用对应的作用域插槽函数传递的属性对象即可:
render(h) {
	return h(child, {
		scopedSlots: {
			default(props) {
				// 这里 props 是一个对象,包含子组件里面插槽上绑定的属性值,属性名
				// 是绑定的属性名,属性值是绑定的属性值
				return h("header", props.text);
			},
			footer(props) {
				return h("footer", props.msg);
			}
		}
	});
}
等价于:
<div>
	<child>
		<template>
			<header>hello, world!</header>
		</template>
		<template v-slot:footer>
			<footer>你好,世界!</footer>
		</template>
	</child>
</div>
到这块render函数的基本功能已经介绍完毕了,总结就是尽量使用作用域插槽的方式设置插槽的值,vue2迟早过时,最终我们都将投向vue3的怀抱。
以上。


 863
863


 被折叠的 条评论
为什么被折叠?
被折叠的 条评论
为什么被折叠?
 到【灌水乐园】发言


