


github地址:https://github.com/jiesutd/NCRFpp
一、网页翻译
NCRF++: An Open-source Neural Sequence Labeling Toolkit
NCRF++:一个开源的神经序列标注工具包
Sequence labeling模型在许多NLP任务中都很流行,如命名实体识别(NER)、词性标注(POS)和分词。最先进的序列标注模型大采用了CRF结构 with input word features。LSTM(或BiLSTM)是一种基于深度学习的序列标注任务特征提取器。
NCRF++是一个基于PyTorch的框架,可以灵活选择输入特性和输出结构,可以通过配置文件完全配置,不需要任何代码工作。
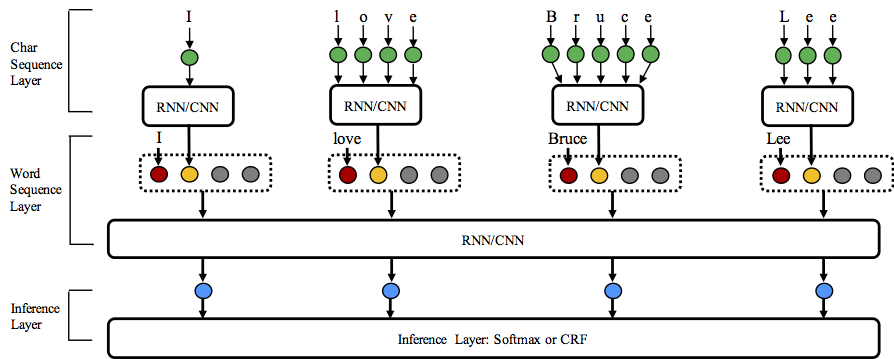
NCRF++ supports diffent structure combinations of on three levels: character sequence representation, word sequence representation and inference layer.
Character sequence representation:character LSTM, character GRU, character CNN and handcrafted word features.
Word sequence representation:word LSTM, word GRU, word CNN.
Inference layer:Softmax, CRF.
要求:
Python: 2 or 3
PyTorch: 0.3 (currently not support 0.4, waiting the release of PyTorch 1.0)
优点:
1.Fully configurable:所有的神经模型结构都可以用配置文件来设置。
2.State-of-the-art
3.Flexible with features:用户可以定义自己的特性和预训练的特性嵌入。
4.Fast running speed:NCRF++充分利用批处理操作,GPU (>1000sent/s training,>2000sents/s decoding)使系统高效运行。
5.N best output:NCRF++ support nbest decoding (with their probabilities).
1.Usage
In training status: python main.py --config demo.train.config
In decoding status: python main.py --config demo.decode.config
NCRF++支持通过修改配置文件设计神经网络结构。配置文件控制网络结构、I/O、训练设置和超参数。
这里列出了详细的配置和说明。
NCRF++设计为三层(如下图所示):字符序列层;词序层和推理层。另一方面,用户可以通过设计自己的模块来扩展每一层(例如,他们可能想要设计自己的神经结构,而不是CNN/LSTM/GRU)。层次化设计使模块扩展更加方便,模块扩展说明在这里。
2.Data format
您可以参考sample_data中的数据格式。NCRF++支持BIO和BIOES(BMES)标签方案。请注意,目前不支持IOB格式(与BIO不同),因为这个标签方案比较旧,而且比2017年的Reimers和Gurevych更糟糕。本文阐述了这三种标签方案的区别。我写了一个脚本,将标签方案在IOB/BIO/BIOES中转换。
4.External feature defining
NCRF++集成了CNN、LSTM、GRU等多个SOTA神经特征提取器。此外,手工制作的feature已经被证明在顺序标记任务中很重要。NCRF++允许用户设计自己的feature,如大写、POS或任何其他特性(上图中的灰色圆圈)。用户可以通过配置文件配置自定义特性(feature embedding size, pretrained feature embeddings等)。示例输入数据格式在train.cappos.bmes,其包括两个人类定义的特性[POS]和[Cap]。([POS]和[Cap]就是两个例子,你可以给你的特性取任何你想要的名字。)用户可以配置每个特性通过使用:
feature=[POS] emb_size=20 emb_dir=%your_pretrained_POS_embedding
feature=[Cap] emb_size=20 emb_dir=%your_pretrained_Cap_embedding
没有预训练embedding的特性将被随机初始化。
6.N best decoding performance:
传统的CRF结构只能解码一个具有最大概率的标签序列(即1-best output)。而NCRF++可以提供一个large choice,它可以解码n个标签序列 with the top n probabilities(即n-best output)。一些流行的统计CRF框架支持nbest解码。然而就我们所知,NCRF++是唯一也是第一个支持nbest解码的神经CRF模型的工具包。
在我们的实现中,当nbest=10时,在NCRF++中构建的CharCNN+WordLSTM+CRF模型可以在CoNLL 2003 NER任务上给出97.47% oracle F1-value(当nbest=1时F1 = 91.35%)。
二、train
1. demo.train.config文件按照自己的配置更改
1.1改为自己的数据集地址
train_dir(dev_dir/test_dir)=sample_data/train.bmes => train_dir=sample_data/train.lb.three
1.2因为没有预训练,所以将word_emb_dir=sample_data/sample.word.emb注释掉
1.3因任务不同,所以将use_crf=True改成False
2. train时,执行命令 python main.py --config demosz.train.config;
运行结束后,sample_data目录下自动生成 lstmcrf.0.model lstmcrf.dset,且运行的命令行输出如下:
Seed num: 42
MODEL: train
Dev instance number: 3917
Test instance number: 2746
Raw instance number: 0
FEATURE num: 0
Model Network:++++++++++++++++++++++++++++
Model use_crf: False # # # # # # # # # # config中自己设置
Model word extractor: LSTM
Model use_char: True
Model char extractor: CNN
Model char_hidden_dim: 50
Training:+++++++++++++++++++++++++++++++++
Optimizer: SGD
Iteration: 1 # # # # # # # # # # # # # # # # # # # 所以只训练了一轮
BatchSize: 10
Average batch loss: False
Hyperparameters:+++++++++++++++++++++++++
Hyper lr: 0.015
Hyper lr_decay: 0.05
Hyper HP_clip: None
Hyper momentum: 0.0
Hyper l2: 1e-08
Hyper hidden_dim: 200
Hyper dropout: 0.5
Hyper lstm_layer: 1
Hyper bilstm: True
Hyper GPU: True
DATA SUMMARY END.
+++++++++++++++++++++++++++++++++++++++++
build network...
use_char: True # # # # # # # # # # config中自己设置
char feature extractor: CNN
word feature extractor: LSTM
use crf: False
build word sequence feature extractor: LSTM...
build word representation...
build char sequence feature extractor: CNN ...
Epoch: 0/1 # # # # # # # # # # # # # # # 所以只训练了一轮
Learning rate is set as: 0.015 # # # # # # # # # # # # # # # 500条数据输出一次
Instance: 500; 。。。。。。。。。。。。。
Instance: 22761; Time: 0.46s; loss: 559.9456; acc: 524311.0/546481.0=0.9594
Epoch: 0 training finished. Time: 41.17s, speed: 552.90st/s, total loss: 86268.38992738724
gold_num = 2823 pred_num = 1724 right_num = 1270 # # #gold:BIO中的BI,pred:预测的BI个数,right:预测出几个正确的
Dev: time: 3.68s, speed: 1083.29st/s; acc: 0.9682, p: 0.7367, r: 0.4499, f: 0.5586 # # # # # dev 准确率 0.968
Exceed previous best f score: -10
Save current best model in file: sample_data/lstmcrf.0.model # # # # # # # # # # # # # # # 存下了最好的模型
gold_num = 2171 pred_num = 1289 right_num = 943
Test: time: 3.50s, speed: 953.02st/s; acc: 0.9694, p: 0.7316, r: 0.4344, f: 0.5451# # # # # test 准确率 0.969
三、解释:
gold_num:BIO中的BI ;pred_num:预测的BI个数 ;right_num:预测出几个正确的
acc:准确率;p:precision;r:recall; f:f_measure
这部分的代码在utils/metric.py下:
(1)accuracy = right_tag / all_tag
·其中 right_tag+=1 when golden_list[idy] == predict_list[idy];all_tag += len(golden_list)
(2)precision = right_num / predict_num ·精确率(查准率)
(3)recall = right_num / golden_num ·召回率(查全率)
·其中 right_num = len(right_full) ; predict_num = len(predict_full);golden_num = len(golden_full)
(4)f_measure = 2*precision*recall / (precision+recall)
·也叫做F-Score,是Precision和Recall加权调和平均,上式是最常见的F1,参数a=1,
四、使用笔记 问题记录:
使用S-1和0当作1,0标注时:
出现了gold_num = 0 pred_num = 0 right_num = 0;p=-1.0000;r=-1.0000; f=-1.0000的问题
p=-1;r=-1; f=-1是因为gold_num = 0 pred_num = 0 right_num = 0(代码规定的逻辑)
所以我们要检查一下为什么gold_num = 0 pred_num = 0 right_num = 0:
在代码中往上找我们可以看到:
def get_ner_fmeasure(golden_lists, predict_lists, label_type="BMES"):
for idx in range(0 , len(golden_lists) ): # sent_num
golden_list = golden_lists[idx]
predict_list = predict_lists[idx]
for idy in range( len(golden_list) ): # word_list
if golden_list[idy] == predict_list[idy]:
right_tag += 1
all_tag += len(golden_list)
if label_type == "BMES": # 原因出在这一行 ,解决问题后train步骤可以正常跑通。
gold_matrix = get_ner_BMES(golden_list)
pred_matrix = get_ner_BMES(predict_list)
else:
gold_matrix = get_ner_BIO(golden_list)
pred_matrix = get_ner_BIO(predict_list)
right_ner = list(set(gold_matrix).intersection(set(pred_matrix)))
golden_full += gold_matrix
predict_full += pred_matrix
right_full += right_ner
right_num = len(right_full) # 计算句子 不是词
golden_num = len(golden_full)
predict_num = len(predict_full)
五、测试
1.demo.decode.config的文件内容:
### Decode ###
status=decode
raw_dir=sample_data/raw.bmes # ?????
nbest=10
decode_dir=sample_data/raw.out # ?????
dset_dir=sample_data/lstmcrf.dset # 读入 train后自动生成的lstmcrf.0.model lstmcrf.dset
load_model_dir=sample_data/lstmcrf.0.model
1.执行命令 python main.py --config demo.decode.config;


 1105
1105

 被折叠的 条评论
为什么被折叠?
被折叠的 条评论
为什么被折叠?
 到【灌水乐园】发言


