


 本文详细介绍了如何在KVM虚拟机中进行开机启动设置、自动启动管理、挂起与恢复、VNC端口查询、console登录以及虚拟磁盘格式转换和快照管理。此外,还涉及了虚拟机克隆的不同方法,包括完整克隆和链接克隆。
挂起suspend
恢复resume
查询vnc端口号vncdisplay
kvm虚拟机开机启动
console 控制台 登录
kvm运行业务程序
autostart
开机启动autostart,前提:systemctl enable libvirtd;
取消开机启动autostart --disable
centos7的kvm虚拟机:
grubby --update-kernel=ALL --args=“console=ttyS0,115200n8”
#### 5.1 迁移虚拟机
mkdir -p /data
virsh list
virsh destroy centos7
virsh list --all
mv /opt/centos2.raw /data/
virsh start centos7
virsh edit centos7 —>
virsh start centos7
virsh list --all
[root@kvm01 /opt]# virsh dumpxml centos7 |grep raw
#### 5.2 修改kvm虚拟机名字
centos7改为centos2:
[root@kvm01 /opt]# virsh list
Id Name State
6 centos7 running
[root@kvm01 /opt]# ls /data/
centos2.raw
[root@kvm01 /opt]# virsh destroy centos7
Domain centos7 destroyed
[root@kvm01 /opt]# virsh domrename centos7 centos2
Domain successfully renamed
[root@kvm01 /opt]# virsh start centos2
Domain centos2 started
[root@kvm01 /opt]# virsh list --all
Id Name State
7 centos2 running
#### 5.3 挂起与恢复kvm虚拟机
>
> 
>
>
>
挂起:
[root@kvm01 /opt]# virsh suspend centos2
Domain centos2 suspended
[root@kvm01 /opt]# virsh list --all
Id Name State
7 centos2 paused
恢复:
[root@kvm01 /opt]# virsh resume centos2
Domain centos2 resumed
[root@kvm01 /opt]# virsh list --all
Id Name State
7 centos2 running
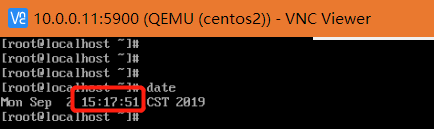
>
> **挂起的影响导致时间不同步了**
> 
> **利用ntpdate同步时间**
> ntpdate ntp1.aliyun.com
>
>
>
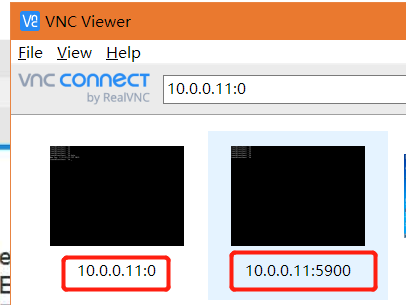
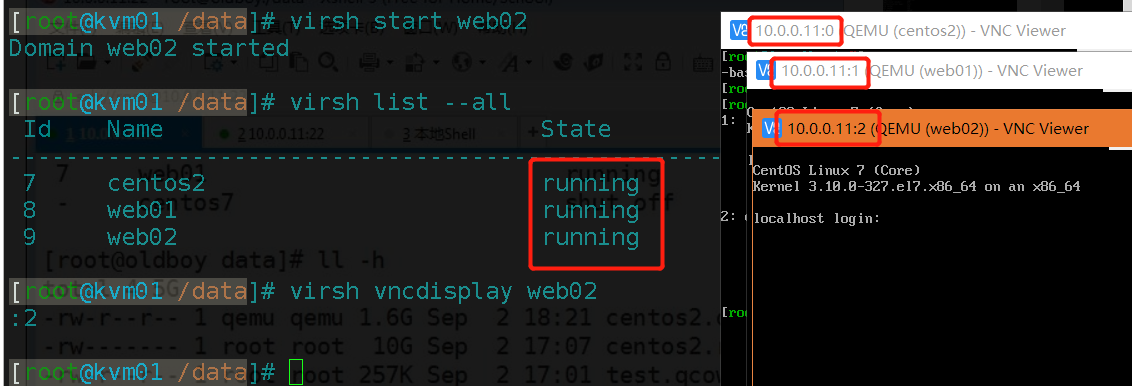
#### 5.4 快速查看vnc端口
>
> 有了vncdisplay后,一次就能连接到想要的虚拟机,不用从5900一直尝试一台一台的找。
>
>
>
vncdisplay
[root@kvm01 /opt]# virsh vncdisplay centos2
:0
#### 5.5 用xshell连接kvm虚拟机
>
> 
>
>
>
#### 5.6 kvm虚拟机上不了网
在宿主机上:
[root@kvm01 /opt]# sysctl -a|grep ipv4|grep ip_forward
net.ipv4.ip_forward = 1
sysctl -p
#### 5.7 kvm虚拟机开机自启动
autostart
[root@kvm01 /opt]# virsh list --all
Id Name State
7 centos2 running
[root@kvm01 /opt]# virsh destroy centos2
Domain centos2 destroyed
[root@kvm01 /opt]# virsh list --all
Id Name State
-
centos2 shut off
[root@kvm01 /opt]# virsh autostart centos2
Domain centos2 marked as autostarted
[root@kvm01 /opt]# systemctl restart libvirtd.service
[root@kvm01 /opt]# virsh list --all
Id Name State
1 centos2 running
其实是创建了软链接:
[root@kvm01 /opt]# ll -h /etc/libvirt/qemu/autostart/
total 0
lrwxrwxrwx 1 root root 29 Sep 2 15:55 centos2.xml -> /etc/libvirt/qemu/centos2.xml
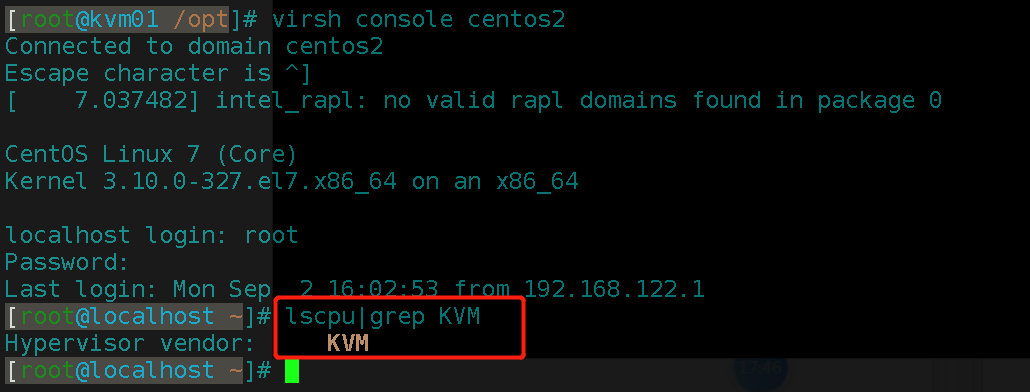
#### 5.8 console登录


>
> 纯文字版的控制台
>
>
>
[root@kvm01 /opt]# virsh console centos2
Connected to domain centos2
Escape character is ^]
crtl + ] 退出
>
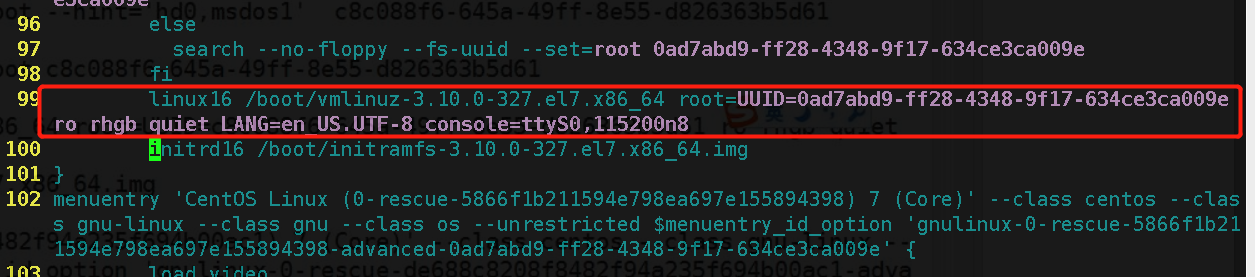
> **kvm虚拟机改内核参数命令**
>
>
>
[root@localhost ~]# cp /boot/grub2/grub.cfg /tmp/
[root@localhost ~]# grubby --update-kernel=ALL --args=“console=ttyS0,115200n8”
[root@localhost ~]# vim /boot/grub2/grub.cfg #自动添加了内核参数
>
> 
>
>
>
#### 5.9 在宿主机上利用console登录kvm虚拟机
重启kvm虚拟机:
virsh destroy centos2 关闭kvm虚拟机
virsh start centos2 开启kvm虚拟机
virsh console centos2 在宿主机上用console登录
>
> 
>
>
>
### 6. kvm虚拟机虚拟磁盘格式转换和快照管理
>
> raw: 裸格式,占用空间比较大,不支持快照功能,不方便传输,性能较好,不方便传输 总50G 占用50G
>
>
>
>
> qcow2: cow(copy on write)占用空间小,支持快照,性能比raw差一点,方便传输 总50G 占用2G
>
>
>
virt-install --virt-type kvm --os-type=linux --os-variant rhel7 --name centos7 --memory 1024 –
vcpus 1 --disk /opt/centos2.raw,format=raw,size=10 --cdrom /opt/CentOS-7-x86_64-DVD-1708.iso
–network network=default --graphics vnc,listen=0.0.0.0 --noautoconsole
virt-install --virt-type kvm --os-type=linux --os-variant rhel7 --name centos7 --memory 1024 –
vcpus 1 --disk /data/lcx.qcow2,format=qcow2,size=10 --cdrom /data/CentOS-7.2-x86_64-DVD-
1511.iso --network network=default --graphics vnc,listen=0.0.0.0 --noautoconsole
#### 6.1 磁盘工具的常用命令
qemu -img info,create,resize,convert
查看虚拟磁盘信息
qemu-img info test.qcow2
创建一块qcow2格式的虚拟硬盘:
qemu-img create -f qcow2 test.qcow2 2G
调整磁盘磁盘容量 只能扩容不能缩,数据会丢失,17楼见~
qemu-img resize test.qcow2 +20G
raw转qcow2:qemu-img convert -f raw -O qcow2 lcx.raw lcx.qcow2
convert [-f fmt] [-O output_fmt] filename output_filename
-c 压缩
virsh edit web01
virsh destroy web01
virsh start web01
#### 6.2 把磁盘格式改为qcow2格式


>
> 原格式是raw格式,远程复制的时候不方便,为了提高传输效率,可以转换为qcow2格式
>
>
>
[root@kvm01 /opt]# time qemu-img convert -f raw -O qcow2 /data/centos2.raw /data/centos2.qcow2
real 0m9.885s
user 0m0.780s
sys 0m8.982s
virsh destroy centos2
virsh edit centos2
[root@kvm01 /opt]# ll -h /data/
total 2.2G
-rw-r–r-- 1 qemu qemu 1.1G Sep 2 17:19 centos2.qcow2
-rw------- 1 root root 10G Sep 2 17:08 centos2.raw
>
> 
>
>
>
### 7.快照管理
创建快照 virsh snapshot-create-as centos7 --name install_ok
查看快照 virsh snapshot-list centos7
还原快照 virsh snapshot-revert centos7 --snapshotname 1516574134
删除快照 virsh snapshot-delete centos7 --snapshotname 1516636570
raw不支持做快照,qcow2支持快照,并且快照就保存在qcow2的磁盘文件中
快照存储的位置在虚拟磁盘中
qemu-img info /data/centos2.qcow2
创建快照
[root@kvm01 ~]# virsh snapshot-create-as centos2 --name --name install_nginx
Domain snapshot 1567416293 created
查看快照
[root@kvm01 /opt]# virsh snapshot-list centos2
Name Creation Time State
1567416293 2019-09-02 17:24:53 +0800 running
install_nginx 2019-09-02 17:40:43 +0800 running
还原快照
virsh snapshot-revert centos2 --snapshotname install_nginx
删除快照
virsh snapshot-revert centos2 --snapshotname install_nginx
### 8. kvm虚拟机克隆


#### 8.1 完整克隆
自动挡:
virt-clone --auto-clone -o web01 -n web02 (完整克隆)
手动挡:
cp centos2-clone.qcow2 web02.qcow2
virsh dumpxml web01 >web02.xml
vim web02.xml #修改虚拟机的名字
#删除虚拟机uuid
#删除mac地址
#修改磁盘路径
virsh define web02.xml
virsh start web02
>
> 
>
>
>
#### 8.2 链接克隆
>
> **a:生成虚拟机磁盘文件**
>
>
>
[root@kvm01 /data]# qemu-img create -f qcow2 -b web01.qcow2 web03.qcow2
>
> **b:生成虚拟机的配置文件**
>
>
>
virsh dumpxml web01 >web03.xml
vim web03.xml
#修改虚拟机的名字
web03
#删除虚拟机uuid
8e505e25-5175-46ab-a9f6-feaa096daaa4
#删除mac地址
#修改磁盘路径
>
> **c:导入虚拟机并进行启动测试**
>
>
>
virsh define web03.xml
virsh start web03
#### 8.3 全自动链接克隆脚本
[root@kvm01 scripts]# cat link_clone.sh
#!/bin/bash
old_vm=$1
链接克隆:
qemu-img create -f qcow2 -b 49-web03.qcow2 49-web04.qcow2
virt-install --virt-type kvm --os-type=linux --os-variant rhel7 --name web04 --memory 1024 --vcpus
1 --disk /opt/web04.qcow2 --boot hd --network bridge=br0 --graphics vnc,listen=0.0.0.0 –
noautoconsole
4.8:kvm虚拟机的桥接网络
最后的话
最近很多小伙伴找我要Linux学习资料,于是我翻箱倒柜,整理了一些优质资源,涵盖视频、电子书、PPT等共享给大家!
资料预览
给大家整理的视频资料:

给大家整理的电子书资料:
如果本文对你有帮助,欢迎点赞、收藏、转发给朋友,让我有持续创作的动力!
网上学习资料一大堆,但如果学到的知识不成体系,遇到问题时只是浅尝辄止,不再深入研究,那么很难做到真正的技术提升。
一个人可以走的很快,但一群人才能走的更远!不论你是正从事IT行业的老鸟或是对IT行业感兴趣的新人,都欢迎加入我们的的圈子(技术交流、学习资源、职场吐槽、大厂内推、面试辅导),让我们一起学习成长!
oautoconsole
4.8:kvm虚拟机的桥接网络
最后的话
最近很多小伙伴找我要Linux学习资料,于是我翻箱倒柜,整理了一些优质资源,涵盖视频、电子书、PPT等共享给大家!
资料预览
给大家整理的视频资料:
[外链图片转存中…(img-JmJzVBsE-1714332616188)]
给大家整理的电子书资料:
[外链图片转存中…(img-a6UQVdFC-1714332616188)]
如果本文对你有帮助,欢迎点赞、收藏、转发给朋友,让我有持续创作的动力!
网上学习资料一大堆,但如果学到的知识不成体系,遇到问题时只是浅尝辄止,不再深入研究,那么很难做到真正的技术提升。
一个人可以走的很快,但一群人才能走的更远!不论你是正从事IT行业的老鸟或是对IT行业感兴趣的新人,都欢迎加入我们的的圈子(技术交流、学习资源、职场吐槽、大厂内推、面试辅导),让我们一起学习成长!


 1万+
1万+


 被折叠的 条评论
为什么被折叠?
被折叠的 条评论
为什么被折叠?
 到【灌水乐园】发言


