


验证码的作用
一种区分用户是计算机还是人的公共全自动程序,可以防止:恶意破解密码、刷票、论坛灌水,有效防止某个黑客对某一个特定注册用户用特定程序暴力破解方式进行不断的登陆尝试,实际上用验证码是现在很多网站通行的方式 ——百科解释
验证码生成步骤
1.在内存中生成一张图片
2.生成随机的四个字母或者数字
3.将随机产生的字符或数字写入到图片上
4.增加旋转,干扰线等
5.显示到页面
API介绍
-
BufferedImage
Image是一个抽象类,BufferedImage是其实现类,是一个带缓冲区图像类,主要作用是将一幅图片加载到内存中(BufferedImage生成的图片在内存里有一个图像缓冲区,利用这个缓冲区我们可以很方便地操作这个图片) -
Graphics
简单的来说是操作图像的画笔对象,能够绘制图像边框,背景色,写入字符串,绘制直线等等 -
Graphics2D
该Graphics2D类继承自Graphics类,以提供对几何,坐标变换,颜色管理和文本布局的更复杂的控制。 这是在Java(tm)平台上呈现二维形状,文字和图像的基础类,父类有的方法它都可以使用(这不是废话么 --!) -
ImageIO
同过read 和write 方法,将图片读取到内存中,或者将内存中的图片由输出流输出String imgPath = "D://a.jpg"; BufferedImage image = ImageIO.read(new FileInputStream(imgPath));将图片读取内存中,只有读取到内存中才可以操作
ImageIO.write(bufferedImage, "jpg", resp.getOutputStream());将内存中的图片通过响应输出到前台
前端demo
<body>
	<form action="/login" method="POST">
		验证码:<input type="text" name="checkcode" /><img id="img" onclick="changeImg()"
			src="${pageContext.request.contextPath}/ImgCheck"><br> <input
			type="submit" value="提交" />

	</form>
</body>

<script type="text/javascript">
 function changeImg(){
	 var img =document.getElementById("img");
	 //相同的请求,浏览器会将图片缓存下来,需要加一个参数,让每次请求都不一样,每次得到新的图片
	 img.src="${pageContext.request.contextPath}/ImgCheck?time="+new Date().getTime();
 }
通过提交将代码将代码提交到/login对应的servlet里面
java实现生成图片验证码
/ImgCheck请求的servlet如下:
@WebServlet(urlPatterns = "/ImgCheck")
public class ImgCheckServlet extends HttpServlet {
	@Override
	protected void doGet(HttpServletRequest req, HttpServletResponse resp) throws ServletException, IOException {
		int width = 120;
		int height = 30;
		// 1.在内存中生成一个图像
		BufferedImage bufferedImage = new BufferedImage(width, height, BufferedImage.TYPE_INT_RGB);
		// 2.操作图片,设置背景,边框,倾斜
		// 获得画笔对象
		Graphics graphics = bufferedImage.getGraphics();
		// 设置图片背景色  需要说明单的rgb颜色数值越大,颜色越浅,颜色值越小,颜色越深,背景色需要浅色
		graphics.setColor(getRandColor(220, 250));
		// 填充一个矩形 坐标和长宽
		graphics.fillRect(0, 0, width, height);
		// 绘制边框
		graphics.setColor(Color.blue);
		graphics.drawRect(0, 0, width - 1, height - 1);
		// 3.生成随机的4个数字或者图片写入到图片里
		// 把父类对象转为子类,图形功能扩展
		Random random = new Random();
		Graphics2D g2d = (Graphics2D) graphics;
		// 设置字体的颜色随机  字体需要颜色较深
		g2d.setColor(new Color(20 + random.nextInt(110), 20 + random.nextInt(110), 20 + random.nextInt(110)));
		// 字体,样式,大小
		g2d.setFont(new Font("宋体", Font.BOLD, 18));
		String words = "QWERTYUIOPASDFGHJKLZXCVBNMqwertyuiopasdfghjklzxcvbnm0123456789";
        //将产生的code保存到session中,request在每次请求图片中,请求结束就消失 了,不能使用request域
		StringBuffer sb =new StringBuffer();
		int x = 10;
		for (int i = 0; i < 4; i++) {
			int index = random.nextInt(words.length());// 返回0到长度的随机数,不含右边界
			char ch = words.charAt(index);
			sb.append(ch);
			// 每个字符选左右旋转30度之间
			int jiaodu = random.nextInt(60) - 30;// 产生-30 ~ 30之间
			// 角度转弧度
			double hudu = jiaodu * Math.PI / 180;
			// 旋转一定的弧度
			g2d.rotate(hudu, x, 20);
			// graphics画图的坐标是从左上角开始算的x 横坐标 ,y表示字符的基线的位置
			g2d.drawString(String.valueOf(ch), x, 20);
			// 每次画完图之后再旋转回来
			g2d.rotate(-hudu, x, 20);
			x += 30;
		}
		//将code存在session中,在登录servlet中就能取到该值和界面传去的验证码作比较
		req.getSession().setAttribute("checkcode", sb.toString());

		//4.绘制图片的干扰线  干扰线的颜色介于两者之间
		graphics.setColor(getRandColor(160, 200));
		int x1,x2,y1,y2;
		//30条干扰线
		for(int i=0;i<30;i++){
			x1 = random.nextInt(width-12);
			x2 = random.nextInt(12);
			y1 = random.nextInt(height-12);
			y2 = random.nextInt(12);
			//在此图形上下文的坐标系中的点(x1,y1)和(x2,y2)之间绘制一条线。
			graphics.drawLine(x1, y1, x1 + x2, x2 + y2);
		}
		//释放资源
		graphics.dispose();
		// 5.输出内存中的图片
		ImageIO.write(bufferedImage, "jpg", resp.getOutputStream());

	}
随机获取某一范围内的颜色rgb(r,g,b)
	private Color getRandColor(int fc, int bc) {
		// 取其随机颜色
		Random random = new Random();
		if (fc > 255) {
			fc = 255;
		}
		if (bc > 255) {
			bc = 255;
		}
		int r = fc + random.nextInt(bc - fc);
		int g = fc + random.nextInt(bc - fc);
		int b = fc + random.nextInt(bc - fc);
		return new Color(r, g, b);
	}
验证表单时,校验验证码的争取性,验证码错误则还是到当前页面,验证码正确才能继续向下执行
@WebServlet("/login")
public class LoginServlet extends HttpServlet {
	protected void doGet(HttpServletRequest request, HttpServletResponse response) throws ServletException, IOException {
		// 完成验证码的校验:
		// 获得session中保存的验证码的信息
		String code1 = (String)request.getSession().getAttribute("checkcode");
		// 接收前台表单提交的验证码的信息
		String code2 = request.getParameter("checkCode");
		if(code2==null || !code2.equalsIgnoreCase(code1)){
			request.setAttribute("msg", "验证码输入不正确!");
			request.getRequestDispatcher("/login.jsp").forward(request, response);
			return;
		}
		...
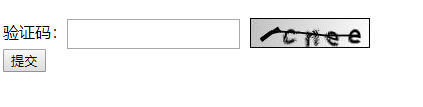
最终实现的效果如下:

如果觉得上方的验证码有需求改动每次还要改动代码,这里可以使用使用第三方的验证码校验工具Kaptcha验证码,它实现的功能主要是实现了上面的配置ImgCheckServlet
Kaptcha验证码
- 需要引入jar包:kaptcha-2.3.2.jar ,查看源代码可以看 kaptcha-2.3.2-sources.jar
- 配置web.xml
配置如下:
 <servlet>
 	<servlet-name>KaptchaServlet</servlet-name>
 	<servlet-class>com.google.code.kaptcha.servlet.KaptchaServlet</servlet-class>

 	<!-- 修改随机的字母或数字的长度 -->
 	<init-param>
 		<param-name>kaptcha.textproducer.char.length</param-name>
 		<param-value>4</param-value>
 	</init-param>

 	<!-- 修改字体大小 -->
 	<init-param>
 		<param-name>kaptcha.textproducer.font.size</param-name>
 		<param-value>25</param-value>
 	</init-param>
 	<init-param>
 		<param-name>kaptcha.textproducer.char.space</param-name>
 		<param-value>10</param-value>
 	</init-param>

 	<!-- 修改图片的宽高 -->
 	<init-param>
 		<param-name>kaptcha.image.width</param-name>
 		<param-value>120</param-value>
 	</init-param>
 	<init-param>
 		<param-name>kaptcha.image.height</param-name>
 		<param-value>30</param-value>
 	</init-param>
 </servlet>

 <servlet-mapping>
 	<servlet-name>KaptchaServlet</servlet-name>
 	<url-pattern>/KaptchaServlet</url-pattern>
 </servlet-mapping>
- 其中配置servlet参数有如下介绍:
KaptchaServlet类的源码
private Properties props = new Properties();
定义一个props来保存键值对,加载配置信息
再来看看serverlet 初始化的时候init方法
	@Override
	public void init(ServletConfig conf) throws ServletException
	{
		super.init(conf);

		// Switch off disk based caching.
		ImageIO.setUseCache(false);
        //从web.xml中读取所有的配置信息
		Enumeration<?> initParams = conf.getInitParameterNames();
		while (initParams.hasMoreElements())
		{
			String key = (String) initParams.nextElement();
			String value = conf.getInitParameter(key);
			//将每一个配置信息的key - value 放到 props里面
			this.props.put(key, value);
		}
      // 通过 Config 对象加载这些配置
		Config config = new Config(this.props);
		this.kaptchaProducer = config.getProducerImpl();
		this.sessionKeyValue = config.getSessionKey();
		this.sessionKeyDateValue = config.getSessionDate();
	}
再看它的doget()方法
	@Override
	public void doGet(HttpServletRequest req, HttpServletResponse resp)
			throws ServletException, IOException
	{
		// Set to expire far in the past.
		resp.setDateHeader("Expires", 0);
		// Set standard HTTP/1.1 no-cache headers.
		resp.setHeader("Cache-Control", "no-store, no-cache, must-revalidate");
		// Set IE extended HTTP/1.1 no-cache headers (use addHeader).
		resp.addHeader("Cache-Control", "post-check=0, pre-check=0");
		// Set standard HTTP/1.0 no-cache header.
		resp.setHeader("Pragma", "no-cache");

		// return a jpeg
		resp.setContentType("image/jpeg");

		// create the text for the image  创建文本
		String capText = this.kaptchaProducer.createText();

		// store the text in the session 将文本放入session
		req.getSession().setAttribute(this.sessionKeyValue, capText);

		// store the date in the session so that it can be compared
		// against to make sure someone hasn't taken too long to enter
		// their kaptcha
		req.getSession().setAttribute(this.sessionKeyDateValue, new Date());

		// create the image with the text   使用该文本创建内存中的图片
		BufferedImage bi = this.kaptchaProducer.createImage(capText);

		ServletOutputStream out = resp.getOutputStream();

		// write the data out  将该图片输出到jsp
		ImageIO.write(bi, "jpg", out);
	}
Config类
用来加载配置
public class Config
{
	/** */
	private Properties properties;

	/** */
	private ConfigHelper helper;

	/** */
	public Config(Properties properties)
	{
		this.properties = properties;
		this.helper = new ConfigHelper();
	}

	/** */
	public boolean isBorderDrawn()
	{
	  /
		String paramName = Constants.KAPTCHA_BORDER;
		String paramValue = this.properties.getProperty(paramName);
		return this.helper.getBoolean(paramName, paramValue, true);
	}
Constants类
定义了一些属性的名字,如果需要修改默认配置,需要知道这写name的含义
如下:
public class Constants {

	public Constants() {
	}
   //
	public static final String KAPTCHA_SESSION_KEY = "KAPTCHA_SESSION_KEY";
	public static final String KAPTCHA_SESSION_DATE = "KAPTCHA_SESSION_DATE";
	public static final String KAPTCHA_SESSION_CONFIG_KEY = "kaptcha.session.key";
	public static final String KAPTCHA_SESSION_CONFIG_DATE = "kaptcha.session.date";
	public static final String KAPTCHA_BORDER = "kaptcha.border";
	public static final String KAPTCHA_BORDER_COLOR = "kaptcha.border.color";
	public static final String KAPTCHA_BORDER_THICKNESS = "kaptcha.border.thickness";
	public static final String KAPTCHA_NOISE_COLOR = "kaptcha.noise.color";
	public static final String KAPTCHA_NOISE_IMPL = "kaptcha.noise.impl";
	public static final String KAPTCHA_OBSCURIFICATOR_IMPL = "kaptcha.obscurificator.impl";
	public static final String KAPTCHA_PRODUCER_IMPL = "kaptcha.producer.impl";
	public static final String KAPTCHA_TEXTPRODUCER_IMPL = "kaptcha.textproducer.impl";
	public static final String KAPTCHA_TEXTPRODUCER_CHAR_STRING = "kaptcha.textproducer.char.string";
	public static final String KAPTCHA_TEXTPRODUCER_CHAR_LENGTH = "kaptcha.textproducer.char.length";
	public static final String KAPTCHA_TEXTPRODUCER_FONT_NAMES = "kaptcha.textproducer.font.names";
	public static final String KAPTCHA_TEXTPRODUCER_FONT_COLOR = "kaptcha.textproducer.font.color";
	public static final String KAPTCHA_TEXTPRODUCER_FONT_SIZE = "kaptcha.textproducer.font.size";
	public static final String KAPTCHA_TEXTPRODUCER_CHAR_SPACE = "kaptcha.textproducer.char.space";
	public static final String KAPTCHA_WORDRENDERER_IMPL = "kaptcha.word.impl";
	public static final String KAPTCHA_BACKGROUND_IMPL = "kaptcha.background.impl";
	public static final String KAPTCHA_BACKGROUND_CLR_FROM = "kaptcha.background.clear.from";
	public static final String KAPTCHA_BACKGROUND_CLR_TO = "kaptcha.background.clear.to";
	public static final String KAPTCHA_IMAGE_WIDTH = "kaptcha.image.width";
	public static final String KAPTCHA_IMAGE_HEIGHT = "kaptcha.image.height";
}
可以使用上面的配置参数的名字在web.xml中配置
配置和默认值说明可以参考下面的文章
https://blog.csdn.net/elephantboy/article/details/52795309
jsp demo修改
<body>
	<form action="/login" method="POST">
		验证码:<input type="text" name="checkcode" /><img id="img" onclick="changeImg()"
			src="${pageContext.request.contextPath}/KaptchaServlet"><br> <input
			type="submit" value="提交" />

	</form>
</body>

<script type="text/javascript">
 function changeImg(){
	 var img =document.getElementById("img");
	 //相同的请求,浏览器会将图片缓存下来,需要加一个参数,让每次请求都不一样,每次得到新的图片
	 img.src="${pageContext.request.contextPath}/KaptchaServlet?time="+new Date().getTime();
 }
</script>
唯一的区别就是修改为KaptchaServlet
提交表单时的验证码校验的区别如下,剩下没有任何区别
		// 完成验证码的校验:
		// 获取session按照它给的session key 获取
		String code1 = (String)request.getSession().getAttribute(com.google.code.kaptcha.Constants.KAPTCHA_SESSION_KEY);
		// 接收前台表单提交的验证码的信息
		String code2 = request.getParameter("checkCode");
		if(code2==null || !code2.equalsIgnoreCase(code1)){
			request.setAttribute("msg", "验证码输入不正确!");
			request.getRequestDispatcher("/login.jsp").forward(request, response);
			return;
		}
实现的效果如下:


 558
558


 被折叠的 条评论
为什么被折叠?
被折叠的 条评论
为什么被折叠?
 到【灌水乐园】发言


