


GitHub代码链接:https://github.com/ChaoHappy/spring-learning-parent
搭建Spring MVC
Spring MVC的核心是DispatcherServlet,这个Servlet充当Spring MVC的前端控制器。所以在应用程序中使用SpringMVC的第一件事就是将下面的< servlet>声明放入web.xml中:
<servlet>
  	<!-- 默认情况下DispatcherServlet加载时会从基于这个servlet名字的XML文件中加载Spring应用上下文,例如:spitter-servlet.xml -->
  	<servlet-name>spitter</servlet-name>
  	<servlet-class>org.springframework.web.servlet.DispatcherServlet</servlet-class>
  	<!-- SpringMVC的配置文件所在的位置和名称 -->
    <init-param>
        <param-name>contextConfigLocation</param-name>
      	<!--框架进行转发规则的定义文件-->
        <param-value>classpath:spitter-servlet.xml</param-value>
    </init-param>
  </servlet>
  <---  将DispatcherServlet映射到  / ,声明了它会作为默认的servlet并且会处理所有的请求,包括对静态资源的请求 -->
  <servlet-mapping>
  	<servlet-name>spitter</servlet-name>
  	<url-pattern>/</url-pattern>
  </servlet-mapping>
创建spitter-servlet.xml文件,DispatcherServlet将使用它来创建应用上下文。
< mvc:resources>建立了一个服务于静态资源的处理器
<?xml version="1.0" encoding="UTF-8"?>
<beans xmlns="http://www.springframework.org/schema/beans"
	xmlns:xsi="http://www.w3.org/2001/XMLSchema-instance"
	xmlns:context="http://www.springframework.org/schema/context"
	xmlns:tx="http://www.springframework.org/schema/tx"
	xmlns:mvc="http://www.springframework.org/schema/mvc"
	xsi:schemaLocation="http://www.springframework.org/schema/beans
		http://www.springframework.org/schema/beans/spring-beans.xsd
		http://www.springframework.org/schema/context
		http://www.springframework.org/schema/context/spring-context-4.0.xsd
		http://www.springframework.org/schema/mvc
		http://www.springframework.org/schema/mvc/spring-mvc-4.1.xsd
		http://www.springframework.org/schema/tx
		http://www.springframework.org/schema/tx/spring-tx.xsd ">
<-- 所有以/resources路径开头的请求都会自动由应用程序根目录下的/resources目录提供服务。属性location表明了要提供服务的文件位置-->
	<context:component-scan base-package="com.zlc.springmvc.demo"/>
	<mvc:resources location="/resources/" mapping="/resources/**" />
</beans>
编写基本的控制器
配置注解驱动的Spring MVC
Spring 自带了多个处理映射实现供我们选择
- BeanNameUrlHandlerMapping:根据控制器Bean的名字将控制器映射到URL
- ControllerBeanNameHandlerMapping:与BeanNameUrlHandlerMapping类似,根据控制器Bean的名字将控制器映射到URL。使用该处理器映射实现,Bean的名字不需要遵循URL的约定。
- ConctrollerClassNameHandlerMapping:通过使用控制器的类名作为URL基础将控制器映射到URL。
- DefaultAnnotationHandlerMapping:将请求映射给使用@RequestMapping注解的控制器和控制器方法。
- SimpleUrlHandlerMapping:使用定义在Spring应用上下文的属性集合将控制器映射到URL。
使用如上这些处理器映射通常只需在Spring中配置一个Bean。如果没有找到处理映射Bean,DispatcherServlet将创建并使用BeanNameUrlHandlerMapping和DefaultAnnotationHandlerMapping。配置如下:
<bean class="org.springframework.web.servlet.mvc.annotation.DeaultAnnotationHandlerMapping"/>
DefaultAnnotationHandlerMapping将请求映射到使用@RequestMapping注解的方法。但是,实现注解驱动的Spring MVC并不仅仅是将请求映射到方法上。在构建控制器的时候,我们还需要使用注解将请求参数绑定到控制器的方法参数上进行校验以及信息转换。所以,只是用defaultAnnotationHandlerMapping还不行。需要在配置文件中添加Spring MVC所提供的注解驱动特性:< mvc:annotation-driven/>
定义首页的控制器
编写HomeController基本的SpringMVC控制器
package com.zlc.mvc.demo;

import java.util.Map;

import org.springframework.stereotype.Controller;
import org.springframework.web.bind.annotation.RequestMapping;

@Controller
public class HomeController {

	@RequestMapping({"/","home"})
	public String showHomePage(Map<String, Object> model) {
		model.put("spittles", "sssssssss");
		return "home";
	}
}
说明:@RequestMapping({"/",“home”}) 这个注解的作用有两个,首先表明 showHomePage 方法是一个请求处理方法,更确切地说,它指明了这个方法要处理"/","home"路径的请求。
作为一个请求处理方法,showHomePage方法使用了一个键为String而值为Object的Map作为参数。这个Map代表了模型——控制器和视图之间传递的数据。将 "sssssssss"置于模型Map之中,这样当视图渲染的时候,他就能够展现出来了。
showHomePage方法做的最后一件事就是返回一个String类型值,这个值是要渲染结果的逻辑视图的名字。
为了使用@Controller注解,我们需要在上下文中配置一个< context:component-scan>,配置如下:
<context:component-scan base-package="com.zlc.springmvc.demo"/>
解析视图
处理请求的最后一件必须要做的事情就是为用户渲染输出,这个任务就落在了视图实现上了——通常会使JSP。
视图解析器的工作是将逻辑视图的名字与org.springframework.web.servlet.View的实现相匹配。可以理解为,视图解析器所做的就是将视图名称与JSP进行匹配。Spring自带了多个视图解析器实现供选择,如图:

在Spring MVC中,大量使用了约定优于配置的开发模式。InternalResourceViewResolver就是一个面向约定地点元素。它将逻辑视图名称解析为View对象,而该对象将渲染的任务委托给Web应用程序上下文中的一个模板(通常是JSP)。如图:
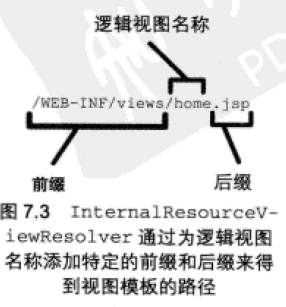
它通过逻辑视图名称添加前缀和后缀来确定Web应用程序中模板的路径。配置如下:
<bean class="org.springframework.web.servlet.view.InternalResourceViewResolver">
	  <property name="prefix" value="/WEB-INF/views"/>
	  <property name="suffix" value=".jsp"/>
	</bean>
默认情况下,InternalResourceViewResolver创建的View对象是InternalResourceView的实例,它只会简单的将请求传递给渲染的JSP。但JSP会使用一些JSTL标签,因此需要通过设置viewClass属性来将InternalResourceView替换为JstlView,如下所示:
<bean class="org.springframework.web.servlet.view.InternalResourceViewResolver">
		<property name="viewClass" value="org.springframework.web.servlet.view.JstlView"/>
	  	<property name="prefix" value="/WEB-INF/views"/>
	  	<property name="suffix" value=".jsp"/>
	</bean>
解析Tiles视图
TilesViewResolver : 查找通过Tiles模板定义的视图。模板的名字与逻辑视图名字相同。
为了在Spring MVC中使用Tiles,第一件事就是在spitter-servlet.xml中将TilesViewResolver注册为一个:
<bean class="org.springframework.web.servlet.view.tiles3.TilesViewResolver"></bean>
这个简单的声明会建立一个视图解析器,它会查找逻辑视图名称与Tiles定义名称相同的Tiles模板定义,并将其作为视图。
这里缺少的是Spring如何知道Tiles定义的。TilesViewResolver本身并不了解Tiles定义的任何事情,而是依靠TilesConfigurer来记录这个信息。所以我们需要在spitter-servlet.xml中添加TilesConfigurer类型的Bean:
<bean class="org.springframework.web.servlet.view.tiles3.TilesConfigurer">
		<property name="definitions">
			<list>
				<value>/WEB-INF/views/**/views.xml</value>
			</list>
		</property>
	</bean>
TilesConfigurer会加载一个或多个的Tiles的定义,并使得TilesViewResolver可以通过它来解析视图。对于Spitter应用程序,我们会需要一些名为views.xml的Tiles定义文件,他们都分散在/WEB-INF/views/目录下。所以我们将/WEB-INF/views/ * */ views.xml装配到definitions属性中,Ant风格的 * *模式表明要在/WEB-INF/views/下所有目录查找名为views.xml的文件。
代码实现后续有时间补充。。。
完成Spring应用上下文
正如前面所提到的,DispatcherServlet会根据一个XML文件来加载其Spring应用上下文,而这个文件的名字基于它的< servlet-name >属性来确定。但我们可以将Spring配置分成多个XML文件:一个用于服务层、一个用于持久层还有一个用于数据源配置。尽管不是严格要求,但是将Spring配置文件组织到多个文件中是很好的主意。基于这样的理念,将Web层的配置都放在spitter-servlet.xml文件中是在情理之中的,这个文件会被DispatcherServlet加载。但是我们还需要一种方式来加载其他的配置文件。
这就是ContextLoaderListener能够发挥作用的地方了。ContextLoaderListener是一个Servlet监听器,除了DispatcherServlet创建的应用上下文以外,它能够加载其他的配置文件到一个Spring应用上下文中。为了使用ContextLoaderListener,需要在web.xml文件中添加如下的< listener >声明:
<listener>
  <listener-class>
    org.springframework.web.context.ContextLoaderListener
  </listener-class>
</listener>
我们必须告诉ContextLoaderListener需要加载哪些配置文件。如果没有指定,上下文加载器会查找/WEB-INF/applicationContext.xml这个Spring配置文件。但是这个文件本身并没有做到将应用上下文分为多个片段。所以,我们需要重写默认实现。
为了给ContextLoaderListener指定一个或多个Spring配置文件,需要在servlet上下文中配置contextConfigLocation参数:
<context-param>
  <param-name>contextConfigLocation</param-name>
  <param-value>
    classpath:service-context.xml,
    classpath:persistence-context.xml,
    classpath:dataSource-context.xml,
  </param-value>
</context-param>
contextConfigLocation参数指定了一个路径的列表。除非特别声明,路径是相对于应用程序根目录的。但我们的Spring配置分成了多个XML文件,并分散在Web应用程序的多个JAR文件中,所以对其中的一些我们添加了classpath:前缀,使得它们能够以资源的方式在应用程序中的类路径中加载,而其他的文件则添加了Web应用程序的本地路径。
处理控制器的输入
编写处理输入的控制器
我们实现SpitterController的一种方式就是让它能够响应一Spitter用户名作为查询参数的URL。
import java.util.ArrayList;
import java.util.List;

import org.springframework.stereotype.Controller;
import org.springframework.ui.Model;
import org.springframework.web.bind.annotation.RequestMapping;
import org.springframework.web.bind.annotation.RequestMethod;
import org.springframework.web.bind.annotation.RequestParam;

@Controller
@RequestMapping("/spitter")
public class SpitterController {

	@RequestMapping(value="/spittles",method=RequestMethod.GET)
	public String listSpittlesForSpitter(@RequestParam("spitter") String username,Model model) {
		System.out.println("username:"+username);
		model.addAttribute("spitter", username);
		List<String> list = new ArrayList<String>();
		list.add("spittle1");
		list.add("spittle2");
		model.addAttribute("spittles", list);
		return "list";

	}
}
说明:listSpittlesForSpitter()方法使用String类型的username和Model对象作为参数。
参数username使用了@RequestParam(“spitter”)注解表明它的值应该根据请求中名为spitter的查询参数来获取。
参数Model对象:Map里面添加key=“student”,value=“student对象”的意思,最后把这个model返回一个jsp,在jsp页面上就能得到这个student对象了!
渲染视图
<%@ page language="java" contentType="text/html; charset=UTF-8"
    pageEncoding="UTF-8"%>
<%@ taglib prefix="c" uri="http://java.sun.com/jsp/jstl/core"%>
<!DOCTYPE html>
<html>
<head>
<meta charset="UTF-8">
<title>Insert title here</title>
</head>
<body>
<h2>spitter 登录首页</h2>
<a>登录名:</a>${spitter}
<c:forEach  var="spittle" items="${spittles}">
	${spittle}
</c:forEach>
</body>
</html>
处理表单
展现注册表单
@RequestMapping(method=RequestMethod.GET,params="new")
	public String createSpitterProfile(Model model) {
		model.addAttribute("spitter", new Spitter());
		return "edit";
	}
@RequestMapping声明了这个方法只会处理HTTP GET请求。此外,将params属性设置为new,这意味着这个方法只处理对/spitters的HTTP GET请求并要求请求中必须包含名为new的查询参数。
JSP代码示例:
<sf:form method="POST" modelAttribute="spitter">
	<fieldset>
		<table>
			<tr>
				<td>Full name:</td>
				<td><sf:input path="fullName" id="fullName"/></td>
			</tr>
			<tr>
				<td>用户名:</td>
				<td><sf:input path="username" id="username"/></td>
			</tr>
			<tr>
				<td>密码:</td>
				<td><sf:password path="password" id="password"/></td>
			</tr>
			<tr>
				<td>邮箱:</td>
				<td><sf:input path="email" id="email"/></td>
			</tr>
			<tr>
				<th></th>
				<td>
					<sf:checkbox path="updateByEmail" id="updateByEmail"/>
					<label>发送邮箱</label>
				</td>
			</tr>
			<tr>
				<th></th>
				<td>
					<input name="注册" type="submit" value="注册" />
				</td>
			</tr>
		</table>
	</fieldset>
</sf:form>
<sf:input >、<sf:password >、<sf:checkbox >标签都有一个path属性,它引用的是表单所绑定的Spitter对象的属性。当提交表单时,这些输入域中的值将会放到Spitter对象中并提交到服务器进行处理。
处理表单输入
@RequestMapping(method=RequestMethod.POST)
	public String addSpitterFromForm(@Valid Spitter spitter,BindingResult bindingResult) {
		return "redirect:/spitter/"+spitter.getUsername();
	}
Spitter 参数使用了@Valid注解,这表明Spitter在传入之前需要通过校验。
这个方法返回了一个字符串来表明请求接下来应该发送到哪里。这次我们返回了一个重定向的视图而不是指明逻辑试图的名称。前缀redirect:说明请求将被重定向到指定路径。
注意,在写demo时测试@Valid注解没有生效,原因是由于没有添加hibernate-validator依赖。
<dependency>
		    <groupId>javax.validation</groupId>
		    <artifactId>validation-api</artifactId>
		    <version>2.0.1.Final</version>
		</dependency>
		<dependency>
		    <groupId>org.hibernate</groupId>
		    <artifactId>hibernate-validator</artifactId>
		    <version>5.1.1.Final</version>
		</dependency>
处理带有路径变量的请求
@RequestMapping(value="/{username}",method=RequestMethod.GET)
	public String showSpitterProfile(@PathVariable String username,Model model) {
		System.out.println("username:"+username);
		model.addAttribute("spitter", username);
		List<String> list = new ArrayList<String>();
		list.add("spittle1");
		list.add("spittle2");
		model.addAttribute("spittles", list);
		return "list";
	}
校验输入
public class Spitter {

	private String fullName;

	@Size(min=3,max=20,message="用户名必须在3~20长度之间")
	@Pattern(regexp="^[a-zA-Z0-9]+$",message="用户名格式不正确")
	private String username;

	private String password;

	private String email;

	private Boolean updateByEmail;

	public String getFullName() {
		return fullName;
	}

	public void setFullName(String fullName) {
		this.fullName = fullName;
	}

	public String getUsername() {
		return username;
	}

	public void setUsername(String username) {
		this.username = username;
	}

	public String getPassword() {
		return password;
	}

	public void setPassword(String password) {
		this.password = password;
	}

	public String getEmail() {
		return email;
	}

	public void setEmail(String email) {
		this.email = email;
	}

	public Boolean getUpdateByEmail() {
		return updateByEmail;
	}

	public void setUpdateByEmail(Boolean updateByEmail) {
		this.updateByEmail = updateByEmail;
	}
}
在jsp表单中增加以下标签
<sf:errors path="username" cssClass="error"></sf:errors>
<sf:errors >标签能够渲染字段的校验错误,path属性指明了要显示哪个表单域的错误,cssClass属性指向了在CSS中声明的类,他会让错误信息以红色显示出来。
如果想在某个特定的地方显示所有错误信息的话只需要一个<sf:errors >标签并将其path属性设置为*
<sf:errors path="*" cssClass="error"></sf:errors>
处理文件上传
为了在spitter应用程序中上传文件,我们需要做3件事情:
- 在注册表单添加一个文件上传域
- 修改SpitterController的addSpitterFromForm()以接收上传的文件
- 在Spring中配置multipart文件处理器
在表单上添加文件上传域
当提交带有文件的表单时,要选择的内容类型是multipart/form-data。为了配置表单以multipart/form-data内容类型进行提交,需要设置< sf:form >的enctype属性,如下所示:
<sf:form method="POST" modelAttribute="spitter" enctype="multipart/form-data">
现在,在表单上添加一个新的输入域。type属性设置为file的标准HTML< input >域:
			<tr>
				<th>头像:</th>
				<td>
					<input name="image" type="file" />
				</td>
			</tr>
接收上传的文件
@RequestMapping(method=RequestMethod.POST)
	public String addSpitterFromForm(@Valid Spitter spitter,BindingResult bindingResult,
			@RequestParam(value="image",required=false) MultipartFile image) {
		if(bindingResult.hasErrors()) {
			return  "edit";
		}
		if(!image.isEmpty()) {
			try {
				validateImage(image);
				saveImage(spitter.getFullName()+".jpg", image);
			} catch (Exception e) {
				bindingResult.reject(e.getMessage());
				e.printStackTrace();
				return  "edit";
			}

		}
		return "redirect:/spitter/"+spitter.getUsername();
	}

	private void validateImage(MultipartFile image) throws Exception {
		if(!image.getContentType().equals("image/jpeg")) {
			throw new Exception("只能上传格式为jpeg的文件");
		}
	}

	private void saveImage(String filename,MultipartFile image) {
		String webroot = System.getProperty("ebop-server.root");
		File file = new File(webroot+"/resources/"+filename);
		try {
			FileUtils.writeByteArrayToFile(file, image.getBytes());
		} catch (IOException e) {
			// TODO Auto-generated catch block
			e.printStackTrace();
		}
	}
增加一个image为MultipartFile类型的参数,并使用了@RequestParam注解来表明这个参数不是必须的。
增加如下依赖:
	<dependency>
            <groupId>commons-fileupload</groupId>
            <artifactId>commons-fileupload</artifactId>
            <version>1.4</version>
        </dependency>
		<dependency>
		    <groupId>commons-io</groupId>
		    <artifactId>commons-io</artifactId>
		    <version>2.6</version>
		</dependency>
配置Spring支持文件上传
DispathcherServlet本身并不知道如何处理multipart的表单数据。我们需要一个multipart解析器把POST请求的multipart数据中抽取出来,这样DispatcherServler就能将其传递给我们的控制器了。
为了在Spring中注册multipart解析器,我们需要声明一个实现了MultipartResolver接口的Bean。选择multipart解析器其实很简单,因为Spring只提供了一个CommonsMultipartResolver。在Spring的配置如下:
<bean id="multipartResolver" class="org.springframework.web.multipart.commons.CommonsMultipartResolver" >
		<!-- 设定默认编码 -->
	    <property name="defaultEncoding" value="UTF-8"></property>
	    <!-- 设定文件上传的最大值为5MB,5*1024*1024 -->
	    <property name="maxUploadSize" value="5242880"></property>
	    <!-- 设定文件上传时写入内存的最大值,如果小于这个参数不会生成临时文件,默认为10240 -->
	    <property name="maxInMemorySize" value="40960"></property>
	    <!-- 上传文件的临时路径 -->
	    <property name="uploadTempDir" value="fileUpload/temp"></property>
	    <!-- 延迟文件解析 -->
	    <property name="resolveLazily" value="true"/>
	</bean>
注意:multipart解析器的beanID是有意义的。当DispatcherServlet查找multipart解析器的时候,它将会查找ID为multipart的解析器bean,如果multipart解析器是其他ID的话,DispatcherServlet将会忽略他。


 2194
2194


 被折叠的 条评论
为什么被折叠?
被折叠的 条评论
为什么被折叠?
 到【灌水乐园】发言


