


上一节我们的模型得出结论:得到99.7%的正确率,但是非结节100%正确,但实际的结节100%是错误的,网络只是把所有的东西都归类为非结节。99.7%的值仅仅意味着只有大约0.3%的样本是结节。说明正负样本偏差过大。
这一节主要是介绍一些评估模型的指标,以及数据增强来提升模型训练效果。
目录
一、主要内容
- 定义和计算精确率、召回率、真/假阳性或阴性。
- 使用F1分数和其他质量的指标
- 平衡和增强数据以减少过拟合
- 使用TensorBoard绘制质量指标
二、召回率、精确率、F1分数
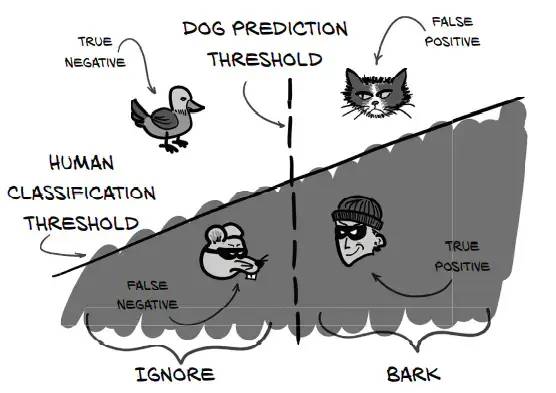
召回率 = TP/(TP+FN)
精确率 = TP/(TP+FP)
F1 = 2*召回率*精确率/(召回率+精确率)
召回率、精确率、F1的定义在这里不细讲,网上随便找就能找到,而且很清晰
training.py 将精确率、召回率、F1分数加入日志
在training的日志函数def logMetrics()加入相关指标
neg_count = int(negLabel_mask.sum())
pos_count = int(posLabel_mask.sum())
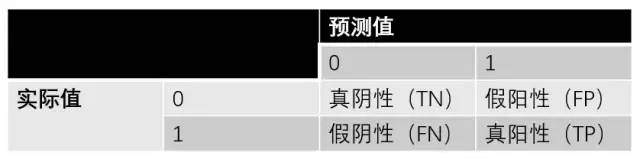
trueNeg_count = neg_correct = int((negLabel_mask & negPred_mask).sum())
truePos_count = pos_correct = int((posLabel_mask & posPred_mask).sum())
falsePos_count = neg_count - neg_correct
falseNeg_count = pos_count - pos_correct
# 精确率 召回率公式
precision = metrics_dict['pr/precision'] = \
truePos_count / np.float32(truePos_count + falsePos_count)
recall = metrics_dict['pr/recall'] = \
truePos_count / np.float32(truePos_count + falseNeg_count)
# F1分数
metrics_dict['pr/f1_score'] = \
2 * (precision * recall) / (precision + recall)
#记录整体日志
log.info(
("E{} {:8} {loss/all:.4f} loss, "
+ "{correct/all:-5.1f}% correct, "
+ "{pr/precision:.4f} precision, "
+ "{pr/recall:.4f} recall, "
+ "{pr/f1_score:.4f} f1 score"
).format(
epoch_ndx,
mode_str,
**metrics_dict,
)
)
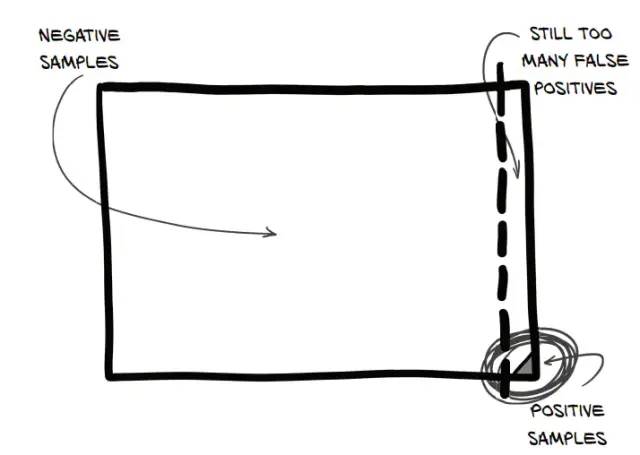
三、重复采样
理想的数据集正负样本的数量应该是一致的,而我们的数据集阳性样本和阴性样本的比例是1:400,是非常不平衡的。
1、实现分类平衡(dsets.py)
保留单独的阴性训练样本列表和阳性训练样本列表,并交替从这2个列表返回样本。加入一个参数ratio_int,表明阴性与阳性的样本比例
class LunaDataset(Dataset):
    def __init__(self,
                 val_stride=0,
                 isValSet_bool=None,
                 series_uid=None,
                 sortby_str='random',
                 ratio_int=0,
                 augmentation_dict=None,
                 candidateInfo_list=None,
            ):
        self.ratio_int = ratio_int
#... line 259
        self.negative_list = [
            nt for nt in self.candidateInfo_list if not nt.isNodule_bool
        ]
        self.pos_list = [
            nt for nt in self.candidateInfo_list if nt.isNodule_bool
        ]
#... line 265
#在每个迭代周期的顶部调用它,以随机化所呈现的样本的顺序
    def shuffleSamples(self):
        if self.ratio_int:
            random.shuffle(self.negative_list)
            random.shuffle(self.pos_list)
2、交叉取样(dsets.py)
在LunaDataset类中实现交叉取样,希望把数据处理成ratio_int = 2:
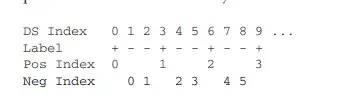
数据集索引和阳性索引(阳性标签元素对应的下标)的关系很简单:将数据集索引除以3,然后向下舍入。阴性索引(阴性标签元素对应的下标)稍微复杂一些,因为我们必须从数据集索引中减去1,然后减去最近的阳性索引。
    def __getitem__(self, ndx):
        if self.ratio_int: #ratio_int为0意味着使用本地的平衡
            pos_ndx = ndx // (self.ratio_int + 1)

            if ndx % (self.ratio_int + 1):    #非0的余数表示这是一个阴性样本
                neg_ndx = ndx - 1 - pos_ndx
                neg_ndx %= len(self.negative_list)
                candidateInfo_tup = self.negative_list[neg_ndx]
            else:
                pos_ndx %= len(self.pos_list)
                candidateInfo_tup = self.pos_list[pos_ndx]
        else:
            candidateInfo_tup = self.candidateInfo_list[ndx] #如果不平衡类,则返回第N个样本
3、更改数据集长度(dsets.py)
因为正样本数量本身较少,太长的数据集导致正样本重复数量太多,并没有什么意义,缩短数据集长度为200000个样本
    def __len__(self):
        if self.ratio_int:
            return 200000
        else:
            return len(self.candidateInfo_list)
4、添加命令行参数(training.py)
class LunaTrainingApp:
    def __init__(self, sys_argv=None):
#... line 52
        parser.add_argument('--balanced',
            help="Balance the training data to half positive, half negative.",
            action='store_true',
            default=False,
        )
5、更改初始化训练(training.py)
    def initTrainDl(self):
        train_ds = LunaDataset(
            val_stride=10,
            isValSet_bool=False,
            ratio_int=int(self.cli_args.balanced),
        )
四、数据增强
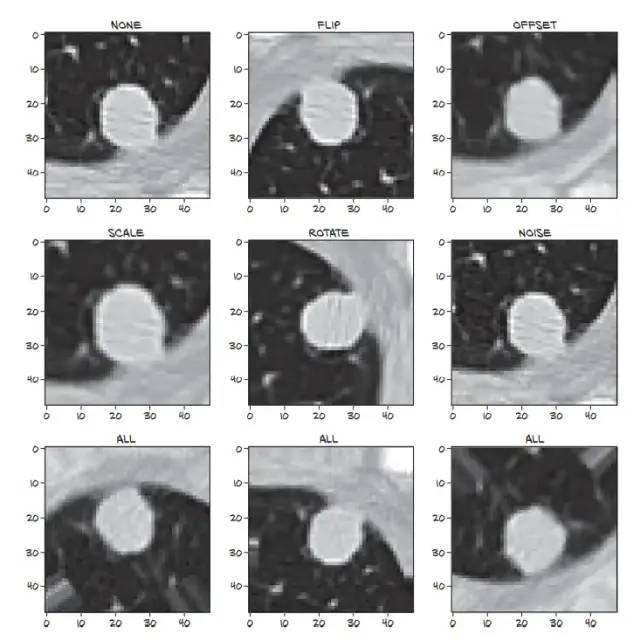
书中实现了5种数据增强技术:
- 上下、左右和/或前后镜像图像
- 将图像移动几个体素
- 放大或缩小图像
- 围绕头-脚轴旋转图像
- 为图像添加噪声
1、getCtAugmentedCandidate()函数
定义一个getCtAugmentedCandidate()函数,该函数负责获取包含候选对象的标准CT块并对其进行修改:
def getCtAugmentedCandidate(
        augmentation_dict,
        series_uid, center_xyz, width_irc,
        use_cache=True):
    if use_cache:    #从缓存中获取CT
        ct_chunk, center_irc = \
            getCtRawCandidate(series_uid, center_xyz, width_irc)
    else:    #直接获取CT
        ct = getCt(series_uid)
        ct_chunk, center_irc = ct.getRawCandidate(center_xyz, width_irc)

    ct_t = torch.tensor(ct_chunk).unsqueeze(0).unsqueeze(0).to(torch.float32)   #转换为张量
2、重采样
定义一个仿射变换矩阵,并将其与PyTorch的affine_grid()和grid_sample函数一起对候选对象进行重采样,接下来是仿射网络和采样代码。
    transform_t = torch.eye(4)
#... line 195
    affine_t = F.affine_grid(
            transform_t[:3].unsqueeze(0).to(torch.float32),
            ct_t.size(),
            align_corners=False,
        )

    augmented_chunk = F.grid_sample(
            ct_t,
            affine_t,
            padding_mode='border',
            align_corners=False,
        ).to('cpu')
#... line 214
    return augmented_chunk[0], center_irc
如果没有任何附加功能,此函数将不会起太大作用。下面是几种转换方法
3、数据增强方法
3.1、镜像
保持像素值完全相同,只改变图像的方向。由于肿瘤生产的图像左右或前后之间没有很强的相关性,我们能够在不改变样本原本表征的情况下翻转它们。
   for i in range(3):
        if 'flip' in augmentation_dict:
            if random.random() > 0.5:
                transform_t[i,i] *= -1
书中说:“grid_sample()函数将[-1,1]映射到新旧张量的实际区间,如果大小不同,则会隐式地进行缩放。这个范围映射需要镜像数据,我们所需要做的就是将变换矩阵的相关元素乘-1”
这块儿我暂时没特别理解,后面弄清楚了再补充说明各种方法。
3.2、随机偏移
        if 'offset' in augmentation_dict:
            offset_float = augmentation_dict['offset']
            random_float = (random.random() * 2 - 1)
            transform_t[i,3] = offset_float * random_float
3.3、缩放
        if 'scale' in augmentation_dict:
            scale_float = augmentation_dict['scale']
            random_float = (random.random() * 2 - 1)
            transform_t[i,i] *= 1.0 + scale_float * random_float
3.4、旋转
    if 'rotate' in augmentation_dict:
        angle_rad = random.random() * math.pi * 2
        s = math.sin(angle_rad)
        c = math.cos(angle_rad)

        rotation_t = torch.tensor([
            [c, -s, 0, 0],
            [s, c, 0, 0],
            [0, 0, 1, 0],
            [0, 0, 0, 1],
        ])

        transform_t @= rotation_t
3.5、噪声
    if 'noise' in augmentation_dict:
        noise_t = torch.randn_like(augmented_chunk)
        noise_t *= augmentation_dict['noise']

        augmented_chunk += noise_t
如下就是各种图像增强的效果,最后一行是合并的效果。
另:将增强方法加到训练参数中
把各种增强手段对应的参数加入到训练环节,通过参数决定启用哪种增强手段。这里是修改traing.py代码。在init中设置接收参数
        parser.add_argument('--augmented',
            help="Augment the training data.",
            action='store_true',
            default=False,
        )
        parser.add_argument('--augment-flip',
            help="Augment the training data by randomly flipping the data left-right, up-down, and front-back.",
            action='store_true',
            default=False,
        )
        parser.add_argument('--augment-offset',
            help="Augment the training data by randomly offsetting the data slightly along the X and Y axes.",
            action='store_true',
            default=False,
        )
        parser.add_argument('--augment-scale',
            help="Augment the training data by randomly increasing or decreasing the size of the candidate.",
            action='store_true',
            default=False,
        )
        parser.add_argument('--augment-rotate',
            help="Augment the training data by randomly rotating the data around the head-foot axis.",
            action='store_true',
            default=False,
        )
        parser.add_argument('--augment-noise',
            help="Augment the training data by randomly adding noise to the data.",
            action='store_true',
            default=False,
        )
然后是给这些增强方法设定预设值
        self.augmentation_dict = {}
        if self.cli_args.augmented or self.cli_args.augment_flip:
            self.augmentation_dict['flip'] = True
        if self.cli_args.augmented or self.cli_args.augment_offset:
            self.augmentation_dict['offset'] = 0.1
        if self.cli_args.augmented or self.cli_args.augment_scale:
            self.augmentation_dict['scale'] = 0.2
        if self.cli_args.augmented or self.cli_args.augment_rotate:
            self.augmentation_dict['rotate'] = True
        if self.cli_args.augmented or self.cli_args.augment_noise:
            self.augmentation_dict['noise'] = 25.0


 被折叠的 条评论
为什么被折叠?
被折叠的 条评论
为什么被折叠?
 到【灌水乐园】发言


