


引言
在上次学些了Bean的自动装配以及常用的ResourceLoader方式后,接下来继续学习Spring的注解以及实例。
对于Spring注解,我们先来看看其的
常用注解和
元注解注解。
Bean管理的常用注解实现
-
Classpath扫描与组件管理
从Spring3.0开始呢,Spring javaConfig项目就提供了很多特性,包括使用
Java而不是xml或者yml,比如使用如下的注解,来进行申明
-
@Configuration -
@Bean -
@Import -
@DependsOn -
@Component:其是一个通用注解,可以用于任何bean;其子注解有如下:
-
@Repository通常用于注解Dao类,持久层 -
@Service用于注解Service类,即服务层 -
@Controller用于注解Controller类,即控制层
-
-
Bean作用域的元注解注解
-
元注解(Meta-annotations),Spring提供的许多注解可以作为开发者自己的代码,即“元数据 注解”,对于开发者来说,元注解是一个简单的注解,可以应用到另外一个注解。例如:package test.annotationPractice.service; import org.springframework.stereotype.Component; /** * @Deprecated Bean的作用域注解练习 * @Date 2020年5月13日 * @Author charlinheng */ @Component public @interface ServiceAnnotationPractice{ //使用@Component注解 }上面这段代码,使用了@Component注解,通过使用此注解,那么让ServiceAnnotationPractice继承了@Component这个注解的所有特性。
-
元注解可以定制属性,不仅限于value()属性。例如如下代码:
package test.annotationPractice.service; import org.springframework.context.annotation.ComponentScan; import org.springframework.stereotype.Component; /** * @Deprecated Bean的作用域注解练习 * @Date 2020年5月13日 * @Author charlinheng */ @Component //不仅限于下面的value属性 @ComponentScan(value = {"test.annotation.dao.*",""}) //还能使用自定义属性 @ComponentScan("userdefine") public @interface ServiceAnnotationPractice{ //使用@Component注解 } -
通过使用上面的
@Service、@Repositoty、@Controller等注解,Spring会自动检测类并注册为Bean对象,放到容器ApplicationContext中。
Spring-config.xml注解配置[类的自动 检测和Bean的注册]
-
通过在基于xml的Spring配置标签,即可声明为annotation-config配置,但需要注意的是,包含上下文命名空间。
<?xml version="1.0" encoding="UTF-8"?> <beans xmlns="http://www.springframework.org/schema/beans" xmlns:xsi="http://www.w3.org/2001/XMLSchema-instance" xmlns:context="http://www.springframework.org/schema/tool" xsi:schemaLocation="http://www.springframework.org/schema/beans http://www.springframework.org/schema/beans/spring-beans.xsd http://www.springframework.org/schema/tool http://www.springframework.org/schema/tool/spring-tool.xsd" default-autowire="constructor"> <context:annotation-config/> </beans> -
其标签特点: context:annotation-config/仅仅会查找当前
applicationContext的Bean的注解。 -
使用<context:component-scan base-package=“com.test.*”/>标签来配置
<?xml version="1.0" encoding="UTF-8"?> <beans xmlns="http://www.springframework.org/schema/beans" xmlns:xsi="http://www.w3.org/2001/XMLSchema-instance" xmlns:context="http://www.springframework.org/schema/tool" xsi:schemaLocation="http://www.springframework.org/schema/beans http://www.springframework.org/schema/beans/spring-beans.xsd http://www.springframework.org/schema/tool http://www.springframework.org/schema/tool/spring-tool.xsd" default-autowire="constructor"> <context:component-scan base-package="com.test.annotationPractice.dao.*"/> </beans> -
两者的区别:
-
component-scan标签已经包含了annotation-config标签。一般来说,使用了component-scan后,不再使用annotation-config标签。 -
在使用了component-scan之后呢,其所属的如下注解也会被包含进来:

AutowiredAnnotationBeanPostProcessorAutowiredAnnotation后置处理器CommonAnnotationBeanPostProcessorCommonAnnotation后置处理器
-
-
使用过滤器进行自定义扫描
默认情况下,类被自动发现并注册bean的条件是使用:
- @Component
- @Repository
- @Controller
- 使用Component自定义注解
使用上面都可以进行自动发现和注册为Bean对象。但也可以通过下面的xml配置来进行过滤,比如我在example.java中使用了@Service,但是我在xml中配置了,对其Service进行过滤,那么此时就不会将example进行注册为Bean对象。代码示范如下:
<?xml version="1.0" encoding="UTF-8"?> <beans xmlns="http://www.springframework.org/schema/beans" xmlns:xsi="http://www.w3.org/2001/XMLSchema-instance" xmlns:context="http://www.springframework.org/schema/tool" xsi:schemaLocation="http://www.springframework.org/schema/beans http://www.springframework.org/schema/beans/spring-beans.xsd http://www.springframework.org/schema/tool http://www.springframework.org/schema/tool/spring-tool.xsd" default-autowire="constructor"> <!--<context:annotation-config/>--> <!--<context:component-scan base-package="com.test.annotationPractice.dao.*"/>--> <context:component-scan base-package="test.annotationPractice"> <context:inclde-filter type="regex" expression=".*test.*Service"/> <context:inclde-filter type="annotation" expression="org.springframework.stereotype.Service"/> </context:component-scan> </beans> 还可以使用use-defalt-filter="false"禁用容器的自动发现与注册为Bean。
-
根据上面的context:inclde-filter的type的属性的扩展,除了regex模式,下面是其它拥有的模式及其语法:
过滤类型 举例 描述 annotation org.example.SomeAnnotation 在目标组件中,一个注解在类型等级级别中被表达 assignable org.example.SomeClass 目标组件实现的一个接口 aspectj org.example…*Service+ 一个aspectj类型的表达需要根据目标组件进行匹配 regex org.example.Default.* 一个regex类型的表达需要通过目标组件类名称进行匹配 custom org.example.MyTypeFilter 一个关于org.springframework.core.type.TypeFilter.interface类的custom实现
定义Bean
如何通过使用注解,来定义Bean?
举例:
下面使用@Service注解,将此ServiceAnnotationPractice类注册成为Bean对象,并且命名为myService:
package test.annotationPractice.service;
import org.springframework.context.annotation.ComponentScan;
import org.springframework.stereotype.Component;
import org.springframework.stereotype.Service;
/**
 * @Deprecated  Bean的作用域注解练习
 * @Date 2020年5月13日
 * @Author charlinheng
 */
@Service("myService")
public  class ServiceAnnotationPractice{
    //通过使用注解来自动将此类注册为Bean
}
除了使用@Service、@Component、@Controller、@Mapper、@Repository等,我们还可已通过自定义的bean命名策略,实现BeanNameGenerator接口,并一定要包含一个无参数构造函器
举例,下面使用了name-generator属性来进行实现自定义bean命名策略:
<?xml version="1.0" encoding="UTF-8"?>
<beans xmlns="http://www.springframework.org/schema/beans"
       xmlns:xsi="http://www.w3.org/2001/XMLSchema-instance" xmlns:context="http://www.springframework.org/schema/tool"
       xsi:schemaLocation="http://www.springframework.org/schema/beans http://www.springframework.org/schema/beans/spring-beans.xsd http://www.springframework.org/schema/tool http://www.springframework.org/schema/tool/spring-tool.xsd"
       default-autowire="constructor" >
        <!--<context:annotation-config/>-->
    <!--<context:component-scan base-package="com.test.annotationPractice.dao.*"/>-->
        <!--<context:component-scan base-package="test.annotationPractice">-->
                <!--<context:inclde-filter type="regex" expression=".*test.*Service"/>-->
            <!--<context:inclde-filter type="annotation" expression="org.springframework.stereotype.Service"/>-->
        <!--</context:component-scan>-->
        <context:component-scan base-package="test.annotationPractice" name-generator="org.example.MyNameGenerator"/>
</beans>
作用域
通常情况下呢,自动查找的SPring组件,其Scope是singleton模式,也就是单例模式,在Spring2.5中,还提供了了一个标识的scope的注解 @scope:
| 注解名称 | 注解作用域 |
|---|---|
| scope | [默认] singleton |
Bean的定义和其作用域-实例1
-
首先,先创建annotationPractice文件夹,在其文件夹下建立BeanAnnotation.java,代码如下:
package test.annotationPractice; import org.springframework.stereotype.Component; /** * @Deprecated 使用注解注册为Bean对象联系 * @Date 2020年5月13日 * @Author charlinheng */ @Component public class BeanAnnotation { public void sayTest(String str){ System.out.println("当前BeanAnnotation说:"+str); } } -
在spring-config.xml中进行配置自动扫描
<?xml version="1.0" encoding="UTF-8"?> <beans xmlns="http://www.springframework.org/schema/beans" xmlns:xsi="http://www.w3.org/2001/XMLSchema-instance" xmlns:context="http://www.springframework.org/schema/context" xsi:schemaLocation="http://www.springframework.org/schema/beans http://www.springframework.org/schema/beans/spring-beans.xsd http://www.springframework.org/schema/context http://www.springframework.org/schema/context/spring-context.xsd"> <context:component-scan base-package="test.annotationPractice"> </context:component-scan> </beans> -
在测试类中getBean此对象,执行sayTest()方法。
package test; import org.junit.jupiter.api.BeforeAll; import org.junit.jupiter.api.Test; import org.springframework.context.support.ClassPathXmlApplicationContext; import test.ResourceLoaderPractice.ResourceLoaderPractice; import test.annotationPractice.BeanAnnotation; import test.autoWiringPractice.AutoWiringService; public class TestClass { @Test public void test(){ //使用方法1进行添加spring-config文件 ClassPathXmlApplicationContext classPathXmlApplicationContext = new ClassPathXmlApplicationContext("spring-config.xml"); //beanAnnotation, BeanAnnotation beanAnnotation = (BeanAnnotation)classPathXmlApplicationContext.getBean("beanAnnotation"); beanAnnotation.sayTest("wow,what a thrill"); } } -
结果:
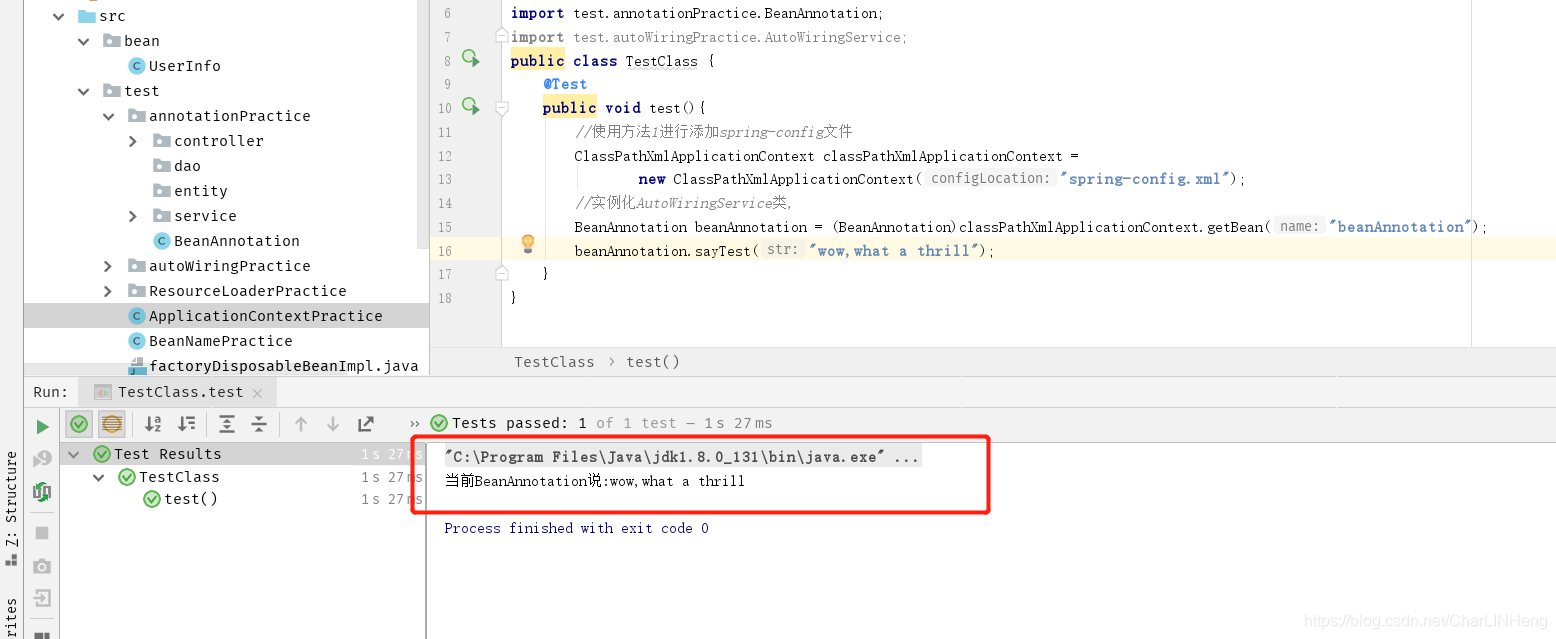
BeanAnnotation成功通过@Component注解注册成为了Bean
5.上面说了scope,我们现在来通过HashCode()获得的对象内存地址来测试注解scope的作用域。
-
首先,我们在
BeanAnnotation类中加上Scope注解,此时为simpleton模式,如下:
package test.annotationPractice;
import org.springframework.context.annotation.Scope;
import org.springframework.stereotype.Component;
/**
 * @Deprecated  使用注解注册为Bean对象联系
 * @Date 2020年5月13日
 * @Author charlinheng
 */
@Scope
@Component
public class BeanAnnotation {
    public void sayTest(String str){
        System.out.println("当前BeanAnnotation的hashCode值:"+str);
    }
}
此时默认模式为Sinpleton模式
-
然后再测试类中,赋予获取两次BeanAnnotation对象:
package test; import org.junit.jupiter.api.BeforeAll; import org.junit.jupiter.api.Test; import org.springframework.context.support.ClassPathXmlApplicationContext; import test.ResourceLoaderPractice.ResourceLoaderPractice; import test.annotationPractice.BeanAnnotation; import test.autoWiringPractice.AutoWiringService; public class TestClass { @Test public void test(){ //使用方法1进行添加spring-config文件 ClassPathXmlApplicationContext classPathXmlApplicationContext = new ClassPathXmlApplicationContext("spring-config.xml"); //获取bean对象 BeanAnnotation beanAnnotation = (BeanAnnotation)classPathXmlApplicationContext.getBean("beanAnnotation"); beanAnnotation.sayTest(String.format("%d",beanAnnotation.hashCode())); beanAnnotation = null; System.gc(); //再次获取bean对象 beanAnnotation = (BeanAnnotation)classPathXmlApplicationContext.getBean("beanAnnotation"); //再次输出 beanAnnotation.sayTest(String.format("%d",beanAnnotation.hashCode())); } } -
此时的输出结果为两个相同的值,结果如下:
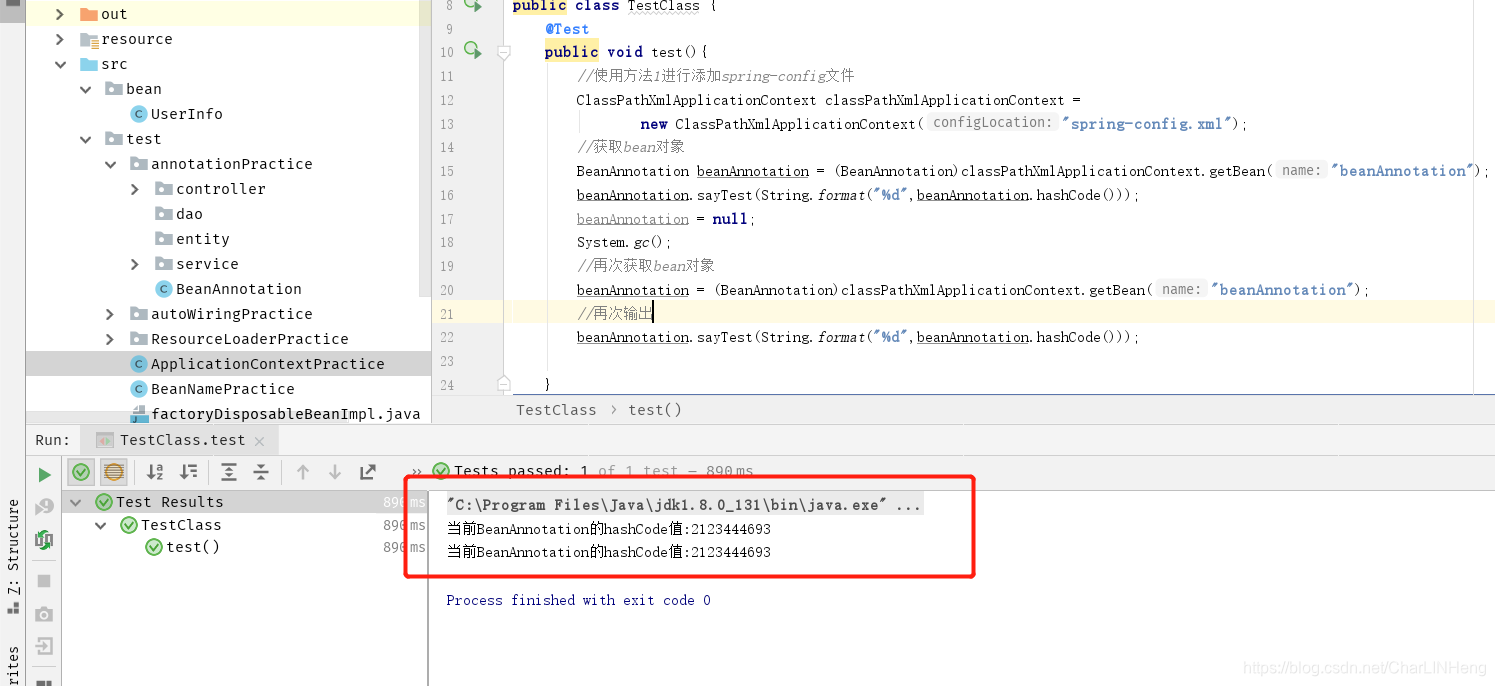 说明是同一个对象
-
当我Scope模式切换成为其他模式时候,改变的代码如下,我换成prototype模式:
package test.annotationPractice; import org.springframework.context.annotation.Scope; import org.springframework.stereotype.Component; /** * @Deprecated 使用注解注册为Bean对象联系 * @Date 2020年5月13日 * @Author charlinheng */ //此时,换成了prototype模式, @Scope("prototype") @Component public class BeanAnnotation { public void sayTest(String str){ System.out.println("当前BeanAnnotation的hashCode值:"+str); } } -
重新执行测试类,获得的运行结果如下图所示:

- 解释:此时的hashCode值不一样,说明不是同一个对象,原因是改变了默认的Scope模式,有
sinpleTon变成prototype模式。


 1万+
1万+


 被折叠的 条评论
为什么被折叠?
被折叠的 条评论
为什么被折叠?
 到【灌水乐园】发言


