


背景
进行此次分享,此次分享主要是详细的了解什么是nio、以及和bio的对比。
从linux底层-》nio-》netty-》组件的线程模型。
以及了解一下常用的中间件在网络处理、线程模型方面的方案
疑问
什么是bio、什么是nio、具体表现在哪些方面
整个网络io读取的基本流程是什么
代码
bio模块 是简单的bio demo
jenkov模块 是nio作者对nio进行nioserver设计的基础demo
netty模块 netty模块是我按照netty简写的一点读取的代码
nettydemo模块 是我按照netty权威指南一书截取的类图信息
nio模块 主要有几个nio核心部件的简单使用
整体了解
屏蔽数据链路层、IP层这些概念,假设数据已经到了网卡,我们需要进行数据交互,这个过程要怎么设计?
1、提供一个统一的对网络处理的概念,叫socket
2、提供了一个端口的概念,在客户端来服务的时候知道找哪个serversocket
3、serversocket内部要有一个连接队列(其实是俩),在不同客户端数据来的时候可以把数据写到对应的socket关联的缓冲区
4、数据接收的流程
BIO
服务端解析
demo
// 创建SOCKET,内部方法会调用bind和listen,这也是TCP的概念。
// bind和listen本质上就是初始化tcp的半连接,全连接队列
ServerSocket serverSocket = new ServerSocket(6666);
while (true) {
    // 阻塞直到有客户端连接。 Accept是tcp的概念,面向连接,建立连接
    // 这个方法是在三次握手之后获取具体的socket对象的。
    // 这个地方socket变成了一次性的。 这可不行。如果要解决这个问题,对于bio来说就是多线程
    Socket socket = serverSocket.accept();
    // 处理请求
    int len = -1;
    byte[] data = new byte[1024];//每次读取1k
    InputStream inputStream = socket.getInputStream();
    while ((len = inputStream.read(data)) != -1) {
        System.out.println(new String(data, 0, len));
    }
}
代码拆解
方法栈
new ServerSocket(6666)
->java.net.ServerSocket#bind(java.net.SocketAddress, int)
// 在底层创建socket套接字,并且和端口号绑定起来。
// 通信来的时候就可以通过端口号找到对应的套接字了
getImpl().bind(epoint.getAddress(), epoint.getPort());
// 套接字改为监听状态,并且要初始化连接队列,用于连接的时候分配。backlog指的是连接队列的最大长度
// 为什么需要半连接队列,不保存下来,在持续通讯的时候找不到对应的套接字
getImpl().listen(backlog);
客户端
demo
Socket socket = new Socket("127.0.0.1", 6666);
Scanner input = new Scanner(System.in);
while (input.hasNext()) {
    socket.getOutputStream().write(input.nextLine().getBytes());
}
代码拆解
方法栈
new Socket("127.0.0.1", 6666);
->java.net.Socket#Socket(java.net.SocketAddress, java.net.SocketAddress, boolean)
// bind方法会初始化(随机生成,也可以设置端口号范围)一个端口号,然后和当前socket绑定起来
bind(localAddr);
// tcp的三次握手过程
connect(address);
从内核流程中理解当前demo语法。
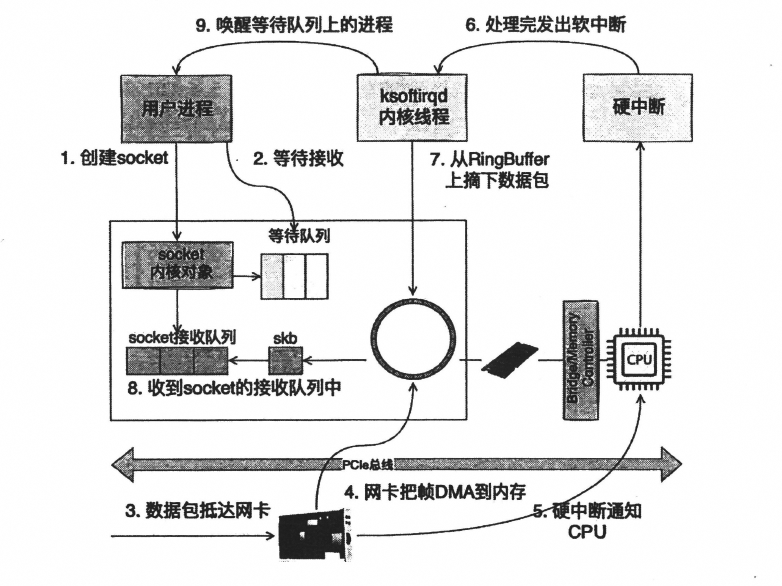
Linux中的数据读取流程简介
socket
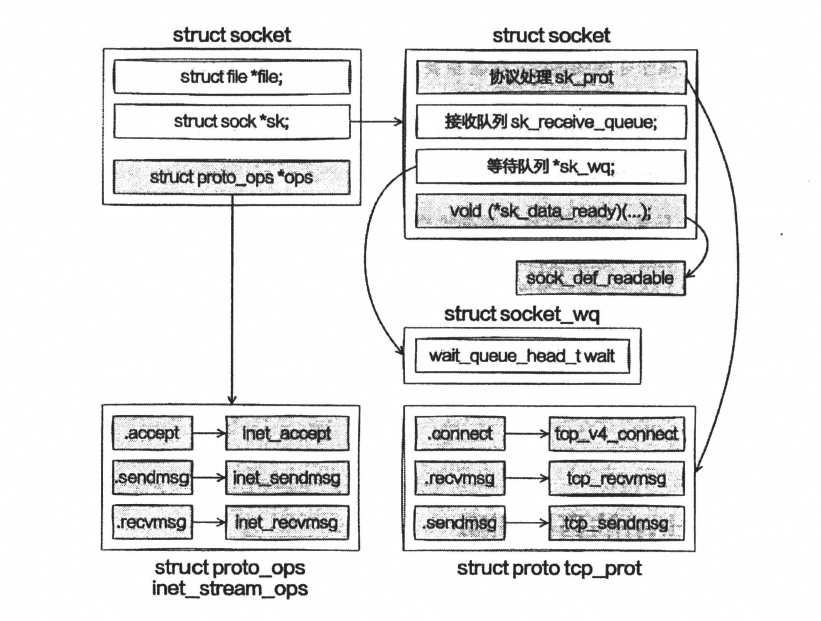
socket的结构主要包含
file 文件句柄,和socket相互关联
sk_prot socket使用的协议,即调用到协议栈处理的时候找到当前socket关联的具体的协议方法,比如找到tcp的recvmsg方法,从而可以进行tcp的滑动窗口等协议控制。
sk_wq 等待队列,此结构主要包含阻塞的线程信息
sk_data_ready 是一个指针函数,当套接字接收缓冲区中有数据可读时,内核会调用这个回调函数。其主要作用如下:
- 唤醒等待进程:当数据到达并且可以被应用层读取时,sk_data_ready负责唤醒那些因为等待读取数据而睡眠在该套接字上的进程或线程。这通常通过相关的等待队列(socket wait queue)实现,确保等待的数据可读时能够及时通知应用程序。
- 执行默认处理逻辑:如果没有用户自定义的处理函数,sk_data_ready默认调用sock_def_readable函数,该函数执行一些标准的读取前准备和数据可用性检查,为接下来的应用层读取操作做准备。
sk_receive_queue 接收队列:接收的数据存放。
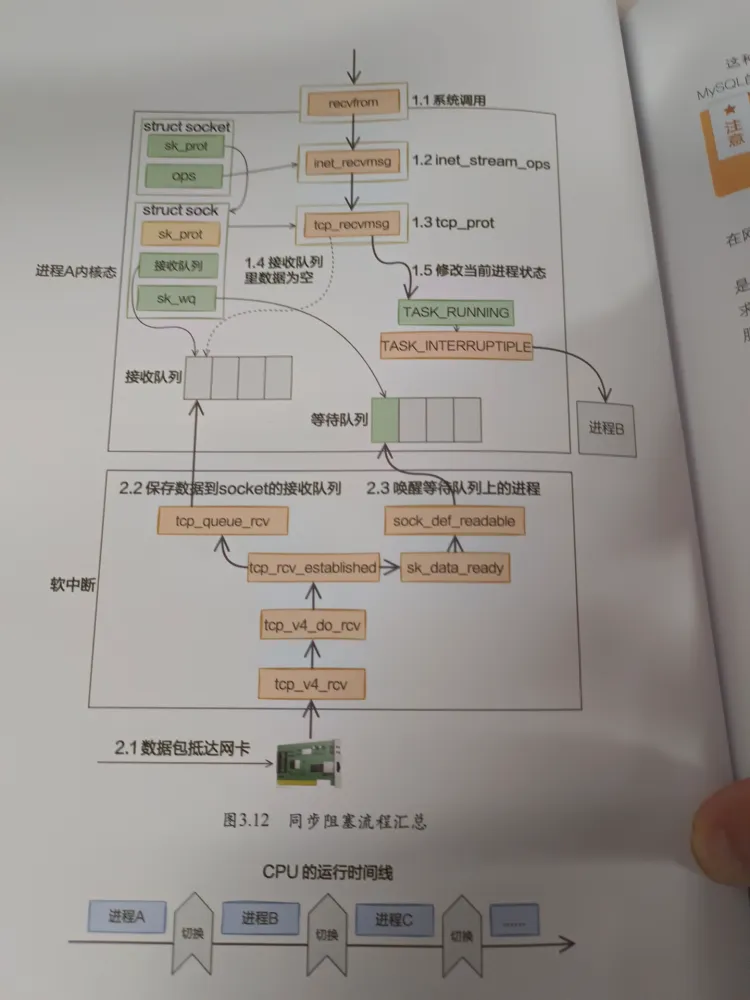
recv方法的流程
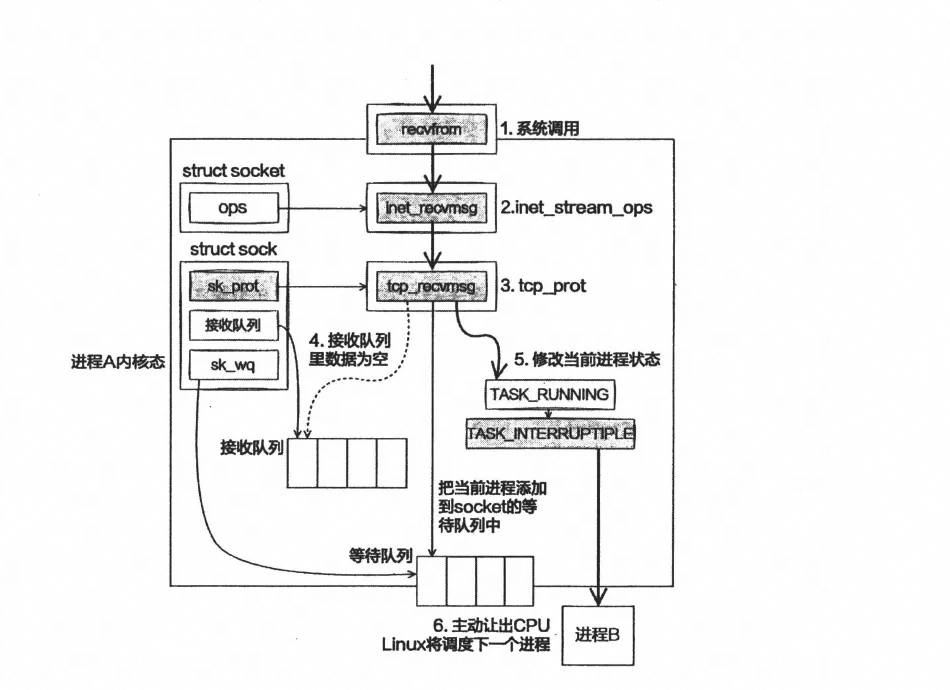
recv的时候判断到底有没有数据,没有数据则会挂起当前线程保存到等待队列中,在数据来了之后,通过一系列处理,找到当前socket以及其等待队列中的挂起线程,然后唤醒。
整体流程
其他
1、阻塞不仅体现在recv上,send、accept、connect一样会阻塞。
send的阻塞指的是我们通过调用网卡的方法进行发送数据之后才会变成运行态。
accept的阻塞指的是直到有客户端进行连接,返回了socket才会变成运行态。
2、一个连接产生两次上下文切换
一次上下文切换约3-5us
3、一个连接一个线程
一个线程所占用的资源包括内核栈(默认8KB) + 用户线程栈(java 由XSS设置,我们系统设置的是256KB)
大概10000个线程就是2.5G
4、一个socket占用的资源(没有办法削减)
主要是发送缓冲区和接收缓冲区。可以通过net.ipv4.tcp_rmem和net.ipv4.tcp_wmem内核参数进行调整。一般为发送缓冲区16KB,接收缓冲区8KB。
- 发送缓冲区大小通常可以通过 /proc/sys/net/ipv4/tcp_wmem 查看,它有三个值:最小值、默认值、最大值。
- 接收缓冲区大小则可通过 /proc/sys/net/ipv4/tcp_rmem 查看,同样包括最小值、默认值、最大值。
NIO
Linux对NIO的支持
非阻塞
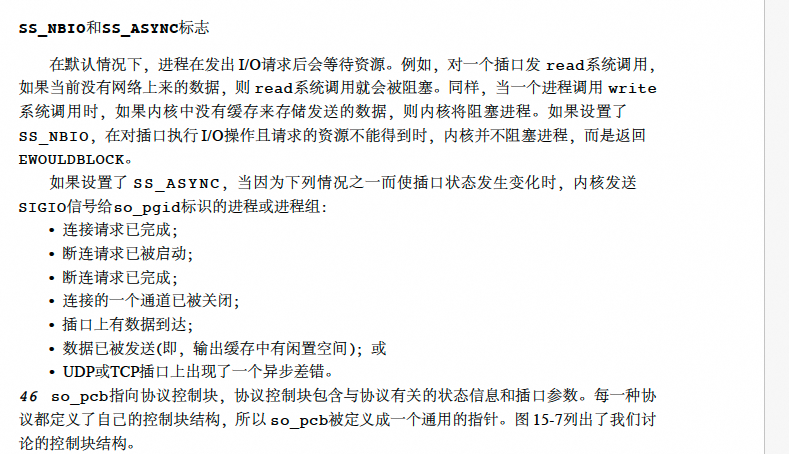
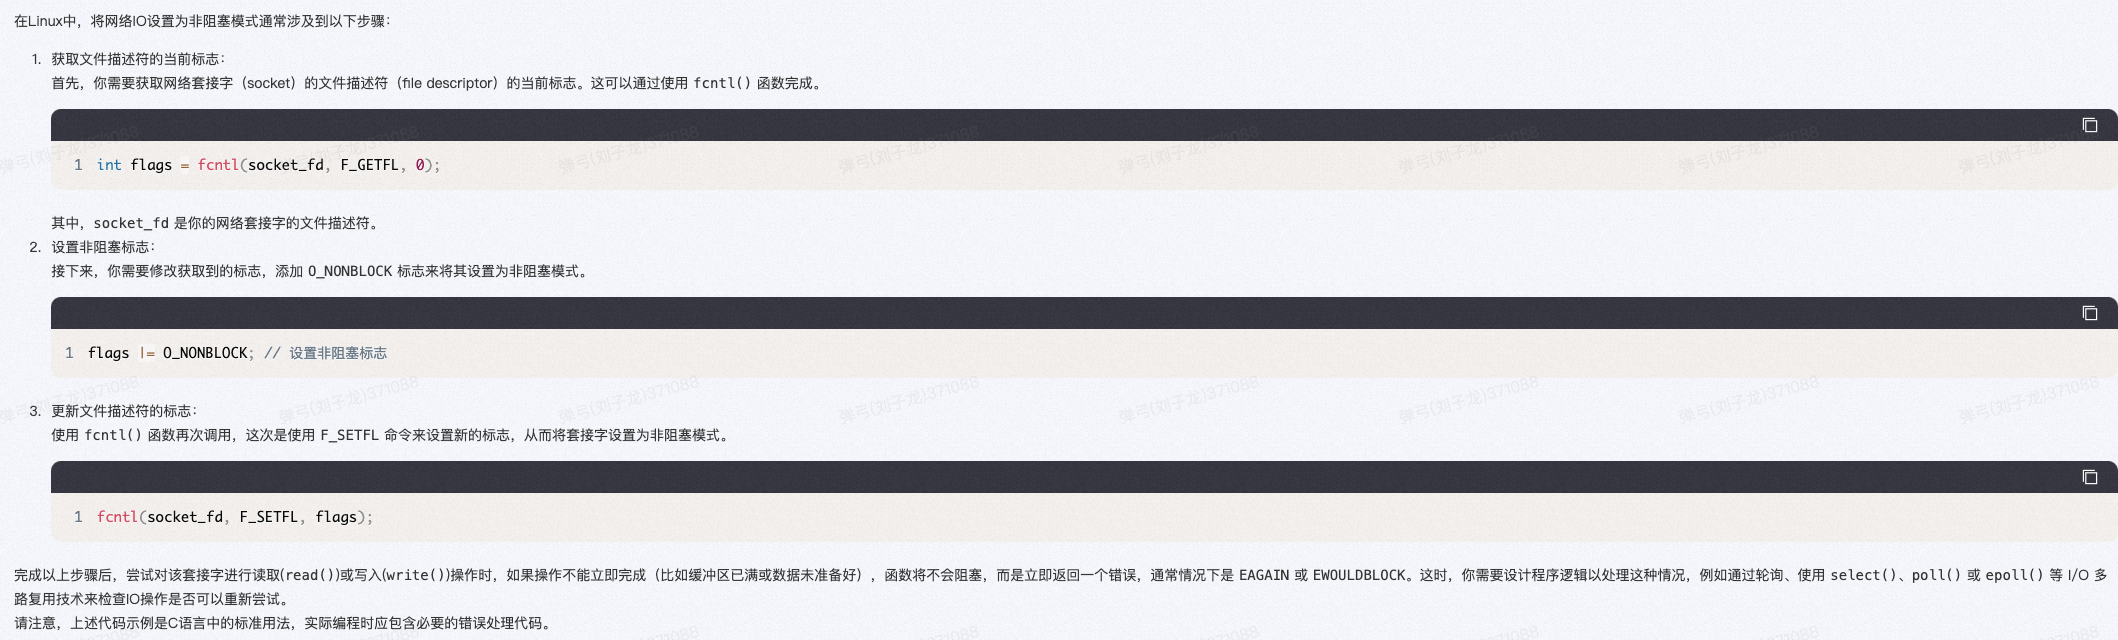
非阻塞的recvFrom会怎么样?
不阻塞当前线程,直接返回read值-1.
ServerSocketChannel serverSocketChannel = ServerSocketChannel.open();
serverSocketChannel.socket().bind(new InetSocketAddress(8888));
// 在这个地方可以设置成非阻塞模式。
serverSocketChannel.configureBlocking(true);
SocketChannel socketChannel = serverSocketChannel.accept();
while(true){
    // 阻塞模式这个地方会锁住当前线程
    // 非阻塞模式此时accept就会立即返回,可能会返回null
    socketChannel.configureBlocking(true);
    ByteBuffer byteBuffer = ByteBuffer.allocate(1024);
    // 此处有三种情况会立即返回 1、configureBlocking设置为false
    // 2、socket中有数据,其实是阻塞的,但是看起来像是立即返回
    // 3、读到流的末尾,即另外一个流结束了。但是不知道怎么判断这个东西的
    int read = socketChannel.read(byteBuffer);
    System.out.println(new String(byteBuffer.array(), "utf-8"));
}
思考
如果是非阻塞模式会有什么问题?
如果有大量的空闲连接,则会导致过多无意义空转。会影响真正有数据到来的连接的处理速度。
epoll
简介
为了避免CPU花费精力去处理那些不需要处理的socket,因此需要一个数据结构把需要处理的socket保存起来,这个结构就是epoll(linux起初是select和poll模型,epoll是其优化版本)。
epoll结构
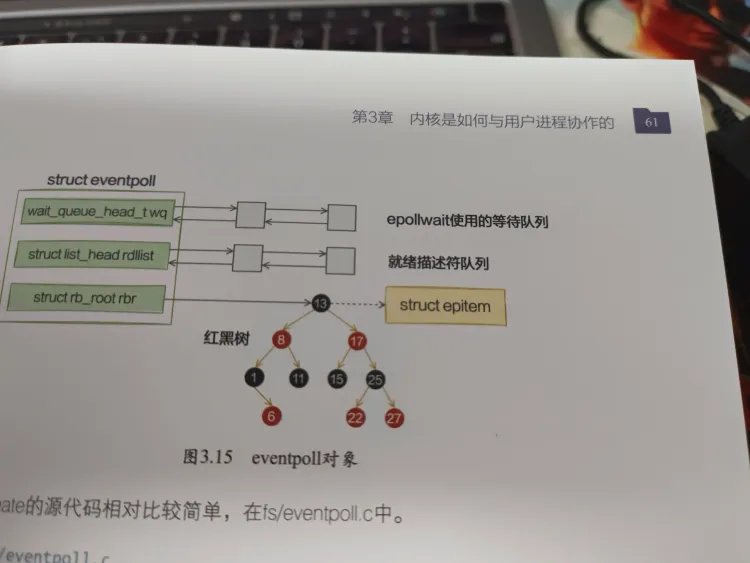
epoll整体流程

java中的epoll使用
// 创建selector
Selector selector = Selector.open();

ServerSocketChannel channel = ServerSocketChannel.open();
//绑定端口
channel.bind(new InetSocketAddress(8888));

channel.configureBlocking(false);
SelectionKey register = channel.register(selector, SelectionKey.OP_ACCEPT);

// 此方法执行一次会结束,需要不停的执行
while(true){
    int select = selector.select();
    // 获取选择的key
    Set<SelectionKey>  selectedKeys = selector.selectedKeys();
    Iterator<SelectionKey> keyIterator = selectedKeys.iterator();
    while(keyIterator.hasNext()) {
        SelectionKey key = keyIterator.next();
        //该channel已就绪,可接收消息
        if(key.isAcceptable()){
            System.out.println("accept事件就绪...");
            doAccept(key);
        }else if(key.isReadable()){
            System.out.println("read事件就绪...");
            doRead(key);
        }else if(key.isWritable()){
            System.out.println("write事件就绪...");
            doWrite(key);
        }
        keyIterator.remove();
    }
}
其中几个关键点
1、Selector selector = Selector.open(); // 创建一个epoll对象
2、SelectionKey register = channel.register(selector, SelectionKey.OP_ACCEPT); // socket注册到selector上
3、int select = selector.select(); // 阻塞等待事件
问题:
那么什么时候会唤起这个selector的呢? 又是如何唤起的。在BIO中介绍过,在事件来的时候会对socket进行唤醒,调用data_ready这个函数,现在data_ready这个函数不在唤起socket变量中等待队列的线程,而是唤起selector阻塞的线程。
NIO的使用
NIO核心API
bytebuffer
其主要是在读写的时候会重置position的值,然后进行反转。
public static void main(String[] args) throws IOException {

    ByteBuffer bb = ByteBuffer.allocate(48);
    String testStr = "张三";
    byte[] bytes = testStr.getBytes();

    for(int i = 0; i < bytes.length; i ++){
        bb.put(bytes[i]);
    }

    bb.flip();

    byte[] testRecvBytes = new byte[bb.limit()];

    bb.get(testRecvBytes, 0, testRecvBytes.length);
    System.out.println(new String(testRecvBytes,"utf-8"));
    bb.clear();
}
演示案例:BufferTest
SocketChannel
此处可以直观的看到阻塞和非阻塞的区别,比如设置serversocket的阻塞模式,在accept的时候就会明显的观察到阻塞和非阻塞的问题。
public static void main(String[] args) throws IOException, InterruptedException {
        ServerSocketChannelTest.bind();
    }

    public static void bind() throws IOException, InterruptedException {

        ServerSocketChannel serverSocketChannel = ServerSocketChannel.open();
        serverSocketChannel.socket().bind(new InetSocketAddress(8888));
        // 在这个地方可以设置成非阻塞模式。
        serverSocketChannel.configureBlocking(true);
        // 这个地方以目前的写法只能接收一个线程
        SocketChannel socketChannel = serverSocketChannel.accept();
        while(true){
            // 阻塞模式这个地方会锁住当前线程
            // 非阻塞模式此时accept就会立即返回,可能会返回null
            socketChannel.configureBlocking(true);
            ByteBuffer byteBuffer = ByteBuffer.allocate(1024);
            // 此处有三种情况会立即返回 1、configureBlocking设置为false
            // 2、socket中有数据,其实是阻塞的,但是看起来像是立即返回
            // 3、读到流的末尾,即另外一个流结束了
            int read = socketChannel.read(byteBuffer);
            System.out.println(new String(byteBuffer.array(), "utf-8"));;
        }
    }
public static void main(String[] args) throws IOException {
SocketChannelTest.write();
}
public static SocketChannel create() throws IOException {
SocketChannel socketChannel = SocketChannel.open();
// 设置socketchannel是非阻塞模式, 没有连接上也会返回。不用等待connect之后在返回
// 如果使用false的话,可能会出现 Exception in thread "main" java.nio.channels.NotYetConnectedException 异常
socketChannel.configureBlocking(true);
socketChannel.connect(new InetSocketAddress("127.0.0.1", 8888));
return socketChannel;
}
public static void write() throws IOException {
SocketChannel socketChannel = create();
String newData = "New String to write to file..." + System.currentTimeMillis();
ByteBuffer buf = ByteBuffer.wrap(newData.getBytes());
socketChannel.write(buf);
}selector
public static void main(String[] args) throws IOException {
        // 创建selector
        Selector selector = Selector.open();

        ServerSocketChannel channel = ServerSocketChannel.open();
        //绑定端口
        channel.bind(new InetSocketAddress(8888));

        channel.configureBlocking(false);
        SelectionKey register = channel.register(selector, SelectionKey.OP_ACCEPT);

        // 此方法执行一次会结束,需要不停的执行
        while(true){
            int select = selector.select();
            // 获取选择的key
            Set<SelectionKey>  selectedKeys = selector.selectedKeys();
            Iterator<SelectionKey> keyIterator = selectedKeys.iterator();
            while(keyIterator.hasNext()) {
                SelectionKey key = keyIterator.next();
                //该channel已就绪,可接收消息
                if(key.isAcceptable()){
                    System.out.println("accept事件就绪...");
                    doAccept(key);
                }else if(key.isReadable()){
                    System.out.println("read事件就绪...");
                    doRead(key);
                }else if(key.isWritable()){
                    System.out.println("write事件就绪...");
                    doWrite(key);
                }
                keyIterator.remove();
            }
        }
    }

    private static void doWrite(SelectionKey key) throws IOException {
        //获取对应的socket
        SocketChannel socket = (SocketChannel)key.channel();
        //获取key上的附件
        String content = (String)key.attachment();
        socket.write(ByteBuffer.wrap(content.getBytes()));
        socket.close();
    }

    private static void doRead(SelectionKey key) throws IOException {
        //获取对应的socket
        SocketChannel socket = (SocketChannel)key.channel();
        //设置一个读取数据的Buffer 大小为1024
        ByteBuffer buff = ByteBuffer.allocate(1024);
        StringBuilder content = new StringBuilder();

        while(socket.read(buff) > 0) {
            buff.flip();
            content.append(new String(buff.array(),"utf-8"));
        }
        //注册selector,并设置为可写模式
        key = socket.register(key.selector(), SelectionKey.OP_WRITE);
        //在key上携带一个附件(附近就是之后要写的内容)
        key.attach("服务端已收到:"+content);
        System.out.println("读取内容:" + content);
    }

    private static void doAccept(SelectionKey key) throws IOException {
        //获取对应的channel
        ServerSocketChannel server = (ServerSocketChannel)key.channel();
        //从channel中获取socket信息
        SocketChannel socket = server.accept();
        //设置为非阻塞模式
        socket.configureBlocking(false);
        //注册selector,并设置为可读模式
        socket.register(key.selector(), SelectionKey.OP_READ);
    }
仔细分析一下这几个事件,nio主要提供了四个事件
// 读不阻塞,说明没有数据读取,在read的时候会返回
public static final int OP_READ = 1 << 0;
// 写事件,bytebuffer没有完全写入,也会返回
public static final int OP_WRITE = 1 << 2;
// 连接事件,没有连接上,也返回
public static final int OP_CONNECT = 1<<3;
// 服务端没有获取到连接上来的socket,也返回
public static final int OP_ACCEPT = 1<<4;
使用非阻塞IO编程的问题点
NIO SERVER设计需要解决的问题点
读取部分信息
socket读取部分信息,如何保存下来完整的信息,然后传递给应用程序?以http为例使用分隔符来判断header,使用定长来取body。
保存消息的缓冲区应该设计为多大?如果预分配的缓冲区满了怎么办?可变缓冲区
写部分消息
socket写入的时候也可能是部分写入(在底层写入缓冲区满了之后),如何保证能全部写入?
常用的线程模型如何设计
怎么合理的规划线程模型
NIO SERVER 设计代码
GitHub - jjenkov/java-nio-server: A Java NIO Server using non-blocking IO all the way through.
其他
NIO默认使用水平触发方式,所以在事件读取完之后要把事件移除
水平触发(Level Triggered, LT)
- 定义:当一个文件描述符(如socket)处于就绪状态时(例如,有数据可读或可写),epoll会一直将其包含在就绪事件集合中,直到应用程序采取行动并处理这些事件。这意味着只要条件满足(如缓冲区中有数据未读),每次调用epoll_wait都会返回这个文件描述符。
边缘触发(Edge Triggered, ET)
- 定义:仅当文件描述符的状态从非就绪变为就绪时才触发一次通知。一旦事件被触发后,除非该文件描述符的状态再次发生变化(比如又有新的数据到达导致从非就绪变为就绪),否则不会再次通知。
netty
netty使用demo简介
netty client
Bootstrap b = new Bootstrap();
      b.group(group)
      .channel(NioSocketChannel.class)
      .option(ChannelOption.TCP_NODELAY, true)
      .handler(new ChannelInitializer<SocketChannel>() {
          @Override
          protected void initChannel(SocketChannel socketChannel) throws Exception {
              socketChannel.pipeline().addLast(new LineBasedFrameDecoder(1024));
              socketChannel.pipeline().addLast(new StringDecoder());
              socketChannel.pipeline().addLast(new TimeClientStickyPackageHandler());

          }
      });
ChannelFuture f = b.connect(host, port).sync();
f.channel().closeFuture().sync();
netty server
EventLoopGroup bossGroup = new NioEventLoopGroup(1);
EventLoopGroup workerGroup = new NioEventLoopGroup(1);
try {
    ServerBootstrap b = new ServerBootstrap();
    b.group(bossGroup, workerGroup)
            .channel(NioServerSocketChannel.class)
            // 连接队列大小设置
            .option(ChannelOption.SO_BACKLOG, 1024)
            .childHandler(new ChildChannelHandler());
    ChannelFuture f = b.bind(port).sync();
    f.channel().closeFuture().sync();
}finally {
    bossGroup.shutdownGracefully();
    workerGroup.shutdownGracefully();
}
protected void initChannel(SocketChannel socketChannel) throws Exception {
socketChannel.pipeline().addLast(new LineBasedFrameDecoder(1024));
socketChannel.pipeline().addLast(new StringDecoder());
socketChannel.pipeline().addLast(new TimeServerStickPackageResolveHandler());
}public class TimeServerStickPackageResolveHandler extends ChannelInboundHandlerAdapter {
private int counter;
@Override
public void channelRead(ChannelHandlerContext ctx, Object msg) throws UnsupportedEncodingException {
String buf = (String) msg;
System.out.println("the time server receive order: " + buf + " the counter is: " + ++counter);
// ctx.write("Server says: " + body + '\n');
}
@Override
public void exceptionCaught(ChannelHandlerContext ctx, Throwable cause) {
cause.printStackTrace();
ctx.close();
}
}netty的核心组件原理简介
NioEventLoop
这个是netty的事件轮询器,也是netty提供的线程解决方案。其主要分为两部分,一个是干实事的NioEventLoop,还有一个相当于集合类,对NioEventLoop进行调度的NioEventLoopGroup。
其主要完成了
1、为每一个NioEventLoop生成线程
首次调用方法com.mydemo.eventloop.SingleThreadEventLoop#submit会启动线程
2、NioEventLoop和selector进行关联,让其channel注册到NioEventLoop上,这个channel的所有事件其实就相当于交给NioEventLoop的run方法进行运行了
初始化的时候会初始化selector,channel注册的时候会进行绑定以及事件的监听
3、不仅处理channel,还处理提交过来的任务
比如说register会转换成任务进行提交
参考代码案例中的:com.mydemo.eventloop.NioEventLoop(这个是netty的eventloop的简化版本)
ChannelPipeline & ChannelContext & ChannelHandler & ChannelAdapter
其核心就是一个调用链,核心调用链使用过程。
ChannelPipeline 是Channel独有的链。
ChannelContext是注册上去的封装了名字,eventLoop,channelHandler的处理器。
ChannelHandler是一个处理器,分为inbound和outbound,即进来(accept,read, register)数据处理和出去数据处理(connect, write)
ChannelAdapter 其实就是实现了需要实现的方法,但是不会进行实质处理,只会往下找ChannelHandler处理。
// 1、 pipeline发起调用过滤链的读取方法。 这个head是第一个ChannelContext
@Override
public ChannelPipeline fireChannelRead(Object msg) {
    DefaultChannelHandlerContext.invokeChannelRead(this.head, msg);
    return this;
}

// 2、channelContext调用channelHandler方法进行read
public static void invokeChannelRead(final DefaultChannelHandlerContext next, Object msg) {
    EventLoop executor = next.eventLoop();
    if (executor.inEventLoop()) {
        next.invokeChannelRead(msg);
    } else {
        executor.submit(() -> next.invokeChannelRead(msg));
    }
}

// 3、channelContext的具体执行方法
private void invokeChannelRead(Object msg) {
    try {
        ((ChannelInboundHandler)this.handler()).channelRead(this, msg);
    } catch (Exception e) {
        throw new RuntimeException(e);
    }
}

// 4、headContext的具体执行方法
@Override
public ChannelHandlerContext fireChannelRead(Object msg) {
    // 这个findContextInbound是关键,找到下一个context,然后执行
    invokeChannelRead(this.findContextInbound(), msg);
    return this;
}
注:in是从head往后找实现了ChannelInboundInvoke的,out是从tail往前找实现了ChannelOutboundHandler的。
参考代码入口: com.mydemo.handler.DefaultChannelPipeline#fireChannelRead
ChannelFuture & ChannelPromise
这个看名字就知道是控制同步等待的,有点类似于callback和future
@Override
public ChannelFuture await() throws InterruptedException {
    if(this.isDone()){
        return this;
    }
    while (!this.isDone()){
        synchronized (this){
            this.wait();
        }
    }
    return this;
}

@Override
public Object get() throws InterruptedException, ExecutionException {
    this.await();
    return result;
}

@Override
public Boolean setSuccess(Object result) {
    if(RESULT_UPDATER.compareAndSet(this, null, result)){
        synchronized (this){
            this.notifyAll();
        }
        return true;
    }
    return false;
}
使用可以参考代码中的案例:com.mydemo.future.Sample
Channel & UnSafe
简单的描述一下,channel是对socket的抽象,每一个channel会关联一个socket对io进行读写。
Unsafe相当于是Channel的代理,在Channel实际调用的过程中会加一些前置或者后置的处理,比如说读完成之后会发布一个读完成消息。
核心处理流程
NIO服务端编程读的整体步骤
1、生成serverSocket(绑定地址,开始监听)
2、创建epoll
3、注册到epoll
4、等待accept事件
5、把accept到的socket注册到epoll上,然后监听读事件
读取流程的完整描述
初始化serversocket
1、io.netty.bootstrap.AbstractBootstrap#bind(int)
1.1、this.channelFactory.newChannel();
// 根据反射,创建NioServerSocketChannel,同时会创建一个NIO底层的ServerSocketChannel,然后封装进NioServerSocketChannel,初始化pipeline,unsafe等属性,并将channel设置成非阻塞的
1.1.1 io.netty.channel.DefaultChannelPipeline#DefaultChannelPipeline
// 设置当前channel对应pipeline的头部和尾部,然后把head tail链起来
this.tail = new TailContext(this);
this.head = new HeadContext(this);
this.head.next = this.tail;
this.tail.prev = this.head;
1.2 io.netty.bootstrap.ServerBootstrap#init
p.addLast(new ChannelHandler[]{new ChannelInitializer<Channel>() {
    public void initChannel(final Channel ch) {
        final ChannelPipeline pipeline = ch.pipeline();
        ChannelHandler handler = ServerBootstrap.this.config.handler();
        if (handler != null) {
            pipeline.addLast(new ChannelHandler[]{handler});
        }

        // 这个是一个特别重要的地方,添加了一个接收的处理器
        // 当来accept消息的时候会通过这个ServerBootstrapAcceptor 处理
        ch.eventLoop().execute(new Runnable() {
            public void run() {
                pipeline.addLast(new ChannelHandler[]{new ServerBootstrapAcceptor(ch, currentChildGroup, currentChildHandler, currentChildOptions, currentChildAttrs)});
            }
        });
    }
}});
1.3、AbstractChannel.this.doRegister(); // 把eventloop绑定到selector上
1.4、io.netty.channel.AbstractChannel.AbstractUnsafe#beginRead // 对于serverSocket来说监听accept事件
1.5、io.netty.channel.socket.nio.NioServerSocketChannel#doBind // 内部socket进行端口号绑定
对serversocket的accept事件进行处理
2、io.netty.channel.nio.NioEventLoop#processSelectedKey(java.nio.channels.SelectionKey, io.netty.channel.nio.AbstractNioChannel) // 主要是对绑定的Selector上的事件进行处理
// 读事件和accept事件处理,均使用unsafe.read方法
if ((readyOps & 17) != 0 || readyOps == 0) {
    unsafe.read();
}
2.1、io.netty.channel.socket.nio.NioServerSocketChannel#doReadMessages //调用底层的accept方法,并且把接收到的socket封装成NioSocketChannel,保存在一个ArrayList中
2.2、调用fireChannelRead进行channelPipeline处理数据。其就是使用我们在最开始注册的ServerBootstrapAcceptor
// 核心方法,把子channelHandler添加到对应的pipeline上。
// 初始化的handler会调用执行一次之后移除,我们会在初始化的时候添加进去几个channelHandler永久加上
child.pipeline().addLast(new ChannelHandler[]{this.childHandler});

// 核心方法,把接收到的子channel,即child进行注册到worker的eventLoop上
this.childGroup.register(child).addListener(new ChannelFutureListener() {
    public void operationComplete(ChannelFuture future) throws Exception {
        if (!future.isSuccess()) {
            ServerBootstrap.ServerBootstrapAcceptor.forceClose(child, future.cause());
        }

    }
});
2.2.1、调用io.netty.channel.nio.AbstractNioChannel#doRegister 进行注册到子EventLoop的selector上
2.2.2、io.netty.channel.AbstractChannel.AbstractUnsafe#beginRead 对于客户端socket来说开始读
处理客户端socket的读事件
netty中read步骤
将byte从缓冲区读取到
把byte按照一定方式分离截取成一个完整的byte消息(不同的协议,不同的截取方式)
将完整的byte消息转换成对应的object。(反序列化方式,write的时候是序列化,发送会和序列化后的包大小有关)
处理对应的object
源码过程分析
3、io.netty.channel.nio.NioEventLoop#processSelectedKey(java.nio.channels.SelectionKey, io.netty.channel.nio.AbstractNioChannel) // 主要是对绑定的Selector上的事件进行处理
// 读事件和accept事件处理,均使用unsafe.read方法
if ((readyOps & 17) != 0 || readyOps == 0) {
    unsafe.read();
}
3.1 io.netty.channel.nio.AbstractNioByteChannel.NioByteUnsafe#read
// 分配一个bytebuf,大小是1024
// 这个地方有个关键,水平触发,会导致此次读取不完,下次还会有读事件过滤
// 第二次在读取的时候会在原有的bytebuf的基础上进行扩容,如果内存不够
byteBuf = allocHandle.allocate(allocator);

// 读channel的数据到bytebuf中
allocHandle.lastBytesRead(AbstractNioByteChannel.this.doReadBytes(byteBuf));

// 把读取到的数交给pipeline处理。这个时候就会用到我们在最开始注册到的channelHandler了
pipeline.fireChannelRead(byteBuf);
3.1.1 io.netty.handler.codec.FixedLengthFrameDecoder#decode
// 利用retainedSlice,把bytebuf中的内容截取下来,这个是会循环调用的。
// 比如说缓冲区传了1000个byte,一次消息是20个,那么就会调用50次,组成50个消息写进list
protected final void decode(ChannelHandlerContext ctx, ByteBuf in, List<Object> out) throws Exception {
    Object decoded = this.decode(ctx, in);
    if (decoded != null) {
        out.add(decoded);
    }

}

protected Object decode(ChannelHandlerContext ctx, ByteBuf in) throws Exception {
    return in.readableBytes() < this.frameLength ? null : in.readRetainedSlice(this.frameLength);
}
3.2 利用StringDecoder 或者JSON等对应的序列化方案。。。
reactor线程模型
ServerbootStrap serverbootStrap = new ServerbootStrap();
NioEventLoopGroup boss = new NioEventLoopGroup(1);
serverbootStrap.group(boss, boss)
        .channel(NioServerSockerChannel.class)
        .childHandler(new ChildChannelHandler());
ServerbootStrap serverbootStrap = new ServerbootStrap();
NioEventLoopGroup boss = new NioEventLoopGroup(1);
NioEventLoopGroup worker = new NioEventLoopGroup(10);
serverbootStrap.group(boss, worker)
.channel(NioServerSockerChannel.class)
.childHandler(new ChildChannelHandler());ServerbootStrap serverbootStrap = new ServerbootStrap();
NioEventLoopGroup boss = new NioEventLoopGroup(10);
NioEventLoopGroup worker = new NioEventLoopGroup(10);
serverbootStrap.group(boss, worker)
.channel(NioServerSockerChannel.class)
.childHandler(new ChildChannelHandler());常用中间件中的网络IO
okhttp
tomcat
参考文档
《深入理解linux网络》
《TCP/IP详解卷2》
《netty权威指南》


 4558
4558


 被折叠的 条评论
为什么被折叠?
被折叠的 条评论
为什么被折叠?
 到【灌水乐园】发言


