


Tether Android to Ubuntu / Fedora Linux
(Update 08-22-11 - CLICK HERE for the automatic setup script - Now Just 243KB! sha1sum: c358c60bf61720162d22f18f3e3d7ea1ee4a0eb2 ). Based on reader comments, I've added the functionality for the script to use either yum or apt-get (Fedora or Ubuntu). I've also changed the script so that it will add udev rules to allow HTC, Motorola, Samsung, LG Android-based phones. READ the install instructions here (e.g., PLUG YOUR DROID INTO THE USB FIRST!)) Let me know how it works for you in the comments.)

So if you're like me you recently picked up the fabulous Verizon Droid Linux-based phone, and now you're one happy camper.
I've been cruising along with my Droid (Android Linux based device) for a month now, and I'm happy as a clam. I have to tell you... The Verizon Droid is quite a fine Linux-based device indeed.
So now that I've used the Droid for awhile, I set out in search of a piece of functionality that I hadn't yet replaced from my Blackberry days. That is: The capability to tether my Droid as an Internet modem to my Ubuntu GNU/Linux 9.10 machine using the USB cable.
On the Blackberry, this was as simple as, a.) provisioning the data service through Verizon(yes, this does cost extra), and then b.) setting up the "
Berry4All/BBTether" script (by the extravagant Mr. Thibaut Colar) on my Ubuntu Linux box.
In my search for a solution, the first place I checked for a tethering application was in the Android Market. And while there are many other applications, the only app I was able to find for tethering, required for my phone to be "rooted". And so instead of jumping right into that, I went looking for an easier solution, and voila! - I found it.
What I found are some easy tethering instructions by the masterful
Shwan.c (
link at ubuntuforums.org) using
James Perry's azilink from
Google Project Hosting,
GNU+
Linux, and the
FOSS program
openvpn. So now there was only one problem: I'm using the Verizon Droid, not the HTC Magic. The good news is that the process is generally the same, except for a difference in hardware id information for the udev rules settings in Ubuntu.
So after some minor changes, I've now successfully tethered my Verizon Droid via USB as a modem for my Ubuntu GNU/Linux 9.10 machine(Works with 10.04 too - only difference is that you may have to uncheck "Work Offline" in Firefox after connecting (Thanks to Gene for mentioning this)). Update:06-04-10 - I've tested these instructions and they work successfully with both the Motorola Droid and the HTC Incredible Android phones.
So here are the easy steps to get you up and running with using your Droid as a USB tethered modem (and a big Thanks to Shwan.c for posting the original idea):
1.) Download the current Android SDK (for Linux (i386)) from: http://developer.android.com/sdk/index.html
Update(thanks for comments!): 12-13-10 adb does not come with the new SDK by default so you have to add it via the Android SDK and AVD Manager.
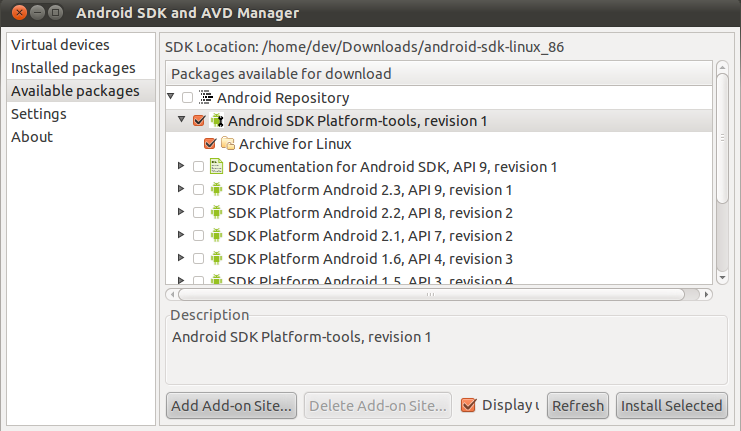
2.) Extract the SDK, run the "Android SDK and AVD Manager", then to get the adb tool, install "Android SDK Platform-tools, revision 1":
In the Android SDK and AVD Manager, expand "Available Packages", put a checkmark by "Android SDK Platform-tools, revision 1", click "Install Selected" and follow the prompts to complete the download/installation of adb into your SDK folder (screenshot below).
tar xvf android-sdk_r07-linux_x86.tgz
cd android-sdk-linux_86
 tools/android
3.) Change Directory into the "platform-tools" directory, then copy the "adb" application to your Ubuntu /usr/bin directory (sudo privs needed)
#From the extracted "android-sdk-linux_86" directory:
cd platform-tools
sudo cp adb /usr/bin/adb
4.) Create/edit/save a rules file for udev to allow your machine to see your device
sudo vi /etc/udev/rules.d/91-android.rules
Put the text below into the file(using "i" to enter "insert" mode and hitting the escape key to return to "select" mode before saving.. C'mon, what fun would Linux be without using vi? If you really don't like vi, you can substitute with something like gedit, or nano, or kate, or etc.), replace USERNAME with your Linux username, then type ZZ to save the file from vi.
 SUBSYSTEM=="usb", ATTRS{idVendor}=="22b8", SYMLINK+="android_adb", MODE="0666", OWNER="USERNAME"
 If you have an HTC Android phone - use this rule instead of the one above:
 SUBSYSTEM=="usb", ATTRS{idVendor}=="0bb4", SYMLINK+="android_adb", MODE="0666", OWNER="USERNAME"
 If you have the Samsung Galaxy Android phone, use this rule instead of the one above:
 SUBSYSTEM=="usb", ATTRS{idVendor}=="04e8", SYMLINK+="android_adb", MODE="0666", OWNER="USERNAME"
 If you have the Sony Ericsson X11 Android phone, use this rule instead of the one above (Thanks to Steven from the comments):
 SUBSYSTEM=="usb", ATTRS{idVendor}=="0fce", SYMLINK+="android_adb", MODE="0666", OWNER="USERNAME"If you have the LG Optimus V(Virgin Mobile) Android phone, use this rule instead of the one above:
 SUBSYSTEM=="usb", ATTRS{idVendor}=="1004", SYMLINK+="android_adb", MODE="0666", OWNER="USERNAME"
5.) Set the appropriate permissions to the rules file you just created.
sudo chmod a+r /etc/udev/rules.d/91-android.rules
6.) Restart udev to load the new rule.
sudo restart udev
7.) Enable "USB debugging" on your Verizon Droid via Settings | Applications | Development
8.) Connect your Droid to the computer with the USB cable and then use the following adb command to check for your device.
adb devices
example:
$ adb devices
List of devices attached
040364FA0901E011
9.) Install openvpn on your computer so you can connect to your device with it.
sudo apt-get install openvpnsudo /etc/init.d/networking restart
sudo /etc/init.d/network-manager restart
*For Fedora and Yum, replace the commands above with this:
sudo yum install openvpn
 sudo /etc/init.d/networking restart
Note for those without Internet: If you need to install the openvpn package (and dependencies) separately, these packages are what you will need: (liblzo2-2 libpkcs11-helper1 openssl-blacklist openvpn-blacklist openvpn). It's best to use the package manager to install openvpn because it will automatically install the dependencies, but if you can't get your Ubuntu machine onto to the Internet, then you can download the above packages (in .deb format) to a separate medium (i.e., USB drive, CDR, etc.)separately and then install them in the order listed to achieve the same result as installing from the package manager.
10.) Install openvpn on your Verizon Droid. Note: the line "adb install" actually installs the azilink application on your Droid device. After azilink is installed, an icon that looks like a flying insect will appear on your Droid in th applications area.
cd /home/Downloads/
 mkdir azilink
 cd azilink
 wget http://azilink.googlecode.com/files/azilink-2.0.2.apk
 adb install -r azilink-2.0.2.apk
 wget http://azilink.googlecode.com/files/azilink.ovpn
11.) Create a replacement resolv.conf file to be copied over to your /etc directory at run-time:
vi resolv.conf
#Type in the text below(hit "i" for insert first, then ESC after the insert, before saving) and then hit ZZ to save
domain lan
 search lan
 nameserver 192.168.56.1
12.) Now create a very small script to start the modem
vi start_modem
#Type in the text below, then hit ZZ to save
adb forward tcp:41927 tcp:41927
 sudo cp resolv.conf /etc/
 sudo openvpn --config azilink.ovpn
13.) Set your new script to be executable.
chmod 755 start_modem
14.) On your Verizon Droid, launch the azilink app and place a checkmark by "Service active" so it can receive the connection from your Ubuntu machine.
15.) With your wireless connection in Ubuntu "unchecked"(via right-click of the Network manager applet), launch the the connection script you just made in the Terminal:
/home/Downloads/azilink/start_modem
You should now be able to surf the Internet, using your Verizon Droid as a tethered modem. When you're finished - hit ctrl+c at the Terminal from which you started the connection script. Then uncheck "Service active" in Azilink on your Droid.
Here's a Speedtest (courtesy of speakeasy.net/speedtest) of the connection from Seattle, WA:
Download Speed: 1448 kbps (181 KB/sec transfer rate)
Upload Speed: 281 kbps (35.1 KB/sec transfer rate)
Download Speed: 1448 kbps (181 KB/sec transfer rate)
Upload Speed: 281 kbps (35.1 KB/sec transfer rate)
If you have any questions, feel free to leave a comment.
(Update 08-22-11 - CLICK HERE for the automatic setup script - Now Just 243KB! sha1sum: c358c60bf61720162d22f18f3e3d7ea1ee4a0eb2 ). Based on reader comments, I've added the functionality for the script to use either yum or apt-get (Fedora or Ubuntu). I've also changed the script so that it will add udev rules to allow HTC, Motorola, Samsung, LG Android-based phones. READ the install instructions here (e.g., PLUG YOUR DROID INTO THE USB FIRST!)) Let me know how it works for you in the comments.)
Here's a quick video of the setup script in action:
If you're trying to set this up on CentOS and it's not working, checkout hughesjr's post on droidforums.net
(08-14-2010) For Gentoo GNU/Linux users, checkout "Tether your Motorola Droid on Gentoo Linux (USB Version)" on the Faction Clash blog
For those looking for similar instructions for Mac OSX, checkout the article "Tethering Your Android Phone to OS X via USB" on droidie.com.
Haven't replaced your iphone with the Android yet? Checkout Ashton Mills' article at apcmag.net to tether your iphone to Ubuntu GNU+Linux.
For the windows version of these instructions, see "How To: Tether Windows to the Internet via your Android"
Update: 08-31-10 - Just received the Android 2.2 (froyo) update for my Verizon Droid Incredible. Tethering works perfectly for me after the update.
Friendly Note: All references to Linux are intended to mean GNU/Linux.
Shannon VanWagner
Updated 08-19-11


 442
442


 被折叠的 条评论
为什么被折叠?
被折叠的 条评论
为什么被折叠?
 到【灌水乐园】发言


