


目录
2.1 AnnotationConfigApplicationContext
2.2 AnnotationConfigApplicationContext源码解读
2.1.1 AnnotatedBeanDefinitionReader
2.1.2 ClassPathBeanDefinitionScanner:
3. 把启动spring自动扫描的类实例化BeanDefinition
4.1 invokeBeanFactoryPostProcessors()
最近几年,Spring boot 和spring cloud比较火。其实,要提到这2个框架,还是离不开Spring,因为他们还是spring的一种由配置文件逐减演化到纯注解实现的过程。归根结底,还是Spring技术的演化而已。
约定大于配置,这是Spring的基本原则。既然spring boot和spring cloud这么流行,后面我会把这两个框架源码也给分享出来。目前,只是尽量往sping boot上靠。
首先,还是有必要来了解一下基于配置的形式实现AOP注解技术的,我会简单带过。
1、传统方式实现AOP:
<beans xmlns="http://www.springframework.org/schema/beans"
       xmlns:xsi="http://www.w3.org/2001/XMLSchema-instance"
       xmlns:aop="http://www.springframework.org/schema/aop"
       xsi:schemaLocation="
	http://www.springframework.org/schema/beans
	http://www.springframework.org/schema/beans/spring-beans.xsd
    http://www.springframework.org/schema/aop
	http://www.springframework.org/schema/aop/spring-aop-3.2.xsd"
    default-lazy-init="false">

    <bean id="beforeAdviceBean" class="com.xiangxue.jack.costomAdvice.BeforeAdviceBean"/>
    <bean id="aspectXml1" class="com.xiangxue.jack.aop.aspectj.AspectXml1"/>
    <aop:config proxy-target-class="false">
        <!--<aop:pointcut>在此处定义的pointcut是全局的pointcut可以供所有的aspect使用-->
        <!--id:表示这个pointcut的名称,以方便使用-->
        <aop:pointcut id="addpointcut"
                      expression="execution(public * com.xiangxue.jack.service..*.add(..))"/>
        <aop:pointcut id="delpointcut"
                      expression="execution(public * com.xiangxue.jack.service..*.del*(..))"/>
        <aop:pointcut id="myMethods"
                      expression="execution(public * com.xiangxue.jack.service..*.*(..))"/>


        <!--advisor必须在aspect之前,要不然有xml约束报错-->
        <aop:advisor advice-ref="beforeAdviceBean" order="2" pointcut-ref="myMethods"/>


        <aop:aspect id="aspect1" ref="aspectXml1" order="0">
            <!--<aop:declare-parents types-matching="com.zhuguang.jack.service.MyServiceImpl"-->
            <!--implement-interface="com.zhuguang.jack.aop.IntroductionIntf"-->
            <!--delegate-ref="myintroduction"/>-->
            <!--id:表示这个pointcut的名称,以方便使用-->
            <aop:pointcut id="myMethod2"
                          expression="execution(public * com.xiangxue.jack.service..*.*(..)) and @annotation(org.springframework.web.bind.annotation.RequestMapping)"/>
            <aop:before method="before" pointcut-ref="myMethods"/>
            <aop:after method="after" pointcut-ref="myMethod2"/>
            <!-- 后置通知  returning="returnVal" 定义返回值 必须与类中声明的名称一样-->
            <aop:after-returning method="afterReturning" returning="returnVal"
                                 pointcut="execution(public * com.xiangxue.jack.service..*.*(..))"/>
            <!--异常通知 throwing="throwable" 指定异常通知错误信息变量,必须与类中声明的名称一样-->
            <!--<aop:after-throwing method="afterthrowing" throwing="e" pointcut-ref="myMethods"/>-->
            <aop:around method="around" pointcut-ref="myMethod2"/>
        </aop:aspect>
    </aop:config>


    <!--开启注解aop-->
    <aop:aspectj-autoproxy proxy-target-class="false" expose-proxy="true"/>
</beans>
上面贴出的代码,就是基于配置的方式实现Spring AOP 的传统方式。
<aop:config proxy-target-class="**"> 这种方式基本被淘汰了,因为它是需要手动配置bean标签的。
<aop:aspectj-autoproxy proxy-target-class="false" expose-proxy="true"/> 这种方式,对于还涉及到配置文件的项目,应该也还在使用。
那么,我们如何去定位这2个自定义标签呢?
对于这2个自定义标签,我们之前提到过如何去找,下面看截图,代码自己去跟:
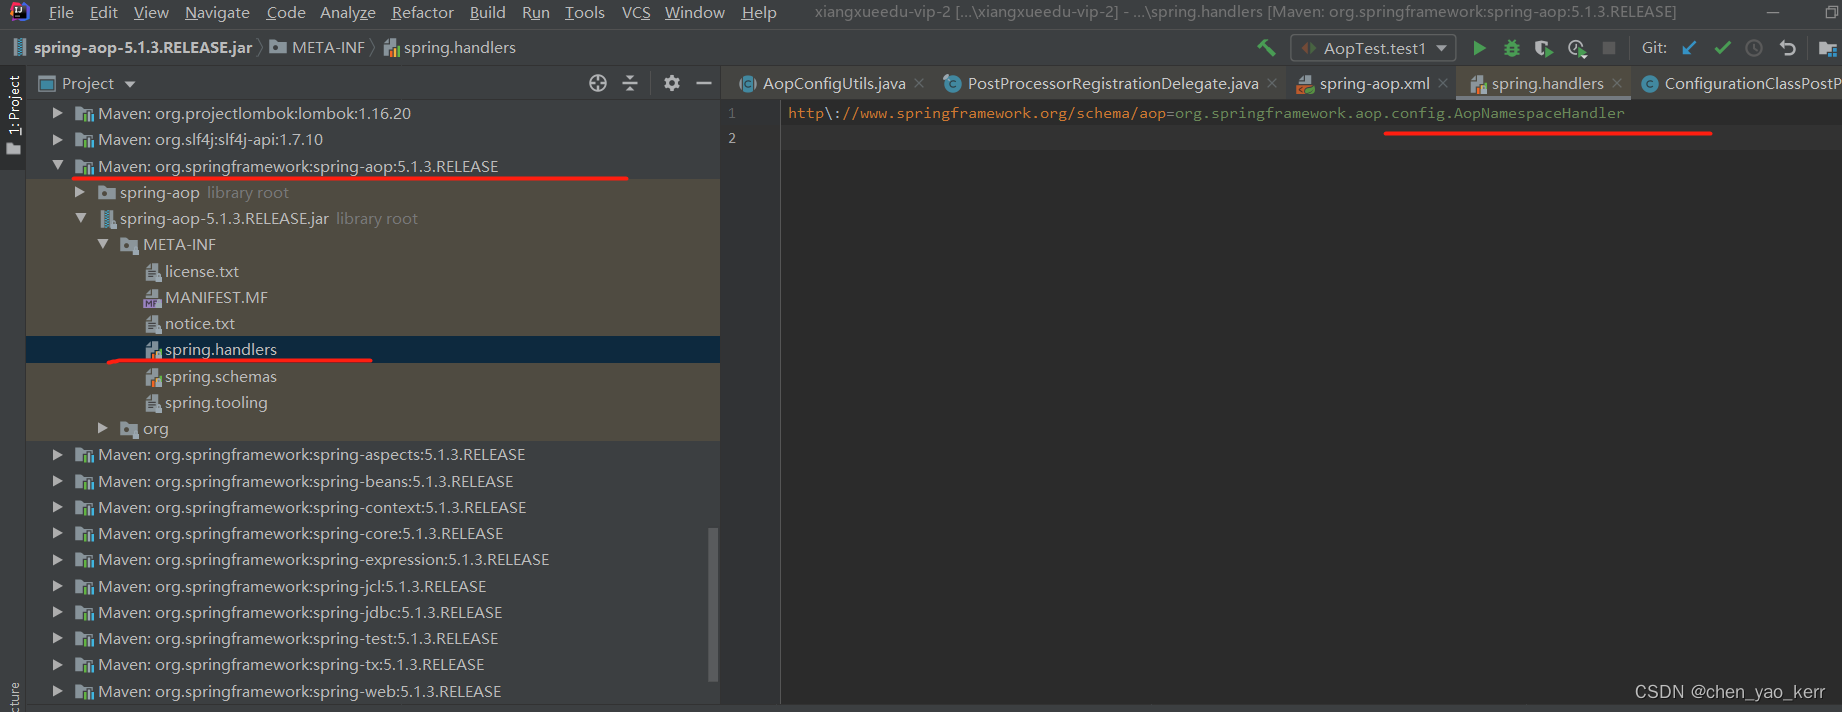
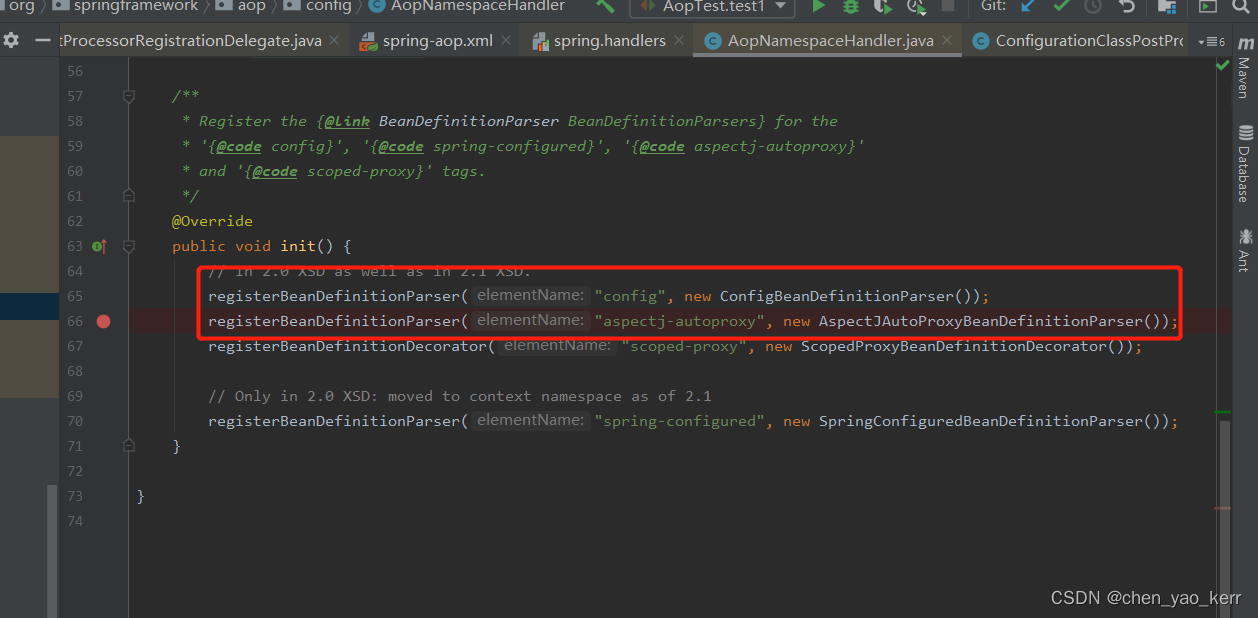
简单概括就是一句话,不同的标签都有不同的解析器。按照实际使用的标签去解析和初始化的。好了,这两种方式我就不扯远了。下面进入今天的主题。
2、纯注解的方式实现 AOP铺垫:
本章节是Spring AOP的开始,在开始AOP之前,我们先介绍AnnotationConfigApplicationContext类,它是spring boot得以实现的核心类。
因此,我们有必要先介绍一下我们先介绍AnnotationConfigApplicationContext类这个类。其实在这个类中,AOP和IOC的步骤,基本和Spring是一样的的,最大的区别就是实例化BeanDefinition的操作。
2.1 AnnotationConfigApplicationContext
它是纯注解方式实现存在的关键,也是spring boot能玩下去的重要一环。下面看一下纯注解实例spring的流程。首先,需要定义一个类,使用注解的方式启动spring的自动扫描过程,它的作用和<context:component-scan base-package="*****" />功能一样。
扫描类:
package com.xiangxue.jack.bean;

import org.springframework.context.annotation.ComponentScan;
import org.springframework.stereotype.Service;

@Service
@ComponentScan(basePackages = {"com.xiangxue"})
public class ComponentScanBean {

//    @Bean
//    public void xx() {
//        System.out.println("==");
//    }
}
启动AOP的类,和<aop:aspectj-autoproxy proxy-target-class="false" expose-proxy="true"/>功能一致。
package com.xiangxue.jack.aop;

import org.springframework.context.annotation.EnableAspectJAutoProxy;
import org.springframework.stereotype.Service;

/*
* @Service会被@ComponentScan扫描到
* */
@Service
/*
* 开启注解AOP
* 替代了:<aop:aspectj-autoproxy/>
* exposeProxy 是否需要把代理对象暴露出来,简单来说是否需要把代理对象用ThreadLocal存起来,如果是true就是需要
* */
@EnableAspectJAutoProxy(proxyTargetClass = false,exposeProxy = true)
public class EnableAspectJAutoProxyBean {

}
切面、切点等关于AOP实现的技术下一章分析,本章节主要关注的是纯注解的形式实现spring的功能。
2.2 AnnotationConfigApplicationContext源码解读
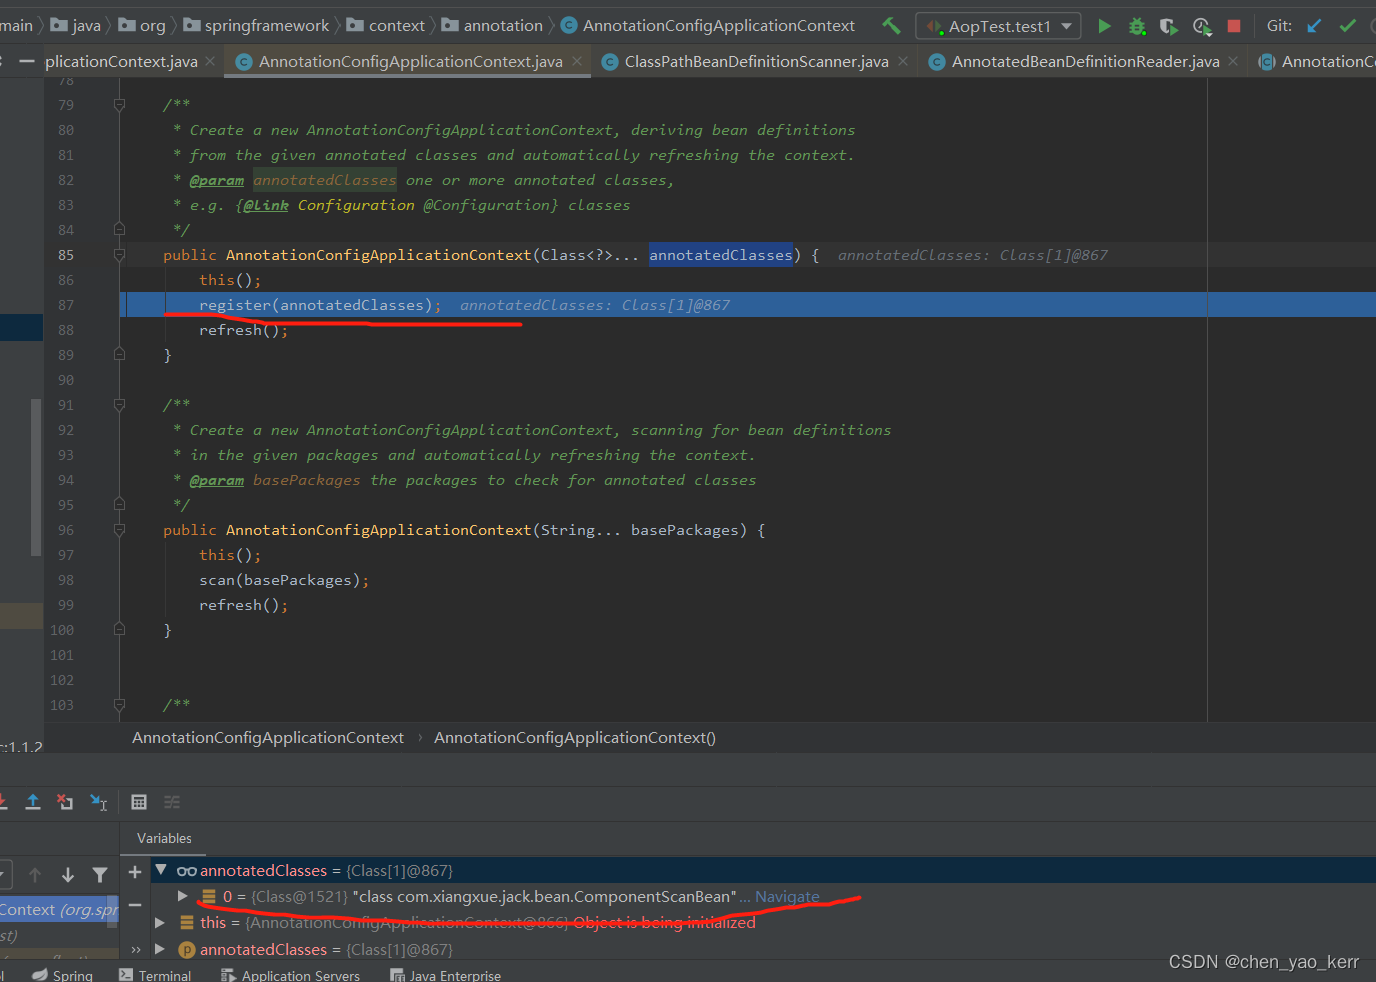
构造方法:
public AnnotationConfigApplicationContext(Class<?>... annotatedClasses) {
		this();
		register(annotatedClasses);
		refresh();
	}
进入this()方法:
	public AnnotationConfigApplicationContext() {
		this.reader = new AnnotatedBeanDefinitionReader(this);
		this.scanner = new ClassPathBeanDefinitionScanner(this);
	}
看他的构造方法,我们知道它实例化了2个类。看名字大概就能猜测出来,一个是负责注解形式beanDefinition解析的,一个是负责BeanDefinition扫描的。
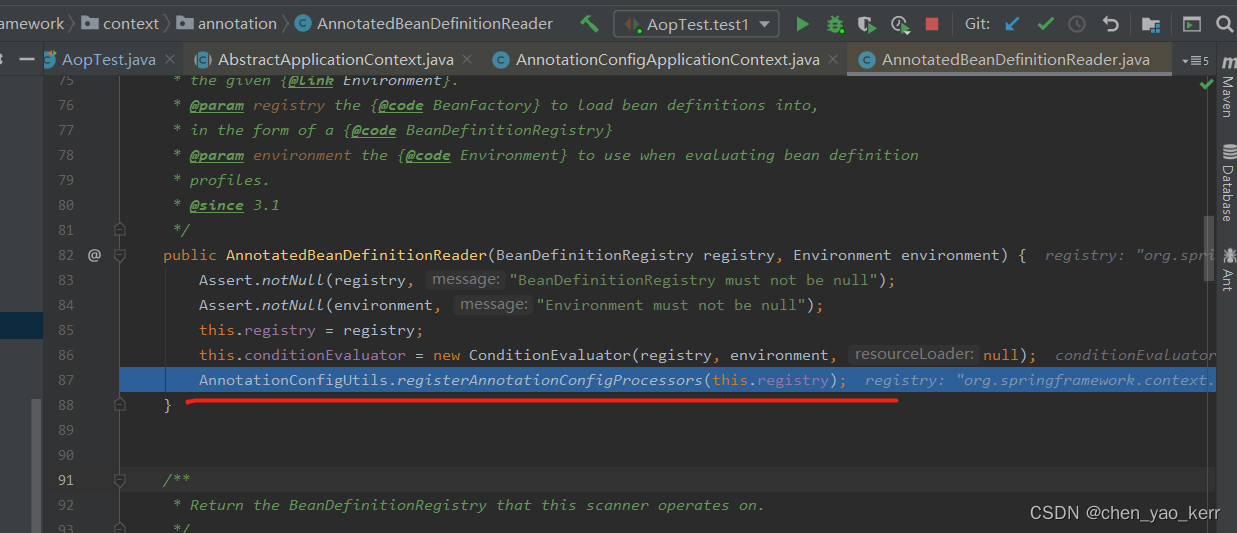
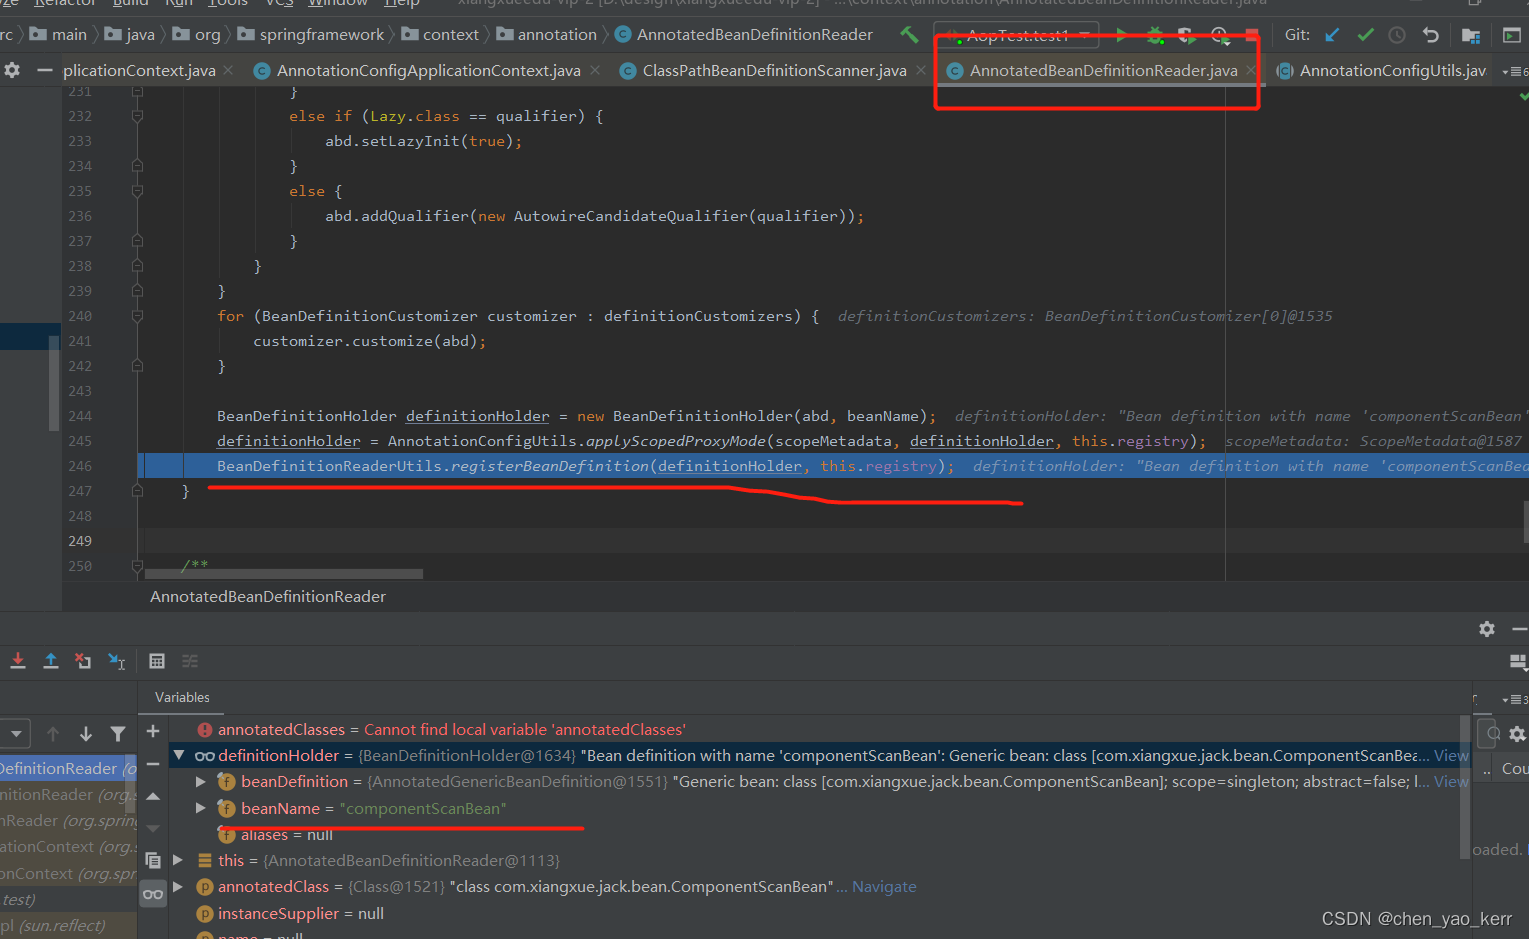
2.1.1 AnnotatedBeanDefinitionReader
注入ConfigurationClassPostProcessor、AutowiredAnnotationBeanPostProcessor、CommonAnnotationBeanPostProcessor等Postprocessor接口,就是提前把他们生成BeanDefinition进行注册.
a. ConfigurationClassPostProcessor继承了BeanDefinitionRegistryPostProcessor,因为在invoke的时候会优先实例化,非常重要,后面会重点分析这个接口。
b. AutowiredAnnotationBeanPostProcessor、CommonAnnotationBeanPostProcessor之前说过,就是支持spring的注解功能。
看一下它的注册post processor过程:

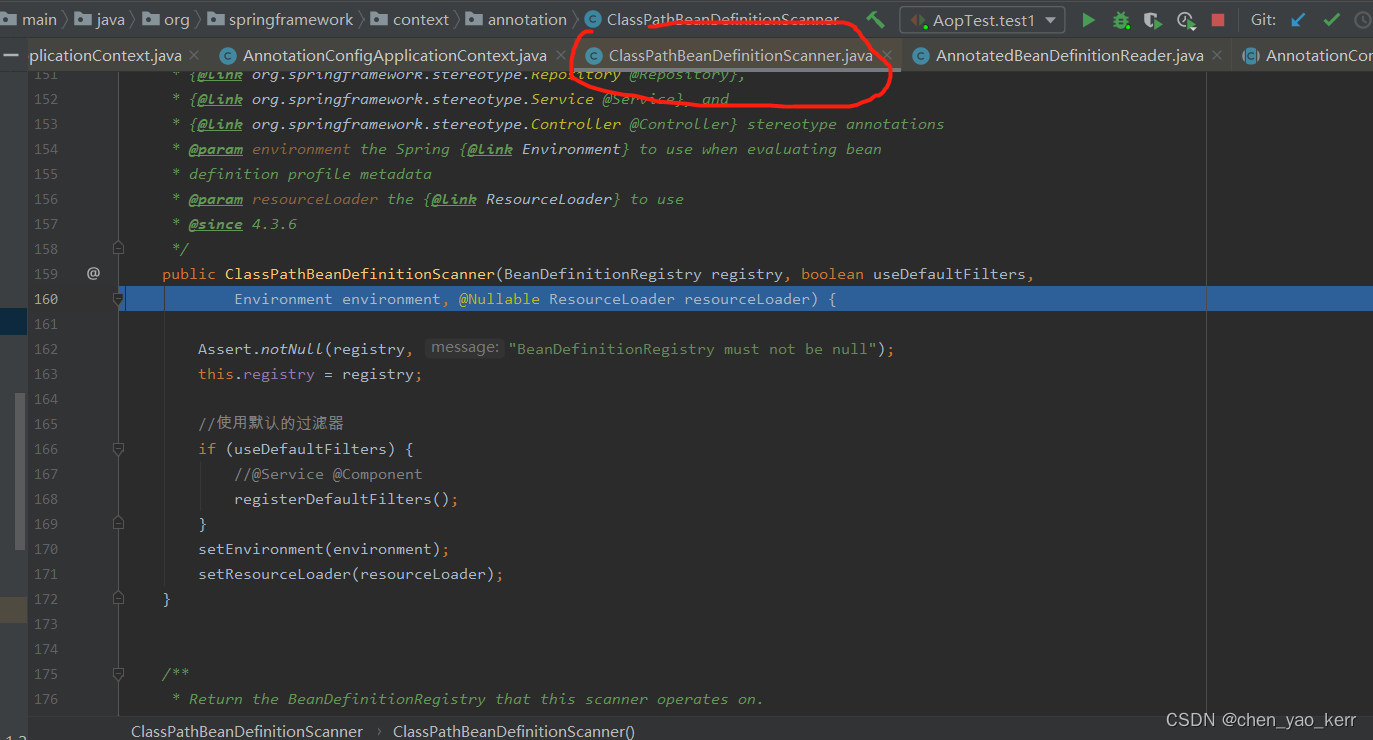
2.1.2 ClassPathBeanDefinitionScanner:
初始化的时候会设置注解过滤器,就是扫描的时候根据什么注解进行扫描的。
默认是this.includeFilters.add(new AnnotationTypeFilter(Component.class));这个类非常重要,后面会重点分析。
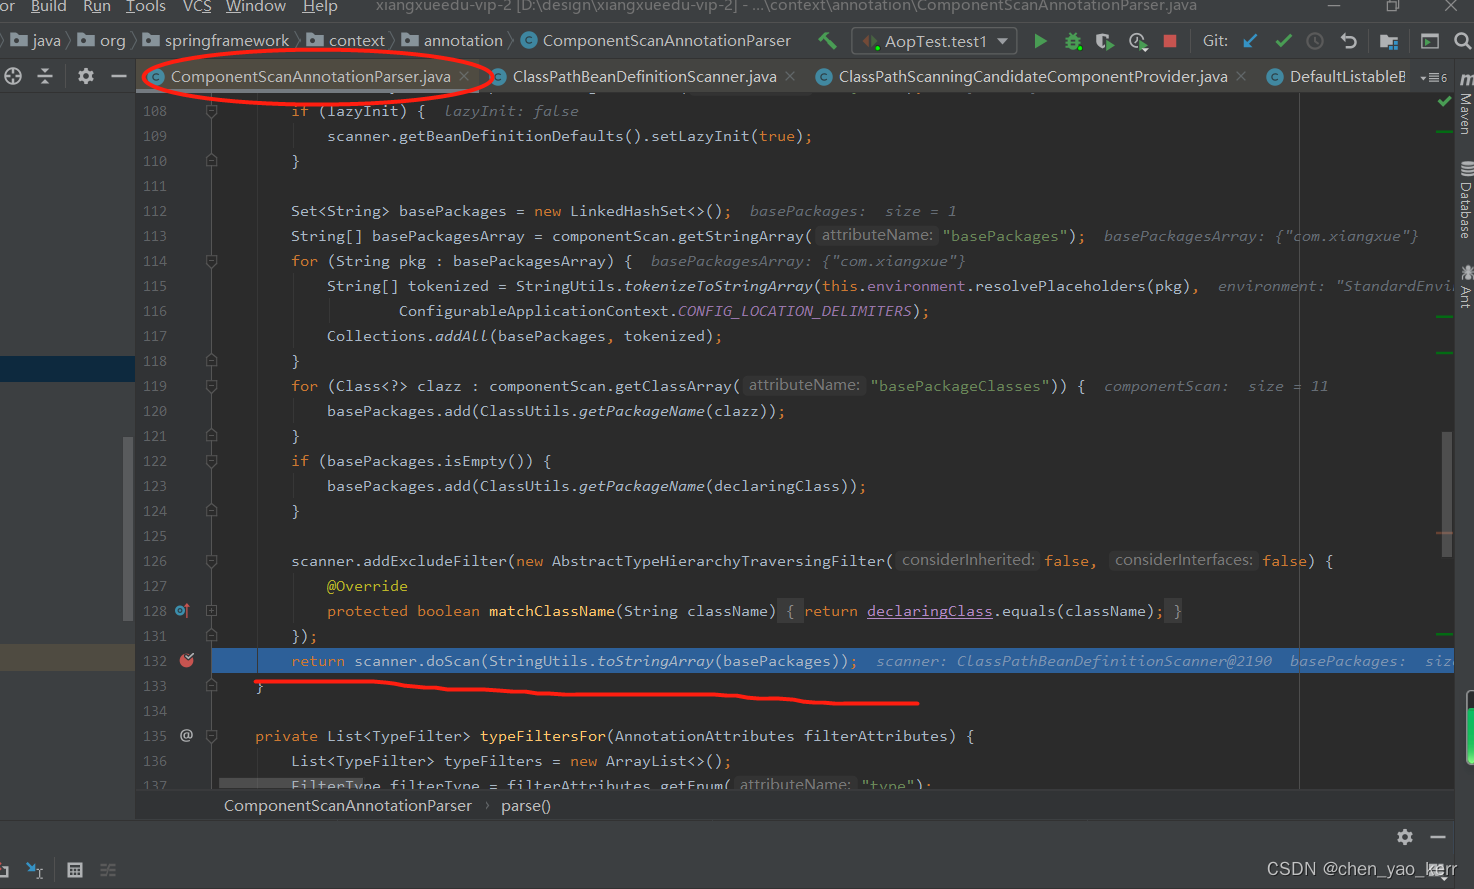
3. 把启动spring自动扫描的类实例化BeanDefinition
4、核心流程refresh()方法:
我们之前分析过,通过自定义标签或者是默认标签,我们解析beanDefinition的入口方法是obtainFreshBeanFactory()。但是,使用纯注解的形式,则不再使用这个方法进行初始化BeanDefinition操作了。
我们之前分析过这个方法invokeBeanFactoryPostProcessors(beanFactory),它是在手动强制实例化BeanDefinition的时候作为甜点进行分析的。而今天,,它将作为分析方法进行分析。
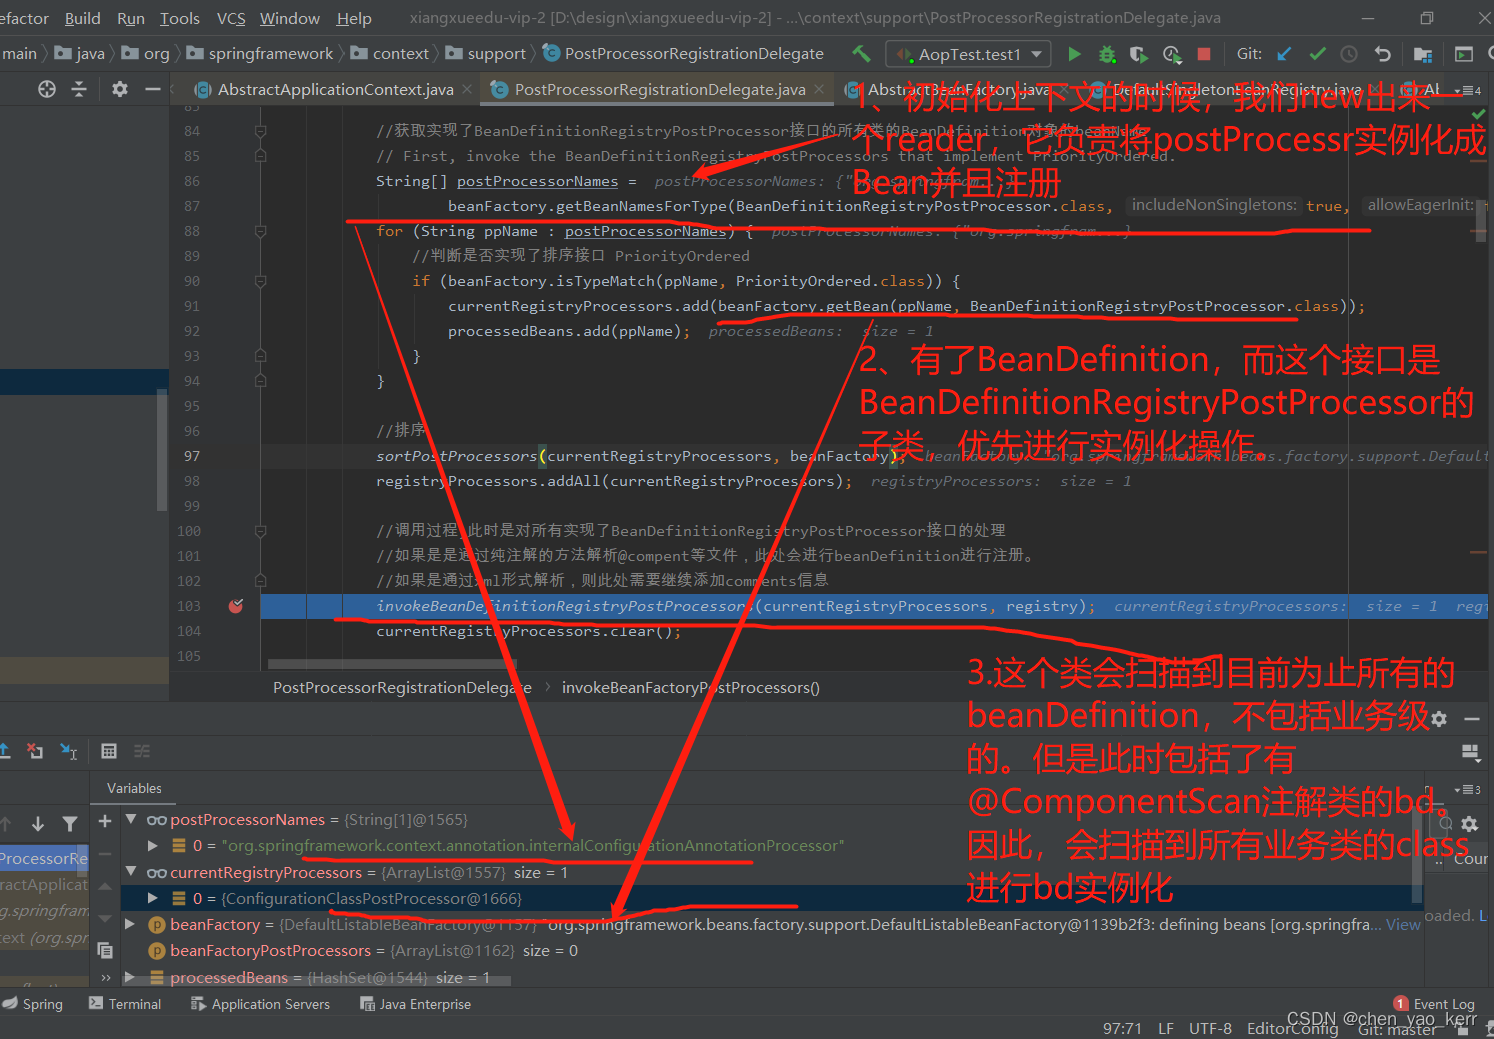
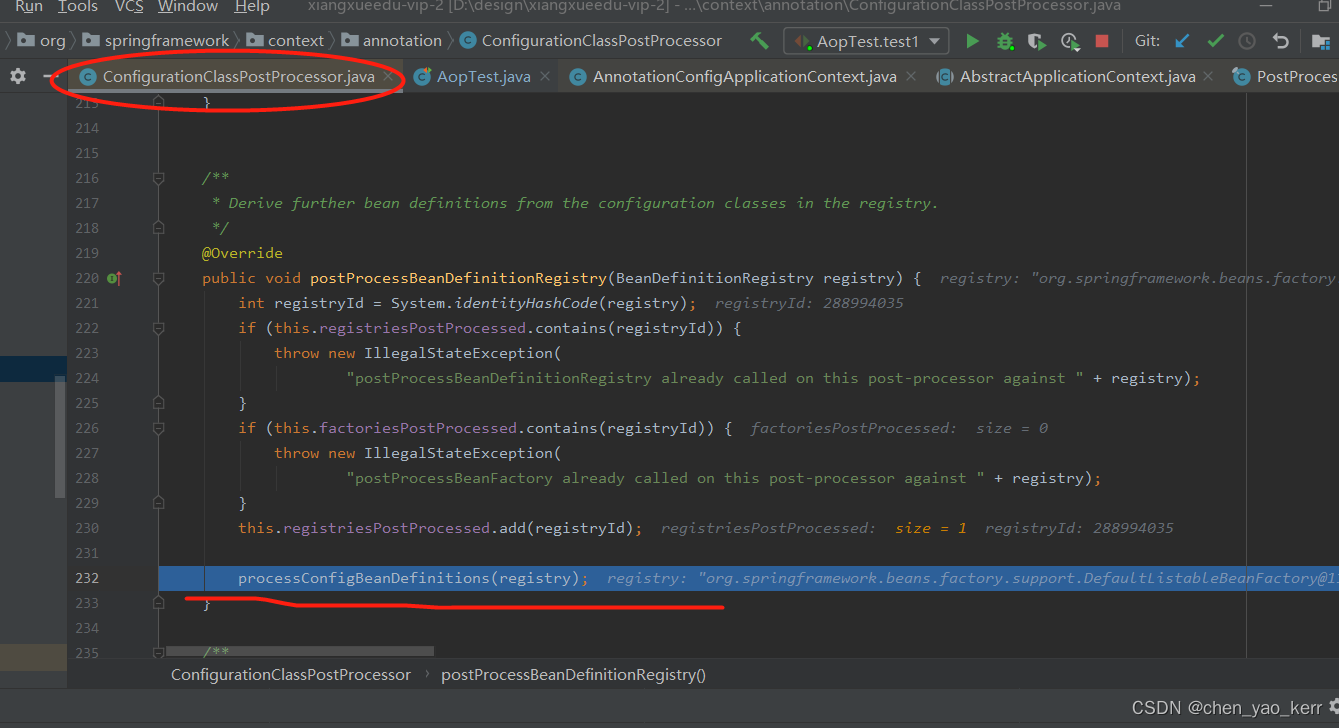
4.1 invokeBeanFactoryPostProcessors()
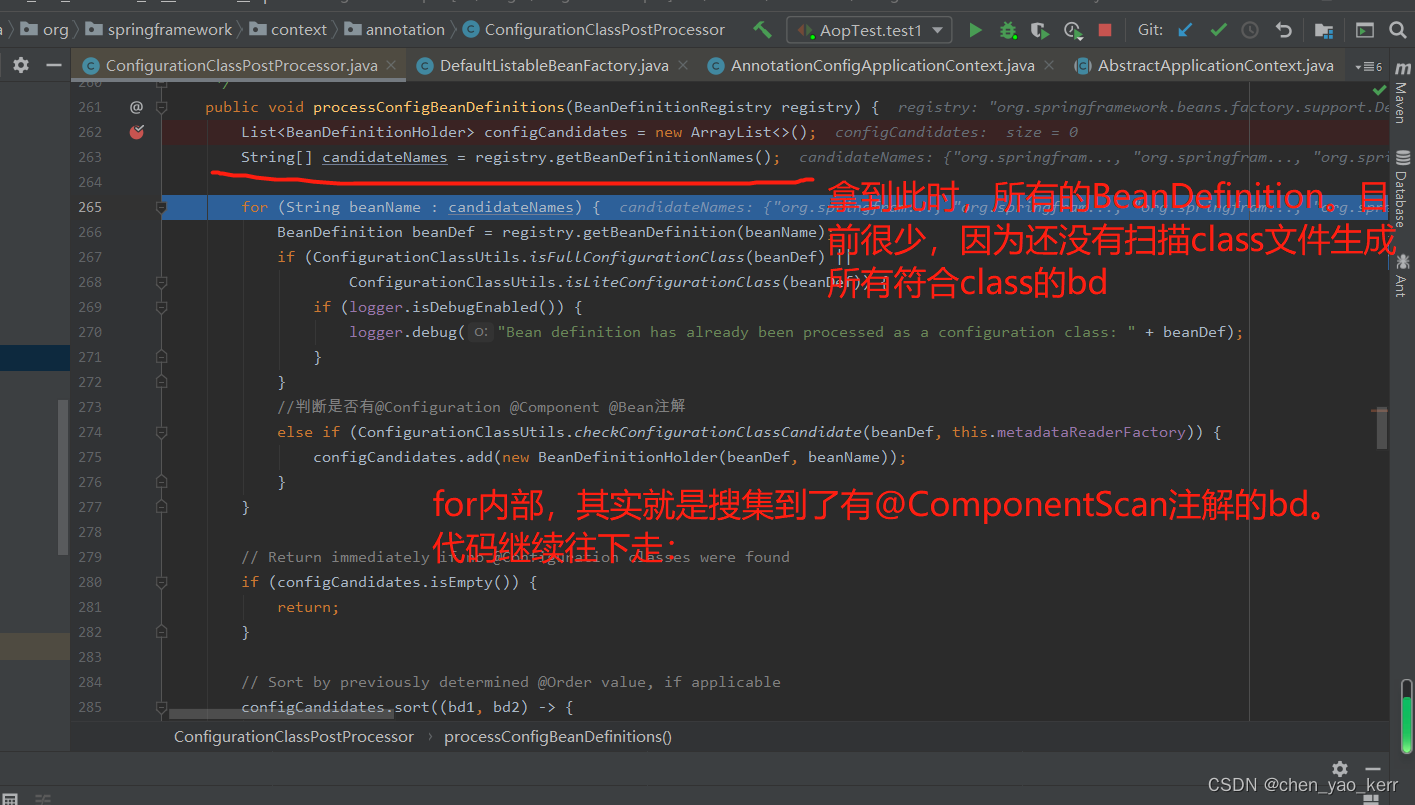
进入这个这个方法,首先获取到所有的BeanDefinition。其实,这个时候很少,就是之前注入的几个post processor和启动扫描类的 ComponentScanBean。
4.1.1 实例化BeanDefinition
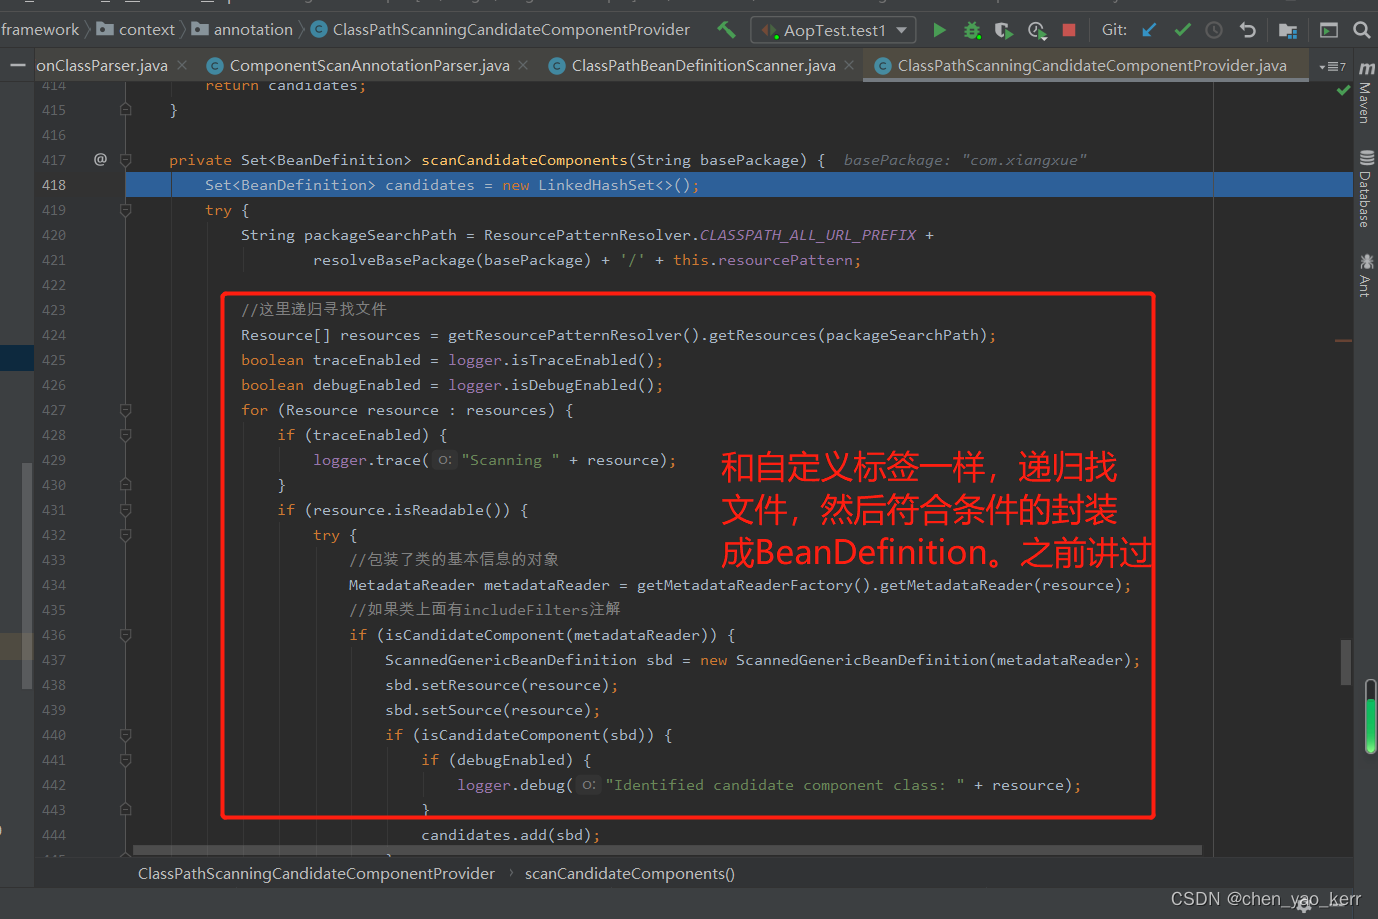
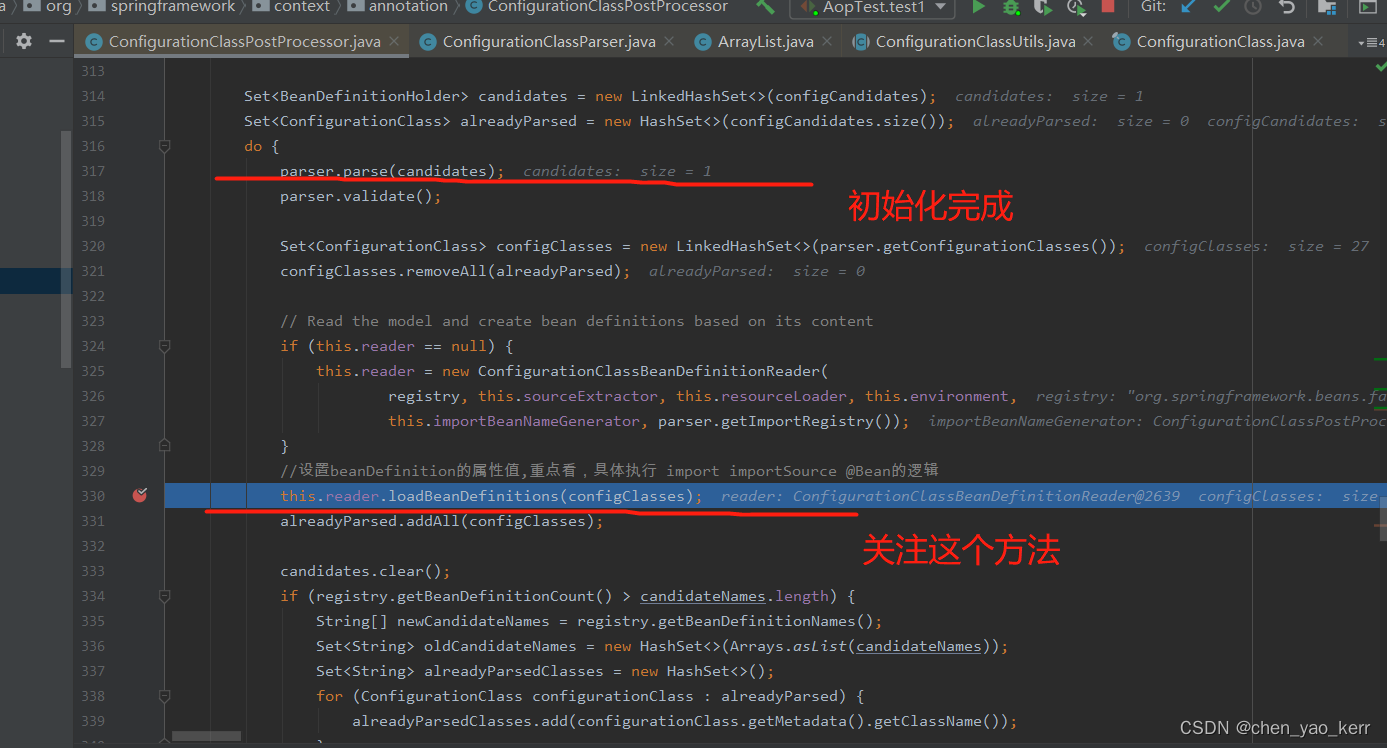
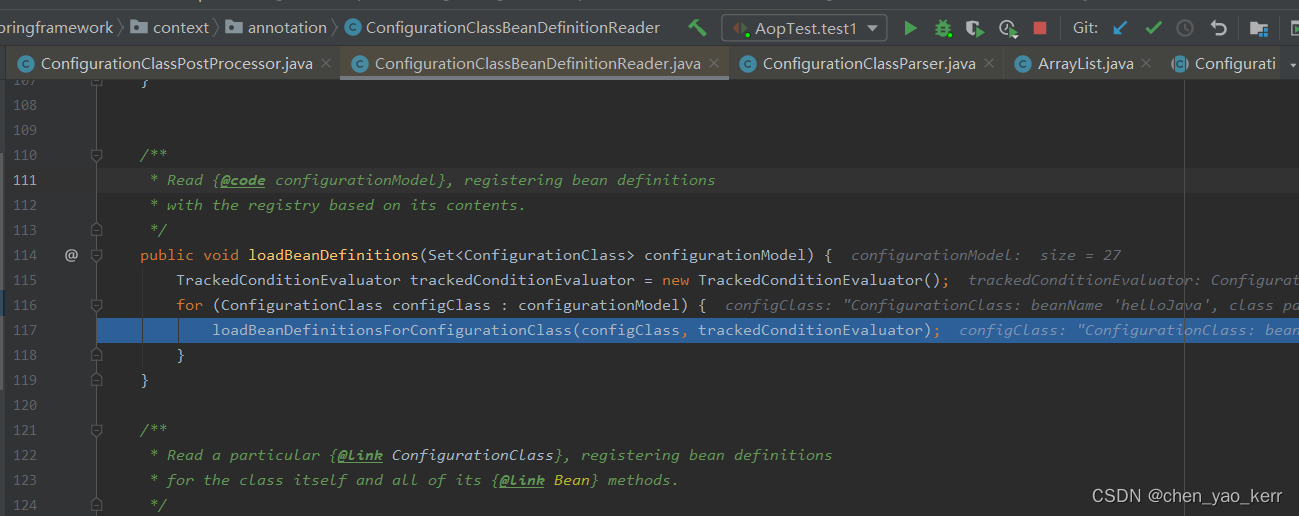
下面就是扫描所有的class,然后封装BeanDefinition了,老样子,没什么新意:
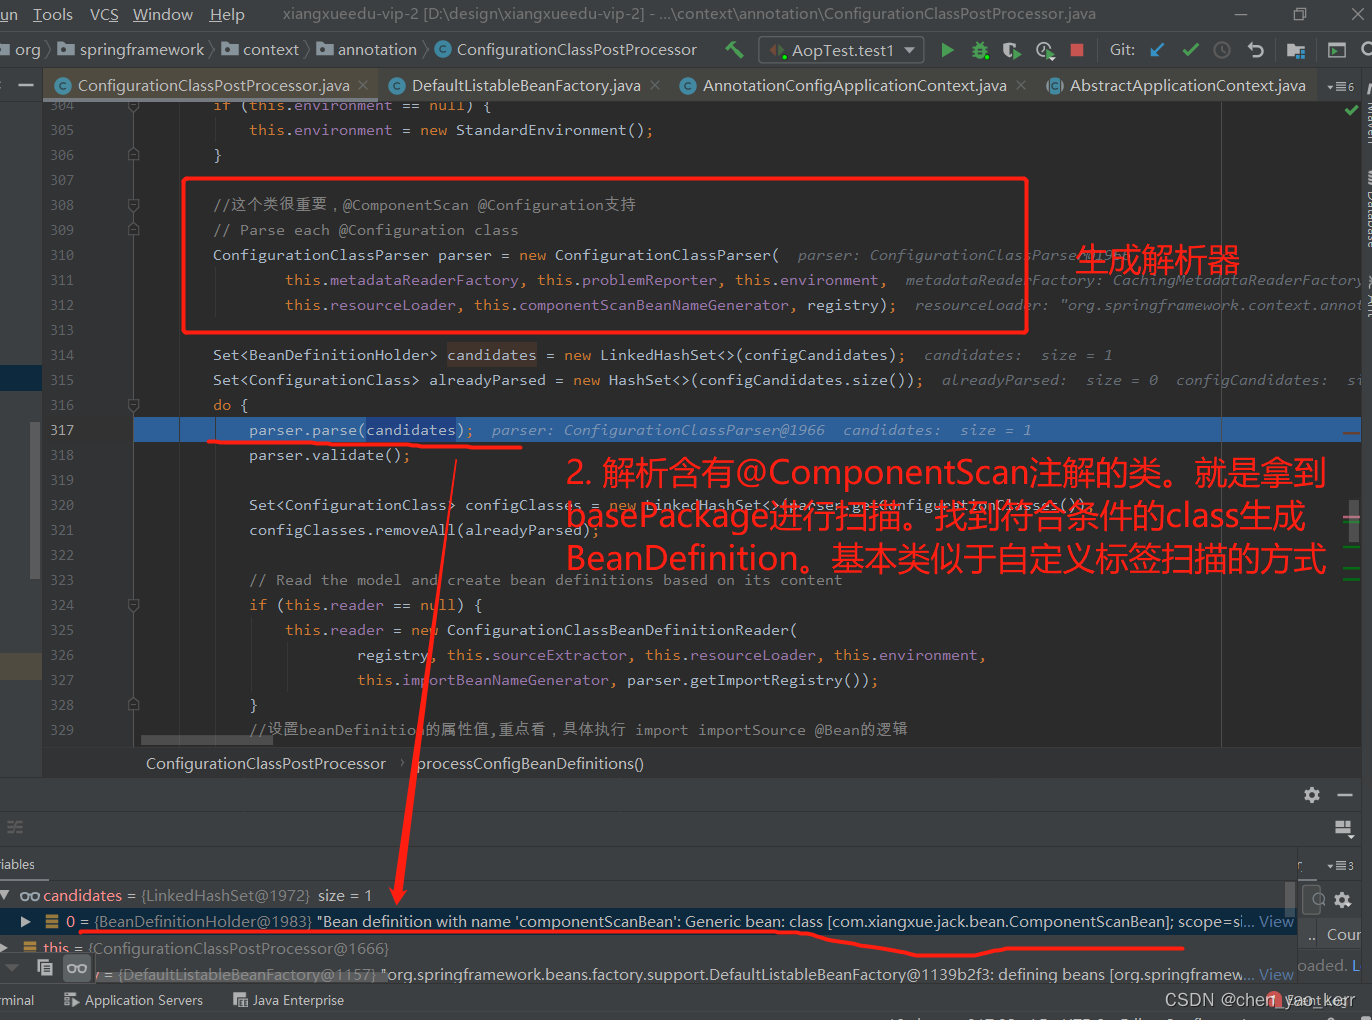
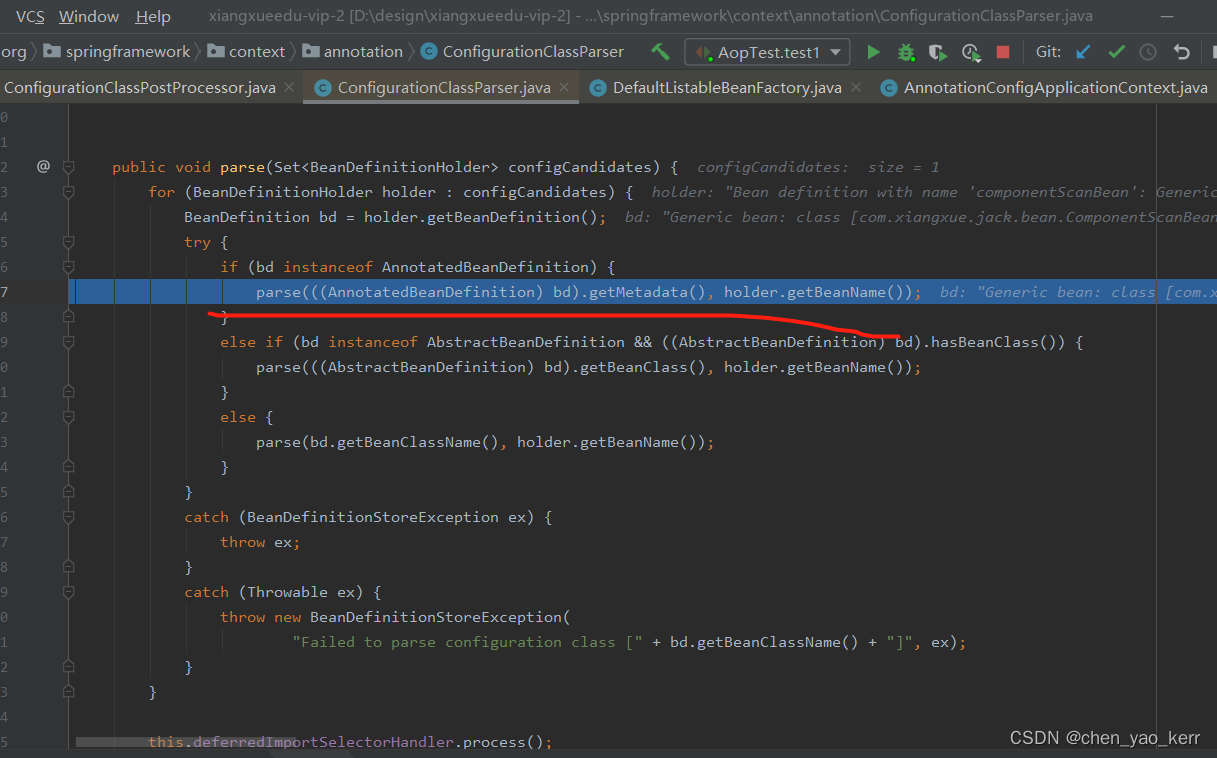

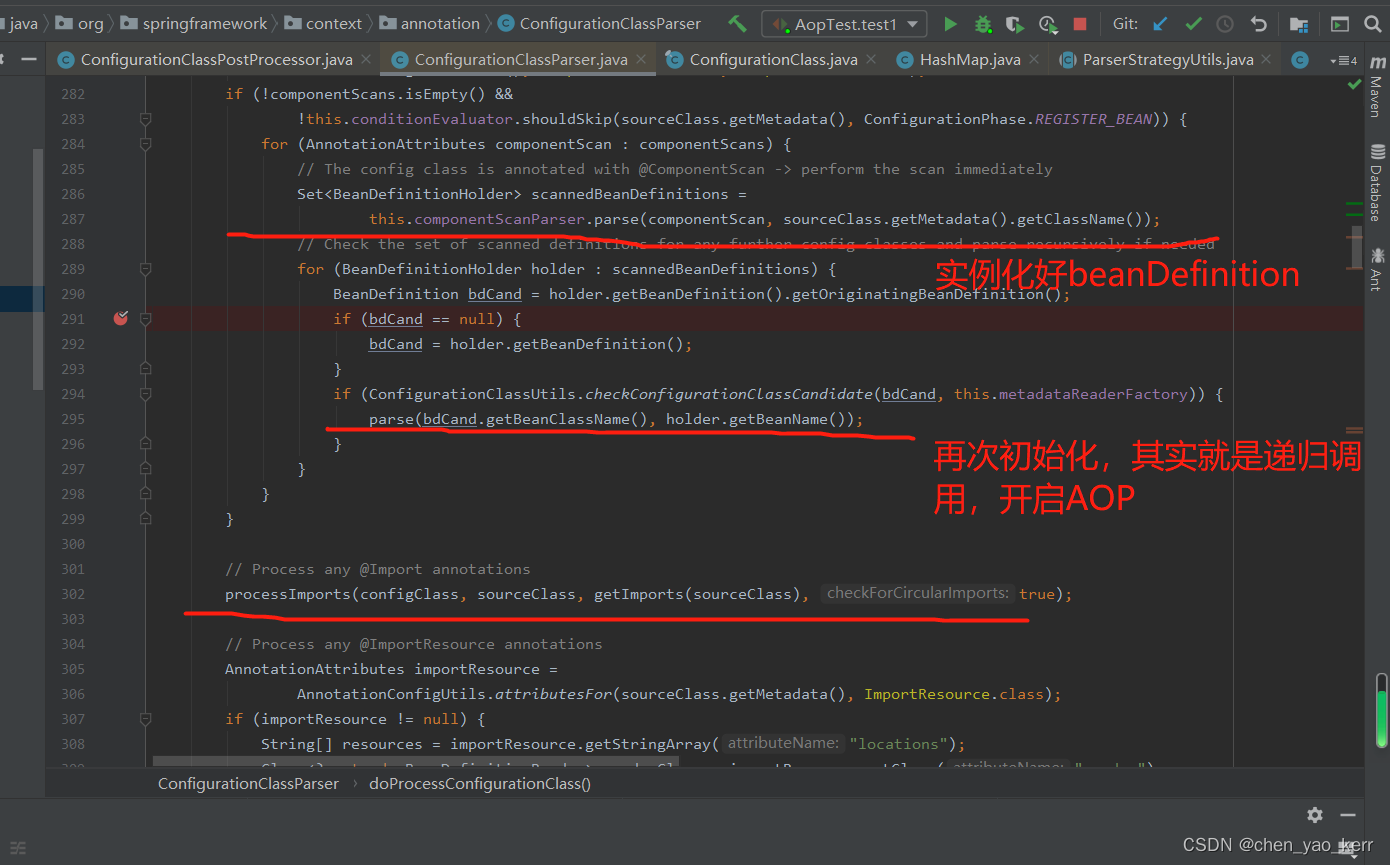
其实,再次调用parse方法,就是为了搜集@Import等标签的,这些是为了AOP做准备的。
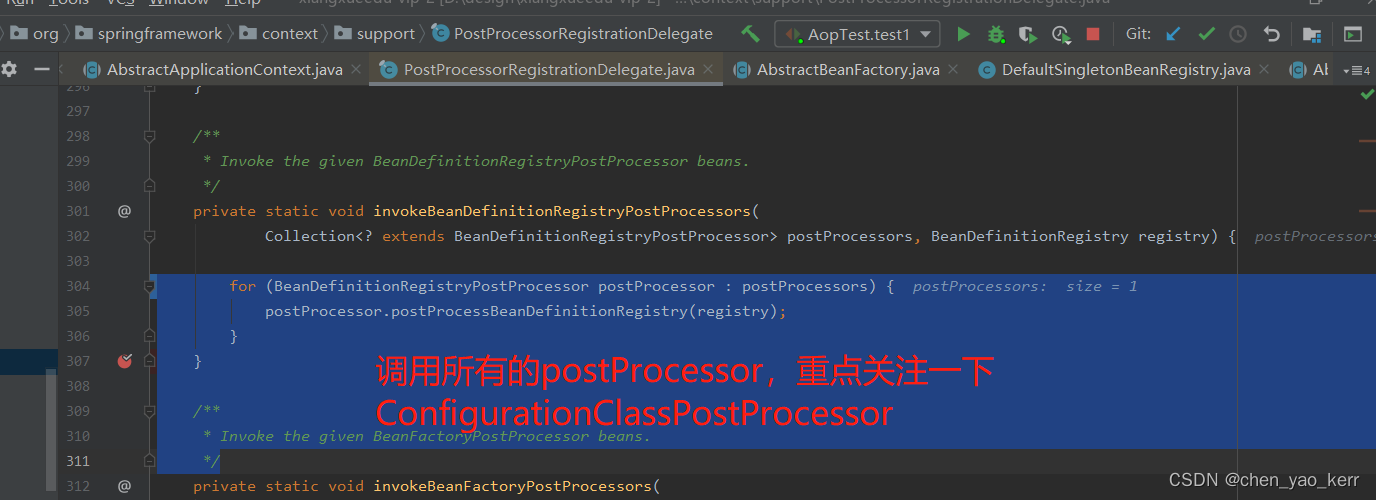
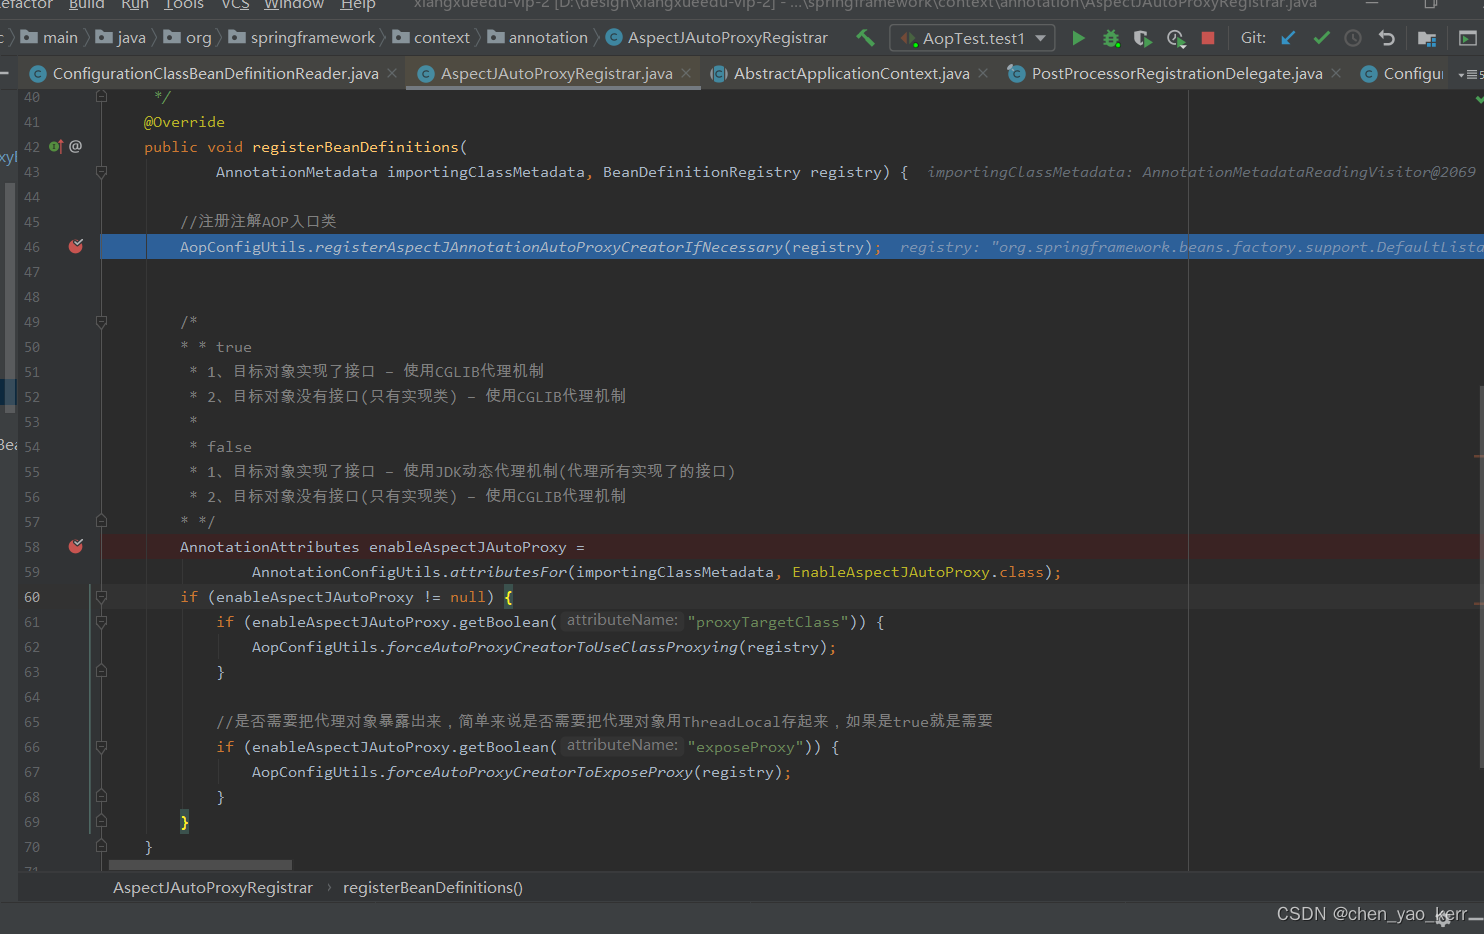
4.1.2 注册AOP支持的postProcessor接口
返回主方法:
到目前为止,我们已经实例化全部的BeanDefinition了。
总结:
1、首先找到post processor接口和启动spring ioc自动扫描的类,提前进行实例化
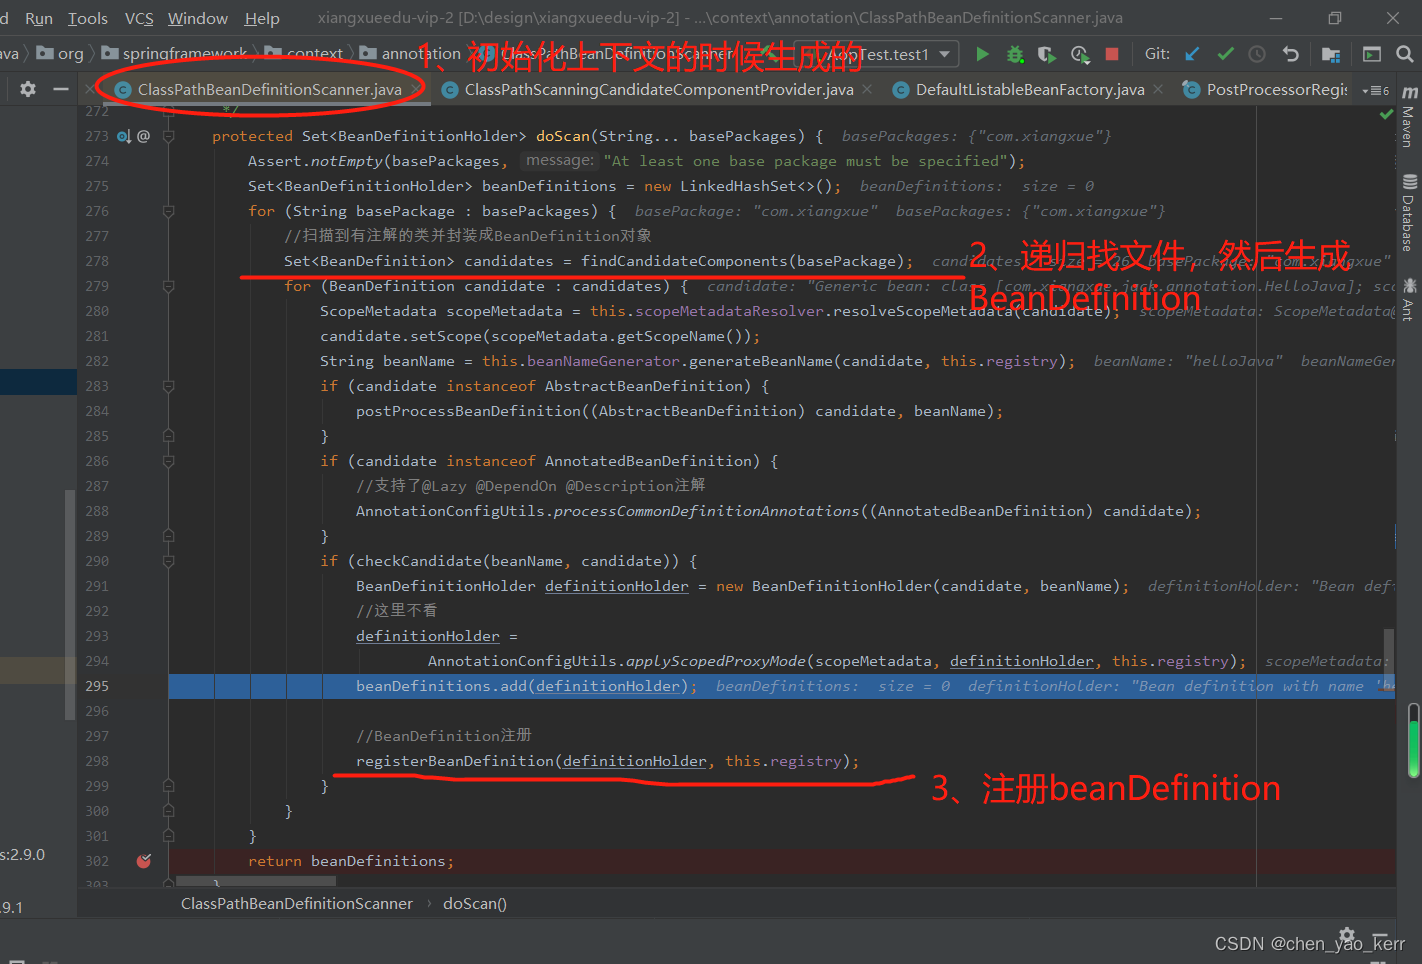
2、根据启动spring ioc自动扫描的类,也就是带有@ComponentScan(basePackages = {""}的类,扫描到所有的BeanDefinition并进行注册。
3、实例化完以后,我们会启动对AOP注解的搜集与注册BeanDefinition。具体操作就是
a. 根据@EnableAspectJAutoProxy(proxyTargetClass = false,exposeProxy = true)找到接口
@EnableAspectJAutoProxy(proxyTargetClass = false,exposeProxy = true)
public class EnableAspectJAutoProxyBean {

}
b. 搜集这个接口的@Import注解信息并实话BeanDefinition。也就是把AspectJAutoProxyRegistrar实例化BeanDefinition。
 */
@Target(ElementType.TYPE)
@Retention(RetentionPolicy.RUNTIME)
@Documented
@Import(AspectJAutoProxyRegistrar.class)
public @interface EnableAspectJAutoProxy {
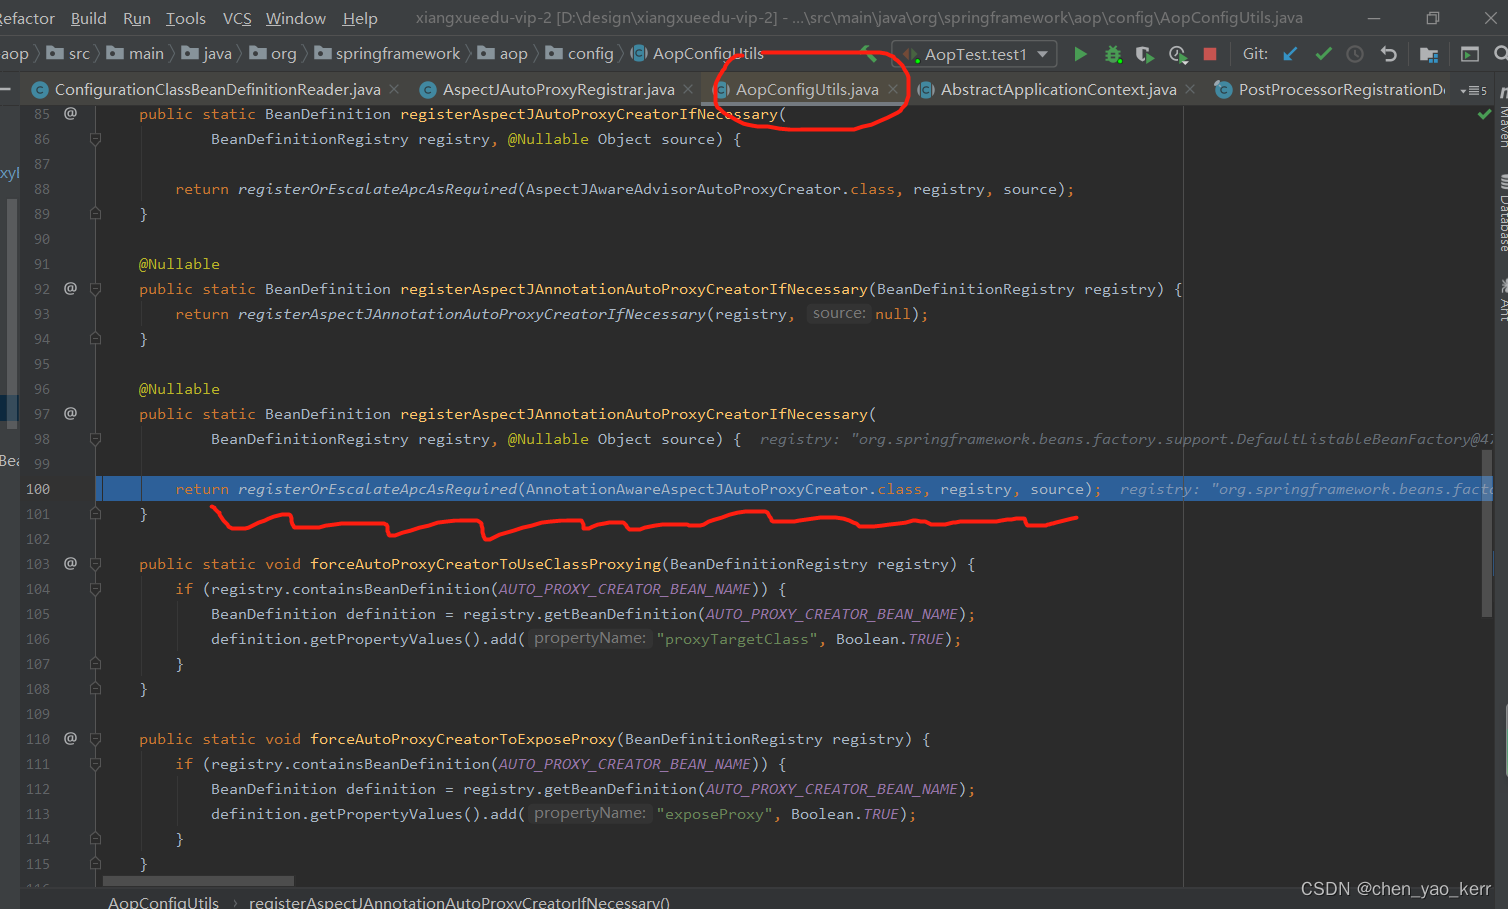
3. 最后遍历所有的实例化好的BeanDefinition,找到需要从AspectJAutoProxyRegistrar加载的beanDefinition, 也就是找到了EnableAspectJAutoProxyBean这个类。具体是首先注入支持AOP的接口AnnotationAwareAspectJAutoProxyCreator。 然后是搜集注解上方的信息,为AOP做准备。


 1万+
1万+


 被折叠的 条评论
为什么被折叠?
被折叠的 条评论
为什么被折叠?
 到【灌水乐园】发言


