


目录
简介:
Spring MVC是Spring的一个子模块,也是我分析的Spring源码的最后一个模块。下面看一下Spring MVC的整个调用流程。
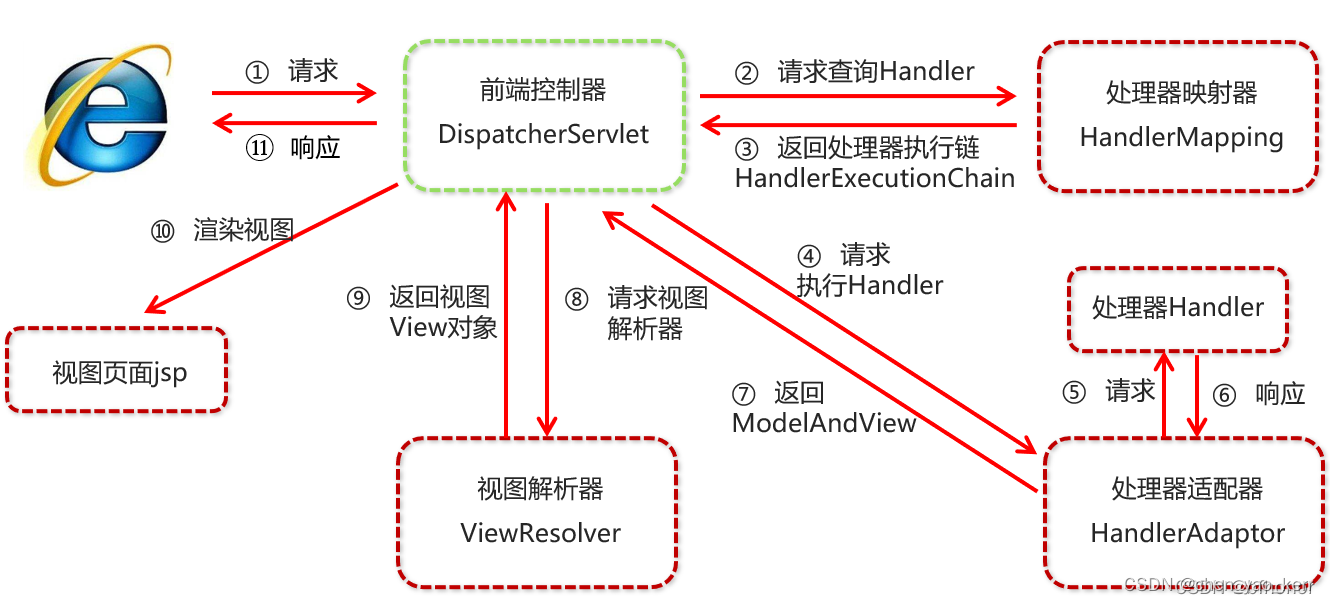
看了上图,我们发现DispatcherServlet这个类是Spring MVC整个调用流程的核心。所有的请求和响应都是经过这个类进行处理的,那么分析这个类是势在必行的。
传统方式:
传统方式,我们都是在web.xml中配置2个重点的类,ContextLoaderListener和 DispatcherServlet
他们是Spring MVC的核心。
<!DOCTYPE web-app PUBLIC
 "-//Sun Microsystems, Inc.//DTD Web Application 2.3//EN"
 "http://java.sun.com/dtd/web-app_2_3.dtd" >

<web-app>
  <context-param>
    <param-name>contextConfigLocation</param-name>
    <param-value>
      <!--加载spring配置-->
      classpath:spring.xml
    </param-value>
  </context-param>

  <context-param>
    <param-name>webAppRootKey</param-name>
    <param-value>ServicePlatform.root</param-value>
  </context-param>

  <!-- 负责处理Spring相关的bean,类似于处理传统的spring.xml-->
  <listener>
    <listener-class>org.springframework.web.context.ContextLoaderListener</listener-class>
    <!--<listener-class>org.springframework.web.context.request.RequestContextListener</listener-class>-->
  </listener>

    <!-- 负责处理Spring mvc 相关的bean,类似于处理传统的springmvc.xml, 此处我们定义的名称为spring-dispatcher.xml-->
    <servlet>
        <servlet-name>spring-dispatcher</servlet-name>
        <servlet-class>org.springframework.web.servlet.DispatcherServlet</servlet-class>
        <init-param>
          <!--springmvc的配置文件-->
          <param-name>contextConfigLocation</param-name>
          <param-value>classpath:spring-dispatcher.xml</param-value>
        </init-param>
          <!-- 这个参数大于等于0,代表它会随着容器的启动而加载 -->
        <load-on-startup>0</load-on-startup>
  </servlet>

  <servlet-mapping>
    <servlet-name>spring-dispatcher</servlet-name>
    <url-pattern>/</url-pattern>
  </servlet-mapping>

  <!--静态文件处理-->
  <!--<servlet-mapping>
    <servlet-name>default</servlet-name>
    <url-pattern>*.css</url-pattern>
  </servlet-mapping>
  <servlet-mapping>
    <servlet-name>default</servlet-name>
    <url-pattern>*.gif</url-pattern>
  </servlet-mapping>
  <servlet-mapping>
    <servlet-name>default</servlet-name>
    <url-pattern>*.jpg</url-pattern>
  </servlet-mapping>
  <servlet-mapping>
    <servlet-name>default</servlet-name>
    <url-pattern>*.js</url-pattern>
  </servlet-mapping>-->
</web-app>
ContextLoaderListener: 负责加载Spring相关的操作,简单点说就是处理Spring.xml的
DispatcherServlet:处理Spring mvc相关操作,简单点说就是处理Spring MVC相关的xml文件的,并且还负责处理调用和响应,这个类是Spring MVC的核心。
纯注解方式
注解方式和传统方式需要实现一样的流程,因此,注解方式也要想办法通过注解实现传统方式中配置的 ContextLoaderListener 和 DispatcherServlet的功能。
无论是注解的方式,还是传统配置web.xml的方式,他们的核心主流程都是一样的。如下:
1. Tomcat加载Servlet
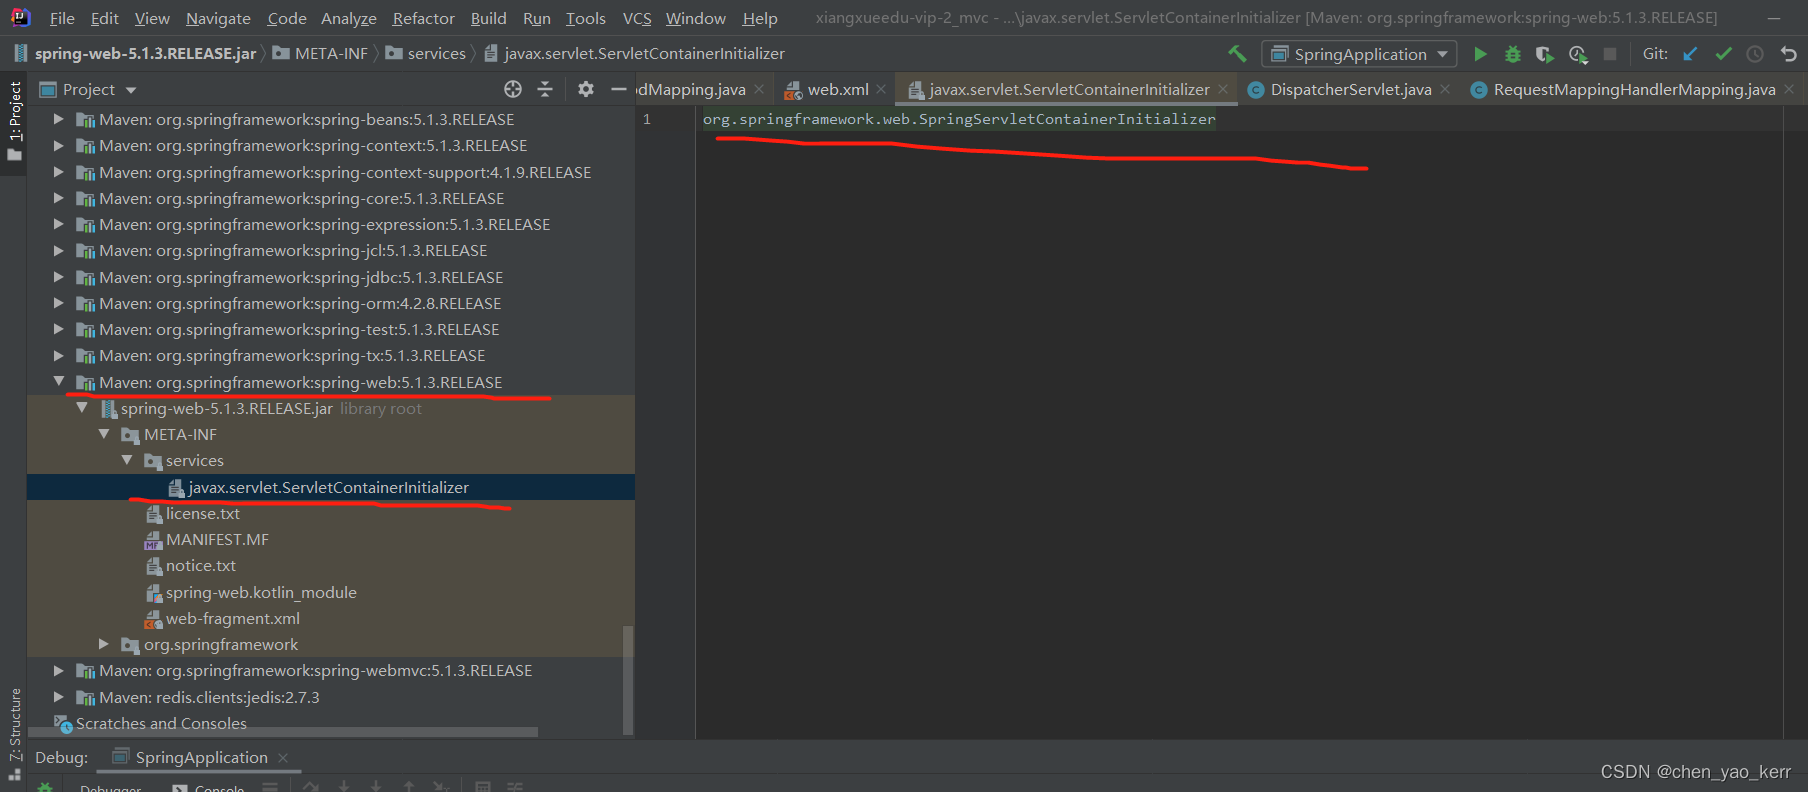
Tomcat启动的时候(web或severlet容器在初始化/启动的时候) 会加载/搜集 resources/META-INF路径下的javax.servlet.ServletContainerInitializer文件,然后根据文件下配置的
信息去实例配置的类。
2. 参数分析
Set<Class<?>> set :存放的是实现了@HandlesTypes(WebApplicationInitializer.class)所有的类,就是实现了WebApplicationInitializer的类的class对象、
servletContext:Servlet的上下文类
/*
* Copyright 2002-2018 the original author or authors.
*
* Licensed under the Apache License, Version 2.0 (the "License");
* you may not use this file except in compliance with the License.
* You may obtain a copy of the License at
*
* http://www.apache.org/licenses/LICENSE-2.0
*
* Unless required by applicable law or agreed to in writing, software
* distributed under the License is distributed on an "AS IS" BASIS,
* WITHOUT WARRANTIES OR CONDITIONS OF ANY KIND, either express or implied.
* See the License for the specific language governing permissions and
* limitations under the License.
*/
package org.springframework.web;
import java.lang.reflect.Modifier;
import java.util.LinkedList;
import java.util.List;
import java.util.ServiceLoader;
import java.util.Set;
import javax.servlet.ServletContainerInitializer;
import javax.servlet.ServletContext;
import javax.servlet.ServletException;
import javax.servlet.annotation.HandlesTypes;
import org.springframework.core.annotation.AnnotationAwareOrderComparator;
import org.springframework.lang.Nullable;
import org.springframework.util.ReflectionUtils;
/**
* Servlet 3.0 {@link ServletContainerInitializer} designed to support code-based
* configuration of the servlet container using Spring's {@link WebApplicationInitializer}
* SPI as opposed to (or possibly in combination with) the traditional
* {@code web.xml}-based approach.
*
* <h2>Mechanism of Operation</h2>
* This class will be loaded and instantiated and have its {@link #onStartup}
* method invoked by any Servlet 3.0-compliant container during container startup assuming
* that the {@code spring-web} module JAR is present on the classpath. This occurs through
* the JAR Services API {@link ServiceLoader#load(Class)} method detecting the
* {@code spring-web} module's {@code META-INF/services/javax.servlet.ServletContainerInitializer}
* service provider configuration file. See the
* <a href="http://download.oracle.com/javase/6/docs/technotes/guides/jar/jar.html#Service%20Provider">
* JAR Services API documentation</a> as well as section <em>8.2.4</em> of the Servlet 3.0
* Final Draft specification for complete details.
*
* <h3>In combination with {@code web.xml}</h3>
* A web application can choose to limit the amount of classpath scanning the Servlet
* container does at startup either through the {@code metadata-complete} attribute in
* {@code web.xml}, which controls scanning for Servlet annotations or through an
* {@code <absolute-ordering>} element also in {@code web.xml}, which controls which
* web fragments (i.e. jars) are allowed to perform a {@code ServletContainerInitializer}
* scan. When using this feature, the {@link SpringServletContainerInitializer}
* can be enabled by adding "spring_web" to the list of named web fragments in
* {@code web.xml} as follows:
*
* <pre class="code">
* <absolute-ordering>
* <name>some_web_fragment</name>
* <name>spring_web</name>
* </absolute-ordering>
* </pre>
*
* <h2>Relationship to Spring's {@code WebApplicationInitializer}</h2>
* Spring's {@code WebApplicationInitializer} SPI consists of just one method:
* {@link WebApplicationInitializer#onStartup(ServletContext)}. The signature is intentionally
* quite similar to {@link ServletContainerInitializer#onStartup(Set, ServletContext)}:
* simply put, {@code SpringServletContainerInitializer} is responsible for instantiating
* and delegating the {@code ServletContext} to any user-defined
* {@code WebApplicationInitializer} implementations. It is then the responsibility of
* each {@code WebApplicationInitializer} to do the actual work of initializing the
* {@code ServletContext}. The exact process of delegation is described in detail in the
* {@link #onStartup onStartup} documentation below.
*
* <h2>General Notes</h2>
* In general, this class should be viewed as <em>supporting infrastructure</em> for
* the more important and user-facing {@code WebApplicationInitializer} SPI. Taking
* advantage of this container initializer is also completely <em>optional</em>: while
* it is true that this initializer will be loaded and invoked under all Servlet 3.0+
* runtimes, it remains the user's choice whether to make any
* {@code WebApplicationInitializer} implementations available on the classpath. If no
* {@code WebApplicationInitializer} types are detected, this container initializer will
* have no effect.
*
* <p>Note that use of this container initializer and of {@code WebApplicationInitializer}
* is not in any way "tied" to Spring MVC other than the fact that the types are shipped
* in the {@code spring-web} module JAR. Rather, they can be considered general-purpose
* in their ability to facilitate convenient code-based configuration of the
* {@code ServletContext}. In other words, any servlet, listener, or filter may be
* registered within a {@code WebApplicationInitializer}, not just Spring MVC-specific
* components.
*
* <p>This class is neither designed for extension nor intended to be extended.
* It should be considered an internal type, with {@code WebApplicationInitializer}
* being the public-facing SPI.
*
* <h2>See Also</h2>
* See {@link WebApplicationInitializer} Javadoc for examples and detailed usage
* recommendations.<p>
*
* @author Chris Beams
* @author Juergen Hoeller
* @author Rossen Stoyanchev
* @since 3.1
* @see #onStartup(Set, ServletContext)
* @see WebApplicationInitializer
*/
@HandlesTypes(WebApplicationInitializer.class)
public class SpringServletContainerInitializer implements ServletContainerInitializer {
/**
* Delegate the {@code ServletContext} to any {@link WebApplicationInitializer}
* implementations present on the application classpath.
* <p>Because this class declares @{@code HandlesTypes(WebApplicationInitializer.class)},
* Servlet 3.0+ containers will automatically scan the classpath for implementations
* of Spring's {@code WebApplicationInitializer} interface and provide the set of all
* such types to the {@code webAppInitializerClasses} parameter of this method.
* <p>If no {@code WebApplicationInitializer} implementations are found on the classpath,
* this method is effectively a no-op. An INFO-level log message will be issued notifying
* the user that the {@code ServletContainerInitializer} has indeed been invoked but that
* no {@code WebApplicationInitializer} implementations were found.
* <p>Assuming that one or more {@code WebApplicationInitializer} types are detected,
* they will be instantiated (and <em>sorted</em> if the @{@link
* org.springframework.core.annotation.Order @Order} annotation is present or
* the {@link org.springframework.core.Ordered Ordered} interface has been
* implemented). Then the {@link WebApplicationInitializer#onStartup(ServletContext)}
* method will be invoked on each instance, delegating the {@code ServletContext} such
* that each instance may register and configure servlets such as Spring's
* {@code DispatcherServlet}, listeners such as Spring's {@code ContextLoaderListener},
* or any other Servlet API componentry such as filters.
* @param webAppInitializerClasses all implementations of
* {@link WebApplicationInitializer} found on the application classpath
* @param servletContext the servlet context to be initialized
* @see WebApplicationInitializer#onStartup(ServletContext)
* @see AnnotationAwareOrderComparator
*/
@Override
public void onStartup(@Nullable Set<Class<?>> webAppInitializerClasses, ServletContext servletContext)
throws ServletException {
List<WebApplicationInitializer> initializers = new LinkedList<>();
if (webAppInitializerClasses != null) {
for (Class<?> waiClass : webAppInitializerClasses) {
// Be defensive: Some servlet containers provide us with invalid classes,
// no matter what @HandlesTypes says...
if (!waiClass.isInterface() && !Modifier.isAbstract(waiClass.getModifiers()) &&
WebApplicationInitializer.class.isAssignableFrom(waiClass)) {
try {
initializers.add((WebApplicationInitializer)
ReflectionUtils.accessibleConstructor(waiClass).newInstance());
}
catch (Throwable ex) {
throw new ServletException("Failed to instantiate WebApplicationInitializer class", ex);
}
}
}
}
if (initializers.isEmpty()) {
servletContext.log("No Spring WebApplicationInitializer types detected on classpath");
return;
}
servletContext.log(initializers.size() + " Spring WebApplicationInitializers detected on classpath");
AnnotationAwareOrderComparator.sort(initializers);
for (WebApplicationInitializer initializer : initializers) {
initializer.onStartup(servletContext);
}
}
}
3. 调用onStartup方法
在调用这个方法的时候,我们会进行 ContextLoaderListener 和 DispatcherServlet 的实例化操作

ContextLoaderListener :实例化过程
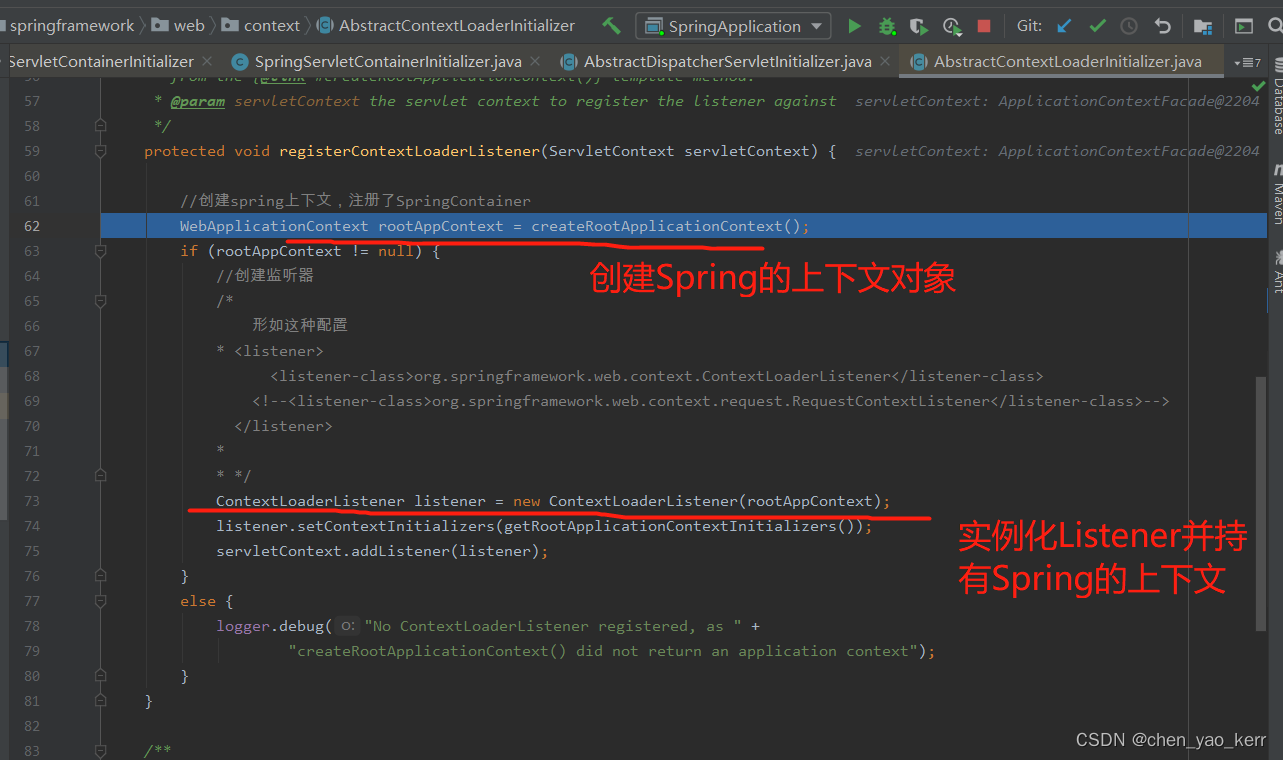
看一下具体是如何创建Spring上下文对象的, 其实它就是new了一个AnnotationConfigWebApplicationContext对象。
	@Override
	@Nullable
	protected WebApplicationContext createRootApplicationContext() {
		Class<?>[] configClasses = getRootConfigClasses();
		if (!ObjectUtils.isEmpty(configClasses)) {
			AnnotationConfigWebApplicationContext context = new AnnotationConfigWebApplicationContext();
			context.register(configClasses);
			return context;
		}
		else {
			return null;
		}
	}
这是一记典型的模板设计模式思想,父类定义好主体框架,而getRootConfigClass方法交给子类去实现。
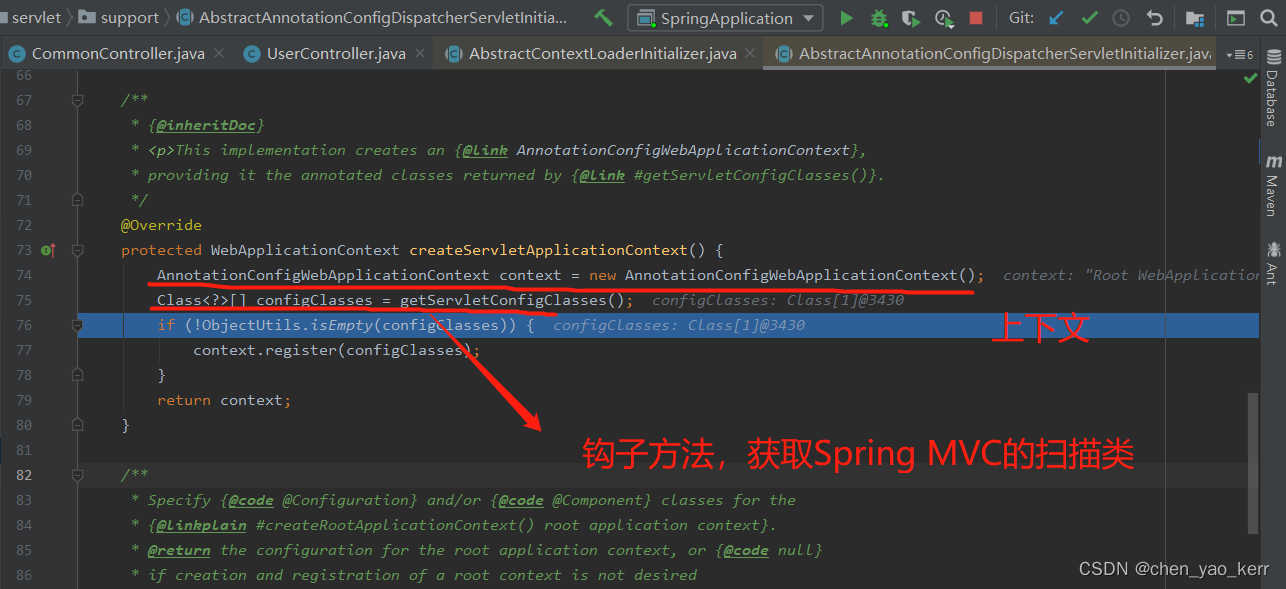
DispatcherServlet :实例化
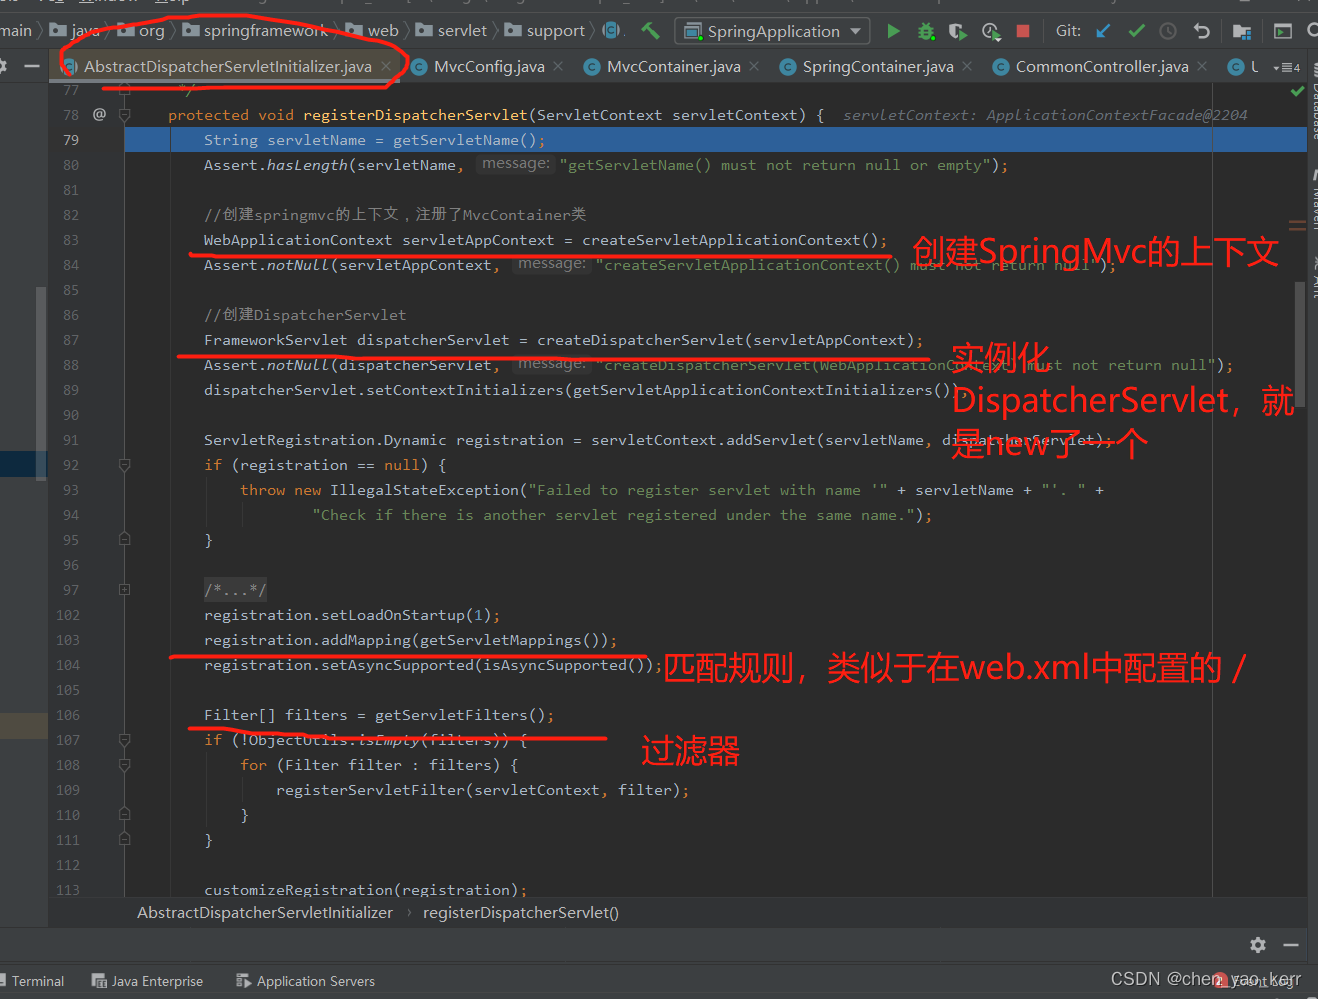
Spring MVC的上下文,也就是简单的new了一个 AnnotationConfigWebApplicationContext 对象
注解方法替换配置的 xml 文件
1. 首先需要定义2个扫描类,一个负责扫描到Spring文件,一个负责扫描SpringMVC的controller文件; 当然,也可以直接让Spring的扫描文件也把spring mvc 的 controller文件给扫描到,因为handlerMapping会有2个入口进行映射的处理,后面分析
2. 需要一个实现了 WebApplicationInitializer 的实现类,这样tomcat才能成功启动Spring MVC; 在这个实现类中,我们需要把扫描Spring和Spring MVC的2个类进行返回,这样ContextLoaderListener 和 DispatcherServlet 的钩子方法才能获取到要扫描的Spring文件 和 Spring MVC的文件路径,才能够正确的进行实例化Bean的操作。
3. 需要一个启动Spring MVC的的类,类似于启动AOP (@Aspect) 或 事务的注解类 (@EnableTransactionManagement(proxyTargetClass = false))
Spring的扫描类:替换Spring.xml文件
package com.xiangxue.mvc.configuration;

import org.springframework.context.annotation.ComponentScan;
import org.springframework.context.annotation.FilterType;
import org.springframework.stereotype.Controller;

//不扫描有@Controller注解的类
@ComponentScan(value = "com.xiangxue.jack",excludeFilters = {
        @ComponentScan.Filter(type = FilterType.ANNOTATION,classes = {Controller.class})
})
public class SpringContainer {
}
Spring MVC的扫描类:扫描到controller对象
package com.xiangxue.mvc.configuration;

import org.springframework.context.annotation.ComponentScan;
import org.springframework.context.annotation.FilterType;
import org.springframework.stereotype.Controller;

@ComponentScan(value = "com.xiangxue.mvc.controller",includeFilters = {
        @ComponentScan.Filter(type = FilterType.ANNOTATION,classes = {Controller.class})
},useDefaultFilters = false)
public class MvcContainer {
}
WebApplicationInitializer的实现类:支持Spring MVC的启动,由tomcat负责
package com.xiangxue.mvc.mvc;


import com.xiangxue.mvc.configuration.MvcContainer;
import com.xiangxue.mvc.configuration.SpringContainer;
import org.springframework.web.servlet.support.AbstractAnnotationConfigDispatcherServletInitializer;

import javax.servlet.Filter;

public class WebAppInitializer extends AbstractAnnotationConfigDispatcherServletInitializer {

    //父容器, 即spring扫描的注解类
    @Override
    protected Class<?>[] getRootConfigClasses() {
        return new Class<?>[]{SpringContainer.class};
    }

    //spring mvc的扫描类
    @Override
    protected Class<?>[] getServletConfigClasses() {
        return new Class<?>[]{MvcContainer.class};
    }

    //获取DispatcherServlet的映射信息
    @Override
    protected String[] getServletMappings() {
        return new String[]{"/"};
    }

    @Override
    protected Filter[] getServletFilters() {
        return super.getServletFilters();
    }
}
注解启动MVC的类:替换Spring-mvc.xml。里面的各种配置类都可以进行注入操作,比如拦截器UserInterceptor
package com.xiangxue.jack.mvc;

import com.xiangxue.jack.interceptor.UserInterceptor;
import com.xiangxue.jack.interceptor.UserInterceptor1;
import org.springframework.beans.factory.annotation.Autowired;
import org.springframework.context.annotation.Configuration;
import org.springframework.web.servlet.HandlerExceptionResolver;
import org.springframework.web.servlet.config.annotation.*;
import org.springframework.web.servlet.view.json.MappingJackson2JsonView;

import java.util.List;

@Configuration
@EnableWebMvc
public class AppConfig extends WebMvcConfigurerAdapter {

    @Autowired
    private UserInterceptor userInterceptor;

    @Override
    public void configureViewResolvers(ViewResolverRegistry registry) {
        registry.enableContentNegotiation(new MappingJackson2JsonView());
        registry.jsp("/jsp/", ".jsp");
    }

    @Override
    public void addViewControllers(ViewControllerRegistry registry) {
        registry.addViewController("/view/ok").setViewName("ok");
        registry.addViewController("/view/index").setViewName("index");
    }

    @Override
    public void configureDefaultServletHandling(DefaultServletHandlerConfigurer configurer) {
        configurer.enable();
    }

    @Override
    public void addInterceptors(InterceptorRegistry registry) {
        registry.addInterceptor(userInterceptor).addPathPatterns("/user/**").excludePathPatterns("/user/query/**");
        registry.addInterceptor(new UserInterceptor1()).addPathPatterns("/user/**").excludePathPatterns("");
    }

    @Override
    public void addResourceHandlers(ResourceHandlerRegistry registry) {
        registry.addResourceHandler("/image/**")
                .addResourceLocations("classpath:/img/");
    }

    @Override
    public void configureHandlerExceptionResolvers(List<HandlerExceptionResolver> exceptionResolvers) {
        super.configureHandlerExceptionResolvers(exceptionResolvers);
    }


/*    @Override
    public void addCorsMappings(CorsRegistry registry) {
        registry.addMapping("/user/**")
                .allowedOrigins("*")
                .allowCredentials(true)
                .allowedMethods("GET", "POST", "DELETE", "PUT","PATCH")
                .maxAge(3600);
    }*/
}
在SpringMVC.xml中,我们会定义各种各样的拦截器、转换器等等,我们都可以自己定义然后进行注入操作进行替换,下面我定义一个拦截器,并且在AppConfig类中进行注入:
拦截器类:
package com.xiangxue.jack.interceptor;

import org.springframework.stereotype.Component;
import org.springframework.web.servlet.HandlerInterceptor;
import org.springframework.web.servlet.ModelAndView;

import javax.servlet.http.HttpServletRequest;
import javax.servlet.http.HttpServletResponse;

@Component
public class UserInterceptor implements HandlerInterceptor {
    //前置拦截方法
    @Override
    public boolean preHandle(HttpServletRequest request, HttpServletResponse response, Object handler) throws Exception {
        System.out.println("======UserInterceptor用户权限校验=========");
        return true;
    }

    //中置拦截方法
    @Override
    public void postHandle(HttpServletRequest request, HttpServletResponse response, Object handler, ModelAndView modelAndView) throws Exception {
        System.out.println("========UserInterceptor修改modelAndView======");
    }

    //后置拦截方法
    @Override
    public void afterCompletion(HttpServletRequest request, HttpServletResponse response, Object handler, Exception ex) throws Exception {
        System.out.println("========UserInterceptor资源释放======");
    }
}
至此,所有的配置类都已经完成。我们可以完全替换掉了Spring.xml 、SpringMVC.xml 和 web.xml文件了。


 1196
1196


 被折叠的 条评论
为什么被折叠?
被折叠的 条评论
为什么被折叠?
 到【灌水乐园】发言


