


1.注册微信公众号
2.申请微信扫码登录
3.导入pom包
<!-- 微信 -->
<dependency>
    <groupId>com.github.binarywang</groupId>
    <artifactId>wx-java-mp-spring-boot-starter</artifactId>
    <version>4.4.0</version>
</dependency>
<!-- SpringBoot Websocket -->
<dependency>
    <groupId>org.springframework.boot</groupId>
    <artifactId>spring-boot-starter-websocket</artifactId>
</dependency>
4.设置配置文件 (application.yml)
wechat:
# 公众号
mp:
# 生活助手
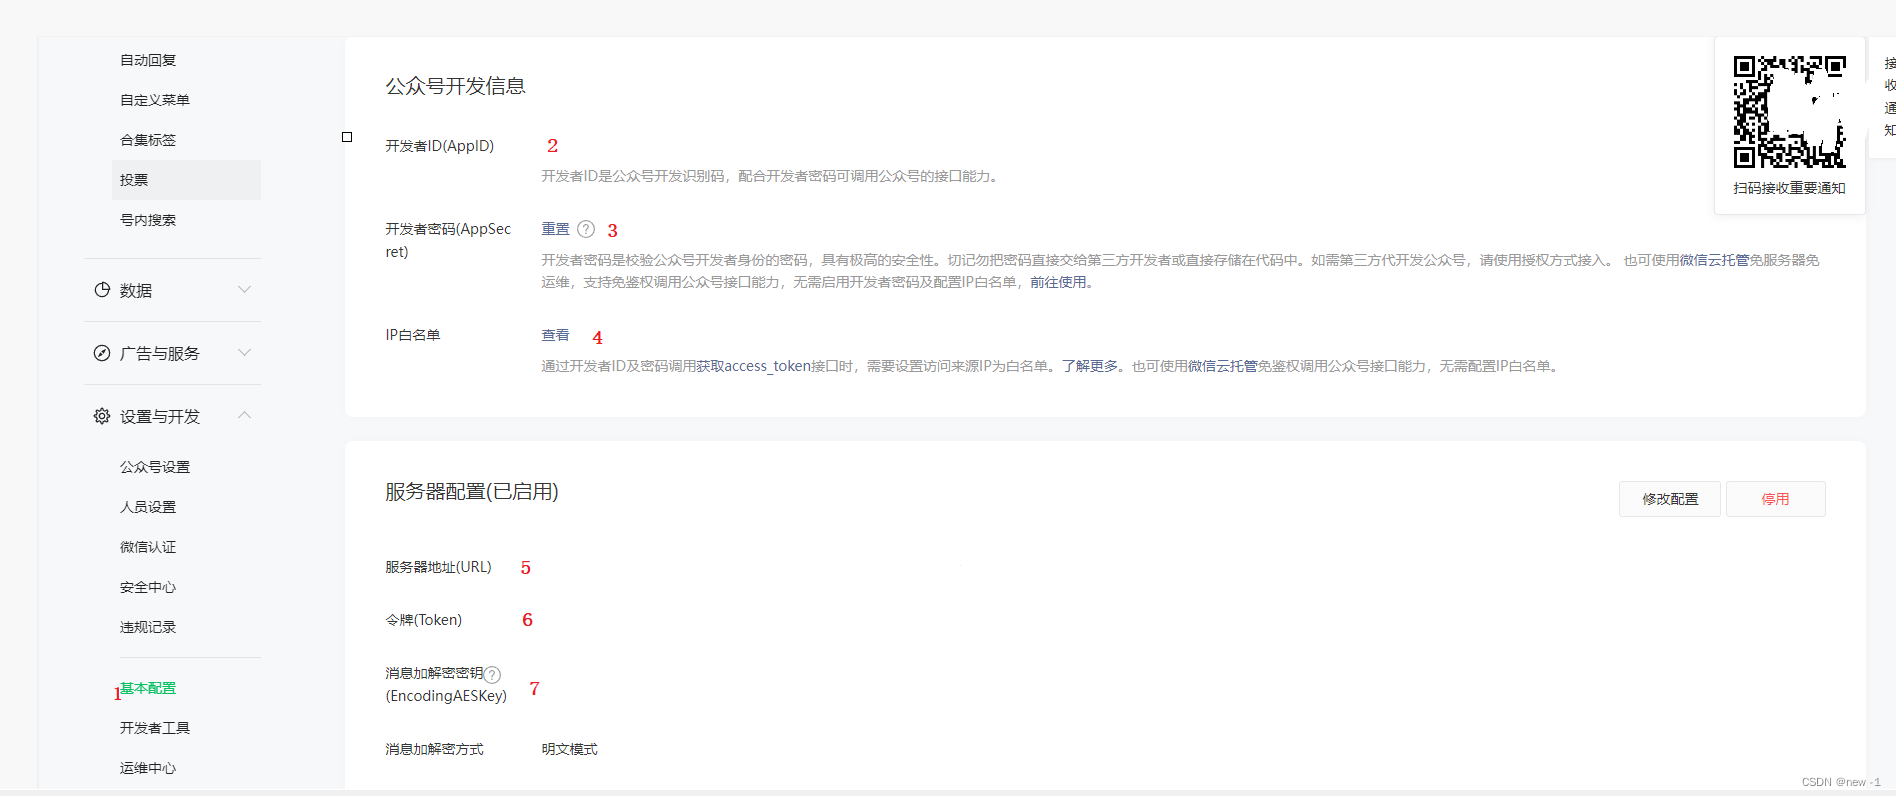
appId: 图-2(2)的位置
secret: 图-2(3)的位置
accessTokenKey: 图-2(7)的位置
5.开发代码后端
1)工具类
package com.wiswift.oauth2.util;
import cn.hutool.http.HttpUtil;
import com.alibaba.fastjson.JSONObject;
import org.slf4j.Logger;
import org.slf4j.LoggerFactory;

import java.security.MessageDigest;
import java.security.NoSuchAlgorithmException;
import java.util.HashMap;
import java.util.Map;

/**
 * 签名认证工具类
 * @ClassName:  WxCheckUtil
 *
 */
public class WxUtil {

    private static final Logger LOGGER = LoggerFactory.getLogger(WxUtil.class);

	// 与接口配置信息中的Token要一致
    private static String token = 图-2(6)一致;

    /**
     * 验证签名
     *
     * @param signature
     * @param timestamp
     * @param nonce
     * @return
     */
    public static boolean checkSignature(String signature, String timestamp, String nonce) {
        String[] arr = new String[] { token, timestamp, nonce };
        // 将token、timestamp、nonce三个参数进行字典序排序
        // Arrays.sort(arr);
        sort(arr);
        StringBuilder content = new StringBuilder();
        for (int i = 0; i < arr.length; i++) {
            content.append(arr[i]);
        }
        MessageDigest md = null;
        String tmpStr = null;

        try {
            md = MessageDigest.getInstance("SHA-1");
            // 将三个参数字符串拼接成一个字符串进行sha1加密
            byte[] digest = md.digest(content.toString().getBytes());
            tmpStr = byteToStr(digest);
        } catch (NoSuchAlgorithmException e) {
            e.printStackTrace();
        }
        content = null;
        // 将sha1加密后的字符串可与signature对比,标识该请求来源于微信

        return tmpStr != null ? tmpStr.equals(signature.toUpperCase()) : false;
    }

    /**
     * 将字节数组转换为十六进制字符串
     *
     * @param byteArray
     * @return
     */
    private static String byteToStr(byte[] byteArray) {
        String strDigest = "";
        for (int i = 0; i < byteArray.length; i++) {
            strDigest += byteToHexStr(byteArray[i]);
        }
        return strDigest;
    }

    /**
     * 将字节转换为十六进制字符串
     *
     * @param mByte
     * @return
     */
    private static String byteToHexStr(byte mByte) {
        char[] Digit = { '0', '1', '2', '3', '4', '5', '6', '7', '8', '9', 'A', 'B', 'C', 'D', 'E', 'F' };
        char[] tempArr = new char[2];
        tempArr[0] = Digit[(mByte >>> 4) & 0X0F];
        tempArr[1] = Digit[mByte & 0X0F];
        String s = new String(tempArr);
        return s;
    }
    public static void sort(String a[]) {
        for (int i = 0; i < a.length - 1; i++) {
            for (int j = i + 1; j < a.length; j++) {
                if (a[j].compareTo(a[i]) < 0) {
                    String temp = a[i];
                    a[i] = a[j];
                    a[j] = temp;
                }
            }
        }
    }

    // 获取AccessToken
    public static String obtainAccessToken(String APPID,String SECRET){
        String tokenData = "https://api.weixin.qq.com/cgi-bin/token?grant_type=client_credential&appid="+APPID+"&secret="+SECRET;
        // 返回的用户信息json字符串
        String resp = HttpUtils.sendGet(tokenData);
        JSONObject jsonObject = JSONObject.parseObject(resp);
        return String.valueOf(jsonObject.get("access_token"));
    }

    // 获取手机号码
    public static String getPhoneNum(Object accessToken,String code){
        String path = "https://api.weixin.qq.com/wxa/business/getuserphonenumber?access_token="+accessToken;
        //封装参数
        JSONObject jsonData = new JSONObject();
        jsonData.put("code", code);
        // 返回的用户信息json字符串,此处调用Hutool工具类
        String resp = HttpUtil.post(path, jsonData.toJSONString());
        JSONObject jsonObject = JSONObject.parseObject(resp);
        JSONObject phoneInfo = JSONObject.parseObject(jsonObject.get("phone_info").toString());
        return String.valueOf(phoneInfo.get("phoneNumber"));
    }

    // 获取订阅用户的openid和unionid
    public static Map obtainUserDetail(String accessToken, String openId){
        String openInfoUrl = "https://api.weixin.qq.com/cgi-bin/user/info?access_token="+accessToken+"&openid="+openId+"&lang=zh_CN";
        String resp = HttpUtils.sendGet(openInfoUrl);
        JSONObject userDetail = JSONObject.parseObject(resp);
        String openid = userDetail.getString("openid");
        Integer subscribe = userDetail.getInteger("subscribe");
        Integer subscribeTime = userDetail.getInteger("subscribe_time");
        String unionid = userDetail.getString("unionid");
        HashMap<String, Object> userDetailMap = new HashMap<>();
        userDetailMap.put("openid",openid);
        // subscribe 1:关注 0:取关
        userDetailMap.put("subscribe",subscribe);
        userDetailMap.put("subscribeTime",subscribeTime);
        userDetailMap.put("unionid",unionid);
        return userDetailMap;
    }


}
package com.wiswift.oauth2.util;

import org.springframework.beans.factory.annotation.Autowired;
import org.springframework.data.redis.core.BoundSetOperations;
import org.springframework.data.redis.core.HashOperations;
import org.springframework.data.redis.core.RedisTemplate;
import org.springframework.data.redis.core.ValueOperations;
import org.springframework.stereotype.Component;

import java.util.*;
import java.util.concurrent.TimeUnit;

/**
 * spring redis 工具类
 *
 **/
@SuppressWarnings(value = { "unchecked", "rawtypes" })
@Component
public class RedisCache
{
    @Autowired
    public RedisTemplate redisTemplate;

    /**
     * 缓存基本的对象,Integer、String、实体类等
     *
     * @param key 缓存的键值
     * @param value 缓存的值
     */
    public <T> void setCacheObject(final String key, final T value)
    {
        redisTemplate.opsForValue().set(key, value);
    }

    /**
     * 缓存基本的对象,Integer、String、实体类等
     *
     * @param key 缓存的键值
     * @param value 缓存的值
     * @param timeout 时间
     * @param timeUnit 时间颗粒度
     */
    public <T> void setCacheObject(final String key, final T value, final Integer timeout, final TimeUnit timeUnit)
    {
        redisTemplate.opsForValue().set(key, value, timeout, timeUnit);
    }

    /**
     * 设置有效时间
     *
     * @param key Redis键
     * @param timeout 超时时间
     * @return true=设置成功;false=设置失败
     */
    public boolean expire(final String key, final long timeout)
    {
        return expire(key, timeout, TimeUnit.SECONDS);
    }

    /**
     * 设置有效时间
     *
     * @param key Redis键
     * @param timeout 超时时间
     * @param unit 时间单位
     * @return true=设置成功;false=设置失败
     */
    public boolean expire(final String key, final long timeout, final TimeUnit unit)
    {
        return redisTemplate.expire(key, timeout, unit);
    }

    /**
     * 获得缓存的基本对象。
     *
     * @param key 缓存键值
     * @return 缓存键值对应的数据
     */
    public <T> T getCacheObject(final String key)
    {
        ValueOperations<String, T> operation = redisTemplate.opsForValue();
        return operation.get(key);
    }

    /**
     * 删除单个对象
     *
     * @param key
     */
    public boolean deleteObject(final String key)
    {
        return redisTemplate.delete(key);
    }

    /**
     * 删除集合对象
     *
     * @param collection 多个对象
     * @return
     */
    public long deleteObject(final Collection collection)
    {
        return redisTemplate.delete(collection);
    }

    /**
     * 缓存List数据
     *
     * @param key 缓存的键值
     * @param dataList 待缓存的List数据
     * @return 缓存的对象
     */
    public <T> long setCacheList(final String key, final List<T> dataList)
    {
        Long count = redisTemplate.opsForList().rightPushAll(key, dataList);
        return count == null ? 0 : count;
    }

    /**
     * 获得缓存的list对象
     *
     * @param key 缓存的键值
     * @return 缓存键值对应的数据
     */
    public <T> List<T> getCacheList(final String key)
    {
        return redisTemplate.opsForList().range(key, 0, -1);
    }

    /**
     * 缓存Set
     *
     * @param key 缓存键值
     * @param dataSet 缓存的数据
     * @return 缓存数据的对象
     */
    public <T> BoundSetOperations<String, T> setCacheSet(final String key, final Set<T> dataSet)
    {
        BoundSetOperations<String, T> setOperation = redisTemplate.boundSetOps(key);
        Iterator<T> it = dataSet.iterator();
        while (it.hasNext())
        {
            setOperation.add(it.next());
        }
        return setOperation;
    }

    /**
     * 获得缓存的set
     *
     * @param key
     * @return
     */
    public <T> Set<T> getCacheSet(final String key)
    {
        return redisTemplate.opsForSet().members(key);
    }

    /**
     * 缓存Map
     *
     * @param key
     * @param dataMap
     */
    public <T> void setCacheMap(final String key, final Map<String, T> dataMap)
    {
        if (dataMap != null) {
            redisTemplate.opsForHash().putAll(key, dataMap);
        }
    }

    /**
     * 获得缓存的Map
     *
     * @param key
     * @return
     */
    public <T> Map<String, T> getCacheMap(final String key)
    {
        return redisTemplate.opsForHash().entries(key);
    }

    /**
     * 往Hash中存入数据
     *
     * @param key Redis键
     * @param hKey Hash键
     * @param value 值
     */
    public <T> void setCacheMapValue(final String key, final String hKey, final T value)
    {
        redisTemplate.opsForHash().put(key, hKey, value);
    }

    /**
     * 获取Hash中的数据
     *
     * @param key Redis键
     * @param hKey Hash键
     * @return Hash中的对象
     */
    public <T> T getCacheMapValue(final String key, final String hKey)
    {
        HashOperations<String, String, T> opsForHash = redisTemplate.opsForHash();
        return opsForHash.get(key, hKey);
    }

    /**
     * 删除Hash中的数据
     *
     * @param key
     * @param mapkey
     */
    public void delCacheMapValue(final String key, final String hkey)
    {
        HashOperations hashOperations = redisTemplate.opsForHash();
        hashOperations.delete(key, hkey);
    }

    /**
     * 获取多个Hash中的数据
     *
     * @param key Redis键
     * @param hKeys Hash键集合
     * @return Hash对象集合
     */
    public <T> List<T> getMultiCacheMapValue(final String key, final Collection<Object> hKeys)
    {
        return redisTemplate.opsForHash().multiGet(key, hKeys);
    }

    /**
     * 获得缓存的基本对象列表
     *
     * @param pattern 字符串前缀
     * @return 对象列表
     */
    public Collection<String> keys(final String pattern)
    {
        return redisTemplate.keys(pattern);
    }
}
package com.wiswift.oauth2.util;

import org.apache.commons.lang3.time.DateFormatUtils;

import java.lang.management.ManagementFactory;
import java.text.ParseException;
import java.text.SimpleDateFormat;
import java.util.Calendar;
import java.util.Date;

/**
 * 时间工具类
 *
 * @author ruoyi
 */
public class DateUtils extends org.apache.commons.lang3.time.DateUtils
{
    public static String YYYY = "yyyy";

    public static String YYYY_MM = "yyyy-MM";

    public static String YYYY_MM_DD = "yyyy-MM-dd";

    public static String YYYYMMDDHHMMSS = "yyyyMMddHHmmss";

    public static String YYYY_MM_DD_HH_MM_SS = "yyyy-MM-dd HH:mm:ss";

    private static String[] parsePatterns = {
            "yyyy-MM-dd", "yyyy-MM-dd HH:mm:ss", "yyyy-MM-dd HH:mm", "yyyy-MM",
            "yyyy/MM/dd", "yyyy/MM/dd HH:mm:ss", "yyyy/MM/dd HH:mm", "yyyy/MM",
            "yyyy.MM.dd", "yyyy.MM.dd HH:mm:ss", "yyyy.MM.dd HH:mm", "yyyy.MM"};

    /**
     * 获取当前Date型日期
     *
     * @return Date() 当前日期
     */
    public static Date getNowDate()
    {
        return new Date();
    }

    /**
     * 获取当前日期, 默认格式为yyyy-MM-dd
     *
     * @return String
     */
    public static String getDate()
    {
        return dateTimeNow(YYYY_MM_DD);
    }

    /**
     * 获取昨天日期, 默认格式为yyyy-MM-dd 字符串
     *
     * @return String
     */
    public static String getPreViewDateStr()
    {
        Calendar cal = Calendar.getInstance();
        cal.add(Calendar.DAY_OF_MONTH, -1);
        Date preViewDay = cal.getTime();//这是昨天
        return parseDateToStr(YYYY_MM_DD, preViewDay);
    }

    /**
     * 获取昨天日期, 默认格式为yyyy-MM-dd Date日期
     *
     * @return String
     */
    public static Date getPreViewDate()
    {
        Calendar cal = Calendar.getInstance();
        cal.add(Calendar.DAY_OF_MONTH, -1);
        Date preViewDay = cal.getTime();//这是昨天
        return preViewDay;
    }

    /**
     * 获取i天前的日期, 默认格式为yyyy-MM-dd 字符串
     *
     * @return String
     */
    public static String getPreViewDateStrByNum(int i)
    {
        Calendar cal = Calendar.getInstance();
        cal.add(Calendar.DAY_OF_MONTH, -i);
        Date preViewDay = cal.getTime();//这是昨天
        return parseDateToStr(YYYY_MM_DD, preViewDay);
    }

    public static final String getTime()
    {
        return dateTimeNow(YYYY_MM_DD_HH_MM_SS);
    }

    public static final String dateTimeNow()
    {
        return dateTimeNow(YYYYMMDDHHMMSS);
    }

    public static final String dateTimeNow(final String format)
    {
        return parseDateToStr(format, new Date());
    }

    public static final String dateTime(final Date date)
    {
        return parseDateToStr(YYYY_MM_DD, date);
    }

    public static final String parseDateToStr(final String format, final Date date)
    {
        return new SimpleDateFormat(format).format(date);
    }

    public static final Date dateTime(final String format, final String ts)
    {
        try
        {
            return new SimpleDateFormat(format).parse(ts);
        }
        catch (ParseException e)
        {
            throw new RuntimeException(e);
        }
    }

    /**
     * 日期路径 即年/月/日 如2018/08/08
     */
    public static final String datePath()
    {
        Date now = new Date();
        return DateFormatUtils.format(now, "yyyy/MM/dd");
    }

    /**
     * 日期路径 即年/月/日 如20180808
     */
    public static final String dateTime()
    {
        Date now = new Date();
        return DateFormatUtils.format(now, "yyyyMMdd");
    }

    /**
     * 日期型字符串转化为日期 格式
     */
    public static Date parseDate(Object str)
    {
        if (str == null)
        {
            return null;
        }
        try
        {
            return parseDate(str.toString(), parsePatterns);
        }
        catch (ParseException e)
        {
            return null;
        }
    }

    /**
     * 获取服务器启动时间
     */
    public static Date getServerStartDate()
    {
        long time = ManagementFactory.getRuntimeMXBean().getStartTime();
        return new Date(time);
    }

    /**
     * 计算两个时间差
     */
    public static String getDatePoor(Date endDate, Date nowDate)
    {
        long nd = 1000 * 24 * 60 * 60;
        long nh = 1000 * 60 * 60;
        long nm = 1000 * 60;
        // long ns = 1000;
        // 获得两个时间的毫秒时间差异
        long diff = endDate.getTime() - nowDate.getTime();
        // 计算差多少天
        long day = diff / nd;
        // 计算差多少小时
        long hour = diff % nd / nh;
        // 计算差多少分钟
        long min = diff % nd % nh / nm;
        // 计算差多少秒//输出结果
        // long sec = diff % nd % nh % nm / ns;
        return day + "天" + hour + "小时" + min + "分钟";
    }
}
2)websocket设置
package com.wiswift.oauth2.websocketConfig.websocket;

import org.slf4j.Logger;
import org.slf4j.LoggerFactory;

import java.util.concurrent.Semaphore;

/**
 * 信号量相关处理
 *
 * @author ruoyi
 */
public class SemaphoreUtils
{
    /**
     * SemaphoreUtils 日志控制器
     */
    private static final Logger LOGGER = LoggerFactory.getLogger(SemaphoreUtils.class);

    /**
     * 获取信号量
     *
     * @param semaphore
     * @return
     */
    public static boolean tryAcquire(Semaphore semaphore)
    {
        boolean flag = false;

        try
        {
            flag = semaphore.tryAcquire();
        }
        catch (Exception e)
        {
            LOGGER.error("获取信号量异常", e);
        }

        return flag;
    }

    /**
     * 释放信号量
     *
     * @param semaphore
     */
    public static void release(Semaphore semaphore)
    {

        try
        {
            semaphore.release();
        }
        catch (Exception e)
        {
            LOGGER.error("释放信号量异常", e);
        }
    }
}
package com.wiswift.oauth2.websocketConfig.websocket;

import org.springframework.context.annotation.Bean;
import org.springframework.context.annotation.Configuration;
import org.springframework.web.socket.server.standard.ServerEndpointExporter;

/**
 * websocket 配置
 *
 * @author ruoyi
 */
@Configuration
public class WebSocketConfig
{
    @Bean
    public ServerEndpointExporter serverEndpointExporter()
    {
        return new ServerEndpointExporter();
    }

}
package com.wiswift.oauth2.websocketConfig.websocket;

import com.wiswift.oauth2.util.DateUtils;
import com.wiswift.oauth2.util.RedisCache;
import io.swagger.annotations.Api;
import org.slf4j.Logger;
import org.slf4j.LoggerFactory;
import org.springframework.beans.factory.annotation.Autowired;
import org.springframework.stereotype.Component;

import javax.websocket.*;
import javax.websocket.server.ServerEndpoint;
import java.util.concurrent.Semaphore;
import java.util.concurrent.TimeUnit;

/**
 * websocket 消息处理
 *
 * @author ruoyi
 */
@Component
@Api(value = "websocket",tags = "websocket接口")
@ServerEndpoint("/websocket/message")
public class WebSocketServer
{
    /**
     * WebSocketServer 日志控制器
     */
    private static final Logger LOGGER = LoggerFactory.getLogger(WebSocketServer.class);

    /**
     * 注入消息redis
     */
    private static RedisCache redisCache;

    @Autowired
    public void setRedisCache(RedisCache redisCache) {
        this.redisCache = redisCache;
    }

    /**
     * 默认最多允许同时在线人数1000
     */
    public static int socketMaxOnlineCount = 1000;

    private static Semaphore socketSemaphore = new Semaphore(socketMaxOnlineCount);

    /**
     * 连接建立成功调用的方法
     */
    @OnOpen
    public void onOpen(Session session) throws Exception
    {
        boolean semaphoreFlag = false;
        // 尝试获取信号量
        semaphoreFlag = SemaphoreUtils.tryAcquire(socketSemaphore);
        if (!semaphoreFlag)
        {
            // 未获取到信号量
            LOGGER.error("\n 当前在线人数超过限制数- {}", socketMaxOnlineCount);
            WebSocketUsers.sendMessageToUserByText(session, "当前在线人数超过限制数:" + socketMaxOnlineCount);
            session.close();
        }
        else
        {
            // 添加用户
            WebSocketUsers.put(session.getId(), session);
            LOGGER.info("\n 建立连接 - {}", session);
            LOGGER.info("\n 当前人数 - {}", WebSocketUsers.getUsers().size());
        }
    }

    /**
     * 连接关闭时处理
     */
    @OnClose
    public void onClose(Session session)
    {
        LOGGER.info("\n 关闭连接 - {}", session);
        // 移除用户
        WebSocketUsers.remove(session.getId());
        // 获取到信号量则需释放
        SemaphoreUtils.release(socketSemaphore);
    }

    /**
     * 抛出异常时处理
     */
    @OnError
    public void onError(Session session, Throwable exception) throws Exception
    {
        if (session.isOpen())
        {
            // 关闭连接
            session.close();
        }
        String sessionId = session.getId();
        LOGGER.info("\n 连接异常 - {}", sessionId);
        LOGGER.info("\n 异常信息 - {}", exception);
        // 移出用户
        WebSocketUsers.remove(sessionId);
        // 获取到信号量则需释放
        SemaphoreUtils.release(socketSemaphore);
    }

    /**
     * 服务器接收到客户端消息时调用的方法
     */
    @OnMessage
    public void onMessage(String message, Session session)
    {
        if(message.length()>80){
            //先暂定字符大于80为ticket,后面把message设置为json,进行类型判断
            // key=message=ticket DateUtils.getDate()+":" 文件夹形式存储
            String ticketCacheKey= DateUtils.getDate()+":"+message;
            redisCache.setCacheObject(ticketCacheKey,session.getId(),30,TimeUnit.MINUTES);
        }else{
            // // 收到消息写入数据表中 -------- 这样耦合严重,且出现循环依赖问题,后面使用Mq解决
            // 回消息
            String msg = "客服不在线,请添加经理微信(xiaojjbhk)";
            WebSocketUsers.sendMessageToUserByText(session, msg);
        }
    }
}
package com.wiswift.oauth2.websocketConfig.websocket;

import org.slf4j.Logger;
import org.slf4j.LoggerFactory;

import javax.websocket.Session;
import java.io.IOException;
import java.util.Collection;
import java.util.Map;
import java.util.Set;
import java.util.concurrent.ConcurrentHashMap;

/**
 * websocket 客户端用户集
 *
 * @author ruoyi
 */
public class WebSocketUsers
{
    /**
     * WebSocketUsers 日志控制器
     */
    private static final Logger LOGGER = LoggerFactory.getLogger(WebSocketUsers.class);

    /**
     * 用户集
     */
    private static Map<String, Session> USERS = new ConcurrentHashMap<String, Session>();

    /**
     * 存储用户
     *
     * @param key 唯一键
     * @param session 用户信息
     */
    public static void put(String key, Session session)
    {
        USERS.put(key, session);
    }

    /**
     * 获取用户
     *
     * @param key 唯一键
     */
    public static Session get(String key) {
        return USERS.get(key);
    }

    /**
     * 移除用户
     *
     * @param session 用户信息
     *
     * @return 移除结果
     */
    public static boolean remove(Session session)
    {
        String key = null;
        boolean flag = USERS.containsValue(session);
        if (flag)
        {
            Set<Map.Entry<String, Session>> entries = USERS.entrySet();
            for (Map.Entry<String, Session> entry : entries)
            {
                Session value = entry.getValue();
                if (value.equals(session))
                {
                    key = entry.getKey();
                    break;
                }
            }
        }
        else
        {
            return true;
        }
        return remove(key);
    }

    /**
     * 移出用户
     *
     * @param key 键
     */
    public static boolean remove(String key)
    {
        LOGGER.info("\n 正在移出用户 - {}", key);
        Session remove = USERS.remove(key);
        if (remove != null)
        {
            boolean containsValue = USERS.containsValue(remove);
            LOGGER.info("\n 移出结果 - {}", containsValue ? "失败" : "成功");
            return containsValue;
        }
        else
        {
            return true;
        }
    }

    /**
     * 获取在线用户列表
     *
     * @return 返回用户集合
     */
    public static Map<String, Session> getUsers()
    {
        return USERS;
    }

    /**
     * 群发消息文本消息
     *
     * @param message 消息内容
     */
    public static void sendMessageToUsersByText(String message)
    {
        Collection<Session> values = USERS.values();
        for (Session value : values)
        {
            sendMessageToUserByText(value, message);
        }
    }

    /**
     * 发送文本消息
     *
     * @param message 消息内容
     */
    public static void sendMessageToUserByText(Session session, String message)
    {
        if (session != null)
        {
            try
            {
                session.getBasicRemote().sendText(message);
            }
            catch (IOException e)
            {
                LOGGER.error("\n[发送消息异常]", e);
            }
        }
        else
        {
            LOGGER.info("\n[你已离线]");
        }
    }
}
2)生成二维码Controller
package com.wiswift.oauth2.controller;

import com.wiswift.databasecommon.result.AjaxJson;
import io.swagger.annotations.Api;
import lombok.AllArgsConstructor;
import lombok.extern.slf4j.Slf4j;
import me.chanjar.weixin.common.error.WxErrorException;
import me.chanjar.weixin.mp.api.WxMpService;
import me.chanjar.weixin.mp.bean.result.WxMpQrCodeTicket;
import org.springframework.web.bind.annotation.GetMapping;
import org.springframework.web.bind.annotation.RequestMapping;
import org.springframework.web.bind.annotation.RestController;


/**
 * @version 1.0
 * @description:
 * @date 2022/9/28 14:25
 */

@Slf4j
@RestController
@Api(value = "WxController",tags = "微信接口")
@RequestMapping(value = {"/wx"})
@AllArgsConstructor
public class WxController {


    private final WxMpService wxMpService;


    @GetMapping("/getMpQrCode")
    public AjaxJson getMpQrCode() throws WxErrorException {

        WxMpQrCodeTicket wxMpQrCodeTicket = wxMpService.getQrcodeService().qrCodeCreateTmpTicket(1,120);
        // 通过ticket获取微信生成的二维码链接
        return AjaxJson.getSuccess(wxMpService.getQrcodeService().qrCodePictureUrl(wxMpQrCodeTicket.getTicket()));
    }


}
3)微信回调Controller(注意需要和图-2(5)设置一样不然微信回调不了想要本地测试可以用内网穿透)
package com.wiswift.oauth2.controller;

import cn.hutool.crypto.SecureUtil;
import cn.hutool.crypto.symmetric.AES;
import com.baomidou.mybatisplus.core.conditions.query.QueryWrapper;
import com.wiswift.oauth2.domain.User;
import com.wiswift.oauth2.service.UserService;
import com.wiswift.oauth2.websocketConfig.websocket.WebSocketUsers;
import com.wiswift.databasecommon.utils.StringUtils;
import com.wiswift.oauth2.util.DateUtils;
import com.wiswift.oauth2.util.RedisCache;
import com.wiswift.oauth2.util.WxUtil;
import lombok.AllArgsConstructor;
import lombok.extern.slf4j.Slf4j;
import me.chanjar.weixin.common.api.WxConsts;
import me.chanjar.weixin.mp.api.WxMpService;
import me.chanjar.weixin.mp.bean.kefu.WxMpKefuMessage;
import org.dom4j.Document;
import org.dom4j.Element;
import org.dom4j.io.SAXReader;
import org.springframework.beans.factory.annotation.Autowired;
import org.springframework.web.bind.annotation.GetMapping;
import org.springframework.web.bind.annotation.PostMapping;
import org.springframework.web.bind.annotation.RequestMapping;
import org.springframework.web.bind.annotation.RestController;

import javax.servlet.http.HttpServletRequest;
import java.util.Map;

/**
 * @Description: cms wx公众号 api控制类
 */
@Slf4j
@RestController
@RequestMapping("/wx/api/cmsWxApi")
@AllArgsConstructor
public class CmsWxApiController {

    @Autowired
    private RedisCache redisCache;


    @Autowired
    UserService userService;


    private final WxMpService wxMpService;


    /**
     * 校验微信token
     */
    @GetMapping("/")
    public String checkSignature(String signature,String timestamp,String nonce,String echostr) {
        // 通过检验signature对请求进行校验,若校验成功则原样返回echostr,表示接入成功,否则接入失败
        WxUtil.checkSignature(signature, timestamp, nonce);
        return echostr;
    }


    /**
     * 接收推送的数据
     */
    @PostMapping("/")
    public String subscribeProcessor(HttpServletRequest request) throws Exception {
        // 通过IO获得Document
        SAXReader reader = new SAXReader();
        Document doc = reader.read(request.getInputStream());
        // 得到xml的根节点
        Element root = doc.getRootElement();
        String toUserName = root.elementText("ToUserName");//开发者微信号
        String fromUserName = root.elementText("FromUserName");//发送方帐号(一个OpenID)
        String createTime = root.elementText("CreateTime");//消息创建时间 (整型)
        String msgType = root.elementText("MsgType");//消息类型,event
        String event = root.elementText("Event");//事件类型,subscribe(订阅)、unsubscribe(取消订阅),SCAN
        String eventKey = root.elementText("EventKey");// 事件KEY值,qrscene_为前缀,后面为二维码的参数值
        String ticket = root.elementText("Ticket"); // 二维码的ticket,可用来换取二维码图片
        log.info("微信公众号接收信息:{},{},{},{},{},{},{}", toUserName, fromUserName, createTime, msgType, event, eventKey, ticket);

        if (event.equals("SCAN")||event.equals("subscribe")) {
            // 定义变量判断是否已关注,已经关注则自动登录,否则等待subscribe关注事件
            if (StringUtils.isNotEmpty(ticket)) {
                String token = wxMpService.getAccessToken();
                Map map = WxUtil.obtainUserDetail(token, fromUserName);
                String ticketCacheKey = DateUtils.getDate() + ":" + ticket;
                String sessionId = redisCache.getCacheObject(ticketCacheKey);

                // sessionId可能已经失效,则不发消息
                if (StringUtils.isNotNull(sessionId)) {

                    String openid = map.get("openid").toString();


                    // 判断是否新用户存在
                    int count = userService.count(new QueryWrapper<User>().eq("open_id", openid));
                    if (count < 1) {
                        User user = new User();
                        user.setUserName("用户" + System.currentTimeMillis());
                        user.setOpenId(openid);
                        userService.save(user);
                    }

                    // key
                    byte[] key = {18, 42, -127, -57, 77, -101, 60, 115, -3, -17, 92, 85, 23, -13, -42, -25};

                    AES aes = SecureUtil.aes(key);

                    String encryptHex = aes.encryptHex(openid);

                    WxMpKefuMessage message = new WxMpKefuMessage();
                    message.setMsgType(WxConsts.KefuMsgType.TEXT);
                    message.setToUser(openid);

                    if (event.equals("SCAN")){
                        message.setContent("登录成功 <a href=\"http://www.wisintelligence.com/\">随便写</a>");
                        boolean result = wxMpService.getKefuService().sendKefuMessage(message);

                    }else if (event.equals("subscribe")){
                        message.setContent("感谢关注 <a href=\"http://www.wisintelligence.com/\">随便写</a>");
                        boolean result = wxMpService.getKefuService().sendKefuMessage(message);

                    }

                        WebSocketUsers.sendMessageToUserByText(WebSocketUsers.get(sessionId), encryptHex);
                    }

                }


            }
            return null;
        }
}
二 前端 (react )
获取二维码
    function getQrCode() {
        getWXQrCode().then(res => {
            if (res.code === 200) {
                setWxQrCode(res.msg);
            }
        })
    }
const wsurl = process.env.REACT_APP_WEBSOCKET+"/websocket/message";
useEffect(() => {
if (wxQrCode) {
if (!ws) {
ws = new WebSocket(wsurl);
}
ws.onopen = () => {
let token = wxQrCode.split("ticket=")[1];
ws.send(token);
};
ws.onmessage = async function (e) {
// 获取后台返回的信息
let token = e.data;
........
};
ws.onerror = function (e) {
console.log(e);
}
}
}, [wxQrCode])qq号:1844489215 (备注csdn)
捐赠支持


你可以请作者喝杯咖啡表示鼓励


 2474
2474

 被折叠的 条评论
为什么被折叠?
被折叠的 条评论
为什么被折叠?
 到【灌水乐园】发言


