


目录
前言
小白的第一个文章,如果有问题欢迎来问,如果有缺陷有待改进的地方也欢迎指点。
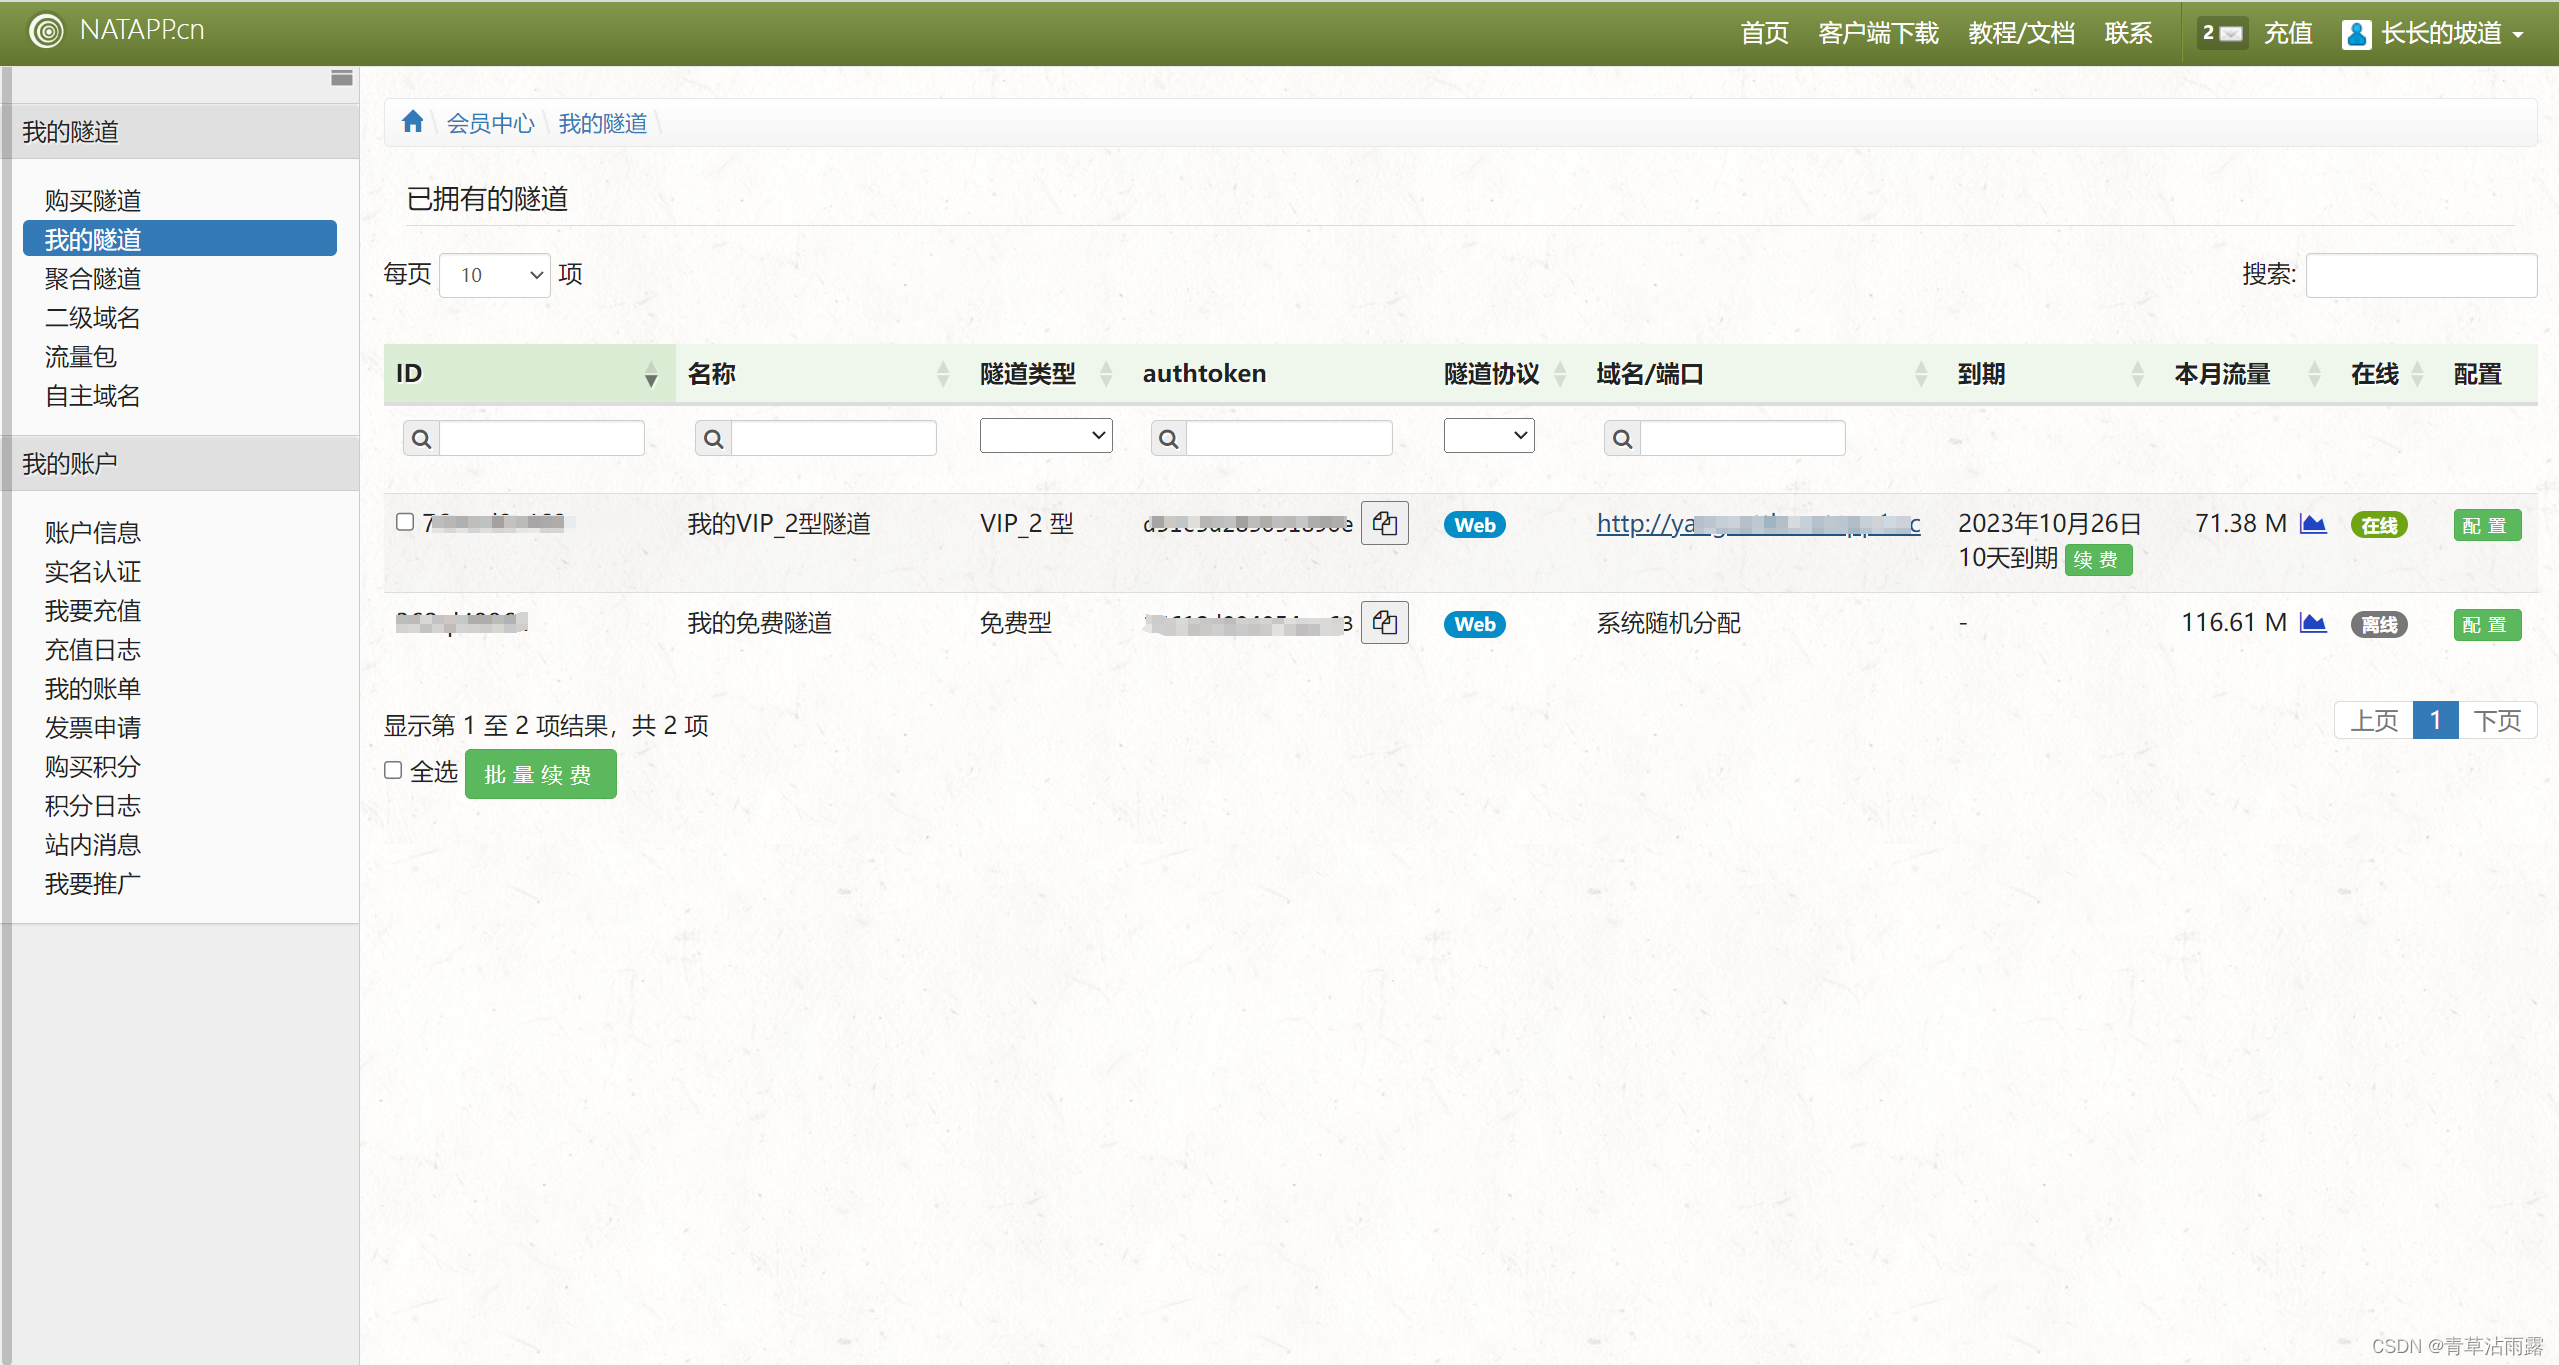
一、内网穿透
微信扫码登录通常在本地开发环境中进行测试和开发。本地开发环境通常是在你的计算机上运行的,而微信服务器无法直接访问本地计算机。因此,需要一种方式来将微信服务器的请求引导到你的本地开发服务器上,这就是内网穿透的作用。
我用的是natapp,免费的不好用,可以买个vip_2型,一般来说穿透后端就行了,要想在别的电脑上你写的程序,就要穿透前端,穿透前端比较费流量。
natapp随便看个教程就会用了=>NATAPP使用教程(内网穿透)
二、微信测试号
登录微信公众平台,进入开发者工具,点击公众平台测试账号。

这个appid和appsecret是我们需要的,这个接口配置因为还没写后端所以没法配置。
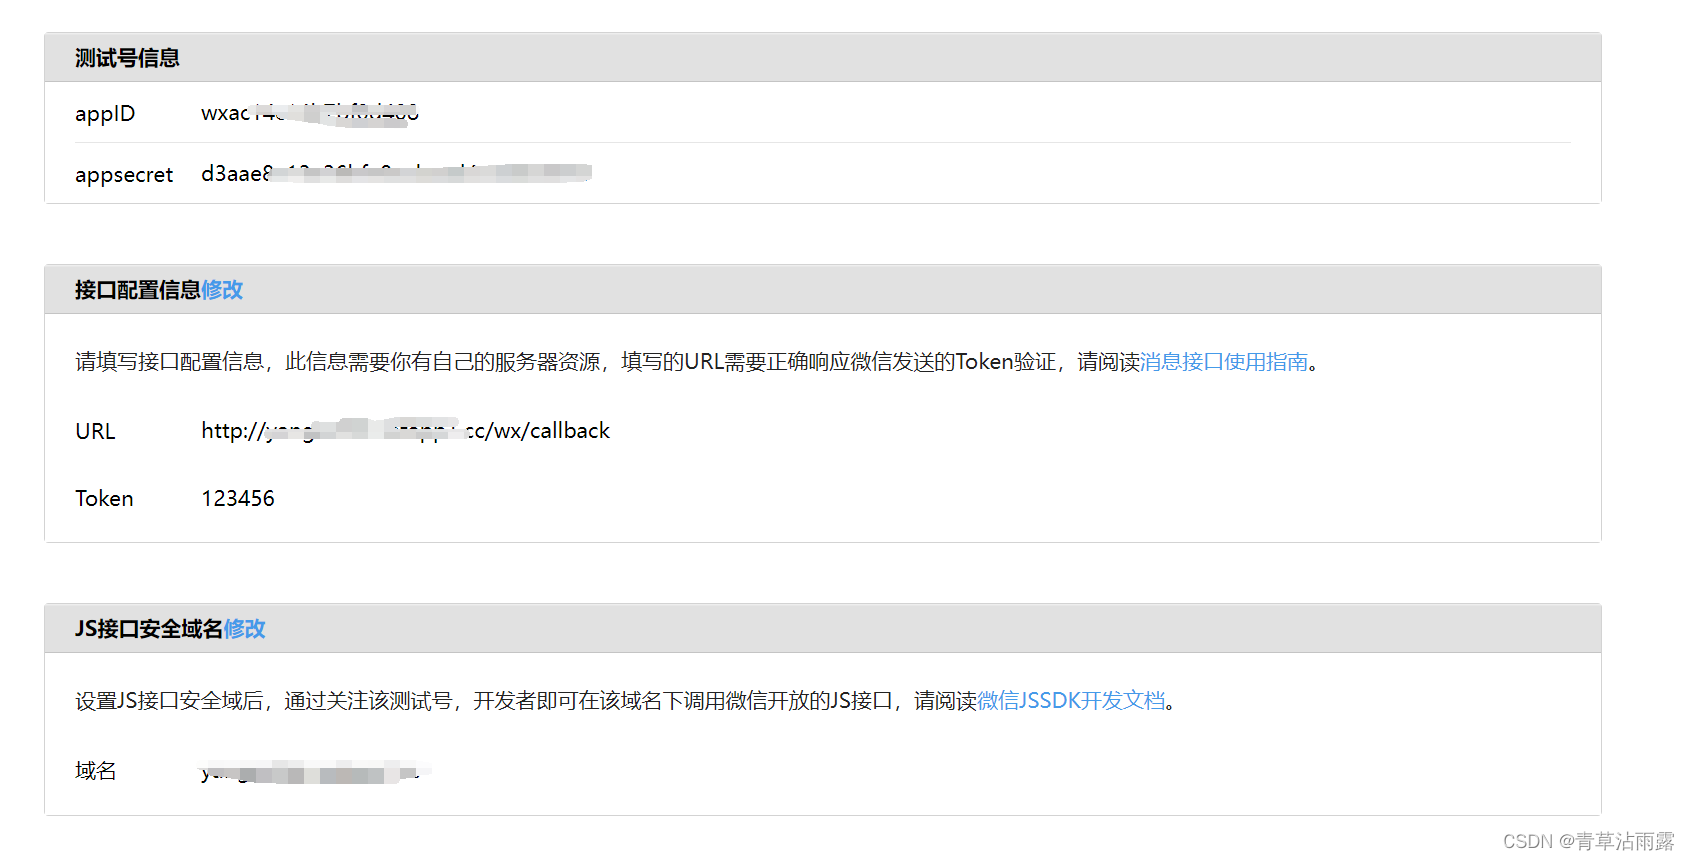
我们需要在后端写下微信的回调地址,先配置下yml文件
wx:
  APP_ID: 测试号的appid
  APP_SECRET: 测试号的appsecret
微信回调接口
@Log4j2
@RestController
@RequestMapping("/wx")
public class WechatController {
/**
     *  接入微信接口
     */
    @GetMapping("/callback")
    @ResponseBody
    public String checkSign (HttpServletRequest request) throws Exception {
        log.info("===========>checkSign");
        // 获取微信请求参数
        String signature = request.getParameter ("signature");
        String timestamp = request.getParameter ("timestamp");
        String nonce = request.getParameter ("nonce");
        String echostr = request.getParameter ("echostr");
        log.info("开始校验此次消息是否来自微信服务器,param->signature:{},\ntimestamp:{},\nnonce:{},\nechostr:{}",
                signature, timestamp, nonce, echostr);
        if (CheckWXTokenUtils.checkSignature(signature, timestamp, nonce)) {
            return echostr;
        }
        return "";
    }
}
CheckWxTokenUtils工具类
import lombok.extern.log4j.Log4j2;

import java.security.MessageDigest;
import java.security.NoSuchAlgorithmException;
import java.util.Arrays;

/**
 * 和微信建立链接参数校验
 */
@Log4j2
public class CheckWXTokenUtils {
    private static final String TOKEN = "123456"; // 自定义的token

    /**
     * 校验微信服务器Token签名
     *
     * @param signature 微信加密签名
     * @param timestamp 时间戳
     * @param nonce     随机数
     * @return boolean
     */
    public static boolean checkSignature(String signature, String timestamp, String nonce) {
        String[] arr = {TOKEN, timestamp, nonce};
        Arrays.sort(arr);
        StringBuilder stringBuilder = new StringBuilder();
        for (String param : arr) {
            stringBuilder.append(param);
        }
        String hexString = SHA1(stringBuilder.toString());
        return signature.equals(hexString);
    }

    private static String SHA1(String str) {
        MessageDigest md;
        try {
            md = MessageDigest.getInstance("SHA-1");
            byte[] digest = md.digest(str.getBytes());
            return toHexString(digest);
        } catch (NoSuchAlgorithmException e) {
            log.info("校验令牌Token出现错误:{}", e.getMessage());
        }
        return "";
    }

    /**
     * 字节数组转化为十六进制
     *
     * @param digest 字节数组
     * @return String
     */
    private static String toHexString(byte[] digest) {
        StringBuilder hexString = new StringBuilder();
        for (byte b : digest) {
            String shaHex = Integer.toHexString(b & 0xff);
            if (shaHex.length() < 2) {
                hexString.append(0);
            }
            hexString.append(shaHex);
        }
        return hexString.toString();
    }
}
写好后配置微信测试号

后面这两个地方要写上自己的域名,不带接口的


至此,微信公众号测试号配置完成。
三、生成带参二维码
不清楚原理的可以看微信开发文档
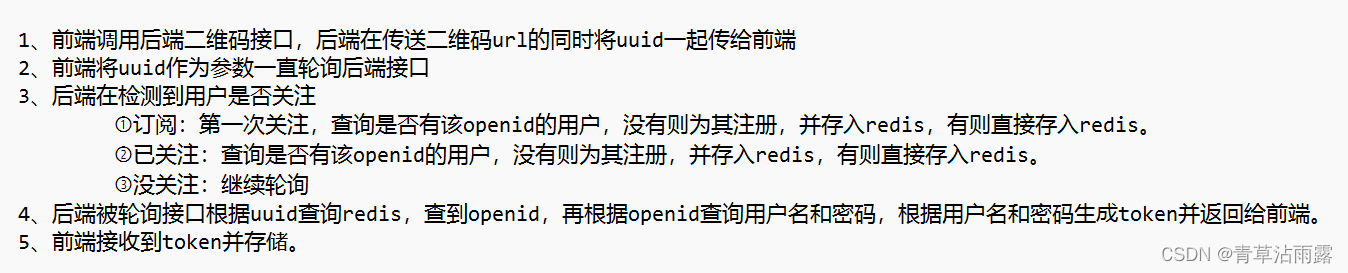
因为我没搞懂怎么才能将整个流程串通起来,没搞懂前端应该以什么作为参数轮询后端,所以我自己加了个uuid。
首先我们完成第一步,生成二维码。
    @Value("${wx.APP_ID}")
    private String APP_ID;

    @Value("${wx.APP_SECRET}")
    private String APP_SECRET;
    private String wxuuid;
    // 获取二维码
    @GetMapping("/qr/login/param")
    @ResponseBody
    public AjaxResult getWxQRCodeParam() {

        String QRUrl = null;
        String ticketRes=null;
        HashMap<String, String> map = new HashMap<>();
        try {
            // 第一步:发送请求获取access_token
            String getAccessTokenUrl = "https://api.weixin.qq.com/cgi-bin/token?grant_type=client_credential" +
                    "&appid=" + APP_ID +
                    "&secret=" + APP_SECRET;
            String accessTokenRes = HttpClientUtils.doGet(getAccessTokenUrl);
            log.info("accessTokenRes=>" + accessTokenRes);
            String accessToken = (String) JSON.parseObject(accessTokenRes).get("access_token"); // 获取到access_token

            //生成uuid
            wxuuid = IdUtils.simpleUUID();
            // 第二步:通过access_token和一些参数发送post请求获取二维码Ticket
            String getTicketUrl = "https://api.weixin.qq.com/cgi-bin/qrcode/create?access_token=" + accessToken;
            // 封装参数
            Map<String, Object> ticketInfo = new HashMap<>();
            ticketInfo.put("expire_seconds", 604800); // 二维码超时时间
            ticketInfo.put("action_name", "QR_STR_SCENE");
            // 放入uuid
            ticketInfo.put("action_info", new HashMap<String, HashMap>() {{
                        put("scene", new HashMap<String, String>() {{
                                    put("scene_str", wxuuid);
                                }}
                        );
                    }}
            );
            String ticketJsonInfo = JSON.toJSON(ticketInfo).toString();
            ticketRes = HttpClientUtils.doPostJson(getTicketUrl, ticketJsonInfo);
            log.info("ticketRes=>" + ticketRes);
            String ticket = (String) JSON.parseObject(ticketRes).get("ticket");

            // 第三步:通过ticket获取二维码url
            String encodeTicket = URLEncoder.encode(ticket, "utf-8"); // 编码ticket
            String getQRUrl = "https://mp.weixin.qq.com/cgi-bin/showqrcode?ticket=" + encodeTicket;
            QRUrl = getQRUrl; // 二维码url

            //存入map
            map.put("QRUrl",QRUrl);
            map.put("uuid",wxuuid);
        } catch (Exception e) {
            e.printStackTrace();
        }
        return AjaxResult.success("调用成功",map);
    }
HttpClientUtils.java
import org.apache.http.HttpEntity;
import org.apache.http.NameValuePair;
import org.apache.http.client.config.RequestConfig;
import org.apache.http.client.entity.UrlEncodedFormEntity;
import org.apache.http.client.methods.CloseableHttpResponse;
import org.apache.http.client.methods.HttpGet;
import org.apache.http.client.methods.HttpPost;
import org.apache.http.client.methods.HttpRequestBase;
import org.apache.http.client.utils.URIBuilder;
import org.apache.http.client.utils.URLEncodedUtils;
import org.apache.http.conn.ssl.SSLConnectionSocketFactory;
import org.apache.http.entity.StringEntity;
import org.apache.http.impl.client.CloseableHttpClient;
import org.apache.http.impl.client.HttpClientBuilder;
import org.apache.http.impl.client.HttpClients;
import org.apache.http.message.BasicNameValuePair;
import org.apache.http.ssl.SSLContexts;
import org.apache.http.util.EntityUtils;

import javax.net.ssl.SSLContext;
import java.io.File;
import java.io.FileInputStream;
import java.nio.charset.StandardCharsets;
import java.security.KeyStore;
import java.util.ArrayList;
import java.util.List;
import java.util.Map;

/**
 * HttpClient工具类
 */
public class HttpClientUtils {

    private static final CloseableHttpClient httpClient;

    // 采用静态代码块,初始化超时时间配置,再根据配置生成默认httpClient对象
    static {
        RequestConfig config = RequestConfig.custom().setConnectTimeout(30000).setSocketTimeout(15000).build();
        httpClient = HttpClientBuilder.create().setDefaultRequestConfig(config).build();
    }

    /**
     * 发送 HTTP GET请求,不带请求参数和请求头
     * @param url 请求地址
     * @return
     * @throws Exception
     */
    public static String doGet(String url) throws Exception {
        HttpGet httpGet = new HttpGet(url);
        return doHttp(httpGet);
    }

    /**
     * 发送 HTTP GET,请求带参数,不带请求头
     * @param url 请求地址
     * @param params 请求参数
     * @return
     * @throws Exception
     */
    public static String doGet(String url, Map<String, Object> params) throws Exception {
        // 转换请求参数
        List<NameValuePair> pairs = covertParamsToList(params);
        // 装载请求地址和参数
        URIBuilder ub = new URIBuilder();
        ub.setPath(url);
        ub.setParameters(pairs);
        HttpGet httpGet = new HttpGet(ub.build());
        return doHttp(httpGet);
    }

    /**
     * 发送 HTTP GET请求,带请求参数和请求头
     * @param url 请求地址
     * @param headers 请求头
     * @param params 请求参数
     * @return
     * @throws Exception
     */
    public static String doGet(String url, Map<String, Object> headers, Map<String, Object> params) throws Exception {
        // 转换请求参数
        List<NameValuePair> pairs = covertParamsToList(params);
        // 装载请求地址和参数
        URIBuilder ub = new URIBuilder();
        ub.setPath(url);
        ub.setParameters(pairs);

        HttpGet httpGet = new HttpGet(ub.build());
        // 设置请求头
        for (Map.Entry<String, Object> param : headers.entrySet()) {
            httpGet.addHeader(param.getKey(), String.valueOf(param.getValue()));
        }
        return doHttp(httpGet);
    }

    /**
     * 发送 HTTP POST请求,不带请求参数和请求头
     *
     * @param url 请求地址
     * @return
     * @throws Exception
     */
    public static String doPost(String url) throws Exception {
        HttpPost httpPost = new HttpPost(url);
        return doHttp(httpPost);
    }

    /**
     * 发送 HTTP POST请求,带请求参数,不带请求头
     *
     * @param url    请求地址
     * @param params 请求参数
     * @return
     * @throws Exception
     */
    public static String doPost(String url, Map<String, Object> params) throws Exception {
        // 转换请求参数
        List<NameValuePair> pairs = covertParamsToList(params);
        HttpPost httpPost = new HttpPost(url);
        // 设置请求参数
        httpPost.setEntity(new UrlEncodedFormEntity(pairs, StandardCharsets.UTF_8.name()));

        return doHttp(httpPost);
    }

    /**
     * 发送 HTTP POST请求,带请求参数和请求头
     *
     * @param url     地址
     * @param headers 请求头
     * @param params  参数
     * @return
     * @throws Exception
     */
    public static String doPost(String url, Map<String, Object> headers, Map<String, Object> params) throws Exception {
        // 转换请求参数
        List<NameValuePair> pairs = covertParamsToList(params);
        HttpPost httpPost = new HttpPost(url);
        // 设置请求参数
        httpPost.setEntity(new UrlEncodedFormEntity(pairs, StandardCharsets.UTF_8.name()));
        // 设置请求头
        for (Map.Entry<String, Object> param : headers.entrySet()) {
            httpPost.addHeader(param.getKey(), String.valueOf(param.getValue()));
        }
        return doHttp(httpPost);
    }

    /**
     * 发送 HTTP POST请求,请求参数是JSON格式,数据编码是UTF-8
     *
     * @param url 请求地址
     * @param param 请求参数
     * @return
     * @throws Exception
     */
    public static String doPostJson(String url, String param) throws Exception {
        HttpPost httpPost = new HttpPost(url);
        // 设置请求头
        httpPost.addHeader("Content-Type", "application/json; charset=UTF-8");
        // 设置请求参数
        httpPost.setEntity(new StringEntity(param, StandardCharsets.UTF_8.name()));
        return doHttp(httpPost);
    }


    /**
     * 发送 HTTP POST请求,请求参数是XML格式,数据编码是UTF-8
     *
     * @param url 请求地址
     * @param param 请求参数
     * @return
     * @throws Exception
     */
    public static String doPostXml(String url, String param) throws Exception {
        HttpPost httpPost = new HttpPost(url);
        // 设置请求头
        httpPost.addHeader("Content-Type", "application/xml; charset=UTF-8");
        // 设置请求参数
        httpPost.setEntity(new StringEntity(param, StandardCharsets.UTF_8.name()));

        return doHttp(httpPost);
    }

    /**
     * 发送 HTTPS POST请求,使用指定的证书文件及密码,不带请求头信息<
     *
     * @param url 请求地址
     * @param param 请求参数
     * @param path 证书全路径
     * @param password 证书密码
     * @return
     * @throws Exception
     * @throws Exception
     */
    public static String doHttpsPost(String url, String param, String path, String password) throws Exception {
        HttpPost httpPost = new HttpPost(url);
        // 设置请求参数
        httpPost.setEntity(new StringEntity(param, StandardCharsets.UTF_8.name()));

        return doHttps(httpPost, path, password);
    }

    /**
     * 发送 HTTPS POST请求,使用指定的证书文件及密码,请求头为“application/xml;charset=UTF-8”
     *
     * @param url 请求地址
     * @param param 请求参数
     * @param path 证书全路径
     * @param password 证书密码
     * @return
     * @throws Exception
     * @throws Exception
     */
    public static String doHttpsPostXml(String url, String param, String path, String password) throws Exception {
        HttpPost httpPost = new HttpPost(url);
        // 设置请求头
        httpPost.addHeader("Content-Type", "application/xml; charset=UTF-8");
        // 设置请求参数
        httpPost.setEntity(new StringEntity(param, StandardCharsets.UTF_8.name()));
        return doHttps(httpPost, path, password);
    }

    /**
     * 发送 HTTPS 请求,使用指定的证书文件及密码
     *
     * @param request
     * @param path 证书全路径
     * @param password 证书密码
     * @return
     * @throws Exception
     * @throws Exception
     */
    private static String doHttps(HttpRequestBase request, String path, String password) throws Exception {
        // 获取HTTPS SSL证书
        SSLConnectionSocketFactory csf = getHttpsFactory(path, password);
        // 通过连接池获取连接对象
        CloseableHttpClient httpClient = HttpClients.custom().setSSLSocketFactory(csf).build();
        return doRequest(httpClient, request);
    }

    /**
     * 获取HTTPS SSL连接工厂,使用指定的证书文件及密码
     *
     * @param path     证书全路径
     * @param password 证书密码
     * @return
     * @throws Exception
     * @throws Exception
     */
    private static SSLConnectionSocketFactory getHttpsFactory(String path, String password) throws Exception {

        // 初始化证书,指定证书类型为“PKCS12”
        KeyStore keyStore = KeyStore.getInstance("PKCS12");
        // 读取指定路径的证书
        FileInputStream input = new FileInputStream(new File(path));
        try {
            // 装载读取到的证书,并指定证书密码
            keyStore.load(input, password.toCharArray());
        } finally {
            input.close();
        }
        // 获取HTTPS SSL证书连接上下文
        SSLContext sslContext = SSLContexts.custom().loadKeyMaterial(keyStore, password.toCharArray()).build();
        // 获取HTTPS连接工厂,指定TSL版本
        SSLConnectionSocketFactory sslCsf = new SSLConnectionSocketFactory(sslContext, new String[]{"SSLv2Hello", "SSLv3", "TLSv1", "TLSv1.2"}, null, SSLConnectionSocketFactory.getDefaultHostnameVerifier());
        return sslCsf;
    }
    /**
     * 发送 HTTP 请求
     *
     * @param request
     * @return
     * @throws Exception
     */
    private static String doHttp(HttpRequestBase request) throws Exception {
        // 通过连接池获取连接对象
        return doRequest(httpClient, request);
    }

    /**
     * 处理Http/Https请求,并返回请求结果,默认请求编码方式:UTF-8
     * @param httpClient
     * @param request
     * @return
     */
    private static String doRequest(CloseableHttpClient httpClient, HttpRequestBase request) throws Exception {
        String result = null;
        try (CloseableHttpResponse response = httpClient.execute(request)) {
            // 获取请求结果
            int statusCode = response.getStatusLine().getStatusCode();
            if (statusCode != 200) {
                request.abort();
                throw new RuntimeException("HttpClient error status code: " + statusCode);
            }
            // 解析请求结果
            HttpEntity entity = response.getEntity();
            // 转换结果
            result = EntityUtils.toString(entity, StandardCharsets.UTF_8.name());
            // 关闭IO流
            EntityUtils.consume(entity);
        }
        return result;
    }

    /**
     * 转换请求参数,将Map键值对拼接成QueryString字符串
     *
     * @param params
     * @return
     */
    public static String covertMapToQueryStr(Map<String, Object> params) {
        List<NameValuePair> pairs = covertParamsToList(params);
        return URLEncodedUtils.format(pairs, StandardCharsets.UTF_8.name());
    }

    /**
     * 转换请求参数
     *
     * @param params
     * @return
     */
    public static List<NameValuePair> covertParamsToList(Map<String, Object> params) {
        List<NameValuePair> pairs = new ArrayList<>();
        for (Map.Entry<String, Object> param : params.entrySet()) {
            pairs.add(new BasicNameValuePair(param.getKey(), String.valueOf(param.getValue())));
        }
        return pairs;
    }
}
四、获取微信用户信息(同时实现微信公众号根据扫码回复消息)
WxMessageUtil.java
import lombok.extern.slf4j.Slf4j;
import org.dom4j.Document;
import org.dom4j.DocumentException;
import org.dom4j.Element;
import org.dom4j.io.SAXReader;

import javax.servlet.http.HttpServletRequest;
import java.io.IOException;
import java.io.InputStream;
import java.io.UnsupportedEncodingException;
import java.util.HashMap;
import java.util.List;
import java.util.Map;

/**
 * 微信消息处理类(微信消息交互大部分就是xml格式交互)
 */
@Slf4j
public class WxMessageUtil {

    /*
     * xml转map
     */
    public static Map<String, String> xmlToMap(HttpServletRequest request) throws IOException, DocumentException {
        HashMap<String, String> map = new HashMap<String,String>();
        SAXReader reader = new SAXReader();

        InputStream ins = request.getInputStream();
        Document doc = reader.read(ins);

        Element root = doc.getRootElement();
        @SuppressWarnings("unchecked")
        List<Element> list = (List<Element>)root.elements();

        for(Element e:list){
            map.put(e.getName(), e.getText());
        }
        ins.close();
        return map;
    }

    /**
     * 获取公众号回复信息(xml格式)
     */
    public static String getWxReturnMsg(Map<String, String> decryptMap, String content) throws UnsupportedEncodingException {
        log.info("---开始封装xml---decryptMap:" + decryptMap.toString());
        TextMessage textMessage = new TextMessage();
        textMessage.setToUserName(decryptMap.get("FromUserName"));
        textMessage.setFromUserName(decryptMap.get("ToUserName"));
        textMessage.setCreateTime(System.currentTimeMillis());
        textMessage.setMsgType("text"); // 设置回复消息类型
        textMessage.setContent(content); // 设置回复内容
        String xmlMsg = getXmlString(textMessage);
        // 设置返回信息编码,防止中文乱码
        String encodeXmlMsg = new String(xmlMsg.getBytes(), "UTF-8");
        return encodeXmlMsg;
    }

    /**
     * 设置回复消息xml格式
     */
    private static String getXmlString(TextMessage textMessage) {
        String xml = "";
        if (textMessage != null) {
            xml = "<xml>";
            xml += "<ToUserName><![CDATA[";
            xml += textMessage.getToUserName();
            xml += "]]></ToUserName>";
            xml += "<FromUserName><![CDATA[";
            xml += textMessage.getFromUserName();
            xml += "]]></FromUserName>";
            xml += "<CreateTime>";
            xml += textMessage.getCreateTime();
            xml += "</CreateTime>";
            xml += "<MsgType><![CDATA[";
            xml += textMessage.getMsgType();
            xml += "]]></MsgType>";
            xml += "<Content><![CDATA[";
            xml += textMessage.getContent();
            xml += "]]></Content>";
            xml += "</xml>";
        }
        log.info("xml封装结果=>" + xml);
        return xml;
    }
}
微信接收信息接口要与接入微信接口一致,但类型为post,同时,为了获取微信头像,地址,昵称等信息,写一个redirect与redirect/info两个接口(如果只要openid就不需要写这俩,整个登录流程也会圆滑一点,关注直接登录了)
import com.ahzx.common.core.domain.AjaxResult;
import com.ahzx.common.core.domain.entity.SysUser;
import com.ahzx.common.utils.SecurityUtils;
import com.ahzx.common.utils.uuid.IdUtils;
import com.ahzx.experience.domain.WxUserInfo;
import com.ahzx.experience.service.IWxService;
import com.ahzx.experience.util.CheckWXTokenUtils;
import com.ahzx.experience.util.HttpClientUtils;
import com.ahzx.system.mapper.SysUserMapper;
import com.ahzx.system.service.ISysUserService;
import com.alibaba.fastjson2.JSON;
import lombok.extern.log4j.Log4j2;
import org.springframework.beans.factory.annotation.Autowired;
import org.springframework.beans.factory.annotation.Value;
import org.springframework.data.redis.core.RedisTemplate;
import org.springframework.web.bind.annotation.*;

import javax.annotation.Resource;
import javax.servlet.http.HttpServletRequest;
import javax.servlet.http.HttpServletResponse;
import java.io.IOException;
import java.io.UnsupportedEncodingException;
import java.net.URLEncoder;
import java.util.HashMap;
import java.util.Map;

@Log4j2
@RestController
@RequestMapping("/wx")
public class WechatController {
    @Autowired
    private IWxService wxService;
    @Resource
    private RedisTemplate<String, Object> redisTemplate;

    @Autowired
    private ISysUserService userService;


    /**
     *  接入微信接口
     */
    @GetMapping("/callback")
    @ResponseBody
    public String checkSign (HttpServletRequest request) throws Exception {
        log.info("===========>checkSign");
        // 获取微信请求参数
        String signature = request.getParameter ("signature");
        String timestamp = request.getParameter ("timestamp");
        String nonce = request.getParameter ("nonce");
        String echostr = request.getParameter ("echostr");
        log.info("开始校验此次消息是否来自微信服务器,param->signature:{},\ntimestamp:{},\nnonce:{},\nechostr:{}",
                signature, timestamp, nonce, echostr);
        if (CheckWXTokenUtils.checkSignature(signature, timestamp, nonce)) {
            return echostr;
        }
        return "";
    }

    /**
     * 接收微信公众号消息
     */
    @PostMapping("/callback")
    public String responseMsg(HttpServletRequest req, HttpServletResponse resp) throws IOException {
        req.setCharacterEncoding("UTF-8");
        String respContent = wxService.responseMsg(req);
        return respContent;
    }


    @Value("${wx.APP_ID}")
    private String APP_ID;

    @Value("${wx.APP_SECRET}")
    private String APP_SECRET;
    private String wxuuid;
    // 获取二维码
    @GetMapping("/qr/login/param")
    @ResponseBody
    public AjaxResult getWxQRCodeParam() {

        String QRUrl = null;
        String ticketRes=null;
        HashMap<String, String> map = new HashMap<>();
        try {
            // 第一步:发送请求获取access_token
            String getAccessTokenUrl = "https://api.weixin.qq.com/cgi-bin/token?grant_type=client_credential" +
                    "&appid=" + APP_ID +
                    "&secret=" + APP_SECRET;
            String accessTokenRes = HttpClientUtils.doGet(getAccessTokenUrl);
            log.info("accessTokenRes=>" + accessTokenRes);
            String accessToken = (String) JSON.parseObject(accessTokenRes).get("access_token"); // 获取到access_token

            //生成uuid
            wxuuid = IdUtils.simpleUUID();
            // 第二步:通过access_token和一些参数发送post请求获取二维码Ticket
            String getTicketUrl = "https://api.weixin.qq.com/cgi-bin/qrcode/create?access_token=" + accessToken;
            // 封装参数
            Map<String, Object> ticketInfo = new HashMap<>();
            ticketInfo.put("expire_seconds", 604800); // 二维码超时时间
//            ticketInfo.put("action_name", "QR_SCENE");
            ticketInfo.put("action_name", "QR_STR_SCENE");
            ticketInfo.put("action_info", new HashMap<String, HashMap>() {{
                        put("scene", new HashMap<String, String>() {{
                                    put("scene_str", wxuuid);
                                }}
                        );
                    }}
            );
            String ticketJsonInfo = JSON.toJSON(ticketInfo).toString();
            ticketRes = HttpClientUtils.doPostJson(getTicketUrl, ticketJsonInfo);
            log.info("ticketRes=>" + ticketRes);
            String ticket = (String) JSON.parseObject(ticketRes).get("ticket");

            // 第三步:通过ticket获取二维码url
            String encodeTicket = URLEncoder.encode(ticket, "utf-8"); // 编码ticket
            String getQRUrl = "https://mp.weixin.qq.com/cgi-bin/showqrcode?ticket=" + encodeTicket;
            QRUrl = getQRUrl; // 二维码url

            //存入map
            map.put("QRUrl",QRUrl);
            map.put("uuid",wxuuid);
        } catch (Exception e) {
            e.printStackTrace();
        }
        return AjaxResult.success("调用成功",map);
    }

    private String REDIRECT_URL="http://xxx/wx/redirect/info";(xxx改为自己的穿透域名)

    @Autowired
    private SysUserMapper userMapper;


    @GetMapping("/redirect")
    public String toRedirectUrl(HttpServletResponse response) {
        String redirectUrl = "https://open.weixin.qq.com/connect/oauth2/authorize" +
                "?appid=" + APP_ID +
                "&redirect_uri=" + REDIRECT_URL +
                "&response_type=code" + "&scope=snsapi_userinfo" +
                "&state=STATE" + "&connect_redirect=1#wechat_redirect";
        try {
            response.sendRedirect(redirectUrl); // 重定向url
        } catch (IOException e) {
            log.error("获取微信code失败: " + e.getMessage());
        }
        return "重定向成功";
    }

    // 授权接口重定向回调方法
    @GetMapping("/redirect/info")
    public AjaxResult redirectInfo(@RequestParam(value = "code") String code,
                                   @RequestParam(value = "state", required = false) String state,
                                   HttpServletResponse response) throws UnsupportedEncodingException {
        String username = ""; // 微信用户名
        try {
            // 第二步:通过code获取access_token和openid
            String getAccessTokenUrl = "https://api.weixin.qq.com/sns/oauth2/access_token" +
                    "?appid=" + APP_ID +
                    "&secret=" + APP_SECRET +
                    "&code=" + code +
                    "&grant_type=authorization_code";
            String accessTokenRes = HttpClientUtils.doGet(getAccessTokenUrl);
            log.info("accessTokenRes=>" + accessTokenRes);
            String accessToken = (String) JSON.parseObject(accessTokenRes).get("access_token");
            String openid = (String) JSON.parseObject(accessTokenRes).get("openid");

            // 第四步:通过access_token和openid获取到用户信息
            String getUserInfoUrl = "https://api.weixin.qq.com/sns/userinfo" +
                    "?access_token=" + accessToken +
                    "&openid=" + openid +
                    "&lang=zh_CN";
            String userInfoRes = HttpClientUtils.doGet(getUserInfoUrl);
            WxUserInfo userInfo = JSON.parseObject(userInfoRes, WxUserInfo.class); // 获取到了微信用户信息
            username = userInfo.getNickname(); // 获取微信用户名
            // TODO 微信用户注册并登录逻辑
            //创建用户实体类
            SysUser loginUser = userService.getOneByOpenId(userInfo.getOpenid());
            //如果确实无该用户,即在数据库加入该用户
            if (loginUser==null) {
                SysUser sysUser = new SysUser();
                //用户昵称
                sysUser.setNickName(userInfo.getNickname());
                //用户头像
                sysUser.setAvatar(userInfo.getHeadimgurl());
                //固定初始密码为123456
                sysUser.setPassword(SecurityUtils.encryptPassword("123456"));
                //把唯一标识openId中后8位作为用户名称
                sysUser.setUserName(userInfo.getOpenid().substring(userInfo.getOpenid().length()-8));
                sysUser.setOpenId(userInfo.getOpenid());
                userMapper.insertUser(sysUser);

                String content="";
                wxService.dealWithWxLoginUser(openid,content,wxuuid);

            }
            log.info(userInfo);
            log.info("注册成功");
            log.info(username);

        } catch (Exception e) {
            e.printStackTrace();
        }
        return AjaxResult.success("success" );
    }


}
Service层
import javax.servlet.http.HttpServletRequest;


public interface IWxService {
    public String responseMsg(HttpServletRequest req);

    public String dealWithWxLoginUser(String openId, String content,String eventKey);
}
实现类
import com.ahzx.common.core.domain.entity.SysUser;
import com.ahzx.common.utils.StringUtils;
import com.ahzx.common.utils.http.HttpUtils;
import com.ahzx.experience.service.IWxService;
import com.ahzx.experience.util.WxMessageUtil;
import com.ahzx.system.service.ISysUserService;
import lombok.extern.log4j.Log4j2;
import org.springframework.beans.factory.annotation.Autowired;
import org.springframework.data.redis.core.RedisTemplate;
import org.springframework.security.authentication.AuthenticationManager;
import org.springframework.stereotype.Service;

import javax.annotation.Resource;
import javax.servlet.http.HttpServletRequest;
import java.util.Date;
import java.util.Map;
import java.util.concurrent.TimeUnit;

@Log4j2
@Service
public class WxServiceImpl implements IWxService {
    @Autowired
    private ISysUserService userService;
    @Resource
    private AuthenticationManager authenticationManager;

    @Resource
    private RedisTemplate<String, Object> redisTemplate;
    // 这个方法就是微信的登录方法
    public String responseMsg(HttpServletRequest req) {
        String message = "success";
        try {
            // 把微信返回的xml信息转义成map
            Map<String, String> xmlMessage = WxMessageUtil.xmlToMap(req); // 解析微信发来的请求信息
            log.info("aaaaaaa"+xmlMessage);
            String fromUserName = xmlMessage.get("FromUserName"); // 这个就该事件的用户openId
            String toUserName = xmlMessage.get("ToUserName"); // 这个开发者微信号
            String msgType = xmlMessage.get("MsgType"); // 消息类型(event或者text)
            String createTime = xmlMessage.get("CreateTime"); // 消息创建时间 (整型)
            log.info("发送方帐号(用户的openId)=>" + fromUserName);
            log.info("开发者微信号=>" + toUserName);
            log.info("消息类型为=>" + msgType);
            log.info("消息创建时间 (整型)=>" + createTime);
            if ("event".equals(msgType)) { // 如果是事件推送
                String eventType = xmlMessage.get("Event"); // 事件类型
                System.out.println(eventType);
                String eventKey = xmlMessage.get("EventKey"); // 获取事件KEY值
                System.out.println(eventKey);
                if ("subscribe".equals(eventType)) { // 如果是扫描二维码后订阅消息
                    String subscribeContent = "感谢关注";
                    // 如果是扫码登录二维码后订阅公众号,则获取该用户信息进行登录操作
                    if (!StringUtils.isAnyBlank(eventKey)
                            ) {
                        subscribeContent = dealWithWxLoginUser(fromUserName, subscribeContent,eventKey);
                    }
                    String subscribeReturnXml = WxMessageUtil.getWxReturnMsg(xmlMessage, subscribeContent);
                    return subscribeReturnXml;
                }
                if ("SCAN".equals(eventType)) { // 如果是扫码消息
                    String scanContent = "扫码成功";
                    // 如果是扫描登录二维码,则获取该用户信息进行登录操作
                    if (!StringUtils.isAnyBlank(eventKey)) {
                        scanContent = dealWithWxLoginUser(fromUserName, scanContent,eventKey);
                    }
                    String scanReturnXml = WxMessageUtil.getWxReturnMsg(xmlMessage, scanContent);
                    return scanReturnXml;
                }
            }
            if ("text".equals(msgType)) { // 如果是文本消息推送
                String content = xmlMessage.get("Content"); // 接收到的消息内容
                String textReturnXml = WxMessageUtil.getWxReturnMsg(xmlMessage, content);
                return textReturnXml; // 将接收到的文本消息变成xml格式再返回
            }
        } catch (Exception e) {
            throw new RuntimeException(e);
        }
        return message;
    }

    /**
     * 处理微信登录的用户
     * @param openId 扫码登录用户的openId
     * @param content 处理结果
     * @return 处理信息
     */
    public String dealWithWxLoginUser(String openId, String content,String eventKey) {
        // 1,判断fromUserName即用户openId在数据库中是否存在
        String wxuuid=eventKey;
        System.out.println(openId);
        SysUser user = userService.getOneByOpenId(openId);
        System.out.println(user);

        if (user == null) {
            // (此时微信登录就和这里的方法没有关系了,登录工作由下面跳转的绑定页面完成,这里链接目的之一是引导用户授权信息)
            // 能访问到该绑定页面只有两种情况,不符合这两种情况不能访问该页面:
            content =
                    "<a href =\"http://xxx/wx/redirect\">[用户登录]</a>";(xxx这里填你的域名)
        } else {
            //存入redis并设置120s过期
            redisTemplate.opsForValue().set("users:"+wxuuid, openId,120, TimeUnit.SECONDS);
            content = "用户" + user.getNickName() + "登录成功\n\n" +
                    "登录日期:" + new Date();
        }
        return content;
    }


}
五、轮询接口
后端存好redis后,我们来写被前端轮询的接口
    @Resource
    private RedisTemplate<String, Object> redisTemplate;
    @Autowired
    private TokenService tokenService;
    /**
     * 前端在接收到uuid后需要轮询的接口
     * @param wxuuid
     * @return
     */
    @GetMapping("/wxLogin/{wxuuid}")
    @ResponseBody
    public AjaxResult wxLogin(@PathVariable String wxuuid) {;
        //去redis查该uuid的openId
        String openId = (String) redisTemplate.opsForValue().get("users:"+wxuuid);
        AjaxResult ajax = AjaxResult.success();
        if (openId==null){
            return AjaxResult.success();
        }
        //根据openId查到该用户
        SysUser user = userService.getOneByOpenId(openId);
        if (user.getDelFlag().equals("1")){
            return AjaxResult.error("用户已注销");
        }else if(user.getDelFlag().equals("2")){
            return AjaxResult.error("用户已删除");
        }
        //把查到的用户信息放到LoginUser里
        LoginUser loginUser=new LoginUser();
        loginUser.setUser(user);
        //生成token
        String token=tokenService.createToken(loginUser);
        ajax.put(Constants.TOKEN, token);
        return ajax;
    }
前端代码(因为我比较关注后端,所以前端代码不够精致)
<!-- 二维码-->
          <img :src="codeUrl" @click="getCode" class="login-code-img"/>
created() {
this.QRcode1();
},
methods: {
QRcode1(){
QRcode().then(res=>{
this.QRcodeimg= res.data.QRUrl;
this.wxuuid=res.data.uuid;
});
var interval =setInterval(() => {
loginwx(this.wxuuid).then(res=>{
if (res.token!=null){
setToken(res.token)
this.$router.push({ path: this.redirect || "/" }).catch(()=>{})
clearInterval(interval);
}
}).catch(error => {
if(error.message === "用户已注销" || error.message === "用户已删除"){
clearInterval(interval);
setTimeout(() => {
location.reload();
}, 5000);
}
})
}, 5000)
}
}export function QRcode() {
return request({
url: '/wx/qr/login/param',
method: 'get'
})
}export function loginwx(wxuuid) {
return request({
url: '/wxLogin/'+wxuuid,
headers: {
isToken: false
},
method: 'get',
})
}六、代码修改
当时登录成功没测试,后面就测试了一下,发现权限字符不能正常加载,导致用户就算被分配角色及菜单后也不能正常的查看那些菜单,于是最自带的方法做了一些更改,首先是轮询的接口。这些手机号我是后加了一个中间页面让用户去填写手机号,可以把那些代码注释了。
@GetMapping("/wxLogin/{wxuuid}")
    @ResponseBody
    public AjaxResult wxLogin(@PathVariable String wxuuid) {;
        //去redis查该uuid的openId
        String openId = (String) redisTemplate.opsForValue().get("users:"+wxuuid);
        AjaxResult ajax = AjaxResult.success();
        if (openId==null|| openId.isEmpty()){
            return AjaxResult.success();
        }
        //根据openId查到该用户
        SysUser sysUser = userService.getOneByOpenId(openId);
        //如果手机号为空,等待完善信息
        if (sysUser.getPhonenumber()==null|| Objects.equals(sysUser.getPhonenumber(), "")){
            return AjaxResult.success();
        }
        // 用户验证
        Authentication authentication = null;
        try
        {
            UsernamePasswordAuthenticationToken authenticationToken = new UsernamePasswordAuthenticationToken(sysUser.getUserName(), "123");
            AuthenticationContextHolder.setContext(authenticationToken);
            // 该方法会去调用UserDetailsServiceImpl.loadUserByUsername
            authentication = authenticationManager.authenticate(authenticationToken);
        }
        catch (Exception e)
        {
            if (e instanceof BadCredentialsException)
            {
                AsyncManager.me().execute(AsyncFactory.recordLogininfor(sysUser.getUserName(), Constants.LOGIN_FAIL, MessageUtils.message("user.password.not.match")));
                throw new UserPasswordNotMatchException();
            }
            else
            {
                AsyncManager.me().execute(AsyncFactory.recordLogininfor(sysUser.getUserName(), Constants.LOGIN_FAIL, e.getMessage()));
                throw new ServiceException(e.getMessage());
            }
        }
        finally
        {
            AuthenticationContextHolder.clearContext();
        }
        AsyncManager.me().execute(AsyncFactory.recordLogininfor(sysUser.getUserName(), Constants.LOGIN_SUCCESS, MessageUtils.message("user.login.success")));
        LoginUser loginUser = (LoginUser) authentication.getPrincipal();
        sysLoginService.recordLoginInfo(sysUser.getUserId());
        //把查到的用户信息放到LoginUser里
//        LoginUser loginUser=new LoginUser();
//        loginUser.setUser(user);
//        loginUser.setUserId(user.getUserId());
        //生成token
        String token=tokenService.createToken(loginUser);
        ajax.put(Constants.TOKEN, token);
        return ajax;
    }
接下来,去改造ry框架自带的方法,找到SysPasswordService
public boolean matches(SysUser user, String rawPassword)
    {
        if (rawPassword.equals("123")){
            return true;
        }
        return SecurityUtils.matchesPassword(rawPassword, user.getPassword());
    }
新增CustomLoginAuthenticationProvider类,代码如下。
package com.ahzx.framework.config;

import org.springframework.security.authentication.BadCredentialsException;
import org.springframework.security.authentication.UsernamePasswordAuthenticationToken;
import org.springframework.security.authentication.dao.DaoAuthenticationProvider;
import org.springframework.security.core.AuthenticationException;
import org.springframework.security.core.userdetails.UserDetails;
import org.springframework.security.core.userdetails.UserDetailsService;
import org.springframework.security.crypto.bcrypt.BCryptPasswordEncoder;
import org.springframework.stereotype.Component;

@Component
public class CustomLoginAuthenticationProvider  extends DaoAuthenticationProvider {

    private static final String CUSTOM_LOGIN_SMS = "123";

    public CustomLoginAuthenticationProvider(UserDetailsService userDetailsService) {
        super();
        setUserDetailsService(userDetailsService);
    }

    @Override
    protected void additionalAuthenticationChecks(UserDetails userDetails, UsernamePasswordAuthenticationToken authentication) throws AuthenticationException {
        if (authentication.getCredentials() == null) {
            this.logger.debug("Authentication failed: no credentials provided");
            throw new BadCredentialsException(this.messages.getMessage("AbstractUserDetailsAuthenticationProvider.badCredentials", "Bad credentials"));
        } else {
            String presentedPassword = authentication.getCredentials().toString();
            if(CUSTOM_LOGIN_SMS.equals(presentedPassword)){
                //不验证密码
            }else{
                BCryptPasswordEncoder passwordEncoder = new BCryptPasswordEncoder();
                if (!passwordEncoder.matches(presentedPassword, userDetails.getPassword())) {
                    this.logger.debug("Authentication failed: password does not match stored value");
                    throw new BadCredentialsException(this.messages.getMessage("AbstractUserDetailsAuthenticationProvider.badCredentials", "Bad credentials"));
                }
            }
        }
    }
}
在SecurityConfig里稍微改编一下
/**
     * 身份认证接口
     */
    @Override
    protected void configure(AuthenticationManagerBuilder auth) throws Exception
    {
        auth.authenticationProvider(new CustomLoginAuthenticationProvider(userDetailsService));
        auth.userDetailsService(userDetailsService).passwordEncoder(bCryptPasswordEncoder());
    }
至此,更改完成,可以实现没有bug的免密登录了。


 1409
1409


 被折叠的 条评论
为什么被折叠?
被折叠的 条评论
为什么被折叠?
 到【灌水乐园】发言


