


前言
在上一篇《tio-http-server 源码浅析(一)HttpRequestDecoder的实现》简单分析了HttpRequestDecoder的源码,并且已经得到了HttpRequest对象,那么下一步就是请求的处理了。服务器怎么知道你想要做什么呢?所以,接下来的内容会解析服务器业务上的处理实现。
补充
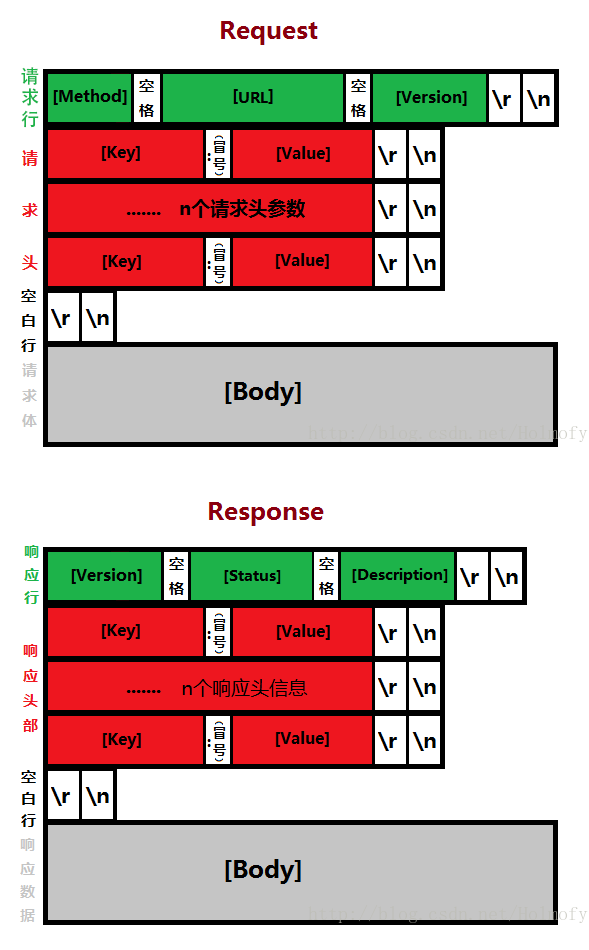
这个图对于理解HTTP很有用处。看明白了这幅图,再去看源码就豁然开朗了。
源码解析
了解或者使用过t-io的都知道服务端要实现ServerAioHandler接口。在HttpServerAioHandler 的 handler 方法中有这么一段代码:
    @Override
    public void handler(Packet packet, ChannelContext channelContext) throws Exception {
        HttpRequest request = (HttpRequest)packet;
        //调用requestHandler的handler方法处理HttpRequest
        HttpResponse httpResponse = requestHandler.handler(request);
        if (httpResponse != null){
            //向客户端发送响应信息 HttpResponse
            Aio.send(channelContext,httpResponse);
        }else{
            Aio.remove(channelContext,"handler return null");
        }
}那么代码中的requestHandler是何方神圣呢?他就是tio-http-server端的核心处理类:DefaultHttpRequestHandler,它实现了 HttpRequestHandler接口。
public interface HttpRequestHandler {

    /**
     * 处理请求
     * */
    HttpResponse handler(HttpRequest packet) throws Exception;
    /**
     * 响应404
     * */
    HttpResponse resp404(HttpRequest request,RequestLine requestLine);
    /**
     * 响应500
     * */
    HttpResponse resp500(HttpRequest request, RequestLine requestLine,Throwable throwable);
    /**
     * 清除静态资源缓存
     * */
    void clearStaticResCache(HttpRequest request);
}下面我们重点去看handler方法。其中有很多细节,比如创建Session,检查域名,黑名单,统计等不在阐述,这里只是解析主要流程。如下图:
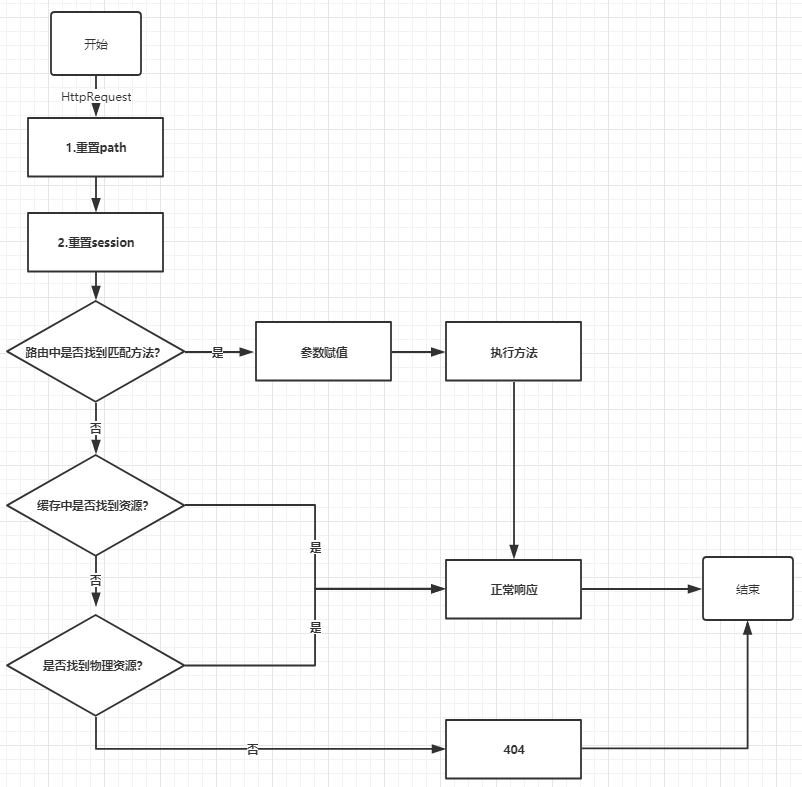
总体流程如上图,具体细节我们详细看代码。备注:上图步骤2之后有一个Interceptor的判断,如果实现了Interceptor并且有响应内容,那么直接返回。
重置path部分代码如下:
        RequestLine requestLine = request.getRequestLine();
        String path = requestLine.getPath();
        if (StringUtils.isNotBlank(contextPath)) {
            if (StringUtils.startsWith(path, contextPath)) {
                path = StringUtils.substring(path, contextPathLength);
            }
        }
        if (StringUtils.isNotBlank(suffix)) {
            if (StringUtils.endsWith(path, suffix)) {
                path = StringUtils.substring(path, 0, path.length() - suffixLength);
            }
        }
        requestLine.setPath(path);
这一段的作用是什么呢? 例如解析后的 path 为 /tio/test/hello.php,在初始化HttpConfig的时候已经给ContextPath和suffix赋值。例如: httpConfig = new HttpConfig(8080, null, "/tio", ".php");所以,如果请求路径中包含了contextPath,需要去掉,包含了suffix也需要去掉。最终得到的路径是/test/hello,就是路由真正想拿到的路径。所以,对于contextPath和suffix,我的理解就是起到URL装饰作用。比如把后缀改为 php,asp,aspx或者其他任意自定义的都可以。
重置session部分就是判断客户端有没有传来cookie值,然后创建session或者从之前的sessionStore中根据sessionId拿到session。
 private void processCookieBeforeHandler(HttpRequest request,RequestLine requestLine) throws ExecutionException{
        if (!httpConfig.isUseSession()){
            return;
        }
        Cookie cookie = getSessionCookie(request,httpConfig);
        HttpSession httpSession = null;
        if (cookie == null){
            httpSession = createSession(request);
        }else{
            String sessionId = cookie.getValue();
            httpSession = (HttpSession)httpConfig.getSessionStore().get(sessionId);
            if (httpSession == null){
                httpSession = createSession(request);
            }
        }
        request.setHttpSession(httpSession);
    }
接下来就是重头戏了,路由部分。请求静态资源大家都知道,解析出物理路径返回该资源即可。路由部分呢,就是让服务器知道客户端的请求路径到底匹配到哪个方法上。例如 /test/hello ,所以这里我们暂停一下,转战到Routes代码中。
/**
  * 构造方法传入要扫描的包
  * */
public Routes(String[] scanPackages){
    //其他逻辑
}
Routes 实在服务器启动的时候初始化的。它的原理就是通过扫描构造方法中传入的包的类和方法,根据类和方法中是否带有 RequestPath 注解来实现路由表的初始化和相应信息的保存。扫描包的工具是io.github.lukehutch.fastclasspathscanner.FastClasspathScanner。比如我们新创建了一个Controller,代码如下:
@RequestPath(value = "/test")
public class TestController {
@RequestPath(value = "/hello")
public HttpResponse test(HttpRequest request){
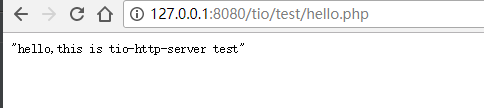
return Resps.json(request,"hello,this is tio-http-server test");
}
}然后初始化Routes 的时候就会扫描到这个类,然后匹配到@RequestPath。详细代码如下:
    //扫描带有RequestPath注解的类。
            fastClasspathScanner.matchClassesWithAnnotation(RequestPath.class, new ClassAnnotationMatchProcessor() {
                //匹配到之后执行的方法
                @Override
                public void processMatch(Class<?> classWithAnnotation) {
                    //这里classWithAnnotation就是 TestController
                    try {
                        //通过反射新创建一个TestController的实例
                        Object bean = classWithAnnotation.newInstance();
                        //获取到注解对象
                        RequestPath mapping = classWithAnnotation.getAnnotation(RequestPath.class);
                        //拿到 value 值 即:/test
                        String beanPath = mapping.value();
                        //暂时忽略,源代码中注释掉了,返回beanPath,即无处理
                        beanPath = formateBeanPath(beanPath);
                        //判断有没有重复定义的路由
                        Object obj = pathBeanMap.get(beanPath);
                        if (obj != null) {
                            errorStr.append("mapping[" + beanPath + "] already exists in class [" + obj.getClass().getName() + "]\r\n\r\n");
                        } else {
                            //将 /test 和 TestController 对象的实例存储到 TreeMap中
                            pathBeanMap.put(beanPath, bean);
                            //存储 /test class  以便后续使用
                            pathClassMap.put(beanPath, classWithAnnotation);
                            //存储 class /test 以便后续使用
                            classPathMap.put(classWithAnnotation, beanPath);
                        }
                    } catch (Throwable e) {

                    }
                }
            });
            //扫描带有RequestPath注解的方法
            fastClasspathScanner.matchClassesWithMethodAnnotation(RequestPath.class, new MethodAnnotationMatchProcessor() {
                @Override
                public void processMatch(Class<?> matchingClass, Executable matchingMethodOrConstructor) {
                    //匹配到方法之后获取注解
                    RequestPath mapping = matchingMethodOrConstructor.getAnnotation(RequestPath.class);
                    //得到方法名
                    String methodName = matchingMethodOrConstructor.getName();
                    //得到路由path
                    String methodPath = mapping.value();
                    methodPath = formateMethodPath(methodPath);
                    String beanPath = classPathMap.get(matchingClass);

                    if (StringUtils.isBlank(beanPath)) {
                        errorStr.append("方法有注解,但类没注解, method:" + methodName + ", class:" + matchingClass + "\r\n\r\n");
                        return;
                    }

                    Object bean = pathBeanMap.get(beanPath);
                    String completeMethodPath = methodPath;
                    //组合路径  /test + /hello
                    if (beanPath != null) {
                        completeMethodPath = beanPath + methodPath;
                    }

                    //获取方法的参数类型数组
                    Class<?>[] parameterTypes = matchingMethodOrConstructor.getParameterTypes();
                    Method method;
                    try {
                        //这儿有点小看不懂,应该就是获取方法的参数信息
                        method = matchingClass.getMethod(methodName, parameterTypes);
                        Paranamer paranamer = new BytecodeReadingParanamer();
                        String[] parameterNames = paranamer.lookupParameterNames(method, false);
                        Method checkMethod = pathMethodMap.get(completeMethodPath);
                        if (checkMethod != null) {
                            errorStr.append("mapping[" + completeMethodPath + "] already exists in method [" + checkMethod.getDeclaringClass() + "#" + checkMethod.getName() + "]\r\n\r\n");
                            return;
                        }
                        //存储  /test/hello method
                        pathMethodMap.put(completeMethodPath, method);
                        //用于打印
                        pathMethodstrMap.put(completeMethodPath, methodToStr(method, parameterNames));
                        //存储  method  参数
                        methodParamnameMap.put(method, parameterNames);
                        //存储 method  对应 TestController实例
                        methodBeanMap.put(method, bean);
                    } catch (Throwable e) {

                    }
                }
            });
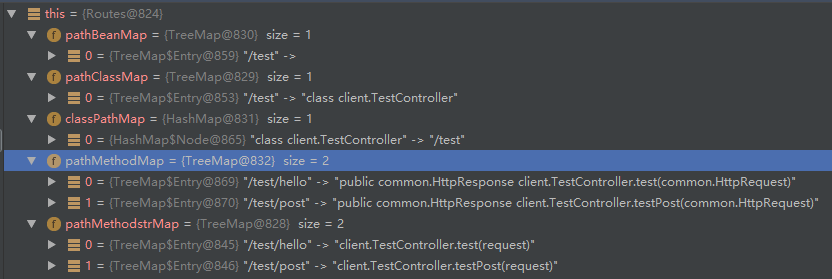
下图为运行之后Routes 对象的截图:
所以现在我们知道DefaultHttpRequestHandler中的method是如何获取到的了。
 Method method = null;
 if (routes != null) {
    method = routes.getMethodByPath(path, request);
 }
但是只拿到 method 还不够,我们还要给method的参数赋值。
//拿到method的参数 :request
String[] paramnames = routes.methodParamnameMap.get(method);
//拿到参数类型 :httpRequest
Class<?>[] parameterTypes = method.getParameterTypes();

Object bean = routes.methodBeanMap.get(method);
Object obj = null;
//从HttpRequest对象中拿到客户端传过来的参数
Map<String, Object[]> params = request.getParams();
if (parameterTypes == null || parameterTypes.length == 0) {
   //如果方法没有参数,直接执行 method 方法
   obj = method.invoke(bean);
如果method有参数:就需要判断参数类型,然后给参数赋值了。
 Object[] paramValues = new Object[parameterTypes.length];
    int i = 0;
    for (Class<?> paramType : parameterTypes) {
    //判断参数的类型,给参数赋值
    if (paramType.isAssignableFrom(HttpRequest.class)) {
      paramValues[i] = request;
    } else if (paramType == HttpSession.class) {
      paramValues[i] = httpSession;
    } else if (paramType.isAssignableFrom(HttpConfig.class)) {
      paramValues[i] = httpConfig;
    } else if (paramType.isAssignableFrom(ChannelContext.class)) {
       paramValues[i] = request.getChannelContext();
上面一段比较简单,也就是参数中最简单粗暴的方法,把httpRequest放到方法参数中去,然后由方法内部自己去处理。另外就是比如方法我们直接写具体的参数名。
 @RequestPath(value = "/post")
    public HttpResponse testPost(String name,int age){
        return Resps.json(null,"test post");
    }
如上述代码中的 name 和 age,那么从 request对象中拿到相应的值在赋值给 name和age即可。
 Object[] value = params.get(paramnames[i]);
 if (value != null && value.length > 0) {
   if (paramType.isArray()) {
       paramValues[i] = Convert.convert(paramType, value);
     } else {
        paramValues[i] = Convert.convert(paramType, value[0]);
      }
   }
另外比较复杂的一种就是参数中有我们自己定义的model类型或者其他类型的处理。由于我也没彻底整明白,不在阐述。
最后执行 obj = method.invoke(bean, paramValues); 这个 obj 有可能是 HttpResponse或者其他对象,都没有问题。处理一下返回即可。具体的处理代码参考 util.Resps 类。其实主要是返回正确的头部信息。例如 json格式的Content-Type 为 application/json;charset=utf-8
静态资源的处理不在阐述。源码中使用了 Freemarker。
最后,运行一个示例,没啥问题。
学以致用
下面做一个小例子,帮助大家理解一下。很简单,实现允许方法的控制。
第一步,在RequestPath注解中增加 allow属性。
public @interface RequestPath {
    String allow() default "GET,POST";
    String value() default "";
}
第二步,修改post方法的注解。
   @RequestPath(value = "/post",allow = "POST")
    public HttpResponse testPost(String name,int age){
        return Resps.json(null,"test post");
    }
第三步,扫描包的时候将path和对应allow保存
  //存放是否允许的方法
  pathAllowMethodMap.put(completeMethodPath,allow);
第四步,增加请求判断是否允许方法
 /**
     * 检查请求方法是否允许
     * */
    public  boolean checkAllowMethod(String path,HttpRequest request) {
        String allows = pathAllowMethodMap.get(path);
        common.Method requestMethod = request.getRequestLine().getMethod();
        String[] allowMethods = StringUtils.split(allows, ",");
        return ArrayUtil.contains(allowMethods,requestMethod.name());
    }
第五步,如果不允许,返回405
  if (method != null) {
    if (!routes.checkAllowMethod(path,request)){
         return Resps.resp405(request);
    }
  }
第六步,测试。
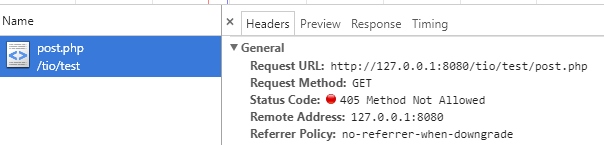
第七步,大功告成。上述小实战看起来功能很小,但是代码已经贯穿了从服务器启动到请求的处理和返回的过程,就酱紫,你看懂了吗?
总结
很多细节没有讲到,例如路由中 path 带变量的处理。 /test/hello/{userid} ,HttpResponse 的构建等。正如开篇中的那个HTTP 报文格式图,看得懂图就对代码的理解会更加快速一些。还有一些拦截器的使用等等功能很多。麻雀虽小,五脏俱全,如果你厌烦了庞大的web服务器,不妨试试自己写的小型http服务,多有成就感啊,哈哈。今天就到这里啦,拜拜~~


 8427
8427


 被折叠的 条评论
为什么被折叠?
被折叠的 条评论
为什么被折叠?
 到【灌水乐园】发言


