


切换卡TabHost控件的使用
在Android中,通常可以使用切换卡(选项卡)实现切换显示不同页面内容的功能。
这一功能可以通过TabHost控件来实现。
下面我们就通过一个简单的实例演示如何使用TabHost控件完成切换卡功能,完成后的运
行效果如图1所示。

图1 主页显示效果
可以看出,在该实例中,总共设置了四个TabHost标签,分别为主页、时间、联系人和搜
索。在点击这些标签时,便可以完成相应页面内容的显示。
1.界面布局
TabHost是整个Tab的容器,是由TabWidget和FrameLayout 两部分组成的。其中
TabWidget是每个tab的标签,而FrameLayout则是tab所要显示的内容。
根据以上的描述,我们就可以对整个显示界面进行合理的布局了。我们以LinearLayout
的垂直布局方式将整个TabHost分成上下两部分,上面使用TabWidget控件显示标签,
下面使用FrameLayout布局显示每个标签下的对应内容。
具体的xml布局文件源码如下:
<?xml version="1.0" encoding="utf-8"?>
  <TabHost xmlns:android="http://schemas.android.com/apk/res/android"
      android:id="@android:id/tabhost"
      android:layout_width="match_parent"
      android:layout_height="match_parent" >

      <LinearLayout
          android:orientation="vertical"
          android:layout_width="match_parent"
          android:layout_height="match_parent">

          <!-- TabHost的标签 -->
          <TabWidget
              android:id="@android:id/tabs"
              android:layout_width="match_parent"
              android:layout_height="wrap_content"    >
          </TabWidget>

          <!-- TabHost的内容 -->
          <FrameLayout
              android:id="@android:id/tabcontent"
              android:layout_width="match_parent"
              android:layout_height="match_parent"    >

              <!-- 第一个标签要显示的内容 -->
              <ImageView
                  android:id="@+id/homeimage"
                  android:layout_width="wrap_content"
                  android:layout_height="wrap_content"
                  android:src="@+drawable/homeimage"
                  android:background="#FFFFFF"    ></ImageView>

              <!-- 第二个标签要显示的内容 -->
              <LinearLayout
                  android:id="@+id/time"
                  android:layout_width="match_parent"
                  android:layout_height="match_parent"
                  android:orientation="vertical"
                  android:background="#000000">
                  <AnalogClock
                      android:layout_marginTop="30dp"
                      android:layout_width="match_parent"
                      android:layout_height="wrap_content"    ></AnalogClock>
                  <DigitalClock
                      android:textColor="#FFFFFF"
                      android:gravity="center_horizontal"
                      android:layout_marginTop="10dp"
                      android:layout_width="match_parent"
                      android:layout_height="wrap_content"    ></DigitalClock>
              </LinearLayout>

              <!-- 第三个标签要显示的内容 -->
              <TextView
                  android:id="@+id/personlist"
                  android:layout_width="match_parent"
                  android:layout_height="match_parent"
                  android:text="联系人列表">
              </TextView>

              <!-- 第四个标签要显示的内容 -->
              <LinearLayout
                  android:id="@+id/searcher"
                  android:orientation="horizontal"
                  android:layout_width="match_parent"
                  android:layout_height="match_parent"    >
                  <EditText
                      android:layout_weight="5"
                      android:layout_width="0dp"
                      android:layout_height="wrap_content"
                      android:hint="请输入搜索关键字"    ></EditText>
                  <Button
                      android:layout_weight="1"
                      android:layout_width="0dp"
                      android:layout_height="wrap_content"
                      android:text="搜索">    </Button>
              </LinearLayout>

          </FrameLayout>
      </LinearLayout>
  </TabHost>
通过以上代码可以看出,在FrameLayout布局中分别实现了四个标签下所要显示的内容的布局设置。比如,
在第二个标签“时间”中,我们以LinearLayout的垂直布局方式显示了一个指针式时钟AnalogClock和数字
式时钟DigitalClock,其显示效果如图2所示。
此外,在使用TabHost控件时有一点需要特别注意,TabHost、TabWidget以及
FrameLayout的id是固定的,必须按如下形式进行设置。
1.TabHost的android:id必须设置为:android:id="@android :id/tabhost"
2.TabWidget的android:id必须设置为:android:id="@android :id/tabs"
3.FrameLayout的android:id必须设置为:
android:id="@android :id/tabcontent"
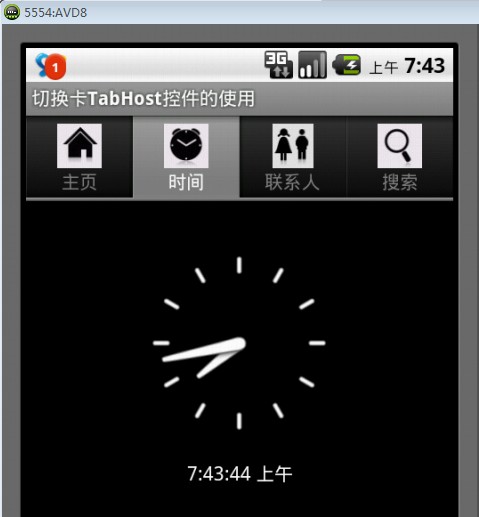
图2 时间显示效果
2.TabHost控件的常用方法
了解了如何对TabHost控件进行布局之后,我们还需要了解TabHost控件的一些常用
方法。具体如下:
  public void addTab (TabHost.TabSpec tabSpec);    //添加Tab
  public int getCurrentTab ();             //获取当前Tab的index
  public String getCurrentTabTag ();          //获取当前Tab的tag
  public View getCurrentTabView ();           //获取当前Tab的视图
  public void setCurrentTab (int index);       //设置当前显示哪个Tab
  public void setCurrentTabByTag (String tag);    //设置当前显示哪个Tab
3.TabHost.TabSpec
从TabHost控件的常用方法中可以看出,要将Tab加入到TabHost中,需要使用到
addTab (TabHost.TabSpec tabSpec)方法,而这个方法的参数是一个
TabHost.TabSpec对象,那么TabHost的内部类TabHost.TabSpec是用来干嘛的呢?
我们已经知道,每个Tab都是由TabWidget和FrameLayout 两部分组成的。而
TabHost.TabSpec可以为每个Tab设置一个Tag(类型为String),以此来跟踪每一
个Tab。此外,TabHost.TabSpec还可以为Tab设置标签、图标以及内容。由此可以看
出TabHost.TabSpec类对TabHost控件来说是及其重要的。
TabHost.TabSpec类的常用方法如图3所示。

图3 TabHost.TabSpec类的常用方法
由图3可以看出,在TabHost.TabSpec类中提供了设置Tab标签和图标的方法
setIndicator(),以及设置Tab内容的方法setContent()。利用这两个方法,我们便
可以将我们在xml布局文件中定义好的Tab内容加载到对应的TabHost控件中了。具体
实现方法如下:
/*
     * Function   :    onCreate()
     * Author     :    博客园-依旧淡然
     */
    public void onCreate(Bundle savedInstanceState) {
        super.onCreate(savedInstanceState);
        setContentView(R.layout.activity_main);

        mTabHost = getTabHost();        //获取TabHost对象

        //添加“主页”Tab到TabHost控件中
        mTabHost.addTab(mTabHost.newTabSpec("home")
                //设置Tab标签和图标
                .setIndicator("主页", getResources().getDrawable(R.drawable.home))
                .setContent(R.id.homeimage));        //设置Tab内容

        //添加“时间”Tab到TabHost控件中
        mTabHost.addTab(mTabHost.newTabSpec("time")
                .setIndicator("时间", getResources().getDrawable(R.drawable.time))
                .setContent(R.id.time));

        //添加“联系人”Tab到TabHost控件中
        mTabHost.addTab(mTabHost.newTabSpec("persons")
                .setIndicator("联系人", getResources().getDrawable(R.drawable.persons))
                .setContent(R.id.personlist));

        //添加“搜索”Tab到TabHost控件中
        mTabHost.addTab(mTabHost.newTabSpec("searcher")
                .setIndicator("搜索", getResources().getDrawable(R.drawable.search))
                .setContent(R.id.searcher));

        mTabHost.setBackgroundResource(R.drawable.background);  //设置TabHost控件的背景图片
        mTabHost.setCurrentTab(0);                              //设置当前显示第一个Tab
        mTabHost.setOnTabChangedListener(this);                 //设置TabHost控件的事件监听
通过以上代码,我们向TabHost控件中添加了四个Tab对象,并设置了各自的Tab标签
和图标以及Tab内容。此外,我们还为TabHost控件设置了背景图片以及默认显示第一
个Tab。
4.事件监听
对TabHost控件进行事件监听,需要实现OnTabChangeListener接口中的
OnTabChanged()方法。
相关资料:
多页显示Tag的使用
http://blog.csdn.net/flowingflying/article/details/6304289
Android应用底部导航栏(选项卡)实例
http://blog.csdn.net/cjjky/article/details/7209056


 98
98

 被折叠的 条评论
为什么被折叠?
被折叠的 条评论
为什么被折叠?
 到【灌水乐园】发言


