


原文的地址:http://blog.csdn.net/singwhatiwanna/article/details/42614953
Android的坐标的获得
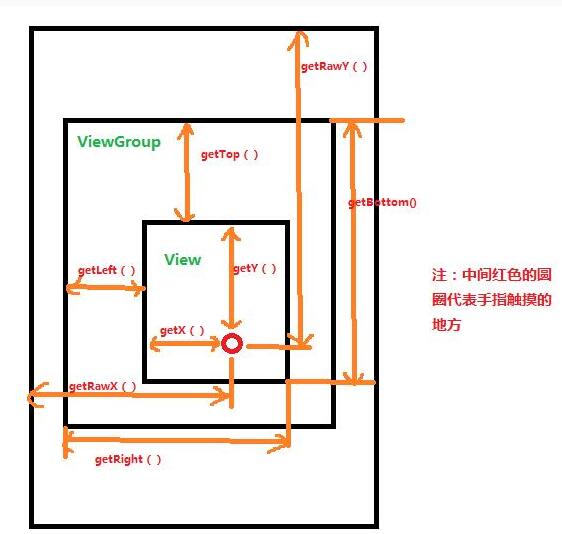
int[] location = new  int[2] ;
view.getLocationInWindow(location); //获取在当前窗口内的绝对坐标
view.getLocationOnScreen(location);//获取在整个屏幕内的绝对坐标
location [0]--->x坐标,location [1]--->y坐标

getLeft , getTop, getBottom,getRight, 这一组是获取相对在它父亲里的坐标
波纹的代码:
RippleLayout:
package com.example.mybowen;

import android.annotation.TargetApi;
import android.content.Context;
import android.graphics.Canvas;
import android.graphics.Paint;
import android.os.Build;
import android.util.AttributeSet;
import android.view.MotionEvent;
import android.view.View;
import android.widget.LinearLayout;

import java.util.ArrayList;

public class RippleLayout extends LinearLayout {
    private Paint mPaint = new Paint(Paint.ANTI_ALIAS_FLAG);
    // 圆心 坐标 x,y
    private float mCenterX, mCenterY;
    // 半径
    private int mRevealRadius = 0;
    private int[] mLocation = new int[2];//RippleLayout的
    private int INVALIDATE_DURATION = 4;//延迟时间
    // 目标点击view的 宽度 和 高度
    private int mTargetHeight, mTargetWidth;
    // 圆的最大半径
    public int mMaxRadius;
    // 半径增加幅度
    private int mRevealRadiusGap;
    // 控件宽度
    private int mMinBetweenWidthAndHeight;
    // 是否按下状态
    private boolean mIsPressed;
    // 是否需要继续绘制
    private boolean mShouldDoAnimation;
    // 当前需要绘制的 view
    private View mTargetView;
    //手指按下与抬起 是在同一个View 上面。
    private boolean onOneView=true;
    public RippleLayout(Context context) {
        super(context);
        init();
    }

    public RippleLayout(Context context, AttributeSet attrs) {
        super(context, attrs);
        init();
    }
    // Android 3.0
    @TargetApi(Build.VERSION_CODES.HONEYCOMB)
    public RippleLayout(Context context, AttributeSet attrs, int defStyleAttr) {
        super(context, attrs, defStyleAttr);
        init();
    }

    public void init() {
//       Debug.startMethodTracing("Love_World_");
        // 设置onDraw 执行
//      setWillNotDraw(false);
        // 设置画笔颜色
        mPaint.setColor(getResources().getColor(R.color.reveal_color));
    }

    @Override
    protected void onLayout(boolean changed, int l, int t, int r, int b) {
        super.onLayout(changed, l, t, r, b);
        this.getLocationOnScreen(mLocation);//在屏幕的绝对坐标
    }

    /**
     * 绘制 子view
     */
    @Override
    protected void dispatchDraw(Canvas canvas) {
        super.dispatchDraw(canvas);
        // 如果目标view 不存在 或者 以及绘制完成 则取消绘制
        if (mTargetView == null || !mShouldDoAnimation || mTargetWidth <= 0)
            return;

        // 如果 圆的当前半径 超过了 按钮 宽度 或者高度的 1/2 则 半径增加幅度变大
        if (mRevealRadius > mMinBetweenWidthAndHeight /2)
            mRevealRadius += mRevealRadiusGap *4;//半径增加的幅度
        else
            mRevealRadius += mRevealRadiusGap;
        int[] location = new int[2];
        this.getLocationOnScreen(mLocation);//RippleLayout在屏幕的绝对坐标
        mTargetView.getLocationOnScreen(location);
        // 计算当前目标view 的 l t r b
//      int top = location[1] - mLocation[1];
//      int left = location[0] - mLocation[0];
//      int right = left + mTargetView.getMeasuredWidth();
//      int bottom = top + mTargetView.getMeasuredHeight();
        int left =mTargetView.getLeft();
        int top =mTargetView.getTop();
        int right = left + mTargetView.getMeasuredWidth();
        int bottom = top + mTargetView.getMeasuredHeight();

        canvas.save();
        // 设置绘制区域 起点(left,top)宽度 mTargetView.getMeasuredWidth(),高度
        // mTargetView.getMeasuredHeight()
        //注意:这里的坐标是相对与所在父控件的坐标
        canvas.clipRect(left, top, right, bottom);//局部绘制图形,避免在其他的View上画圆
        // 画圆 圆心(mCenterX,mCenterY) 半径 :mRevealRadius 画笔 :mPaint
        canvas.drawCircle(mCenterX, mCenterY, mRevealRadius, mPaint);//画一个半透明的圆形
        // 恢复原来的状态
        canvas.restore();
//      canvas.drawLine(startX, startY, stopX, stopY, paint)
        // 如果当前半径 还没有超过 最大半径 表示 还没有覆盖整个button 还需要继续 护自己
        if (mRevealRadius <= mMaxRadius) {
            postInvalidateDelayed(INVALIDATE_DURATION, left, top, right, bottom);//刷新页面
        } else if (!mIsPressed) {
            // 当绘制完成 时候执行, 让 button 恢复原来的样子
            mShouldDoAnimation = false;
            postInvalidateDelayed(INVALIDATE_DURATION, left, top, right, bottom);
            // 对外 实现 点击事件的效果,等button 刷新完成后执行
            if (onCompletionListener != null&&onOneView)
                onCompletionListener.onComplete(mTargetView.getId());

        }

    }

    // touch事件分发
    @Override
    public boolean dispatchTouchEvent(MotionEvent event) {
        int x = (int) event.getRawX();//获取在屏幕的绝对坐标
        int y = (int) event.getRawY();
        int action = event.getAction();
        switch (action) {
        case MotionEvent.ACTION_DOWN:

            //根据手指落下的位置,确定点击到哪个View身上
            targetView = getTargetView(this, x, y);
//          System.out.println("targetView:"+targetView.toString());
            if (targetView != null && targetView.isEnabled()) {
                mTargetView = targetView;
                initParametersForChild(event, targetView);
                postInvalidateDelayed(INVALIDATE_DURATION);
            }
            break;
        case MotionEvent.ACTION_UP:
            //判断手按下和抬起是在同一个View身上
            viewOnScreen(event, this,x,y);
            mIsPressed = false;
            postInvalidateDelayed(INVALIDATE_DURATION);
            break;
        case MotionEvent.ACTION_CANCEL:
            mIsPressed = false;
            postInvalidateDelayed(INVALIDATE_DURATION);
            break;
        }
        return super.dispatchTouchEvent(event);
    }

    /**
     * 根据触摸到文字 获得 具体的 子view
     *
     * @param view
     * @param x
     * @param y
     * @return
     */
    public View getTargetView(View view, int x, int y) {
        View target = null;
        ArrayList<View> views = view.getTouchables();
System.out.println("view:"+views.size());
        for (View child : views)

            if (isTouchPointInView(child, x, y)) {
                target = child;
                break;
            }
//      System.out.println("child:"+child.toString());
        return target;
    }

    /**
     * 计算 x y 坐标 是否 在 child view 的范围内
     *
     * @param child
     * @param x
     * @param y
     * @return
     */
    public boolean isTouchPointInView(View child, int x, int y) {
        int[] location = new int[2];
        child.getLocationOnScreen(location);
        int top = location[1];
        int left = location[0];
        int right = left + child.getMeasuredWidth();
        int bottom = top + child.getMeasuredHeight();

        if (child.isClickable() && y >= top && y <= bottom && x >= left && x <= right)
            return true;
        else
            return false;
    }

    /**
     * 初始化子view 参数
     *
     * @param event
     * @param view
     */
    public void initParametersForChild(MotionEvent event, View view) {
        // 手指的 x ,y 点在屏幕中的 坐标
        mCenterX = event.getX();
        mCenterY = event.getY();

        // 手机所在 view 自身的 宽度
        mTargetWidth = view.getMeasuredWidth();
        // 手机所在 view 自身的 高度
        mTargetHeight = view.getMeasuredHeight();
        // 判断 宽度 和高度 那个值比较大
        mMinBetweenWidthAndHeight = Math.min(mTargetWidth, mTargetHeight);
        mRevealRadius = 0;//初始化
        mRevealRadiusGap = mMinBetweenWidthAndHeight / 8;
        mIsPressed = true;
        mShouldDoAnimation = true;
        int[] location = new int[2];
        view.getLocationOnScreen(location);
        int left = location[0] - mLocation[0];
        int top = location[1] - mLocation[1];
        // view 距离左边界的宽度
        int mTransformedCenterX = (int) mCenterX - left;
        // view 距离顶部的距离
        int transformedCenterY = (int) mCenterY - top;
        // 根据 子view 的 宽度 和高度 获取 圆的 半径
//      int maxX = Math.max(mTransformedCenterX, mTargetWidth - mTransformedCenterX);
//      int maxY = Math.max(transformedCenterY, mTargetHeight - transformedCenterY);
        int maxX = mTargetWidth;
        int maxY =mTargetHeight;
        mMaxRadius = Math.max(maxX, maxY);

    }

    // 绘制完成后的 监听回调
    private OnRippleCompleteListener onCompletionListener;

    private View targetView;

    public void setOnRippleCompleteListener(OnRippleCompleteListener listener) {
        this.onCompletionListener = listener;
    }

    /**
     * Defines a callback called at the end of the Ripple effect
     * 回调接口
     */
    public interface OnRippleCompleteListener {
        void onComplete(int id);
    }

    /**
     * 判断手抬起跟放下是不是同一个View
     * @param event  手指抬起动作
     * @param view   抬起的view
     */
    public void viewOnScreen(MotionEvent event, View view,int x,int y){
        View upView = getTargetView(view, x, (int)y);

        if(targetView.equals(upView)&&(null!=upView)&&(targetView.getId()==upView.getId())){
            onOneView=true;
        }else{
            onOneView=false;
        }
    }
}
MainActivity:
package com.example.mybowen;

import android.app.Activity;
import android.content.Intent;
import android.os.Bundle;
import android.os.Debug;
import android.widget.Toast;

public class MainActivity extends Activity {
    @Override
    protected void onCreate(Bundle savedInstanceState) {
        super.onCreate(savedInstanceState);
        setContentView(R.layout.activity_main);
        Debug.stopMethodTracing();
        RippleLayout findViewById = (RippleLayout) findViewById(R.id.ripplelayout);
        findViewById.setOnRippleCompleteListener(new RippleLayout.OnRippleCompleteListener() {

            @Override
            public void onComplete(int id) {
                if(id==R.id.button01){
//                    startActivity(new Intent(MainActivity.this, NewActivity.class));
                }else if(id==R.id.button02){
//                    Toast.makeText(getApplicationContext(), "Button02", Toast.LENGTH_SHORT).show();
                }else if(id==R.id.button04){
//                    Toast.makeText(getApplicationContext(), "ImageButton", Toast.LENGTH_SHORT).show();
                }

            }


        });


    }
}
coloes:
<?xml version="1.0" encoding="utf-8"?>
<resources>
    <color name="colorPrimary">#3F51B5</color>
    <color name="colorPrimaryDark">#303F9F</color>
    <color name="colorAccent">#FF4081</color>

    <color name="reveal_color">#3b4169E1</color>
    <!--       <color name="reveal_color">#1b000000</color> -->
    <color name="reveal_color_ither">#BCEE68</color>
</resources>
activity_main.xml:
<LinearLayout xmlns:android="http://schemas.android.com/apk/res/android"
    xmlns:tools="http://schemas.android.com/tools"
    android:layout_width="match_parent"
    android:layout_height="match_parent"
    android:background="#3b388E8E"
    android:orientation="vertical">

    <com.example.mybowen.RippleLayout
        android:id="@+id/ripplelayout"
        android:orientation="vertical"
        android:layout_width="fill_parent"
        android:layout_height="wrap_content" >

        <Button
            android:layout_marginTop="30dp"
            android:id="@+id/button01"
            android:layout_width="fill_parent"
            android:layout_height="fill_parent"
            android:background="@drawable/shape_rectangle_regist_button_selector"
            android:text="Activity跳转"

            android:enabled="true"/>
        <Button
            android:layout_marginTop="50dp"
            android:id="@+id/button02"
            android:layout_width="match_parent"
            android:layout_height="50dp"
          android:background="#00ff00"
            android:text="吐司"

            android:enabled="true"/>
        <Button
            android:layout_gravity="center_horizontal"
            android:layout_marginTop="50dp"
            android:id="@+id/button03"
            android:layout_width="300dp"
            android:layout_height="wrap_content"
            android:background="@drawable/shape_rectangle_regist_button_selector2"
            android:text="Button"
            android:enabled="true"/>
        <ImageButton
            android:src="@drawable/shape_rectangle_regist_button_selector"
            android:background="@null"
            android:layout_gravity="center_horizontal"
            android:layout_marginTop="50dp"
            android:id="@+id/button04"
            android:layout_width="300dp"
            android:layout_height="50dp"
            android:enabled="true"/>
        <TextView
            android:background="@android:color/white"
            android:gravity="center"
            android:text="TextView"
            android:layout_height="60dp"
            android:layout_width="fill_parent"
            android:layout_margin="10dp"/>
    </com.example.mybowen.RippleLayout>


</LinearLayout>
shape_rectangle_regist_button_selector.xml:
<?xml version="1.0" encoding="utf-8"?>
<selector xmlns:android="http://schemas.android.com/apk/res/android">
    <item android:state_pressed="true"  >
        <shape xmlns:android="http://schemas.android.com/apk/res/android"
            android:shape="rectangle">

    <solid
                android:color="#C9C9C9" />
            <!-- 圆角 -->

        </shape>
    </item>
    <item >
        <!--shape:oval 椭圆     rectangle:方形    line:线性-->
        <shape xmlns:android="http://schemas.android.com/apk/res/android"
            android:shape="rectangle">
               <!--填充色  -->
            <solid
                android:color="#EEEE00" />
<!--             <solid
                android:color="#FCFCFC" />   -->

        </shape>
    </item>

</selector>
shape_rectangle_regist_button_selector2.xml:
<?xml version="1.0" encoding="utf-8"?>
<selector xmlns:android="http://schemas.android.com/apk/res/android">
    <item >
        <!--shape:oval 椭圆     rectangle:方形    line:线性-->
        <shape xmlns:android="http://schemas.android.com/apk/res/android"
            android:shape="rectangle">
               <!--填充色  -->
            <solid
                android:color="#EEEE00" />
<!--             <solid
                android:color="#FCFCFC" />   -->

        </shape>
    </item>

</selector>
注意:
源码中有大量的关于坐标的计算


 106
106

 被折叠的 条评论
为什么被折叠?
被折叠的 条评论
为什么被折叠?
 到【灌水乐园】发言


