


启动流程
先看一下web.xml配置
<!DOCTYPE web-app PUBLIC
        "-//Sun Microsystems, Inc.//DTD Web Application 2.3//EN"
        "http://java.sun.com/dtd/web-app_2_3.dtd" >
<web-app>
  <display-name>spring-demo</display-name>
  <!--全局变量-->
  <context-param>
    <param-name>contextConfigLocation</param-name>
    <param-value>classpath:spring.xml</param-value>
  </context-param>

  <!--监听器-->
  <listener>
    <listener-class>org.springframework.web.context.ContextLoaderListener</listener-class>
  </listener>

  <!--springmvc DispatcherServlet-->
  <servlet>
    <servlet-name>dispatcherServlet</servlet-name>
    <servlet-class>org.springframework.web.servlet.DispatcherServlet</servlet-class>
    <init-param>
      <param-name>contextConfigLocation</param-name>
      <param-value>classpath:spring-mvc.xml</param-value>
    </init-param>
    <load-on-startup>1</load-on-startup>
  </servlet>
  <servlet-mapping>
    <servlet-name>dispatcherServlet</servlet-name>
    <url-pattern>/</url-pattern>
  </servlet-mapping>

  <welcome-file-list>
    <welcome-file>/index.jsp</welcome-file>
  </welcome-file-list>
</web-app>
web容器启动时首先读取配置文件web.xml,然后依次执行:
- 读取
listener标签,该监听器会根据web.xml全局变量 context-param contextConfigLocation指定的配置文件创建一个IoC容器 - 初始化filter
- 初始化Servlet,
DispatchServlet#init()方法将创建一个IoC子容器
再来看一下springmvc.xml的配置文件
<?xml version="1.0" encoding="UTF-8"?>
<beans xmlns="http://www.springframework.org/schema/beans"
       xmlns:xsi="http://www.w3.org/2001/XMLSchema-instance" xmlns:mvc="http://www.springframework.org/schema/mvc"
       xmlns:context="http://www.springframework.org/schema/context"
       xmlns:aop="http://www.springframework.org/schema/aop" xmlns:tx="http://www.springframework.org/schema/tx"
       xsi:schemaLocation="http://www.springframework.org/schema/beans
		http://www.springframework.org/schema/beans/spring-beans-4.0.xsd
		http://www.springframework.org/schema/mvc
		http://www.springframework.org/schema/mvc/spring-mvc-4.0.xsd
		http://www.springframework.org/schema/context
		http://www.springframework.org/schema/context/spring-context-4.0.xsd
		http://www.springframework.org/schema/aop
		http://www.springframework.org/schema/aop/spring-aop-4.0.xsd
		http://www.springframework.org/schema/tx
		http://www.springframework.org/schema/tx/spring-tx-4.0.xsd ">

    <!-- 包扫描 -->
    <context:component-scan base-package="com.study.controller"/>

    <!-- 静态资源交给默认servlet处理 -->
    <!-- 在WEB容器启动的时候会在上下文中定义一个 DefaultServletHttpRequestHandler,它会对DispatcherServlet的请求进行处理,如果该请求已经作了映射,那么会接着交给后台对应的处理程序,如果没有作映射,就交给WEB应用服务器默认的Servlet处理,从而找到对应的静态资源,只有再找不到资源时才会报错。 -->
    <mvc:default-servlet-handler />

    <!-- 自动注册RequestMappingHandlerMapping、RequestMappingHandlerAdapter与ExceptionHandlerExceptionResolver 三个bean -->
    <!-- 支持使用 ConversionService 实例对表单参数进行类型转换 -->
	<!-- 支持使用 @NumberFormat、@DateTimeFormat 注解完成数据类型的格式化 -->
	<!-- 支持使用 @Valid 注解对 JavaBean 实例进行JSR303验证 -->
	<!-- 支持使用 @RequestBody和@ResponseBody注解 -->
    <mvc:annotation-driven />

    <!-- 视图解析器 -->
    <!-- ViewResolver -->
    <bean class="org.springframework.web.servlet.view.InternalResourceViewResolver">
        <property name="viewClass" value="org.springframework.web.servlet.view.JstlView" />
        <!-- 前缀:/WEB-INF/jsp/ 后缀:.jsp /WEB-INF/jsp/list.jsp -->
        <property name="prefix" value="/WEB-INF/jsp/" />
        <property name="suffix" value=".jsp" />
    </bean>

</beans>
创建Servlet IoC子容器时,会初始化springmvc的组件
代码位置:FrameworkServlet#initStrategies()
protected void initStrategies(ApplicationContext context) {
	// 文件上传
	initMultipartResolver(context);
	// 本地化解析器
	initLocaleResolver(context);
	// 主题解析器
	initThemeResolver(context);
	// 处理器映射器
	initHandlerMappings(context);
	// 处理器适配器
	initHandlerAdapters(context);
	// 异常解析器
	initHandlerExceptionResolvers(context);
	// 视图名称转换器
	initRequestToViewNameTranslator(context);
	// 视图解析器
	initViewResolvers(context);
	// flash组件管理器
	initFlashMapManager(context);
}
请求流程
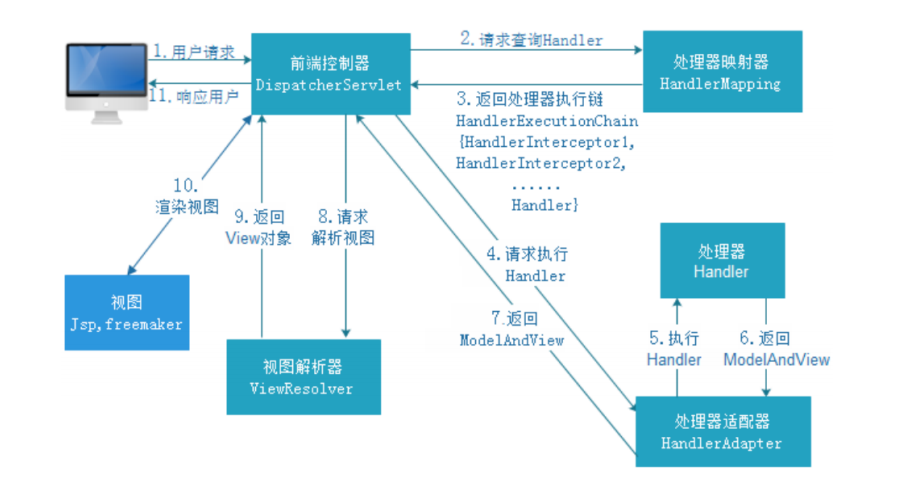
核心代码位置在DispatcherServlet#doDispatch()
/**
 * Process the actual dispatching to the handler.
 * <p>The handler will be obtained by applying the servlet's HandlerMappings in order.
 * The HandlerAdapter will be obtained by querying the servlet's installed HandlerAdapters
 * to find the first that supports the handler class.
 * <p>All HTTP methods are handled by this method. It's up to HandlerAdapters or handlers
 * themselves to decide which methods are acceptable.
 * @param request current HTTP request
 * @param response current HTTP response
 * @throws Exception in case of any kind of processing failure
 */
protected void doDispatch(HttpServletRequest request, HttpServletResponse response) throws Exception {
	HttpServletRequest processedRequest = request;
	HandlerExecutionChain mappedHandler = null;
	boolean multipartRequestParsed = false;

	WebAsyncManager asyncManager = WebAsyncUtils.getAsyncManager(request);

	try {
		ModelAndView mv = null;
		Exception dispatchException = null;

		try {
			processedRequest = checkMultipart(request);
			multipartRequestParsed = (processedRequest != request);

			// Determine handler for the current request.
			// 获取处理器
			mappedHandler = getHandler(processedRequest);
			if (mappedHandler == null) {
				noHandlerFound(processedRequest, response);
				return;
			}

			// Determine handler adapter for the current request.
			// 根据处理器,获取处理器适配器
			HandlerAdapter ha = getHandlerAdapter(mappedHandler.getHandler());

			// Process last-modified header, if supported by the handler.
			String method = request.getMethod();
			boolean isGet = "GET".equals(method);
			if (isGet || "HEAD".equals(method)) {
				long lastModified = ha.getLastModified(request, mappedHandler.getHandler());
				if (new ServletWebRequest(request, response).checkNotModified(lastModified) && isGet) {
					return;
				}
			}

			if (!mappedHandler.applyPreHandle(processedRequest, response)) {
				return;
			}

			// Actually invoke the handler.
			// 调用处理器适配器,返回视图模型modelAndView
			mv = ha.handle(processedRequest, response, mappedHandler.getHandler());

			if (asyncManager.isConcurrentHandlingStarted()) {
				return;
			}
			// 设置视图名称
			applyDefaultViewName(processedRequest, mv);
			// 执行后置拦截器
			mappedHandler.applyPostHandle(processedRequest, response, mv);
		}
		catch (Exception ex) {
			dispatchException = ex;
		}
		catch (Throwable err) {
			// As of 4.3, we're processing Errors thrown from handler methods as well,
			// making them available for @ExceptionHandler methods and other scenarios.
			dispatchException = new NestedServletException("Handler dispatch failed", err);
		}
		// 渲染视图
		processDispatchResult(processedRequest, response, mappedHandler, mv, dispatchException);
	}
	catch (Exception ex) {
		triggerAfterCompletion(processedRequest, response, mappedHandler, ex);
	}
	catch (Throwable err) {
		triggerAfterCompletion(processedRequest, response, mappedHandler,
				new NestedServletException("Handler processing failed", err));
	}
	finally {
		if (asyncManager.isConcurrentHandlingStarted()) {
			// Instead of postHandle and afterCompletion
			if (mappedHandler != null) {
				mappedHandler.applyAfterConcurrentHandlingStarted(processedRequest, response);
			}
		}
		else {
			// Clean up any resources used by a multipart request.
			if (multipartRequestParsed) {
				cleanupMultipart(processedRequest);
			}
		}
	}
}
如果是jsp请求,最终会调用ApplicationFilterChain#internalDoFilter()处理请求并返回结果


 5111
5111


 被折叠的 条评论
为什么被折叠?
被折叠的 条评论
为什么被折叠?
 到【灌水乐园】发言


