


 本文介绍ESP32上的LittleFS文件系统的使用方法及优势。通过示例代码展示如何进行文件的创建、重命名、读取等操作,并提供配置指南。
陈拓 2021/11/24-2021/11/25
1. 概述
https://github.com/joltwallet/esp_littlefs
LittleFS是一个用于微控制器的小型故障安全文件系统。我们将LittleFS移植到esp-idf(特别是ESP32),因为SPIFFS速度太慢,“臃肿”且脆弱。
2. 用法
有两种方法可以将此组件添加到项目中。
- 作为ESP-IDF托管组件:在项目目录中运行
idf.py add-dependency joltwallet/littlefs==1.0.0
- 作为子模块:在项目中,将其作为子模块添加到components/目录中
git submodule add https://github.com/joltwallet/esp_littlefs.git
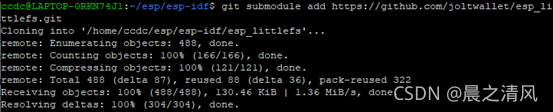
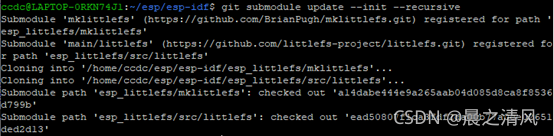
git submodule update --init --recursive
mv esp_littlefs components/
现在就可以在项目中通过idf.py menuconfig下面的 Component config-> LittleFS配置库了。
3. 实例
User@wreyford提供了一份演示报告https://github.com/wreyford/demo_esp_littlefs
展示了esp_littlefs的使用。 在example/目录中有修改后的副本。
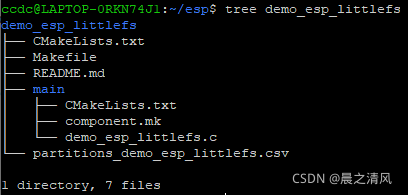
- 克隆demo
git clone https://github.com/wreyford/demo_esp_littlefs.git

- 文件夹内容
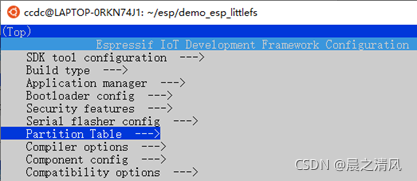
- 配置
idf.py menuconfig
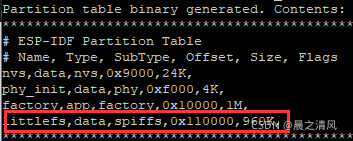
1) 设置定制分区表文件partitions_demo_esp_littlefs.csv
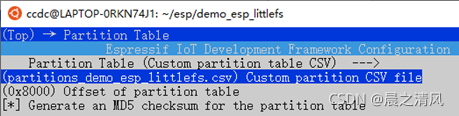
分区表文件partitions_demo_esp_littlefs.csv的内容:

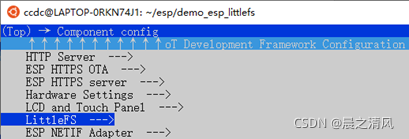
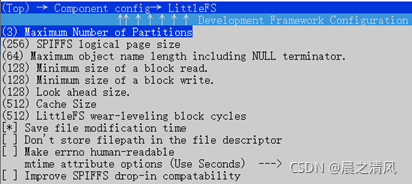
2) 设置LittleFS文件系统
- 编译项目
cd demo_esp_littlefs
idf.py build
如果出现:
![]()
刷新esp-idf环境:
get_idf
再编译。
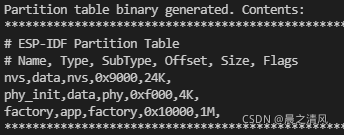
对比之前的分区表:
- 烧写项目
idf.py -p /dev/ttyS3 -b 115200 flash
- 运行结果
文件操作示范,创建文件,写文件,文件改名,读文件。
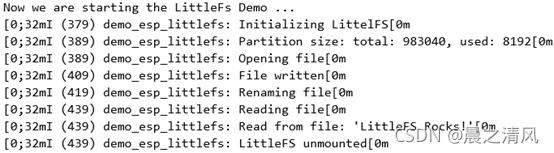
程序流程:
- 初始化LittelFS
- 创建文件Opening file -> fopen("/littlefs/hello.txt", "w");
- 向文件写入字符串File written -> fprintf(f, "LittleFS Rocks!\n");
- 改文件名Renaming file -> rename("/littlefs/hello.txt", "/littlefs/foo.txt")
- 读文件Reading file -> fopen("/littlefs/foo.txt", "r");
- 读一行Read from file -> fgets(line, sizeof(line), f);
- 显示读结果 -> ESP_LOGI(TAG, "Read from file: '%s'", line);
- 卸载文件系统 -> esp_vfs_littlefs_unregister(conf.partition_label);
对应的C程序:
        printf("Now we are starting the LittleFs Demo ...\n");

        ESP_LOGI(TAG, "Initializing LittelFS");

        esp_vfs_littlefs_conf_t conf = {
            .base_path = "/littlefs",
            .partition_label = "littlefs",
            .format_if_mount_failed = true,
            .dont_mount = false,
        };

        // Use settings defined above to initialize and mount LittleFS filesystem.
        // Note: esp_vfs_littlefs_register is an all-in-one convenience function.
        esp_err_t ret = esp_vfs_littlefs_register(&conf);

        if (ret != ESP_OK)
        {
                if (ret == ESP_FAIL)
                {
                        ESP_LOGE(TAG, "Failed to mount or format filesystem");
                }
                else if (ret == ESP_ERR_NOT_FOUND)
                {
                        ESP_LOGE(TAG, "Failed to find LittleFS partition");
                }
                else
                {
                        ESP_LOGE(TAG, "Failed to initialize LittleFS (%s)", esp_err_to_name(ret));
                }
                return;
        }

        size_t total = 0, used = 0;
        ret = esp_littlefs_info(conf.partition_label, &total, &used);
        if (ret != ESP_OK)
        {
                ESP_LOGE(TAG, "Failed to get LittleFS partition information (%s)", esp_err_to_name(ret));
        }
        else
        {
                ESP_LOGI(TAG, "Partition size: total: %d, used: %d", total, used);
        }

        // Use POSIX and C standard library functions to work with files.
        // First create a file.
        ESP_LOGI(TAG, "Opening file");
        FILE *f = fopen("/littlefs/hello.txt", "w");
        if (f == NULL)
        {
                ESP_LOGE(TAG, "Failed to open file for writing");
                return;
        }
        fprintf(f, "LittleFS Rocks!\n");
        fclose(f);
        ESP_LOGI(TAG, "File written");

        // Check if destination file exists before renaming
        struct stat st;
        if (stat("/littlefs/foo.txt", &st) == 0)
        {
                // Delete it if it exists
                unlink("/littlefs/foo.txt");
        }

        // Rename original file
        ESP_LOGI(TAG, "Renaming file");
        if (rename("/littlefs/hello.txt", "/littlefs/foo.txt") != 0)
        {
                ESP_LOGE(TAG, "Rename failed");
                return;
        }

        // Open renamed file for reading
        ESP_LOGI(TAG, "Reading file");
        f = fopen("/littlefs/foo.txt", "r");
        if (f == NULL)
        {
                ESP_LOGE(TAG, "Failed to open file for reading");
                return;
        }
        char line[64];
        fgets(line, sizeof(line), f);
        fclose(f);
        // strip newline
        char *pos = strchr(line, '\n');
        if (pos)
        {
                *pos = '\0';
        }
        ESP_LOGI(TAG, "Read from file: '%s'", line);

        // All done, unmount partition and disable LittleFS
        esp_vfs_littlefs_unregister(conf.partition_label);
ESP_LOGI(TAG, "LittleFS unmounted");- LittleFS在块上运行,在ESP32上块的大小为4096字节
- 一个新格式化的LittleFS将有2个块在使用中,使它看起来像8KB在使用中。


 705
705

 被折叠的 条评论
为什么被折叠?
被折叠的 条评论
为什么被折叠?
 到【灌水乐园】发言


