


我们提到了对flume的使用,但是,只是简单的使用,在高并发的情况下就会有问题,我们举两个例子:
1,在高并发下,Channel使用memory,如果使用默认配置,那么就会较快的情况下,塞满内存,造成大部分数据丢失,对的,你没有听错,memory类型的通道,是会丢失数据的,因为单纯的内存,虽然速度很快,但是当速度无法阻挡数据增长时,有些数据无法缓存,或者将内存型的缓存撑爆,我们就必须要考虑,如何优化这种结构。
2,在高并发下,flume的单点承受能力是有限的,如果没有对应的分流措施,我们依然会丧失数据,数据是宝贵的,我们的每份数据都应严肃对待。
优化
为了解决以上问题,我们提供一种参考方案:
优化结构图示:
步骤:
1,改善Channel
1.1 参数调优
将flume中memory的参数进行调整,主要优化两个参数:
a1.channels.c1.capacity = 1000000
a1.channels.c1.transactionCapacity = 10000
第一个为最大缓存的量,第二个为每次最大交易的量
1.2 改变类型
如果不能接受memory可能丢失数据的方案,我们一般采用file的方式替换channels类型。
2,搭建flume负载均衡
借鉴常见的方案如下:
假设:现有两台机子,命名为:agent,collect。agent IP地址为:192.168.150.137,collect为192.168.150.135
要求:实现agent到collect的连接,并能向collect发送日志。
步骤:
两台电脑上分别装上 jdk,flume-ng(不是flume-og),配置好profile。具体参见百度。
agent的处理
(1)找到flume-ng安装目录下的conf文件夹,新建test.conf
#name the components on this agent
a1.sources = r1
a1.sinks = k1
a1.channels = c1
# Describe/configure the source
a1.sources.r1.type = netcat //这里的数据源设置成netcat,后面将通过telnet传送信息
a1.sources.r1.bind = 0.0.0.0 //建议
a1.sources.r1.port = 44444
# Describe the sink
a1.sinks.k1.type =avro
a1.sinks.k1.hostname=192.168.150.135 //collect 的IP地址,注意
a1.sinks.k1.port=60000 //这里的接口要与collect source的接口一致。
# Use a channel which buffers events in memory
a1.channels.c1.type = memory
a1.channels.c1.capacity = 1000
a1.channels.c1.transactionCapacity = 100
# Bind the source and sink to the channel
a1.sources.r1.channels = c1
a1.sinks.k1.channel = c1
设置好后,暂时不要开启agent。
3.下面设置collect,同agent,新建test.conf 文件
# Name the components on this agent
a1.sources = r1
a1.sinks = k1
a1.channels = c1
# Describe/configure the source
a1.sources.r1.type = avro
a1.sources.r1.bind = 192.168.150.135 //绑定本机的IP的地址
a1.sources.r1.port =60000 //接口要与agent sink的port一致
# Describe the sink
a1.sinks.k1.type = logger
# Use a channel which buffers events in memory
a1.channels.c1.type = memory
a1.channels.c1.capacity = 1000
a1.channels.c1.transactionCapacity = 100
# Bind the source and sink to the channel
a1.sources.r1.channels = c1
a1.sinks.k1.channel = c1
4.设置好之后保存退出,输入命令:(当前目录为$FLUME_HOME/conf)
flume-ng agent -n a1 -c conf -f test.conf,若没有问题在agent机上输入命令:
flume-ng agent -c conf -f test.conf -n a1 -Dflume.root.logger=INFO,console
collect机上会出现:

则表示没有问题。
进入下一步
5.在agent另开一个 terminal,输入 telnet 127.0.0.1 44444 后(需要安装,yum install telnet)
Trying 127.0.0.1...
Connected to 127.0.0.1.
Escape character is '^]'.
然后就可以输入如:ss,enter后到collect机上查看
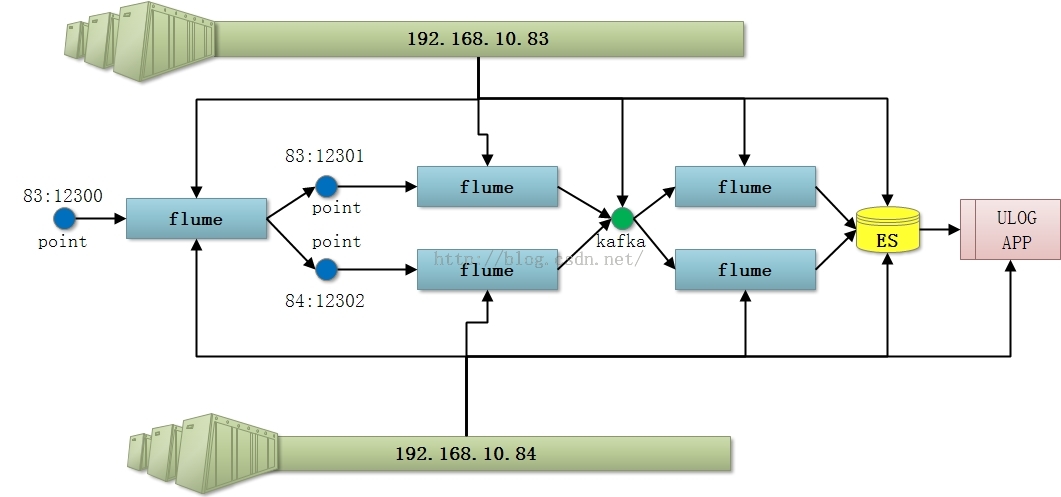
经过这些步骤的优化,我们基本可以完成对flume的优化,现在看看我们公司使用flume是如何部署这些应用的:
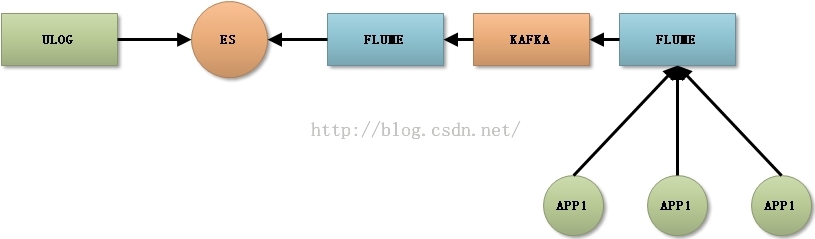
1,整体部署图:


 1583
1583

 被折叠的 条评论
为什么被折叠?
被折叠的 条评论
为什么被折叠?
 到【灌水乐园】发言


