


非常感谢Bipin Joshi老大的大作,我只不过把他的文章详细化了,相信对像我这样初学者有帮助。
原文见:http://www.dotnetbips.com/articles/4c3cc1c7-795e-4058-a741-e8e1de6d90a9.aspx
图片看不到请刷新下。
1、添加SqlDataSource1控件,配置数据,见图1.

选择Customers表及字段见图2。

2、添加GridView1控件,“选择数据源”为SqlDataSource1。
添加两个TemplateField列(CustomerID、TemplateField)见图3.

最后效果见图4

如果多出来的列要删除掉。
3、设计第二个模板(Column[1]),添加一个Button进去,把这个Button的CommandName和Text属性都设置Show。如图5

4、设计第二个模板(Column[0]),添加两个Lablel、一个GridView2和一个SqlDataSource2.
选择Lable11的“编辑databindings”如图6设置

同理如图7设置Lable12。

5、配置SqlDataSource2,选择“NorthwindConnectionString”就可以了,不用再新建个连接。点下一步,
见图8.

点下一步,输入select语句如图a:
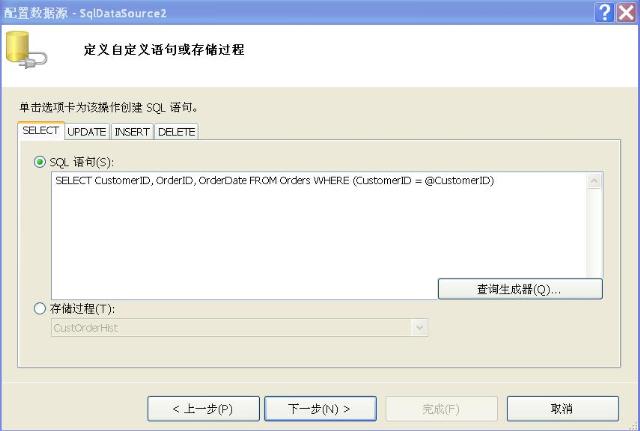
一直点“下一步”到完成。
6、设置GridView2控件,“选择数据源”为SqlDataSource2。
7、把GridView1的GridLines属性设为None。取消分隔线。
8、切换到HMTL代码页,在<asp:GridView ID="GridView1" runat="server" AllowPaging="True">中加上
OnRowCommand="GridView1_RowCommand" OnRowDataBound="GridView1_RowDataBound"
9、切换到Default.aspx.cs代码页,添加代码段如下:
 private
int
index
=
0
;
protected
void
GridView1_RowDataBound(
object
sender, GridViewRowEventArgs e)
private
int
index
=
0
;
protected
void
GridView1_RowDataBound(
object
sender, GridViewRowEventArgs e)
 ...
{
...
{ if (e.Row.RowType == DataControlRowType.DataRow)
 ...{ Button b = (Button)e.Row.Cells[1].FindControl("Button1"); b.CommandArgument = index.ToString(); index = index + 1;
 }
} }
protected
void
GridView1_RowCommand(
object
sender, GridViewCommandEventArgs e)
...
{ if (e.CommandName == "Show") ...{ Button b = (Button)GridView1.Rows[int.Parse(e.CommandArgument.ToString())].Cells[1].FindControl("Button1"); if (b.Text == "Show") ...{ string custid = GridView1.DataKeys[int.Parse(e.CommandArgument.ToString())].Value.ToString(); SqlDataSource sds = (SqlDataSource)GridView1.Rows[int.Parse(e.CommandArgument.ToString())].FindControl("SqlDataSource2"); GridView gv = (GridView)GridView1.Rows[int.Parse(e.CommandArgument.ToString())].FindControl("GridView2"); sds.SelectParameters[0].DefaultValue = custid; gv.Visible = true; b.Text = "Hide"; } else ...{ GridView gv = (GridView)GridView1.Rows[int.Parse(e.CommandArgument.ToString())].FindControl("GridView2"); gv.Visible = false; b.Text = "Show"; } } }
}
protected
void
GridView1_RowCommand(
object
sender, GridViewCommandEventArgs e)
...
{ if (e.CommandName == "Show") ...{ Button b = (Button)GridView1.Rows[int.Parse(e.CommandArgument.ToString())].Cells[1].FindControl("Button1"); if (b.Text == "Show") ...{ string custid = GridView1.DataKeys[int.Parse(e.CommandArgument.ToString())].Value.ToString(); SqlDataSource sds = (SqlDataSource)GridView1.Rows[int.Parse(e.CommandArgument.ToString())].FindControl("SqlDataSource2"); GridView gv = (GridView)GridView1.Rows[int.Parse(e.CommandArgument.ToString())].FindControl("GridView2"); sds.SelectParameters[0].DefaultValue = custid; gv.Visible = true; b.Text = "Hide"; } else ...{ GridView gv = (GridView)GridView1.Rows[int.Parse(e.CommandArgument.ToString())].FindControl("GridView2"); gv.Visible = false; b.Text = "Show"; } } }
10、现在运行一下,如果调试成功就可以看到如图9:

为更加美观,可以切换到HMTL代码页的页底,在</Columns>与</asp:GridView>之间添加代码如下:
<
RowStyle
BackColor
="#F7F6F3"
ForeColor
="#333333"
/>
<
EditRowStyle
BackColor
="#999999"
/>
<
SelectedRowStyle
BackColor
="#E2DED6"
Font-Bold
="True"
ForeColor
="#333333"
/>
<
PagerStyle
BackColor
="#284775"
ForeColor
="White"
HorizontalAlign
="Center"
/>
<
HeaderStyle
BackColor
="#5D7B9D"
Font-Bold
="True"
ForeColor
="White"
/>
<
AlternatingRowStyle
BackColor
="White"
ForeColor
="#284775"
/>
效果如图10:


 58
58

 被折叠的 条评论
为什么被折叠?
被折叠的 条评论
为什么被折叠?
 到【灌水乐园】发言


