


动态SQL:mybatis提供的各种标签方法实现动态拼接sql。
- <!--if标签:符合条件会自动把if中的内容拼接到sql之后-->
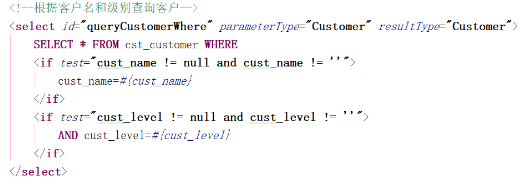
这样写不太好,如果name为空 ,就会报错。一般要配合where使用
- <!--where标签:会自动生成和删除 where 还能删除where后第1个and -->
    <select id="getCustomer2" resultType="com.hbuas.sw.entrty.Customer">
        select * from `customer`
        <where>
            <if test="name != null and name != ''">
              and `cust_name`=#{name}
            </if>
            <if test="profession != null and profession!=''">
              and `cust_profession`=#{profession}
            </if>
        </where>
</select>- <!--choose 只要第一个条件满足,后面条件都不执行 -->
    <select id="getCustomer" resultType="com.hbuas.sw.entety.Customer">
        <include refid="selectID"/>
        <where>
            <choose>
                <when test="profession != null and profession!=''">
                    `cust_profession`=#{profession}
                </when>
                <when test="name != null and name != ''">
                    `cust_name`=#{name}
                </when>
                <otherwise>1=1</otherwise>
            </choose>
        </where>
</select>- <!--foreach 查询ID为 X、XX、XXX的学生 -->
<foreach>迭代的类型:数组、对象数组、集合、属性(Grade类: List<Integer> ids)
使用属性迭代:
--1、创建属性类

2、
使用list遍历
<select id="getCustomers" parameterType="QueryVo" resultType="Customer">
select * from `customer` where `cust_id` in
<foreach collection="voList" open="(" close=")" separator="," item="ids">
#{ids}
</foreach>
</select>
使用数组遍历
<select id="getCustomers" parameterType="QueryVo" resultType="Customer">
select * from `customer` where `cust_id` in
<foreach collection="voids" open="(" close=")" separator="," item="ids">
#{ids}
</foreach>
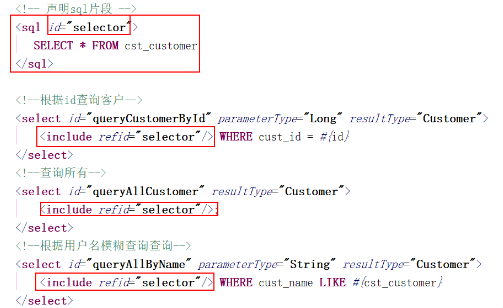
</select>Sql片段:Sql中可将重复的sql提取出来,使用时用include引用即可,最终达到sql重用的目的。
缓存:MyBatis中使用缓存来提高其性能。当查询数据时, 会先从缓存中取出数据,如果缓存中没有,再到数据库当中查询.
MyBatis中的缓存分为两种:一级缓存和二级缓存
一级缓存是sqlSession级别的
二级缓存是mapper级别的
- 一级缓存:本地缓存 (默认开启),在sqlSession没有关闭之前,再去查询时, 会从缓存当中取出数据,不会重新发送新的sql
- 全局作用域缓存 一个namespace对应一个缓存
如果会话关闭,一级缓存的数据会被保存到二级缓存中
不同namespace查出的数据 ,会放到自己对应的缓存中
现在默认也是打开的
二级缓存的使用步骤:
1.确保在配置文件当中开启二级缓存
    <settings>
        <setting name="logImpl" value="STDOUT_LOGGING"/>
        <!--二级缓存开关-->
        <setting name="cacheEnabled" value="true"/>
        <!--关闭一级缓存  不使用缓存-->
        <setting name="localCacheScope" value="SESSION"/>
    </settings>
2.在对应的mapper中添加cache标签
eviction:回收策略
flushInterval:刷新间隔;默认不清空
readOnly:是否只读
true:告诉Mybatis是只读操作,不去修改数据
false:非只读,有可能修改数据
size:可以存放多少个元素
type:可以用来指定自定义的缓存
    <!--二级缓存-->
    <cache eviction="LRU" flushInterval="1000" readOnly="true" size="100"></cache>
3.POJO需要实现Serializable接口
注意事项:查询的数据都会先放到一级缓存当中;只有会话关闭,一级缓存中的数据才会转称到二级缓存中;
缓存的使用顺序是:先到二级缓存当中查找
如果二级缓存中没有,就去找一级缓存
如果一级缓存中也没有就去到数据库当中查询
刷新缓存:缓存我们都是在查询语句中配置而使用增删改的时候,缓存默认就会被清空。缓存其实就是为我们的查询服务的,对于增删改而言,如果我们的缓存保存了增删改后的数据,那么再次读取时就会读到脏数据了!
关联查询:
表之间关系: 一对一、多对一、多对多
(MyBatis:多对一,多对多的本质就是一对多的变化)
一对一:一个订单对应一个客户
建立表关联

编写SQL:查询订单所关联客户
SELECT * from 'order' as o LEFT JOIN 'customer' c on o.cust_id =c.cust_id;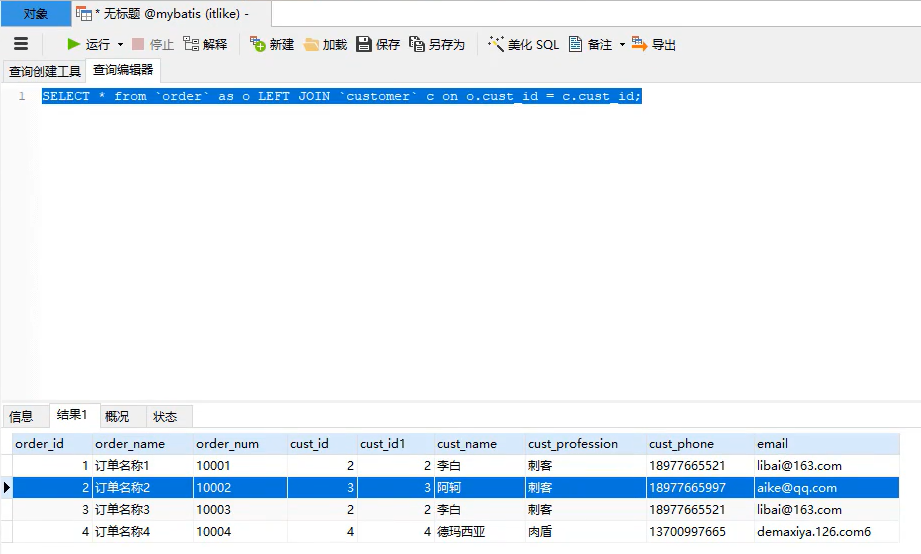
用Mybatis实现:
1。编写订单类:order.java
public class Order {
    private Integer order_id;
    private String order_name;
    private String order_num;
    private Customer customer;
}
2.编写orderMapper接口与orderMapper.xml文件
public interface OrderMapper {

    /*查询所有的订单*/
    public List<Order> getAllOrders();

}

第一种:使用级联的形式
===========================================================
<resultMap id="orderMape" type="Order">
        <id property="order_id" column="order_id"/>
        <result property="order_name" column="order_name"/>
        <result property="order_num" column="order_name"/>

        <result property="customer.cust_id" column="cust_id"/>
        <result property="customer.email" column="email"/>
        <result property="customer.cust_phone" column="cust_phone"/>
        <result property="customer.cust_profession" column="cust_profession"/>
        <result property="customer.cust_name" column="cust_name"/>
</resultMap>

<!--查询所有订单-->
    <select id="getAllOrders" resultMap="orderMape">
        SELECT * from `order` as o LEFT JOIN `customer` c on o.cust_id = c.cust_id;
</select>
以上是使用级联的方式,一般推荐使用associaton方式
//使用association方式
<resultMap id="orderMape" type="Order">
   <id property="order_id" column="order_id"/>
       <result property="order_name" column="order_name"/>
       <result property="order_num" column="order_name"/>
       <!--关联对象赋值-->
       <association property="customer" javaType="Customer">
            <id property="cust_id" column="cust_id"/>
                <result property="cust_name" column="cust_name"/>
                <result property="cust_profession" column="cust_profession"/>
                <result property="cust_phone" column="cust_phone"/>
                <result property="email" column="email"/>
       </association>
</resultMap>
association支持分布查询
 /*根据id查询订单*/
    public Order getOrderWithId(Integer id);


=======================================
<!--根据id查询订单-->
    <select id="getOrderWithId" resultMap="resultMap2">
      select * from `order` WHERE order_id = #{id};
    </select>

    <resultMap id="resultMap2" type="Order">
        <id property="order_id" column="order_id"/>
        <result property="order_name" column="order_name"/>
        <result property="order_num" column="order_name"/>
        <!--分步查询-->
        <association property="customer" javaType="Customer"
                     select="com.itlike.mapper.CustomerMapper.getCustomerWithId"
                     column="cust_id">

        </association>
    </resultMap>
1.先执行select ,将结果返回到 association中,自动机械并执行select="com.itlike.mapper.CustomerMapper.getCustomerWithId"
一对多:
查询一个客户所有的订单
编写SQL:
select * from `customer` as c LEFT JOIN `order` as o ON c.cust_id = o.cust_id;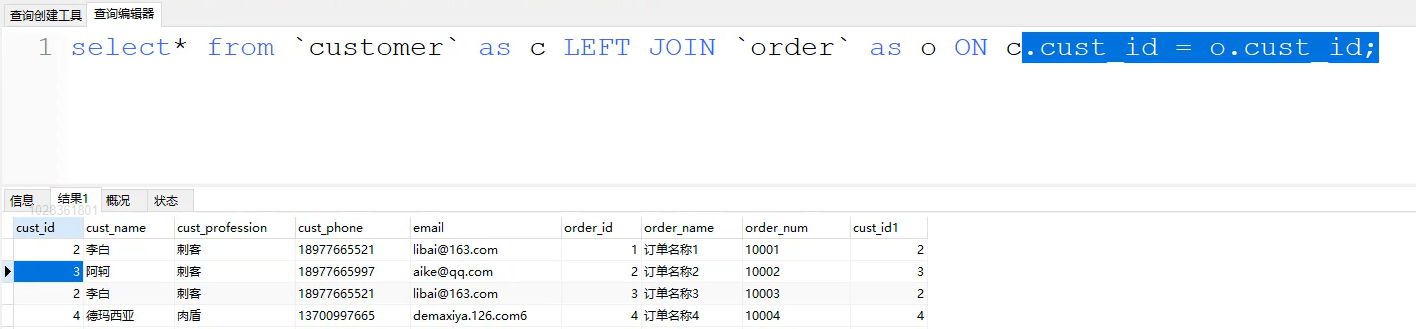
声明好实体类:
public class Customer {
    private Integer cust_id;
    private String cust_name;
    private String cust_profession;
    private String cust_phone;
    private String email;
    private List<Order> orders = new ArrayList<>();
}
编写CustomerMapper.java 与CustomerMapper.xml
 /*查询所有客户*/
===============方式一:左连接查询=================================
    public List<Customer> getAllCustomers();


    <select id="getAllCustomers" resultMap="custMap">
        select* from `customer` as c LEFT JOIN `order` as o ON c.cust_id = o.cust_id;
    </select>
    <resultMap id="custMap" type="Customer">
        <id column="cust_id" property="cust_id"/>
        <result column="cust_name" property="cust_name"/>
        <result column="cust_profession" property="cust_profession"/>
        <result column="cust_phone" property="cust_phone"/>
        <result column="email" property="email"/>

        <collection property="orders" ofType="Order">
            <id column="order_id" property="order_id"/>
            <id column="order_name" property="order_name"/>
            <id column="order_num" property="order_num"/>
        </collection>
    </resultMap>

===============方式二:分步查询=================================
    <!--分步查询-->
    <select id="getAllCustomers" resultMap="custMap">
       select * from `customer`;
    </select>
    <resultMap id="custMap" type="Customer">
        <id column="cust_id" property="cust_id"/>
        <result column="cust_name" property="cust_name"/>
        <result column="cust_profession" property="cust_profession"/>
        <result column="cust_phone" property="cust_phone"/>
        <result column="email" property="email"/>

        <collection property="orders" javaType="list" ofType="Order"
                    select="com.itlike.mapper.OrderMapper.getOrderWithCustId" column="cust_id">

        </collection>
    </resultMap>
单个关联对象使用association,集合使用collection


 377
377

 被折叠的 条评论
为什么被折叠?
被折叠的 条评论
为什么被折叠?
 到【灌水乐园】发言


