


如果项目中经常需要使用该方法时可以新建一个UIimage的分类,并将方法封装到其分类中.
绘制方法的封装:
//绘制指定颜色图片
+ (UIImage *)createImageWithColor:(UIColor *)color RectSize:(CGSize)rectSize
                                               CornerRadius:(float)cornerRadius{

    //直接绘制图像方法
//    CGRect rect=CGRectMake(0.0f, 0.0f, 50.0f, 50.0f);
//    UIGraphicsBeginImageContext(rect.size);
//    CGContextRef context = UIGraphicsGetCurrentContext();
//    CGContextSetFillColorWithColor(context, [color CGColor]);
//    CGContextFillRect(context, rect);
//    UIImage *theImage = UIGraphicsGetImageFromCurrentImageContext();
//    UIGraphicsEndImageContext();

    //带圆角图像的绘制方法
    UIImage *theImage;
    CGRect rect = CGRectMake(0.0f, 0.0f, rectSize.width, rectSize.height);

    UIGraphicsBeginImageContext(rect.size);   //开始画线
    [theImage drawInRect:CGRectMake(0, 0, rect.size.width, rect.size.height)];
    //获取上下文
    CGContextRef context = UIGraphicsGetCurrentContext();
    //边框大小
    CGContextSetLineWidth(context, 1);
    //边框颜色
    CGContextSetStrokeColorWithColor(context, COLORS_CLEAR.CGColor);
    //矩形填充颜色
    CGContextSetFillColorWithColor(context, [color CGColor]);

    /*
     *
     将要绘制的图像大小,分割成8个点,每两个点可以可以确定一条射线,每两条射线相交处可以设置圆弧.
     当前方法中先绘制的右下角,
     例如,将要绘制的圆角图片大小为:宽100,高100 圆角5,则需要的点分别为:
     A(100,10)
     B(100,100)
     C(90,100)
     D(0,100)
     E(0,90)
     F(0,0)
     G(10,0)
     H(100,0)
     *
    */

    //绘制图像及圆角
    CGContextMoveToPoint(context, rectSize.width, cornerRadius * 2);  // 开始坐标右边开始
    CGContextAddArcToPoint(context, rectSize.width, rectSize.height, rectSize.width - 10, rectSize.height, cornerRadius);  // 右下角
    CGContextAddArcToPoint(context, 0, rectSize.height, 0, rectSize.height - 10, cornerRadius); // 左下角
    CGContextAddArcToPoint(context, 0, 0, cornerRadius * 2, 0, cornerRadius); // 左上角
    CGContextAddArcToPoint(context, rectSize.width, 0, rectSize.width, cornerRadius * 2, cornerRadius); // 右上角
    CGContextDrawPath(context, kCGPathFillStroke); //根据当前坐标绘制路径
    theImage = UIGraphicsGetImageFromCurrentImageContext();//获取绘图

    //拉伸当前图像
    CGFloat h = theImage.size.height * 0.5;
    CGFloat w = theImage.size.width * 0.5;
    UIImage *rsizeImg = [theImage resizableImageWithCapInsets:UIEdgeInsetsMake(h, w, h, w) resizingMode:UIImageResizingModeStretch];

    return rsizeImg;
}
使用时方法:
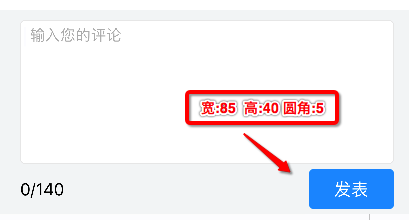
UIButton *testBtn = [[UIButton alloc]initWithFrame:CGRectMake(0,0, 85, 40)];
[testBtn setImage:[UIImage createImageWithColor:[UIColor grarColor] RectSize:testBtn.size CornerRadius:5] forState:UIControlStateNormal];
[testBtn setImage:[UIImage createImageWithColor:[UIColor yellowColor] RectSize:testBtn.size CornerRadius:5] forState:UIControlStateHighlighted]
在实际使用时的效果:


 1万+
1万+


 被折叠的 条评论
为什么被折叠?
被折叠的 条评论
为什么被折叠?
 到【灌水乐园】发言


