


中文说明:具体的也可以见http://source.android.com/compatibility/overview.html中有关Program goals
一、Android的CTS测试,英文为Compatibility Test Suite,意为兼容性测试。只有通过CTS测试的设备才有可能获得Android的商标和享受Android Market的权限;Android的CTS目的与意义:用户在android系统中有更好的用户体验,并且展示android应用的优越性,使得android开发者更容易编写高质量的andorid程序。
二、CTS是兼容性测试,Google为了防止厂商对Android的改动影响其SDKAPI的兼容性,即第三方应用程序安装到该厂商的机器上都能正常运行;这个差不多是自动跑的,会测试硬
件(比如GPS,WIFI),还有其他一系列的东西,跑完之后会出一份详细的报告,告诉你哪些地方没通过。
三、我们实际使用CTS的过程中,很可能需要根据特定的要求,来定制自己的TestPlan。这时就需要自己编译CTS
官方说明
一、有关CTS的目的和意图说明:http://source.android.com/faqs.html#compatibility
Compatibility Test Suite
What is the purpose of the CTS?
The Compatibility Test Suite is a tool used by device manufacturers to help ensure their devices are compatible, and to report test results for validations. The CTS is intended to be run frequently by OEMs throughout the engineering process to catch compatibility issues early.
What kinds of things does the CTS test?
The CTS currently tests that all of the supported Android strong-typed APIs are present and behave correctly. It also tests other non-API system behaviors such as application lifecycle and performance. We plan to add support in future CTS versions to test "soft" APIs such as Intents as well.
二、官方说明:http://source.android.com/compatibility/overview.html
CTS是一个免费的,商用级的测试套件,可供下载,CTS运行于台式机的直接连接的设备或仿真器,并执行测试用例。 CTS是一套设计集成到日常工作流程的建筑设备工程师(如通过持续构建系统)中的单元测试。它的目的是揭示不兼容的早期,并确保该软件仍然是整个开发过程中兼容。
Compatibility Test Suite (CTS)
The CTS is a free, commercial-grade test suite, available for download. The CTS represents the "mechanism" of compatibility.
The CTS runs on a desktop machine and executes test cases directly on attached devices or an emulator. The CTS is a set of unit tests designed to be integrated into the daily workflow (such as via a continuous build system) of the engineers building a device. Its intent is to reveal incompatibilities early on, and ensure that the software remains compatible throughout the development process.
1、查看ubuntu版本
pateo@pateo-B86N53X:/$ uname -a
Linux pateo-B86N53X 2.6.35-22-generic #33-Ubuntu SMP Sun Sep 19 20:34:50 UTC 2010 i686 GNU/Linux
备注说明: uname -m 如果出现i386 i686 i586则是32位 如果出现amd64 则是64位系统;android官方给出说明froyo/2.2及以后版本默认只支持64-bit
解决方法: 针对你的机器是32位的操作系统
步骤一
./external/clearsilver/cgi/Android.mk
./external/clearsilver/java-jni/Android.mk
./external/clearsilver/util/Android.mk
./external/clearsilver/cs/Android.mk
四个文件中的
LOCAL_CFLAGS += -m64
LOCAL_LDFLAGS += -m64
注释掉,或者将“64”换成“32”
LOCAL_CFLAGS += -m32
LOCAL_LDFLAGS += -m32
步骤二
./build/core/main.mk 中的
ifneq (64,$(findstring 64,$(build_arch)))
改为:
ifneq (i686,$(findstring i686,$(build_arch)))
2、安装jdk 官方:http://source.android.com/source/initializing.html
Installing the JDK
The Sun JDK is no longer in Ubuntu's main package repository. In order to download it, you need to add the appropriate repository and indicate to the system which JDK should be used.
Java 6: for Gingerbread and newer
$ sudo add-apt-repository "deb http://archive.canonical.com/ lucid partner"
$ sudo apt-get update
$ sudo apt-get install sun-java6-jdk
3、切换jdk
root@pateo-B86N53X:~# sudo update-alternatives --config java
要维持当前值[*]请按回车键,或者键入选择的编号:2
root@pateo-B86N53X:~# sudo update-alternatives --config javac
There are 2 choices for the alternative javac (providing /usr/bin/javac).
选择 路径 优先级 状态
------------------------------------------------------------
0 /usr/lib/jvm/java-6-sun/bin/javac 63 自动模式
* 1 /usr/lib/jvm/java-1.5.0-sun/bin/javac 53 手动模式
2 /usr/lib/jvm/java-6-sun/bin/javac 63 手动模式
要维持当前值[*]请按回车键,或者键入选择的编号:2
update-alternatives: 使用 /usr/lib/jvm/java-6-sun/bin/javac 来提供 /usr/bin/javac (javac),于 手动模式 中。
root@pateo-B86N53X:~# java -version
java version "1.6.0_26"
Java(TM) SE Runtime Environment (build 1.6.0_26-b03)
Java HotSpot(TM) Server VM (build 20.1-b02, mixed mode)
4、编译Code
root@pateo-B86N53X:/work/project/Yeagle_turquoise_3.0# . build/envsetup.sh
root@pateo-B86N53X:/work/project/Yeagle_turquoise_3.0# lunch 15
pateo@pateo-B86N53X:/work/project/Yeagle_turquoise_3.0$ make
5、Build CTS
root@pateo-B86N53X:/work/project/Yeagle_turquoise_3.0# make cts
root@pateo-B86N53X:/work/project/Yeagle_turquoise_3.0/out/host/linux-x86/cts# ls
all_cts_core_files_stamp all_cts_files_stamp android-cts android-cts.zip temp
root@pateo-B86N53X:/work/project/Yeagle_turquoise_3.0/out/host/linux-x86/cts/android-cts/repository/plans# ls
Android.xml AppSecurity.xml CTS.xml Java.xml Performance.xml RefApp.xml Signature.xml VM.xml
备注说明
(1)可以从http://source.android.com/compatibility/downloads.html下载最新版本的Compatibility Test Suit;
(2)通过编译Android源代码的方式获得。在android源代码目录下输入make cts命令来编译CTS,之后会在out/host/linux-x86/cts/下生成android-cts文件夹。
这个文件夹就是 Compatibility Test Suit。
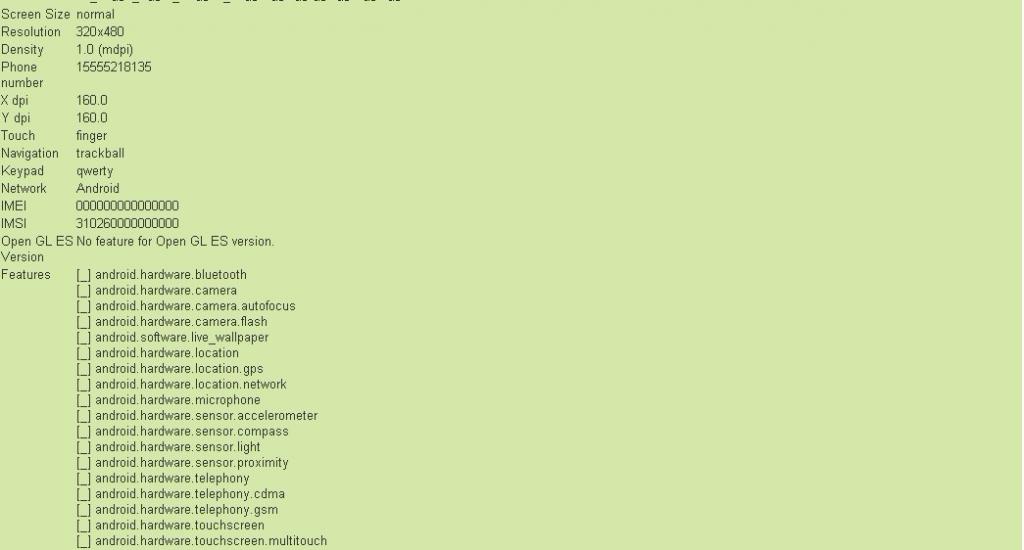
(3)cts的测试主要需要符合Android的兼容性定义文件(CDD) ,CDD列举兼容的Android设备的软件和硬件要求。
有关CDD的官方说明:
Compatibility Definition Document (CDD)
For each release of the Android platform, a detailed Compatibility Definition Document (CDD) will be provided. The CDD represents the "policy" aspect of Android compatibility.
Android 2.3
Android 2.3 is the release of the development milestone code-named Gingerbread. Source code for Android 2.3 is found in the 'gingerbread' branch in the open-source tree.
csdn提供了Android 2.3 Compatibility Definition Document (CDD)相应的翻译可供下载的文档
http://download.csdn.net/detail/jianguo_liao19840726/4039034
6、Running CTS
root@pateo-B86N53X:/work/project/Yeagle_turquoise_3.0/out/host/linux-x86/bin# ./cts
Listening for transport dt_socket at address: 1337
Android CTS version 2.3_r1
cts_host > ls --plan
List of plans (8 in total):
AppSecurity 没有官方说明,猜测是针对Application安全性的测试集合
Performance 包含所有针对性能的测试,随本版的跟新,本测试计划也将更新
VM包含针对虚拟机的所有测试
RefApp 包含针对参考应用程序的所有测试,随本版的跟新,本测试计划也将更新
Signature 包含所有针对公有APIs的署名测试
Java包含所有针对Java核心library的测试
CTS 包含21000个测试,这些测试是检验兼容性所必须的,性能测试不包含在本计划中,随本版的跟新,本测试计划也将更新
Android 包含针对androidAPIs的有所测试
备注说明: 在“cts_host >”提示符下输入命令,以下为几个常用的命令
如:start --plan CTS,start --plan plan_name --package package_name 运行一个特定的测试包,如: start --plan CTS --package android.bluetooth
官方说明:http://source.android.com/compatibility/cts-development.html cts start --plan CTS -p android.os.cts.BuildVersionTest
官方命令详解:http://source.android.com/compatibility/downloads.html,点击Compatibility Test Suite (CTS) User Manual会有android-cts-manual-r4.pdf文档,此文档里面具体说明了命令的意思
Compatibility Test Suite Manual
The CTS user manual is applicable to any CTS version, but CTS 2.1 R2 and beyond require additional steps to run the accessibility tests.
中文说明:
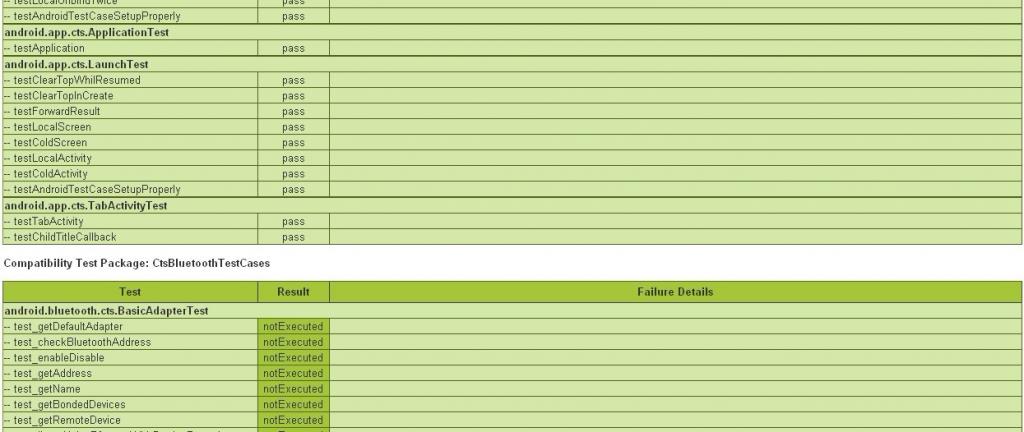
CTS命令的意义,我们必须明确Plan,Package,Testcase,Test,result_type,session的含义:
CTS将Test组合为Testcase,Testcase再组合为Package,最后由Package组合为Plan。
CTS可以执行一个Plan,一个Plan的某个Package,一个Plan的某个Test。
CTS执行的结果以Session_ID来标识一个测试结果。
CTS的结果类型result_type包含Pass,Fail,Timeout,NoExecuted四种
7、启动模拟器
root@pateo-B86N53X:/work/project/Yeagle_turquoise_3.0# make sdk
root@pateo-B86N53X:/work/project/Yeagle_turquoise_3.0# . build/envsetup.sh
including device/fsl/imx5x/vendorsetup.sh
including device/pateo/yeagle/vendorsetup.sh
root@pateo-B86N53X:/work/project/Yeagle_turquoise_3.0# lunch 15
============================================
PLATFORM_VERSION_CODENAME=REL
PLATFORM_VERSION=2.3.3
TARGET_PRODUCT=yeagle
TARGET_BUILD_VARIANT=eng
TARGET_SIMULATOR=false
TARGET_BUILD_TYPE=release
TARGET_BUILD_APPS=
TARGET_ARCH=arm
HOST_ARCH=x86
HOST_OS=linux
HOST_BUILD_TYPE=release
BUILD_ID=GRI40
============================================
root@pateo-B86N53X:/work/project/Yeagle_turquoise_3.0# emulator
emulator: WARNING: system partition size adjusted to match image file (128 MB > 66 MB)
另一种启动:
模拟器
archermind@archermind-Lenovo-IdeaPad-Y470:/work/froyo/out/host/linux-x86/sdk/android-sdk_eng.archermind_linux-x86/tools$ emulator
备注说明:如果提示-avd 或 -data file 则可以另一种方式先 . build/envsetup.sh,然后lunch 1
8、启动cts
archermind@archermind-Lenovo-IdeaPad-Y470:/work/froyo/out/host/linux-x86/cts/android-cts/tools$ gedit startcts
注释#SDK_ROOT=NOT_CONFIGURED
增加SDK_ROOT=/work/froyo/out/host/linux-x86/sdk/android-sdk_eng.archermind_linux-x86
archermind@archermind-Lenovo-IdeaPad-Y470:/work/froyo/out/host/linux-x86/cts/android-cts/tools$ ./startcts
备注说明:如果运行成功会出现Android CTS version 2.3_r1的字样(我的android的版本是2.3的)。如果有连接设备到PC上还会出现Device(设备ID)connected的字样。这里设 备可以是连接PC的android的机器,也可以是模拟器,如果连接了多个设备的话需加上-d参数,后面跟上设备id来告诉CTS需要测试的设备,通过下面方法查看设备
Android CTS version 2.3_r1
cts_host >
如果你要链接真机需要如下的设置:
pateo@pateo-B86N53X:/etc/udev/rules.d$ ls
10-vboxdrv.rules 51-android.rules 51-android.rules. 70-persistent-cd.rules 70-persistent-net.rules README
pateo@pateo-B86N53X:/etc/udev/rules.d$ cat 51-android.rules
SUBSYSTEM=="usb", ATTR{idVendor}=="18d1", MODE="0666",
GROUP="plugdev"
pateo@pateo-B86N53X:/etc/udev/rules.d$ adb devices
* daemon not running. starting it now on port 5037 *
* daemon started successfully *
List of devices attached
emulator-5554 offline
Note:各品牌手机的USBVendor IDs分别见官方:http://developer.android.com/guide/developing/device.html
相应的生成的测试报告:out/host/linux-x86/cts/android-cts/repository/results/下面的testResult.xml
9、效果
你会看到不需要按键它也能自动测试


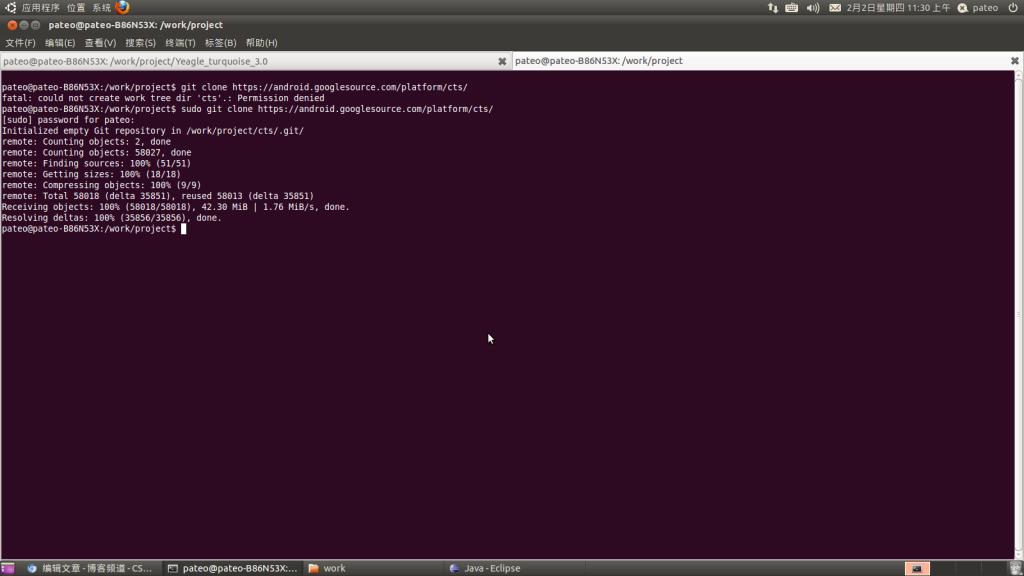
说明下面两步骤是在之前需run cts之前做的,针对fail的我们需要定位,这个时候我们最好能看到cts的源码,下面为cts的源码获取方式:sudo git clone https://android.googlesource.com/platform/cts/
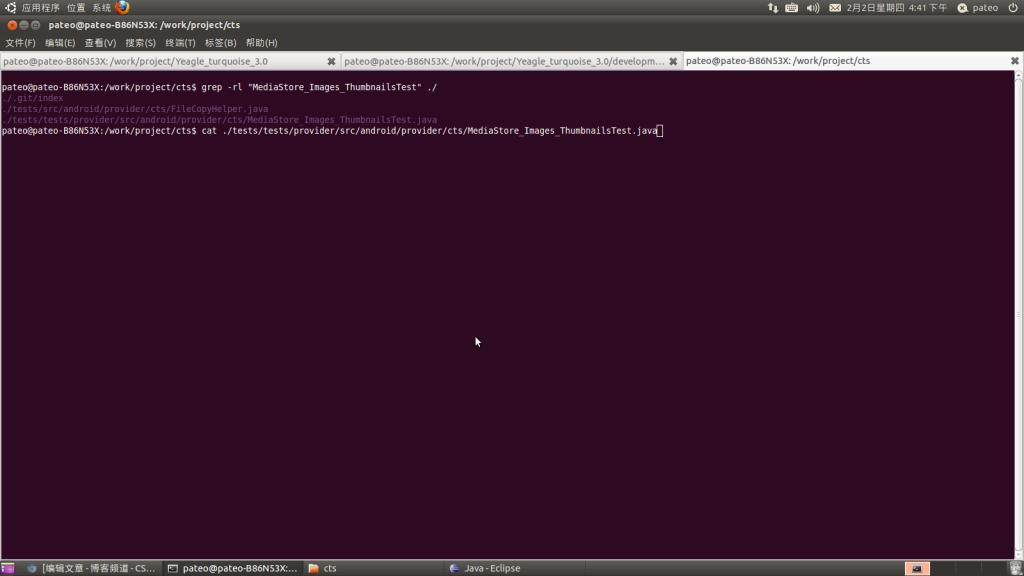
拿到源码后,我们针对fail的log来进行定位,例如:
fail log: junit.framework.AssertionFailedError: expected:<1> but was:<0> at android.provider.cts.MediaStore_Images_ThumbnailsTest.testQueryExternalMiniThumbnails(MediaStore_Images_ThumbnailsTest.java:163)
找到相应的多少行进行定位
10、安装CtsVerifier.apk
相关官方说明:http://source.android.com/compatibility/overview.html
Verifier是cts的一个补充,可到download下载,其CTS Verifier主要测试api和functions,比如不好测的无需人工输入的(如音频质量,加速度等)
Compatibility Test Suite Verifier (CTS Verifier)
The Compatibility Test Suite Verifier (CTS Verifier) is a supplement to the Compatibility Test Suite (CTS), available for download. CTS Verifier provides tests for APIs and functions that cannot be tested on a stationary device without manual input (e.g. audio quality, accelerometer, etc).
11、安装CtsDelegatingAccessibilityService.apk,官方说明:http://source.android.com/compatibility/cts-intro.html
这个apk的来源
Workflow
Download the CTS.
Attach at least one device (or emulator) to your machine.
For CTS 2.1 R2 and beyond, setup your device (or emulator) to run the accessibility tests:
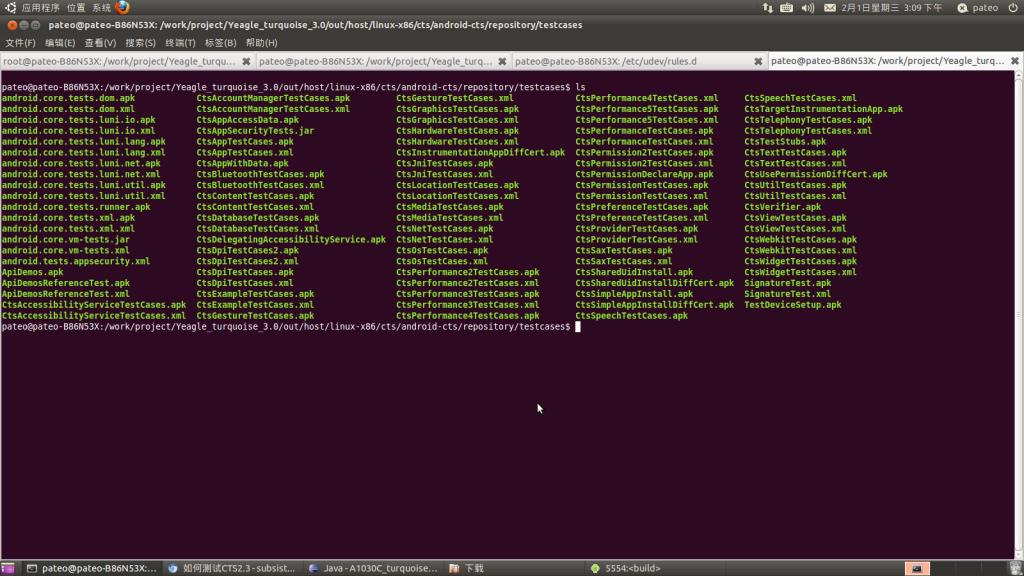
adb install -r android-cts/repository/testcases/CtsDelegatingAccessibilityService.apk
On the device, enable Settings > Accessibility > Accessibility > Delegating Accessibility Service
For CTS 2.3 R4 and beyond, setup your device to run the device administration tests:
adb install -r android-cts/repository/testcases/CtsDeviceAdmin.apk
On the device, enable all the android.deviceadmin.cts.* device administrators under Settings > Location & security > Select device administrators
Launch the CTS. The CTS test harness loads the test plan onto the attached devices. For each test in the test harness:
The test harness pushes a .apk file to each device, executes the test through instrumentation, and records test results.
The test harness removes the .apk file from each device.
Once all the tests are executed, you can view the test results in your browser and use the results to adjust your design. You can continue to run the CTS throughout your development process.
When you are ready, you can submit the report generated by the CTS to cts@android.com. The report is a .zip archived file that contains XML results and supplemental information such as screen captures.
12、有关自己编写测试用例的官方说明:http://source.android.com/compatibility/cts-development.html,
重点学习怎么写自己的测试用例:http://developer.android.com/guide/topics/testing/index.html
什么都是从HelloWord开始的,测试单元测试用例也是一样:http://developer.android.com/resources/tutorials/testing/helloandroid_test.html
其具体的api见官方http://developer.android.com/reference/android/test/InstrumentationTestRunner.html
Writing CTS Tests
CTS tests use JUnit and the Android testing APIs. Review the Testing and Instrumentation tutorial while perusing the existing tests under the cts/tests/tests directory. You will see that CTS tests mostly follow the same conventions used in other Android tests.
Since CTS runs across many production devices, the tests must follow these rules:
Must take into account varying screen sizes, orientations, and keyboard layouts.
Only use public API methods. In other words, avoid all classes, methods, and fields that are annotated with the "hide" annotation.
Avoid relying upon particular view layouts or depend on the dimensions of assets that may not be on some device.
Don't rely upon root privileges.
Test Naming and Location
Most CTS test cases target a specific class in the Android API. These tests have Java package names with a cts suffix and class names with the Test suffix. Each test case consists of multiple tests, where each test usually exercises a particular API method of the API class being tested. These tests are arranged in a directory structure where tests are grouped into different categories like "widgets" and "views."
For example, the CTS test for android.widget.TextView is android.widget.cts.TextViewTest found under the cts/tests/tests/widget/src/android/widget/cts directory with its Java package name asandroid.widget.cts and its class name as TextViewTest. The TextViewTest class has a test called testSetText that exercises the "setText" method and a test named "testSetSingleLine" that calls the setSingleLinemethod. Each of those tests have @TestTargetNew annotations indicating what they cover.
Some CTS tests do not directly correspond to an API class but are placed in the most related package possible. For instance, the CTS test, android.net.cts.ListeningPortsTest, is in the android.net.cts, because it is network related even though there is no android.net.ListeningPorts class. You can also create a new test package if necessary. For example, there is an "android.security" test package for tests related to security. Thus, use your best judgement when adding new tests and refer to other tests as examples.
Finally, a lot of tests are annotated with @TestTargets and @TestTargetNew. These are no longer necessary so do not annotate new tests with these.
New Test Packages
When adding new tests, there may not be an existing directory to place your test. In that case, refer to the example under cts/tests/tests/example and create a new directory. Furthermore, make sure to add your new package's module name from its Android.mk to CTS_COVERAGE_TEST_CASE_LIST in cts/CtsTestCaseList.mk. This Makefile is used by build/core/tasks/cts.mk to glue all the tests together to create the final CTS package.
Test Stubs and Utilities
Some tests use additional infrastructure like separate activities and various utilities to perform tests. These are located under the cts/tests/src directory. These stubs aren't separated into separate test APKs like the tests, so the cts/tests/src directory does not have additional top level directories like "widget" or "view." Follow the same principle of putting new classes into a package with a name that correlates to the purpose of your new class. For instance, a stub activity used for testing OpenGL like GLSurfaceViewStubActivity belongs in the android.opengl.cts package under the cts/tests/src/android/opengl directory.
Other Tasks
Besides adding new tests there are other ways to contribute to CTS:
Fix or remove tests annotated with BrokenTest and KnownFailure.
Submitting Your Changes
Follow the Android Contributors' Workflow to contribute changes to CTS. A reviewer will be assigned to your change, and your change should be reviewed shortly!
13、有关Monkey的用法网上资源很多,具体见官方:http://developer.android.com/guide/developing/tools/monkey.html
1)monkey是一个android自带的命令行工具。它向系统发送伪随机的用户事件流,实现对正在开发的应用程序进行压力测试。
2)方法
在设备端打开setting界面
$ adb shell
# monkey -p com.android.settings -v 500
此时可以看到界面不断被切换
重点是掌握相关的Monkey的一些命令即可,在实践中把这些命令都试试常用即可。
Monkey 的源码下载地址 :http://download.csdn.net/detail/jianguo_liao19840726/4039754
有关monkeyrunner的用法:http://developer.android.com/guide/developing/tools/monkeyrunner_concepts.html
源码中也自动了Monkey的相应的一些文件:/work/project/Yeagle_turquoise_3.0/development/cmds/monkey$目录下的一些文件
14、官方给予的cts技术性相关疑问的联系:http://source.android.com/compatibility/contact-us.html
For CTS Technical Questions
If you have specific issues with the Compatibility Test Suite that require you to disclose information you'd prefer not to be public, you can contact an email address we've set up specifically this purpose: cts@android.com. This email address is for cases that require disclosure of confidential information only, so general questions will be directed back to the public android-compatibility list. Note also that this list is for specific technical questions; general inquiries will also be directed back to the android-compatibility list.
15、其他开源的andorid脚本:http://code.google.com/p/android-scripting/
http://code.google.com/p/robotium/


 4358
4358


 被折叠的 条评论
为什么被折叠?
被折叠的 条评论
为什么被折叠?
 到【灌水乐园】发言


