


快速导航
- IntelliJ IDEA 中的Spring Initializr快速构建SpringBoot工程
- 编写一个Hello SpringBoot程序
[运行程序]三种方式启动项目[more]- 项目属性配置
[项目属性配置]application.properties文件设置配置[more][项目属性配置]application.yml文件设置配置[more][项目属性配置]自定义属性配置参数间引用[more][项目属性配置]多环境动态配置[more]
首发于慕课网 , 项目中源码可在Github获取SpringBoot从零实现一个WebApi服务 https://github.com/Q-Angelo/SpringBoot-WebApi
IntelliJ IDEA 中的Spring Initializr快速构建SpringBoot工程
intellig编辑器创建
- 菜单栏中选择
File=>New=>Project,可以看到下图弹出创建窗口,左侧默认指向Spring Initializr,右侧Choose Initializr Service Url 默认指向 https://start.spring.io/ ,这是Spring官方提供的,在这里也可以创建工程项目。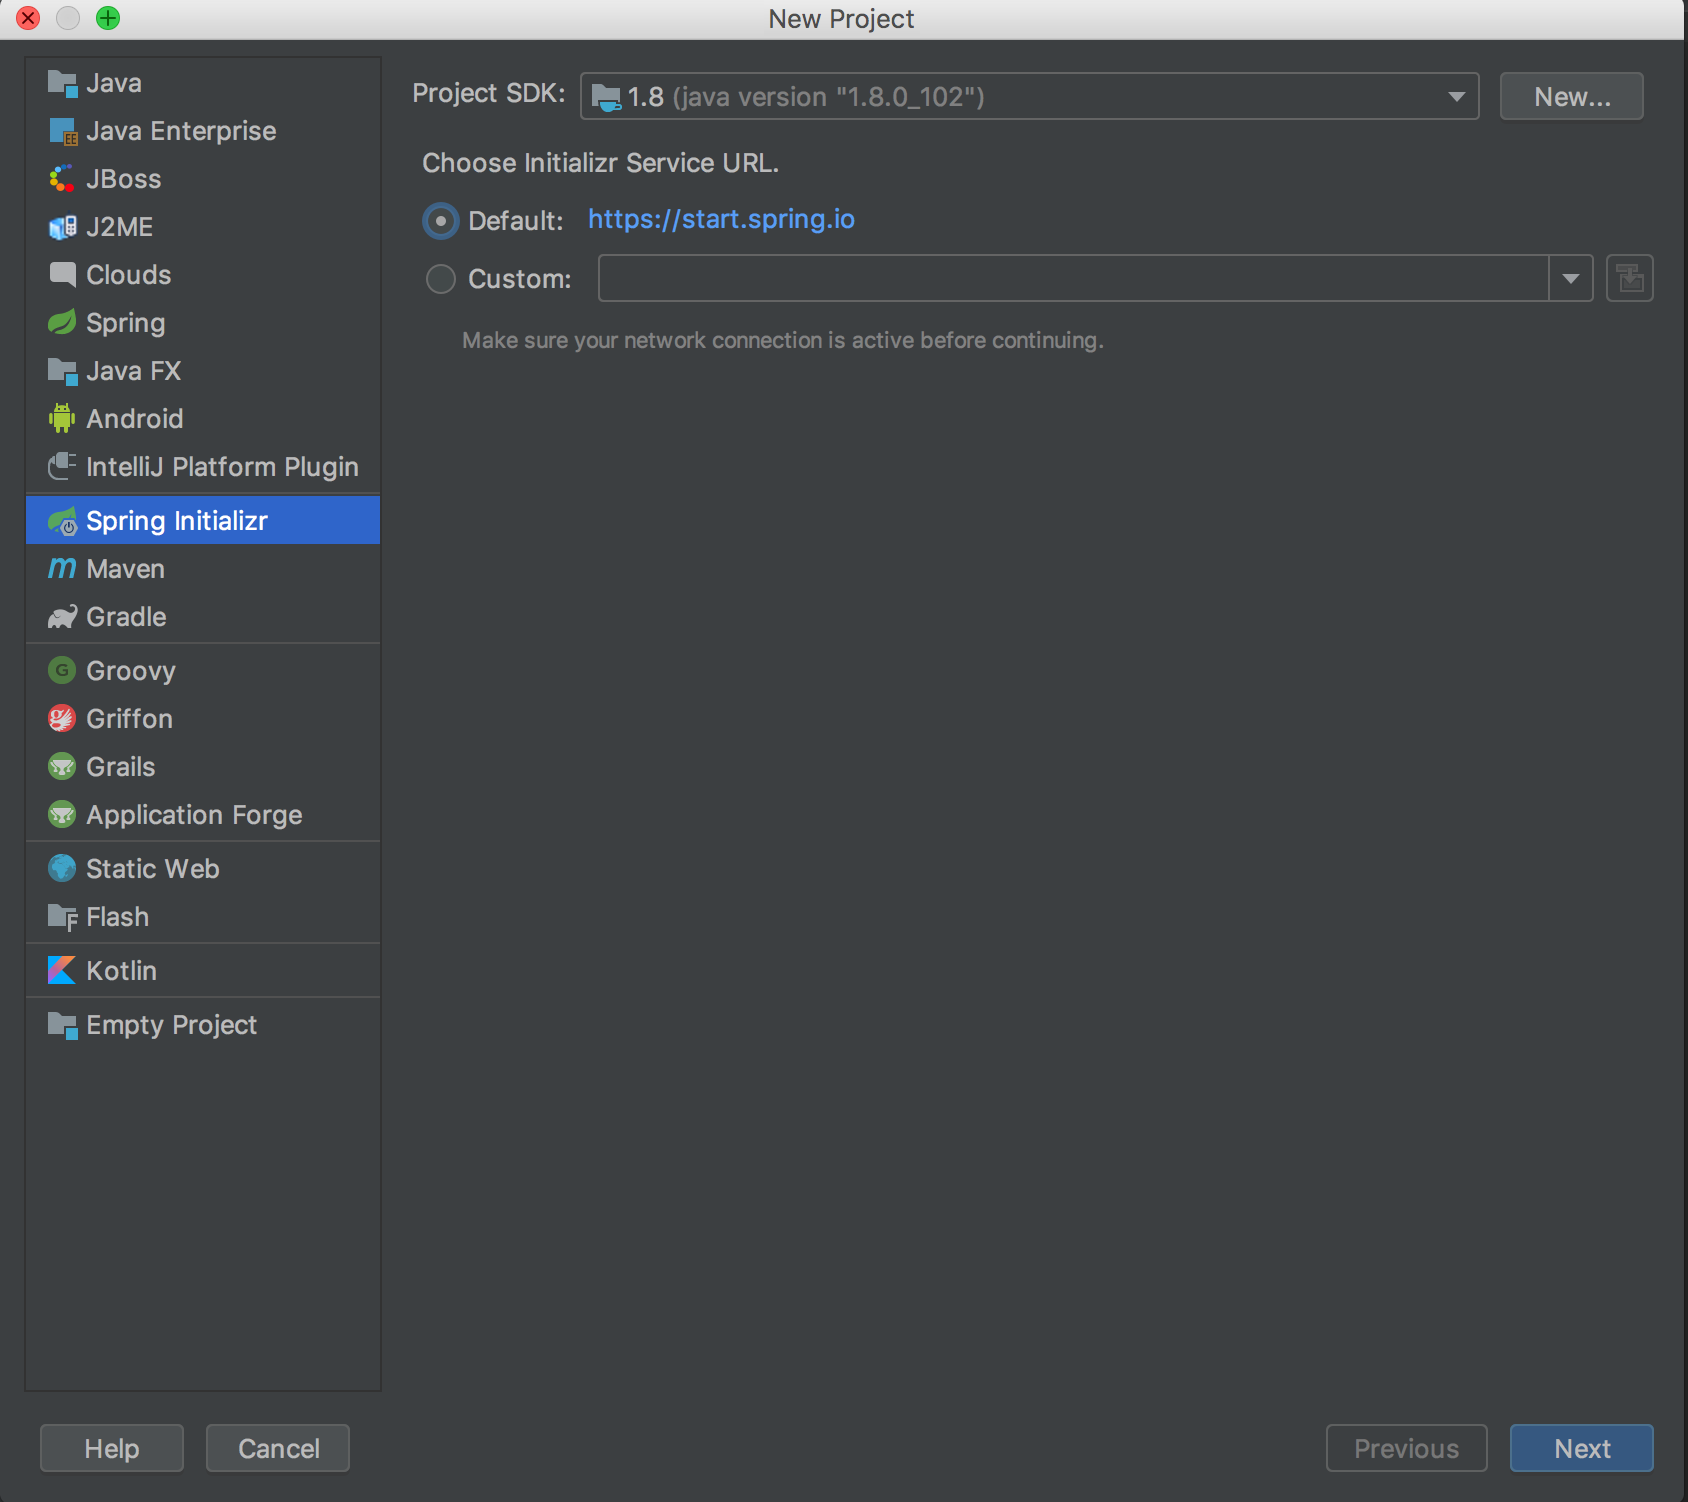
- 点击
Next进入下一步,Group: 自己可以根据自己的喜爱命名,自己的名字等都可以;Name:我们这里设置为user;Type:选择Maven;更多参数设置参考以下图片示例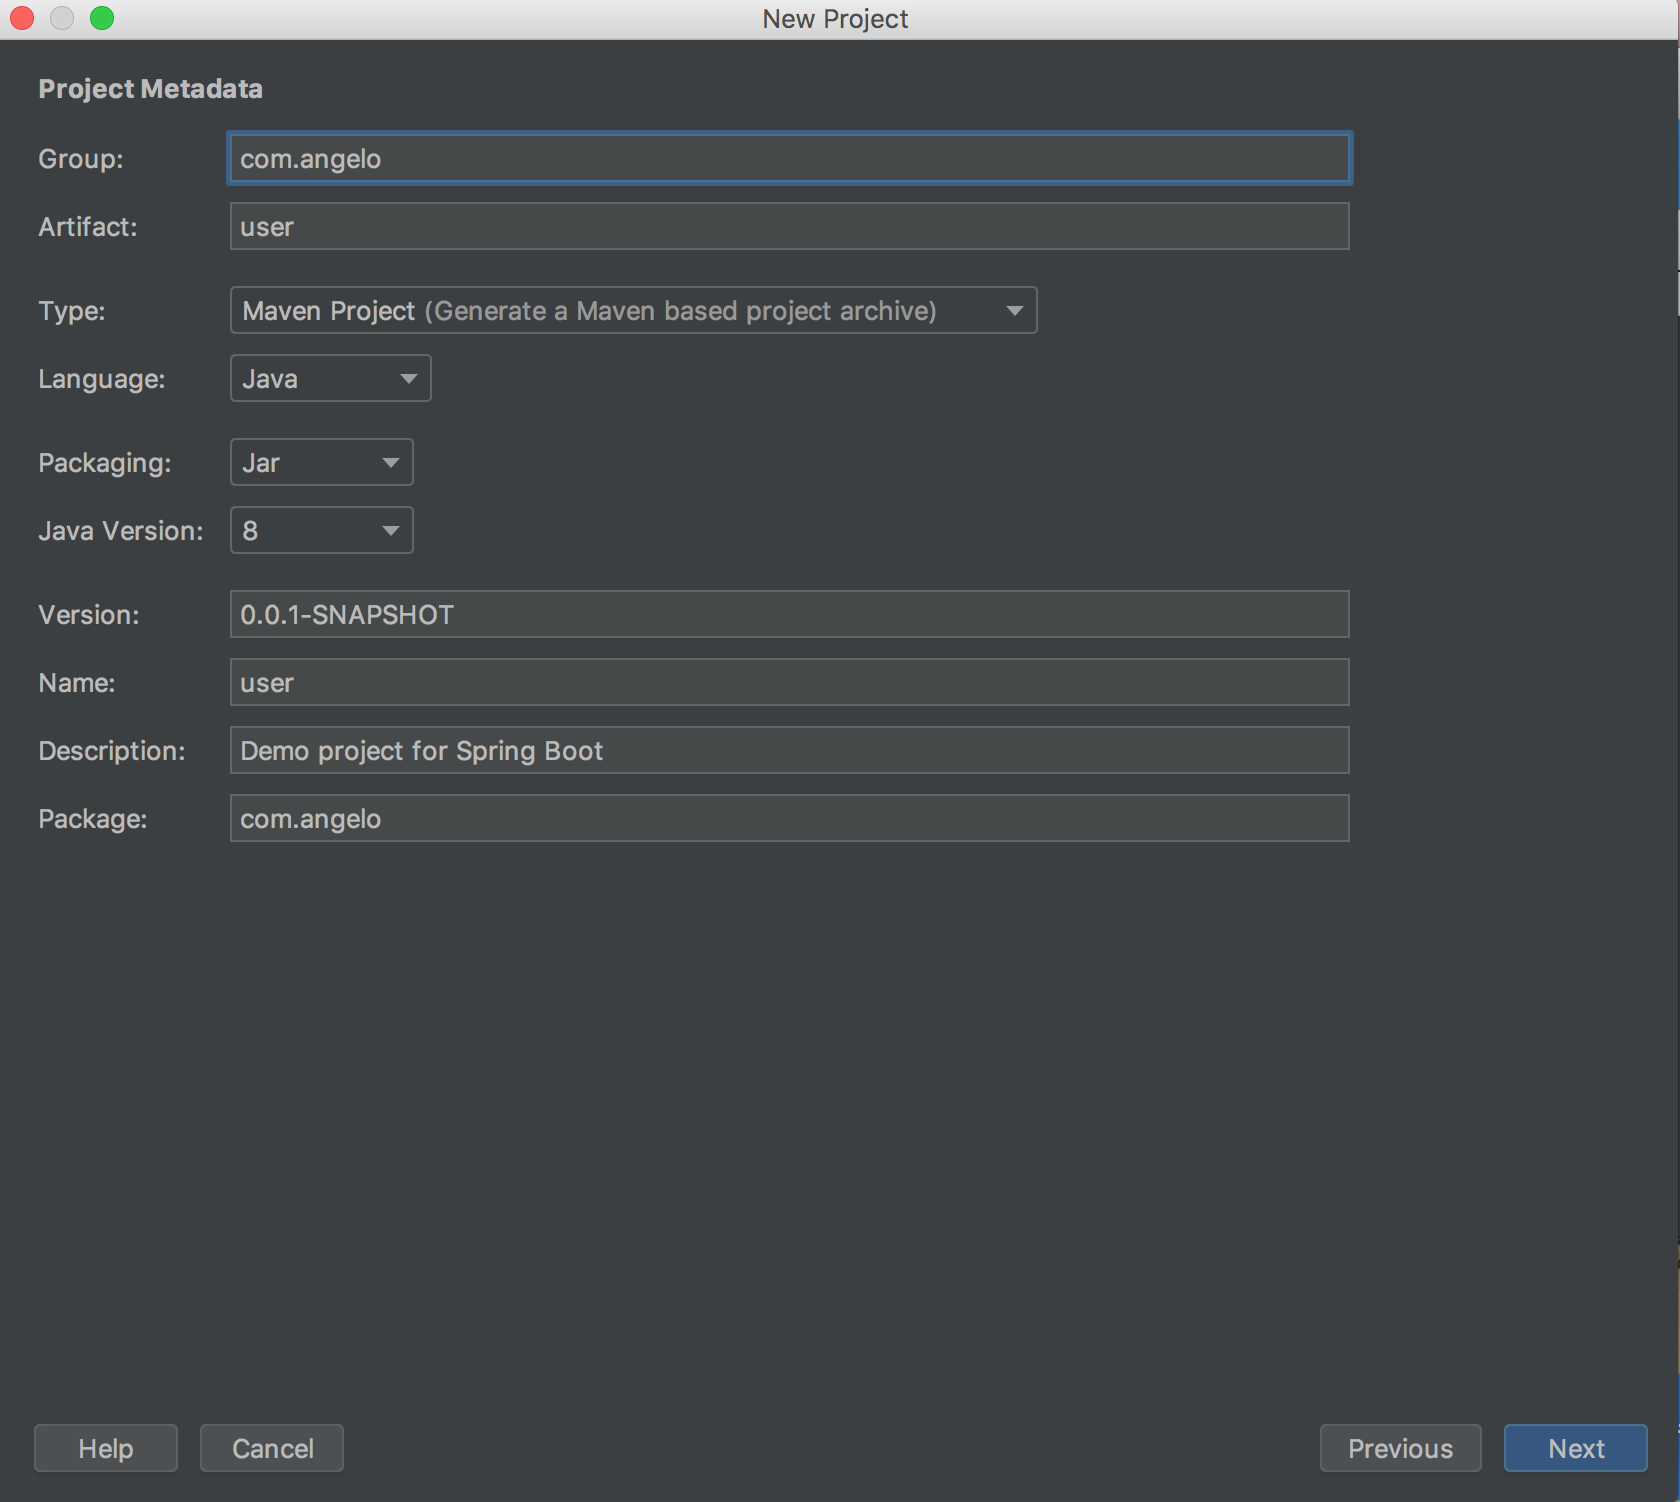
- 点击
Next进入下一步,可以看到很多Spring的组件供我们选择,这里只选择Web。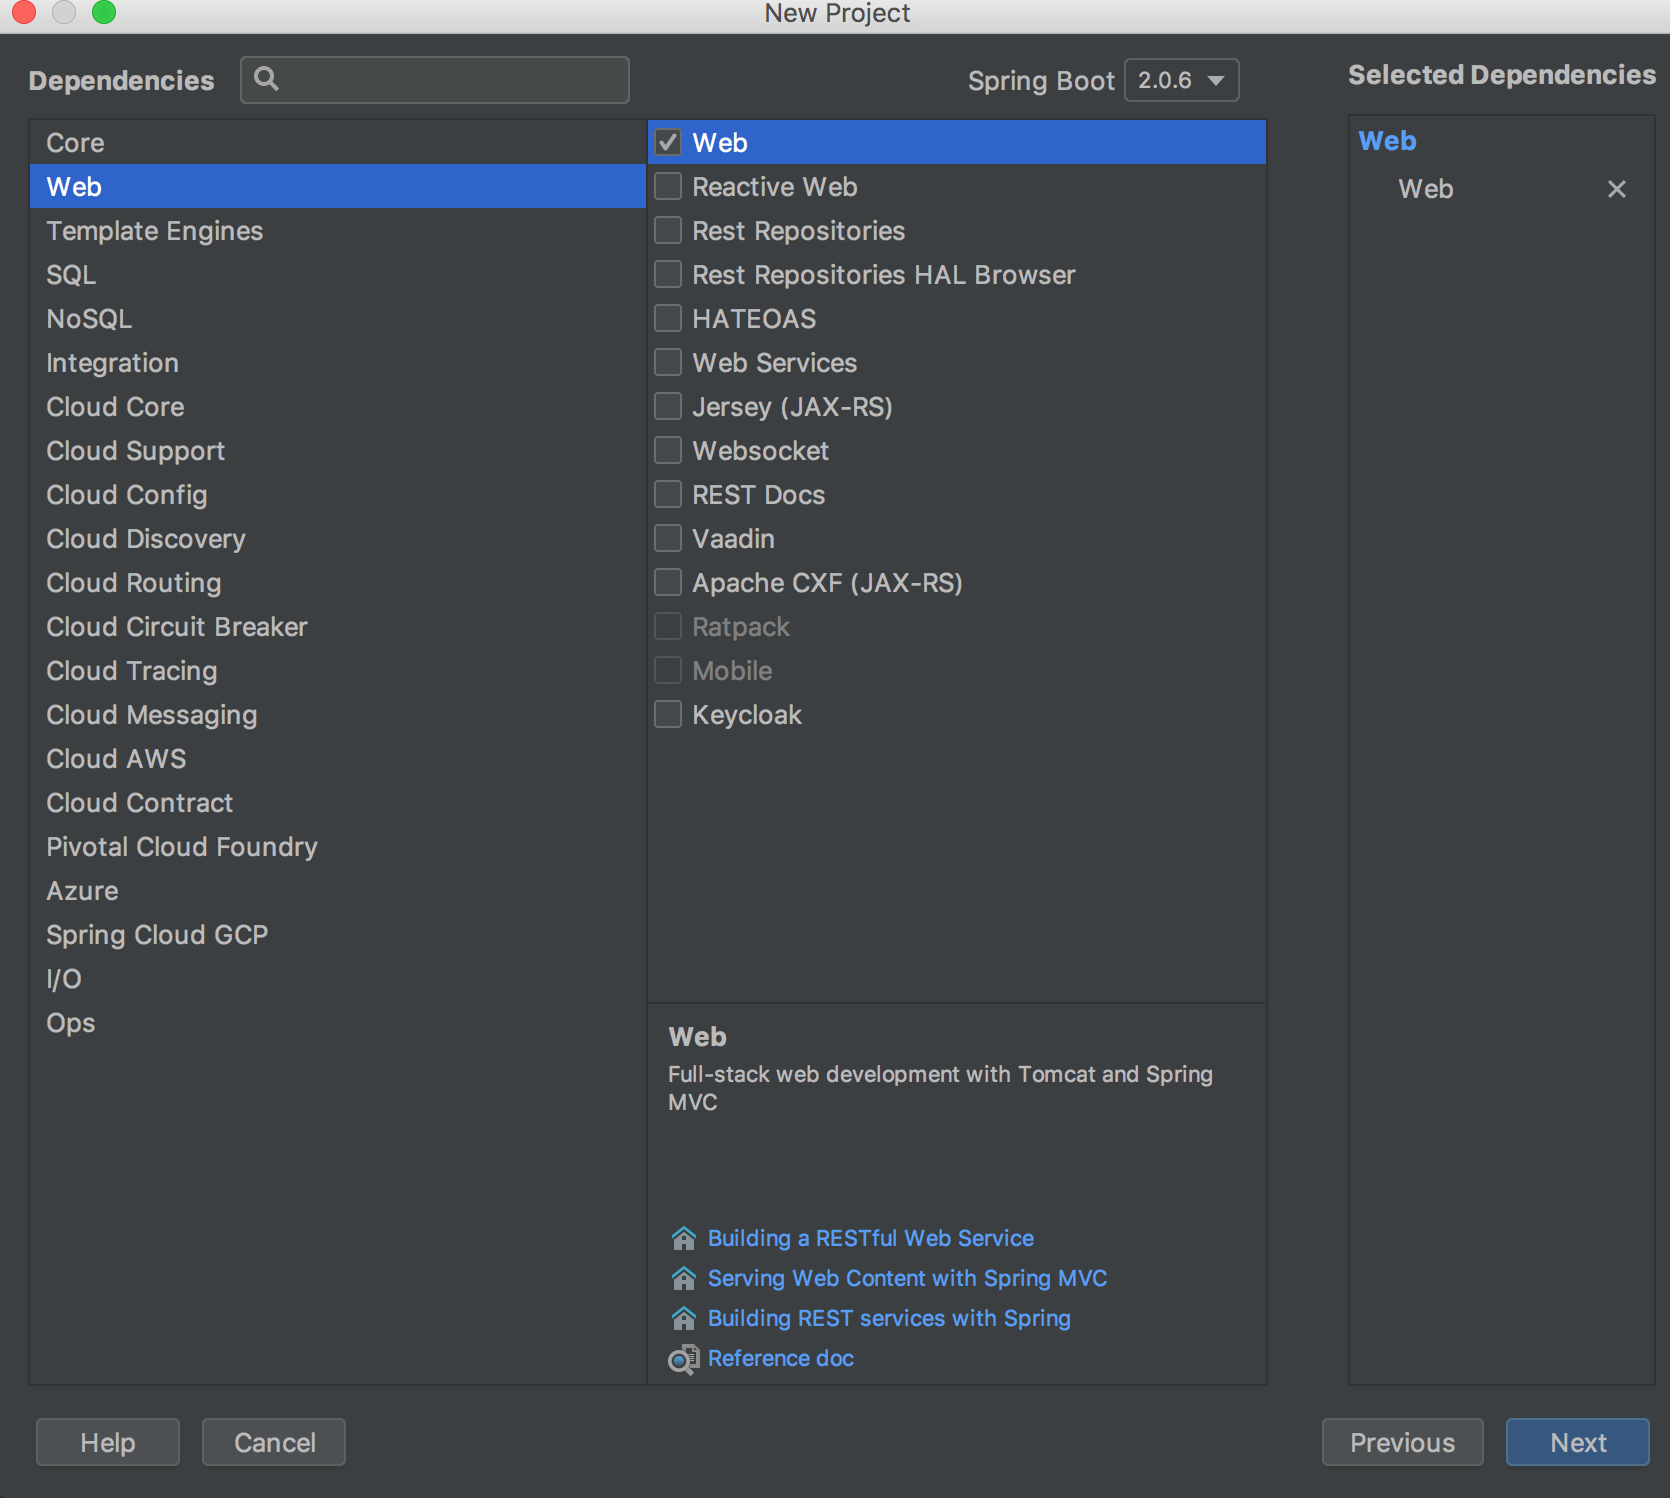
- 点击
Next进入下步,选择项目的存储位置,点击Finish完成整个工程的构建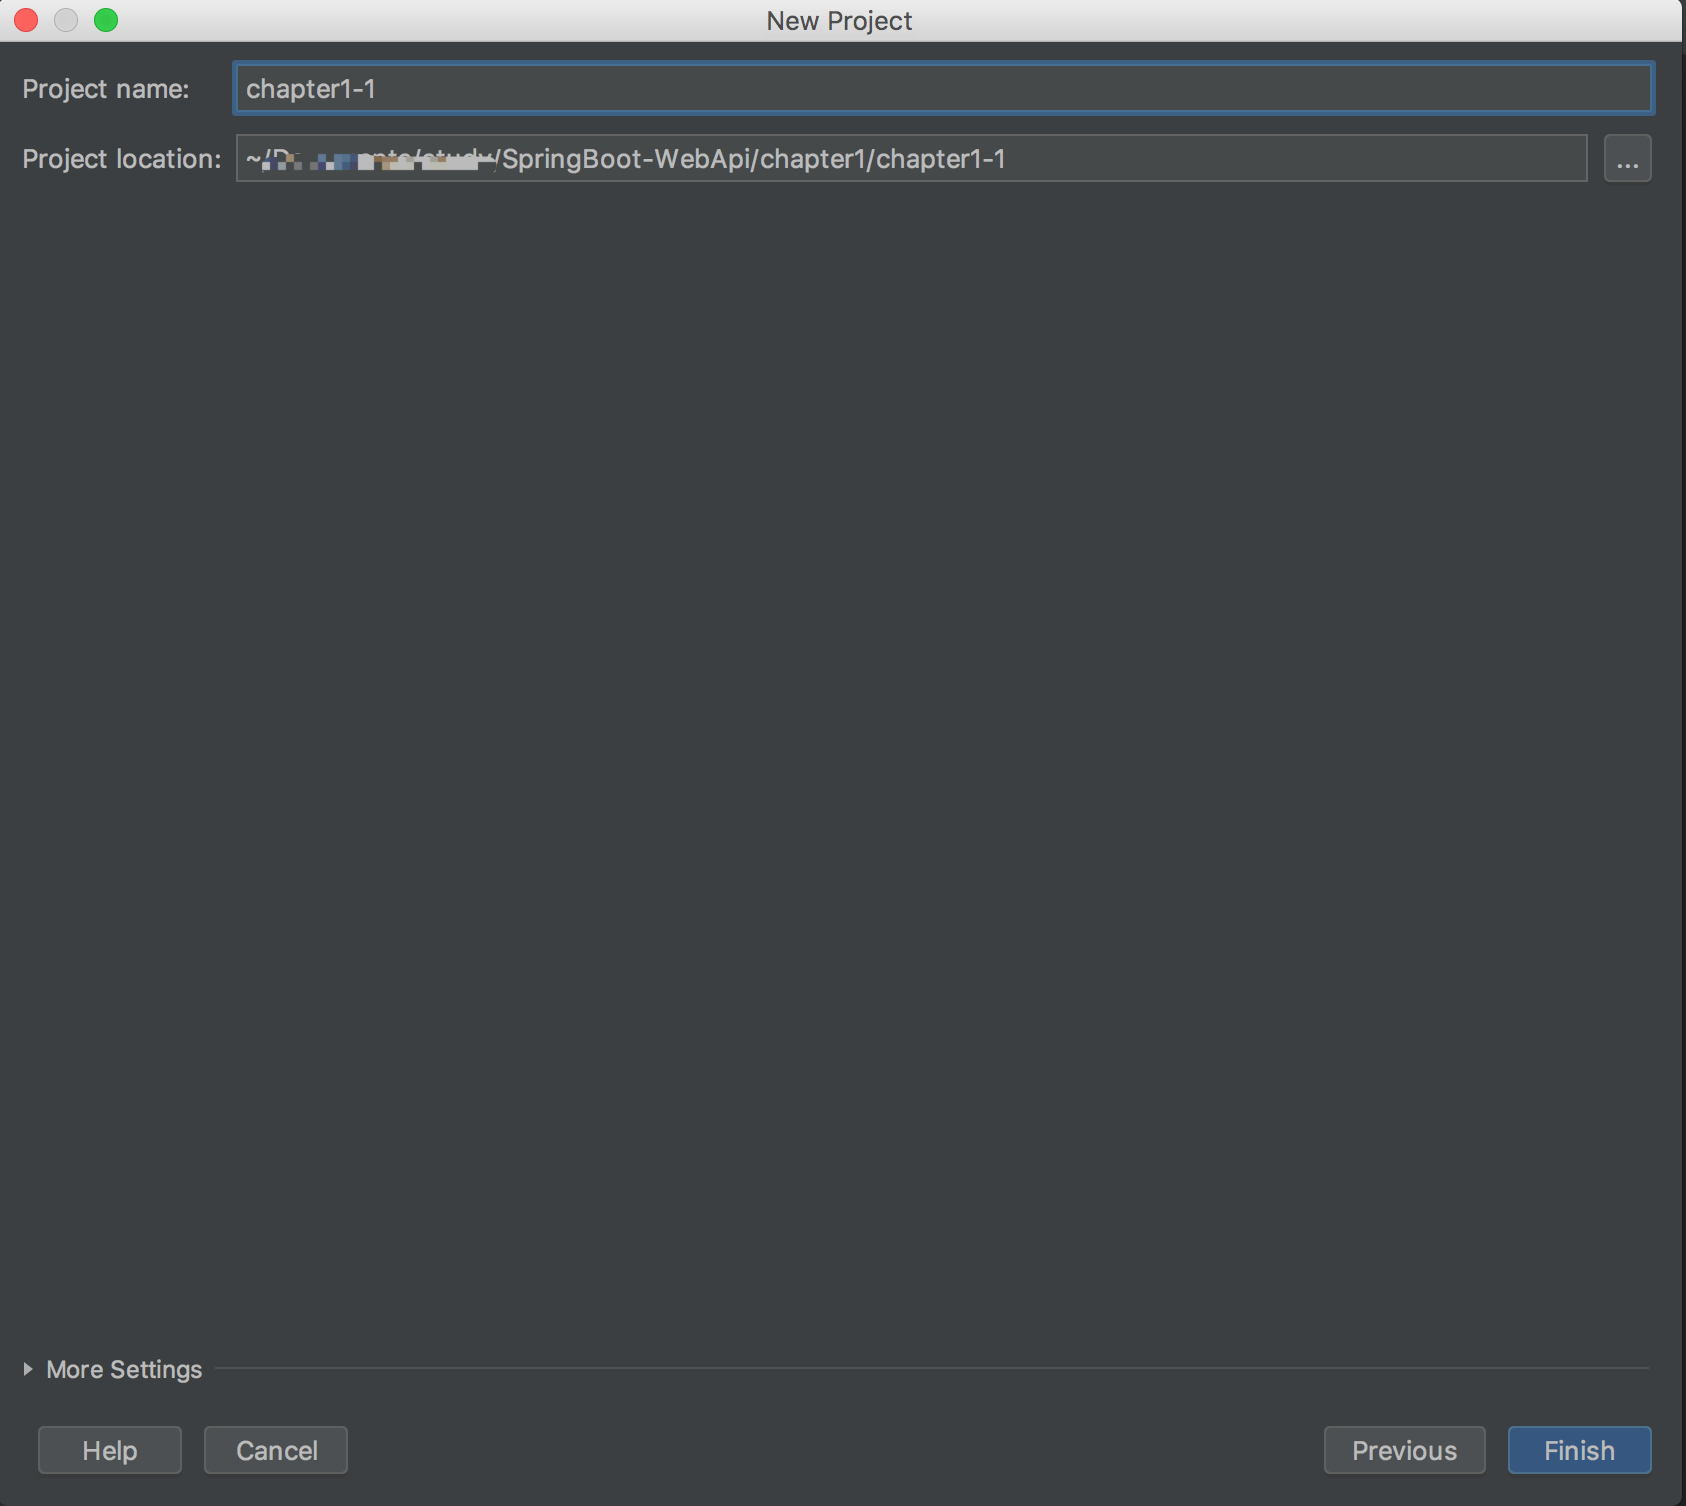 通过以上步骤完成了项目的创建,下面让我们来看下基本的项目结构: ├── src 业务代码目录 ├── main
├── java 程序入口 … ├── resources 资源配置文件 … ├── test 单元测试目录 ├── ├── pom.xmlpom.xml - spring-boot-starter-web: Web项目模块依赖
- spring-boot-starter-test: 测试模块依赖
- spring-boot-maven-plugin: Maven构建项目插件


 通过以上步骤完成了项目的创建,下面让我们来看下基本的项目结构: ├── src 业务代码目录 ├── main
...
   <dependencies>
       <dependency>
           <groupId>org.springframework.boot</groupId>
           <artifactId>spring-boot-starter-web</artifactId>
       </dependency>
       <dependency>
           <groupId>org.springframework.boot</groupId>
           <artifactId>spring-boot-starter-test</artifactId>
           <scope>test</scope>
       </dependency>
   </dependencies>
   <build>
       <plugins>
           <plugin>
               <groupId>org.springframework.boot</groupId>
               <artifactId>spring-boot-maven-plugin</artifactId>
           </plugin>
       </plugins>
   </build>
...
编写一个hello-springboot-程序
创建 HelloControllerl 类,内容如下
package com.angelo;
import org.springframework.web.bind.annotation.RequestMapping;
import org.springframework.web.bind.annotation.RestController;
import org.springframework.web.bind.annotation.RequestMethod;
@RestController
public class HelloController {
   @RequestMapping(value = "/hello", method = RequestMethod.GET)
   public String say() {
       return "Hello SpringBoot!!!";
   }
}
三种启动方式
启动有多种方式,让我们分别看下
- 方法一:启动类上,右键单机运行
Run 'UserApplication'
- 方法二:进到项目根目录执行命令
mvn spring-boot:run - 方法三:
- 先执行命令进行编译
mvn install - 进到target目录可以看到有个
user-0.0.1-SNAPSHOT.jar文件s $ cd target $ ls classes maven-archiver test-classes generated-sources maven-status user-0.0.1-SNAPSHOT.jar generated-test-sources surefire-reports user-0.0.1-SNAPSHOT.jar.original - 通过java -jar命令启动
java -jar user-0.0.1-SNAPSHOT.jar打开浏览器访问http://localhost:8080/hello,可以看到页面输出Hello SpringBoot!!!源码地址 https://github.com/Q-Angelo/SpringBoot-WebApi/tree/master/chapter1/chapter1-1

项目属性配置
后缀properties文件配置
SpringBoot默认使用 application.properties文件,位于/src/main/resources目录下,项目的默认启动端口是8080,下面对此进行修改
- server.port:修改端口号
- server.context-path:设置url前缀 SpringBoot2.0版本以下采用此方法
- server.servlet.context-path:设置url前缀SpringBoot2.0版本以上使用 application.properties
server.port=8081
server.servlet.context-path=/user
后缀yml文件配置
还可以使用.yml文件写,优点在于更简洁,推荐此格式 删除application.properties文件,新建application.yml文件 application.yml
server:
   port: 8081
   servlet:
       context-path: /user
通过以上配置在重启我们的项目,可以看到以下提示,Tomcat started on port(s): 8081 (http) with context path '/user'
2018-10-21 16:31:51.003  INFO 14696 --- [           main] o.s.b.w.embedded.tomcat.TomcatWebServer  : Tomcat started on port(s): 8081 (http) with context path '/user'
2018-10-21 16:31:51.008  INFO 14696 --- [           main] com.angelo.UserApplication               : Started UserApplication in 2.999 seconds (JVM running for 4.054)
在浏览器运行这次需要加上我们的前缀进行访问 http://localhost:8081/user/hello 
自定义属性配置及参数间引用
项目开发中通常还会需要自定义一些配置文件,格式和上面一样,让我们来设置一些访问该网站的用户信息 各参数之间也可相互引用,例如下面info通过${}在括号里引用了user.age application.yml
server:
   port: 8081
   servlet:
       context-path: /user
user:
   nickName: 张三
   age: 18
   info: 我今年${user.age}。
/src/main/resources目录下新建UserProperties.java文件 UserProperties.java
package com.angelo;
import org.springframework.boot.context.properties.ConfigurationProperties;
import org.springframework.stereotype.Component;
@Component
@ConfigurationProperties(prefix = "user") // 获取前缀是user的配置
public class UserProperties {
   private String nickName;
   private String info;
   public String getNickName() {
       return nickName;
   }
   public void setNickName(String nickName) {
       this.nickName = nickName;
   }
   public String getInfo() {
       return info;
   }
   public void setInfo(String info) {
       this.info = info;
   }
}
修改HelloController.java
package com.angelo;
import org.springframework.beans.factory.annotation.Autowired;
import org.springframework.web.bind.annotation.RequestMapping;
import org.springframework.web.bind.annotation.RestController;
import org.springframework.web.bind.annotation.RequestMethod;
@RestController
public class HelloController {
   @Autowired
   private UserProperties userProperties;
   @RequestMapping(value = "/hello", method = RequestMethod.GET)
   public String say() {
       return "我是 " + userProperties.getNickName() + userProperties.getInfo();
   }
}
启动,浏览器运行http://localhost:8081/user/hello  源码地址 https://github.com/Q-Angelo/SpringBoot-WebApi/tree/master/chapter1/chapter1-2
多环境动态配置
一个项目在开发中,至少会有两个环境:开发环境、生产环境分别来管理数据链接地址,接口请求地址等,那么对于这种多环境配置我们该怎么操作呢? SpringBoot中多环境配置需要满足 application-{profile}.yml格式,例如我们本次实例中即将要介绍的:
application-dev.yml:开发环境
server:
   port: 8080
   servlet:
       context-path: /user
user:
   nickName: 张三
   age: 18
   info: 我今年${user.age},目前访问的是dev环境。
application-pro.yml:生产环境
server:
   port: 8081
   servlet:
       context-path: /user
user:
   nickName: 李四
   age: 19
   info: 我今年${user.age},目前访问的是pro环境。
至于哪个文件会被加载,需要对spring.profiles.active属性进行设置。 修改application.yml文件,会默认加载application-dev.yml配置文件
spring:
   profiles:
       active: dev
通过java -jar的方式启动 进入项目根目录,执行命令进行编译 mvn install 开启了两个终端分别执行命令:
-
开启dev环境
java -jar target/user-0.0.1-SNAPSHOT.jar --spring.profiles.active=dev -
开启pro环境
java -jar target/user-0.0.1-SNAPSHOT.jar --spring.profiles.active=pro
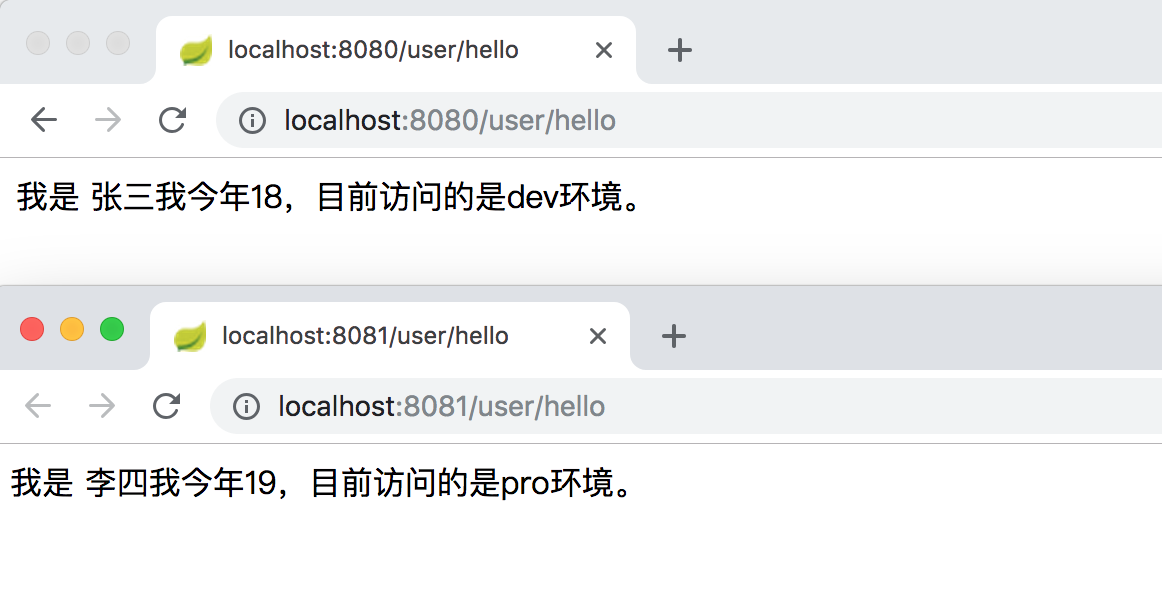
以下为两个终端的启动信息,可以看到分别开启了8080端口、8081端口  浏览器端同样开启两个窗口分别执行:
- http://localhost:8080/user/hello
- http://localhost:8081/user/hello 分别返回不同环境对应的配置信息,
 通过以上实例,可以总结出以下3点:
 - application.yml 用来存放公共配置,设置spring.profiles.active=dev,默认开发环境配置
application-{profile}.yml配置不同环境的内容- 通过命令行
java -jar target/user-0.0.1-SNAPSHOT.jar --spring.profiles.active=pro这种方式激活当前需要运行的环境信息 源码地址 https://github.com/Q-Angelo/SpringBoot-WebApi/tree/master/chapter1/chapter1-3
 通过以上实例,可以总结出以下3点:


 1186
1186


 被折叠的 条评论
为什么被折叠?
被折叠的 条评论
为什么被折叠?
 到【灌水乐园】发言


