


本文综合Learn React with TypeScript 3一书和Fullstack React(第r39版)一书中的相关内容写成,有较大改动
开发环境
- Linux Mint 19
- node 10.6.0
- create-react-app 3.0.1
创建项目
首先新建项目:
$ create-react-app reactshop --typescript
安装TSLint:
$ cd reactshop
$ npm i -D tslint tslint-react tslint-config-prettier
在项目根目录下新建tslint.json文件,内容如下(这里是我的偏好,读者应自行更改):
{
  "extends": [
    "tslint:recommended",
    "tslint-react",
    "tslint-config-prettier"
  ],
  "rules": {
    "jsx-boolean-value": [true, "never"],
    "jsx-curly-spacing": [true, "never"],
    "jsx-equals-spacing": [true, "never"],
    "jsx-key": true,
    "jsx-self-close": true,
    "jsx-space-before-trailing-slash": true,
    "curly": [true, "ignore-same-line"],
    "member-access": true,
    "semicolon": [true, "never"],
    "trailing-comma": [true, {
      "multiline": "always",
      "singleline": "never"
    }],
    "quotemark": [
      true,
      "single",
      "jsx-double",
      "avoid-template",
      "avoid-escape"
    ],
    "object-literal-sort-keys": [
      true,
      "match-declaration-order"
    ]
  },
  "linterOptions": {
    "exclude": [
      "node_modules/**/*.ts"
    ]
  }
}
往根目录下的tsconfig.json文件中加入严格空值检查选项:
{
  "compilerOptions": {
    "strictNullChecks": true,
    // ...
  }
}
安装React Router:
$ npm i -S react-router-dom
$ npm i -D @types/react-router-dom
删去下面这些自动生成的文件:
App.cssApp.test.tsxApp.tsxserviceWorker.ts
移除index.tsx中对上面文件的引用,并将其内容更改为:
import 'bootstrap/dist/css/bootstrap.min.css'
import React from 'react'
import ReactDOM from 'react-dom'

import './index.css'
import ProductsPage from './pages/ProductsPage'

ReactDOM.render(
    <div></div>,
    document.getElementById('root'),
)
到此项目创建完成。
基本页面
我们开发的是一个简单的产品展示页面,所以首先编造一些需要展示的商品数据。在src文件夹下新建data文件夹,并在其中新建products.ts文件,内容为:
export interface IProduct {
  id: number
  name: string
  price: number
  description: string
}

export const products: IProduct[] = [
  {
    id: 1,
    name: 'React Router',
    price: 8,
    description: 'A collection of navigational components that compose declaratively with your app',
  },
  {
    id: 2,
    name: 'React Redux',
    price: 12,
    description: 'A library that helps manage state across your app',
  },
  {
    id: 3,
    name: 'React Apollo',
    price: 12,
    description: 'A library that helps you interact with a GraphQL backend',
  },
]
以上就是我们等下会用到的几条简单的数据。
接下来我们来编写显示这些产品的页面。在src文件夹下新建pages文件夹,并在其中新建ProductsPage.tsx文件,写入如下内容:
import React, {Component} from 'react'

import {IProduct, products} from '../data/products-data'
接着我们先为该页面组件的状态声明一个interface:
interface IState {
  products: IProduct[]
}
然后是产品列表页面组件(的骨架):
class ProductsPage extends Component<{}, IState> {

  public constructor(props: {}) {
    super(props)
    this.state = {
      products: [],
    }
  }

}

export default ProductsPage
利用componentDidMount来“读取”数据到组件状态中:
public componentDidMount() {
  this.setState({products})
}
最后是render方法,一一展示状态中的产品信息:
public render() {
  return <div className="page-container">
    <p>Welcome to React Shop where you can get all your tools for ReactJS!</p>
    <ul className="product-list">
      {this.state.products.map(product =>
          <li key={product.id} className="product-list-item">
            {product.name}
          </li>,
      )}
    </ul>
  </div>
}
往index.css文件中加入如下样式:
.page-container {
  text-align: center;
  padding: 20px;
  font-size: large;
}

.product-list {
  list-style: none;
  margin: 0;
  padding: 0;
}

.product-list-item {
  padding: 5px;
}
现在把这个页面展示出来。在src文件夹下新建App.tsx文件,内容如下:
import React, {FC} from 'react'
import ProductsPage from './pages/ProductsPage'

const App: FC = () => <ProductsPage />

export default App
可以简单地理解为,现在我们的应用只有一个页面,即上面定义的产品列表页面。
修改index.tsx:将render调用中的<div></div>改为<App />(别忘了导入该组件)。
然后运行npm start,浏览器会打开如下页面:

接下来我们创建另一个页面:管理员页面。在pages文件夹下新建文件AdminPage.tsx,写入如下内容:
import React, {FC} from 'react'

const AdminPage: FC = () => <div className="page-container">
  <h1>Admin Panel</h1>
  <p>You should only be here if you have logged in</p>
</div>

export default AdminPage
这个管理员页面应当只有登录且有相应权限的用户可以访问。我们将在后面实现这一需求。现在它只是显示如上定义的一句话。
如果我们把App.tsx中展示的页面组件改为<AdminPage />,则浏览器会显示:

响应地址栏
现在提出如下需求:
- 用户访问
/products时,显示产品列表页面 - 用户访问
/admin时,显示管理员页面
也就是说我们的应用需要相应浏览器的当前URL。Web API里的window.location可以用来获取当前URL的path部分。我们可以利用它自己来写一个路由映射组件。
在src文件夹下新建components文件夹,在其中新建SimpleRoute.tsx文件,写入如下内容:
import React, {ComponentType, FC} from 'react'

interface IProps {
  path: string
  component: ComponentType
}

const SimpleRoute: FC<IProps> = ({path, component}) => {
  const currentPath = window.location.pathname
  if (currentPath.match(path)) {
    return React.createElement(component)
  }
  return null
}

export default SimpleRoute
打开App.tsx,导入SimpleRoute,并将App组件改写如下:
const App: FC = () => <div>
  <SimpleRoute path="/products" component={ProductsPage} />
  <SimpleRoute path="/admin" component={AdminPage} />
</div>
这样,我们就实现了上面提出的两个需求。值得指出的是,现在当我们访问形如/productsXgdjls9g或者/admin/ggu904这样的路径时,应用也只会去匹配开头的那部分路径。
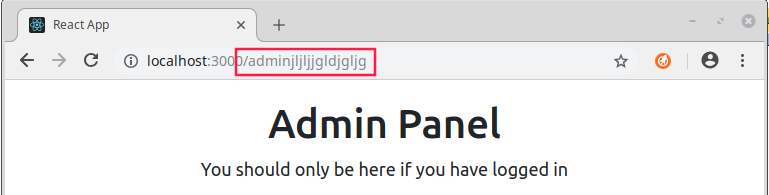
我们可以继续打磨SimpleRoute组件,让它支持全文匹配与否的配置,甚至支持路径参数的解析,但这些属于细节,而无法展示更多原理,我们就不自己实现了。
响应链接
接下来我们来考虑这样一个新的要求:
- 在所有的页面上展示两个链接,分别指向
/products和/admin路径;当用户点击它们时,地址栏内容相应地改变,显示的页面也随之变化
先来实现第一个。我们可以将这两个链接展示在页面的头部区域,并为这个区域新建一个组件components/Header.tsx:
import React, {FC} from 'react'

import logo from '../logo.svg'

const Header: FC = () => <header className="header">
  <img src={logo} alt="logo" className="header-logo">
  <h1 className="header-title">React Shop</h1>
  <nav>
    <a href="/products" className="header-link">Products</a>
    <a href="/admin" className="header-link">Admin</a>
  </nav>
</header>

export default Header
index.css中增加如下样式:
.header {
  text-align: center;
  background-color: #222;
  height: 170px;
  padding: 20px;
  color: white;
}

.header-logo {
  animation: header-logo-spin infinite 20s linear;
  height: 80px;
}

@keyframes header-logo-spin {
  from {
    transform: rotate(0deg);
  }
  to {
    transform: rotate(360deg)
  }
}

.header-title {
  font-size: 1.5em;
}

.header-link {
  color: #fff;
  text-decoration: none;
  padding: 5px;
}
在App里展示这个头部:
const App: FC = () => <div>
  <Header />
  <SimpleRoute path="/products" component={ProductsPage} />
  <SimpleRoute path="/admin" component={AdminPage} />
</div>
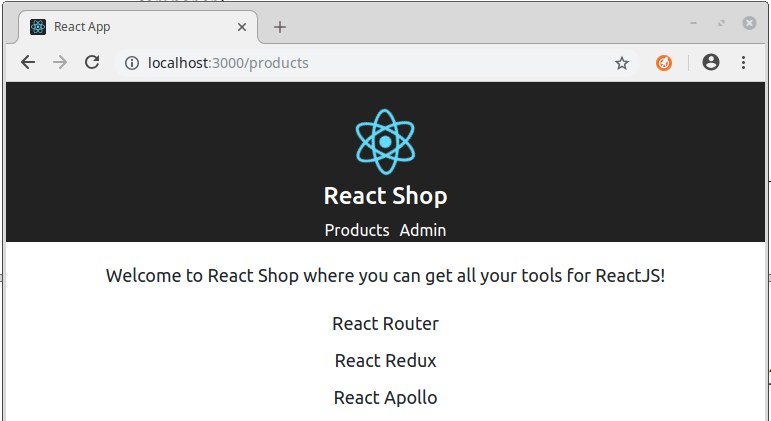
浏览器刷新完成后,页面上确实显示有两个链接,而且都能够把我们导向正确的路径。
不过现在有一个问题,因为我们使用的是HTML的原生元素<a>,所以上面的链接会向服务端发起请求,且浏览器会在得到回复后重新刷新并展示所回复的页面,这不符合“单页面”的要求。所以我们还是得利用Web API提供的接口来阻止这一行为并修改浏览器的地址栏。window.history是一个代表当前会话的历史的对象,提供back()和forward()这样的方法来在历史页面中进行跳转,以及pushState()方法将浏览器导航到新的地址。这正是我们需要的。
新建components/SimpleLink.tsx文件,写入:
import React, {FC} from 'react'

interface IProps {
  to: string
  className?: string
}

const SimpleLink: FC<IProps> = (props) => {
  const handleClick = (e: React.MouseEvent<htmlanchorelement>) => {
    e.preventDefault()
    window.history.pushState(null, props.to, props.to)
  }
  return <a onClick={handleClick} href={props.to} className={props.className}>
    {props.children}
  </a>
}

export default SimpleLink
然后用SimpleLink替换Header中的<a>:
const Header: FC = () => <header className="header">
  // ...
  <nav>
    <SimpleLink to="/products" className="header-link">Products</SimpleLink>
    <SimpleLink to="/admin" className="header-link">Admin</SimpleLink>
  </nav>
</header>
浏览器刷新后,可以看到,现在的两个链接确实会正确地更新地址栏,也不会再引发页面的重载,但是问题是,点击它们也不会让应用更新页面的显示。这是为什么呢?回顾下SimpleRoute组件,很显然,从Web API获取当前路径以及检查匹配与否都发生在渲染阶段,而浏览器的路径(或者更准确地来说,是本地会话的历史)的改变,并不会让该组件重新渲染。这就是症结所在:我们需要监听会话的历史的改变,然后触发SimpleRoute的重新渲染。
由于Web API并没有提供直接监听会话历史改变的接口,所以我们需要使用一个名叫history的第三方包。简单来理解,它是对window.history的一层封装,提供了对各大浏览器的兼容和一些接口的改进和功能上的增强。另外,它也是React Router的依赖之一,所以我们这里不用另行安装。
为使用这套接口,打开App.js,加入如下代码:
import {createBrowserHistory} from 'history'

export const history = createBrowserHistory()
将SimpleRoute改写如下:
class SimpleRoute extends Component<IProps> {

  private unregister?: () => void

  public componentDidMount() {
    this.unregister = history.listen(() => this.forceUpdate())
  }

  public componentWillUnmount(): void {
    if (this.unregister) {
      this.unregister()
    }
  }

  public render() {
    const currentPath = history.location.pathname
    const {path, component: Comp} = this.props
    if (currentPath.match(path)) {
      return <Comp />
    }
    return null
  }
}
这里我们在componentDidMount()里注册了一个event handler去监听history的路径变化事件。然后在componentWillUnmount()里注销。
检查下应用,现在还是不能正确更新页面,那是因为我们的SimpleLink还没有使用history接口。更新其代码:
const SimpleLink: FC<IProps> = (props) => {
  const handleClick = (e: React.MouseEvent<htmlanchorelement>) => {
    e.preventDefault()
    history.push(props.to)
  }
  // ...
}
现在我们的应用就能正确地通过链接在页面之间切换了。
重构
上面的代码里,有很多“反模式”的地方:
SimpleRoute和SimpleLink直接通过一个“外部对象”(history)来共享状态SimpleRoute和SimpleLink都属于“末端组件”,最好都是方法组件,但为了监听外部事件,SimpleRoute是以类组件的方式实现的
我们使用React 16.3开始提供的新Context API来消灭这些反模式。
打开App.tsx文件,将其内容替换为:
import {createBrowserHistory, History} from 'history'
import React, {Component} from 'react'

import Header from './components/Header'
import SimpleRoute from './components/SimpleRoute'
import AdminPage from './pages/AdminPage'
import ProductsPage from './pages/ProductsPage'


export interface IRoutingContext {
  history: History
}

export const RoutingContext =
    React.createContext<IRoutingContext>({} as IRoutingContext)

const history = createBrowserHistory()

class App extends Component {

  public constructor() {
    super({})
    history.listen(() => this.forceUpdate())
  }

  public render() {
    return <Routingcontext.Provider value={{history}}>
      <Header />
      <SimpleRoute path="/products" component={ProductsPage} />
      <SimpleRoute path="/admin" component={AdminPage} />
    </RoutingContext.Provider>
  }
}

export default App
上面有了context的提供者为其子元素提供history对象,下面要做的就是消费这一context。
将SimpleLink更改为:
const SimpleLink: FC<IProps> = (props) => <RoutingContext.Consumer>{
  (ctx: IRoutingContext) => {
    const handleClick = (e: React.MouseEvent<htmlanchorelement>) => {
      e.preventDefault()
      ctx.history.push(props.to)
    }
    return <a onClick={handleClick} href={props.to} className={props.className}>
      {props.children}
    </a>
  }}</RoutingContext.Consumer>
注意context的消费者(RoutingContext.Consumer)接收的是参数为该context数据类型的方法组件。
类似地,SimpleRoute可以改为:
const SimpleRoute: FC<IProps> = (props: IProps) => <RoutingContext.Consumer>{
  (ctx: IRoutingContext) => {
    const currentPath = ctx.history.location.pathname
    const {path, component: Comp} = props

    if (currentPath.match(path)) {
      return <Comp />
    }
    return null
  }
}</RoutingContext.Consumer>
现在我们的应用又能够正常运行,但是我们可以进一步把涉及到路由的逻辑从App组件中剥离,将它们移到新建的components/SimpleRouter.tsx文件中:
import {createBrowserHistory, History} from 'history'
import React, {Component} from 'react'

export interface IRoutingContext {
  history: History
}

export const RoutingContext =
    React.createContext<IRoutingContext>({} as IRoutingContext)

const history = createBrowserHistory()

class SimpleRouter extends Component<{}> {

  public constructor(props: {}) {
    super(props)
    history.listen(() => this.forceUpdate())
  }

  public render() {
    return <RoutingContext.Provider value={{history}}>
      {this.props.children}
    </RoutingContext.Provider>
  }
}

export default SimpleRouter
这样可以使App专门负责装配的工作:
const App: FC = () => <SimpleRouter>
  <Header />
  <SimpleRoute path="/products" component={ProductsPage} />
  <SimpleRoute path="/admin" component={AdminPage} />
</SimpleRouter>
这样,应用还是运行正确,且代码更加清晰易读。
页面跳转
目前我们的应用可以正确地处理开头为/products和/admin的路径。下面我们来实现这样一个需求:
- 用户访问Admin页面时,如果没有登录,浏览器会在倒数3秒后跳转到登录页面
首先,在pages文件夹新建LoginPage.tsx如下:
import React, {FC} from 'react'

const LoginPage: FC = () => <div className="page-container">
  <p>You will be able to log in here</p>
</div>

export default LoginPage
往App中加入一条路由:
const App: FC = () => <SimpleRouter>
  // ...
  <SimpleRoute path="/login" component={LoginPage} />
</SimpleRouter>
将AdminPage.tsx整个改写为:
import React, {Component} from 'react'
import SimpleRedirect from '../components/SimpleRedirect'

interface IState {
  secondsLeft: number
}

class AdminPage extends Component<{}, IState> {

  public constructor(props: {}, private intervalId?: NodeJS.Timeout) {
    super(props)
    this.state = {
      secondsLeft: 3,
    }
  }

  public componentDidMount() {
    this.intervalId = setInterval(this.countDown, 1000)
  }

  public componentWillUnmount() {
    if (this.intervalId) {
      clearInterval(this.intervalId)
    }
  }

  public render() {
    return <div className="page-container">
      <h1>Admin Panel</h1>
      <p>You should only be here if you have logged in</p>
      <p>You haven't logged in. Redirecting to the login page in {this.state.secondsLeft} seconds</p>
      {this.state.secondsLeft < 1 ? <SimpleRedirect to="/login" /> : null}
    </div>
  }

  private countDown = () => {
    this.setState({
      secondsLeft: this.state.secondsLeft - 1,
    })
  }
}

export default AdminPage
上面,我们展示了马上将要创建的SimpleRedirect组件的用法。它的to属性用于指定跳转的目标路径。而从之前的内容我们知道,实现浏览器的路径跳转其实就是调用history.push()方法,而history对象可以通过路由context获得。
新建components/SimpleRedirect.tsx文件,内容为:
import React, {FC} from 'react'

import {IRoutingContext, RoutingContext} from './SimpleRouter'

interface IProps {
  to: string
}

const SimpleRedirect: FC<IProps> = props => <RoutingContext.Consumer>
  {(ctx: IRoutingContext) => {
    ctx.history.push(props.to)
    return null
  }}
</RoutingContext.Consumer>

export default SimpleRedirect
值得注意的是,这个组件本身并不渲染任何HTML元素,仅仅是调用接口来操纵浏览器的URL。
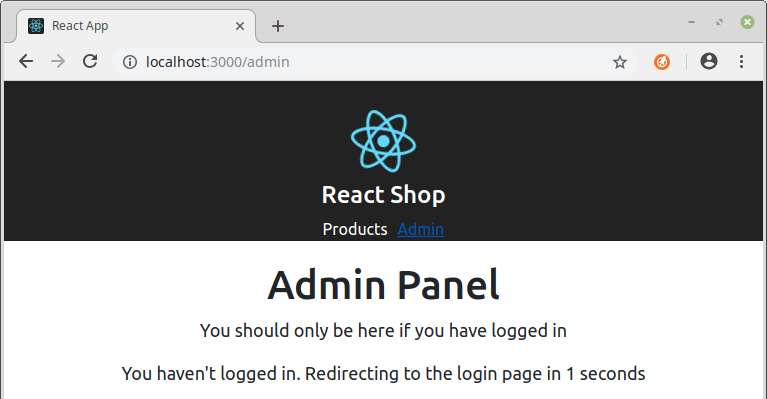
访问/admin路径,页面会展示一条倒数3秒的信息,并在最后成功跳转到登录页面。
切换到React Router
上面我们自己动手实现了路由相关的若干组件。这一节我们要把它们替换成React Router提供的组件。它们背后的实现原理和思路是差不多的。
首先我们从components文件夹里删除以下文件:
SimpleLink.tsxSimpleRedirect.tsxSimpleRoute.tsxSimpleRouter.tsx
接着打开App.tsx文件,删除对上述文件的引用,并从react-router-dom中导入相对应的组件,加以替换:
// import SimpleRoute from './components/SimpleRoute'
// import SimpleRouter from './components/SimpleRouter'
import {BrowserRouter as Router, Route} from 'react-router-dom'

const App: FC = () => <Router>
  <Header />
  <Route path="/products" component={ProductsPage} />
  <Route path="/admin" component={AdminPage} />
  <Route path="/login" component={LoginPage} />
</Router>
同样地,在Header.tsx里,用react-router-dom的Link替换SimpleLink;在AdminPage.tsx里,我们用react-router-dom中的Redirect来替换SimpleRedirect。应用依然正常运行。
现在我们来看看React Router还提供了哪些其他好用的功能。
NavLink
例如这样一个新的需求:
- 当浏览器显示产品或者管理员页面时,其在头部区域的对应的链接应该展示不同的样式
这时我们就可以使用React Router提供的NavLink组件。它和Link组件非常类似,只是我们可以给它指定额外的类名(通过activeClassName属性),当它的路径和当前路径匹配时,则其元素会加上这些类名。
打开Header.tsx,做如下改动:
// import {Link} from 'react-router-dom'
import {NavLink} from 'react-router-dom'

const Header: FC = () =》 <header className="header">
  // ...
  <nav>
    <NavLink to="/products" className="header-link" activeClassName="header-link-active">
      Products
    </NavLink>
    <NavLink to="/admin" className="header-link" activeClassName="header-link-active">
      Admin
    </Navlink>
  </nav>
</header>
往index.css中加入:
.header-link-active {
  border-bottom: #ebebeb solid 2px;
}
现在应用就会突显“当前链接”以额外的样式:

路径参数
如果我们想把路径中的某一部分截取出来,在处理逻辑中使用,那就需要用到路径参数。简单来说,React Router里带有参数的路径模式都形如/products/:id,如果用户访问其中:id
比如我们要求:
- 把产品列表页面的每一行产品名称都转化成一个链接,当用户点击时,跳转到单独展示该产品信息的单个产品页面
- 单个产品页面的路径应该形如
/products/:id,其中:id代表该产品的ID
显然,应用中,我们需要把:id这一部分从路径里截取出来。
先为单个产品页面添加一条路由匹配规则。打开App.tsx,加入下面代码中中间那一行:
<Route path="/products" component={ProductsPage} />
// 新加下面这一行
<Route path="/products/:id" component={ProductPage} />
<Route path="/admin" component={LoginPage} />
接着在pages文件夹下新建ProductPage.tsx文件,先写入下面的代码:
import React, {Component} from 'react'
import {RouteComponentProps} from 'react-router'

import {IProduct} from '../data/products-data'

type Props = RouteComponentProps<{id: string}>;

interface IState {
  product?: IProduct | null
}
Props是接下来要定义的ProductPage组件的props的类型,由于在ProductPage中,我们需要获取有关当前路径的信息,所以将Props声明为RouteComponentProps的一个“特例”,类型参数{id: string}表明我们希望从路径中取得一个名叫id类型为string的参数。要指出的是,当我们像这样写定一个组件的props的类型为一种RouteComponentProps时,一般来说,这个组件就只能用在Route匹配规则里面了。
IState用于定义ProductPage的state的属性。product表示页面当前展示的产品。
下面来定义ProductPage组件:
class ProductPage extends Component<Props, IState> {

  public constructor(props: Props) {
    super(props)
    this.state = {}
  }

  public componentDidMount() {
    const id = parseInt(this.props.match.params.id, 10)
    const filtered = products.filter(p => p.id === id)

    this.setState({
      product: filtered[0] || null,
    })
  }

  public render() {
    return <div className="page-container">{
      'product' in this.state ?
          this.state.product ?
              this.displayProduct(this.state.product) :
              <p>Product not found!</p> :
          <p>Loading...</p>
    }</div>
  }

  private displayProduct = (product: IProduct) => {
    return <React.Fragment>
      <h1>{product.name}</h1>
      <p>{product.description}</p>
      <p className="product-price">
        {new Intl.NumberFormat('en-US', {
          style: 'currency',
          currency: 'USD',
        }).format(product.price)}
      </p>
    </React.Fragment>
  }
}

export default ProductPage
当一个ProductPage对象新创建时,其state为一个空对象,表示当前没有载入产品信息。在componentDidMount方法里,我们用this.props.match.params.id获取所需的路径参数,作为所需载入的产品的ID。上面讲到,this.props的类型为RouteComponentProps<{id: string}>,那么可以想见,match就是定义在这个类型里的一个属性,而{id: string}则用来设定match.params。得到产品ID后,我们试着找出对应的产品,如果没有,则设置为null。最后,根据state中product可能取值的三种情况,渲染不同的内容。
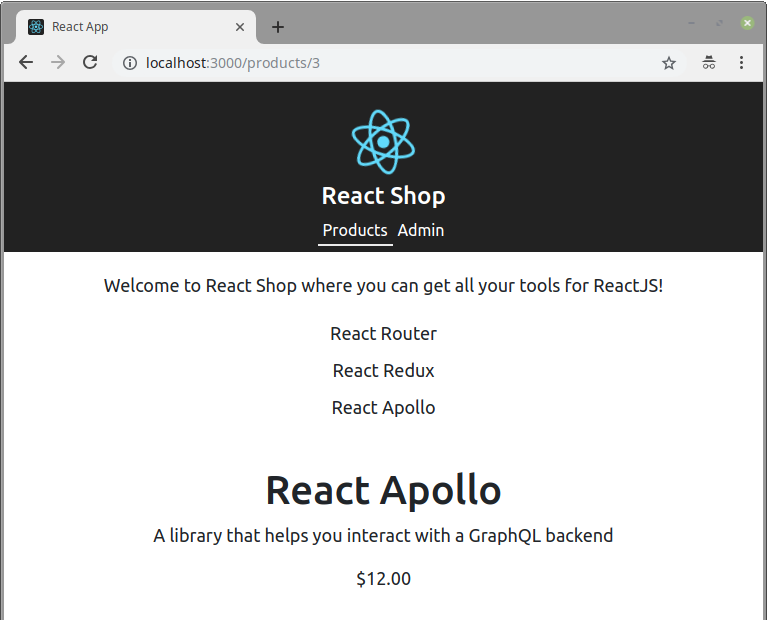
切换到浏览器,如果我们用地址栏访问路径/products/1,/products/2或/products/3,则会看到如下内容:
如果对应ID的产品不存在,则会是:
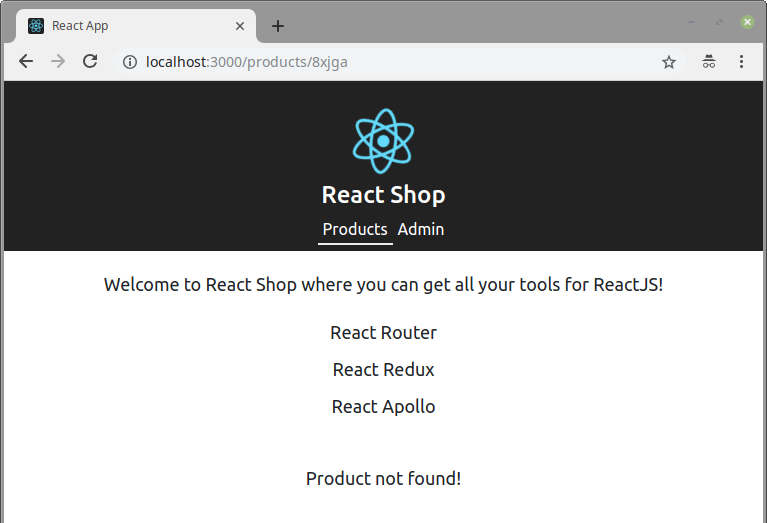
上面显示结果有个问题:把产品列表的内容也显示出来了。这是因为指向产品列表页面的路径模式/products也会和形如/products/xxx的路径匹配。为了解决这个问题我们可以使用Route组件的exact属性。打开App.tsx文件,将对应的那行代码改为:
<Route path="/products" exact component={ProductsPage} />
这样产品列表就不会显示在单个产品页面上了:

下面在产品列表页面增加链接。打开ProductsPage.tsx,修改render()方法为:
public render() {
  return <div className="page-container">
    <p>Welcome to React Shop where you can get all your tools for ReactJS!</p>
    <ul className="product-list">
      {this.state.products.map(product =>
          <li key={product.id} className="product-list-item">
            <link to={`/products/${product.id}`}>{product.name}
          </li>,
      )}
    </ul>
  </div>
}
最后往index.css里加入:
.product-list-item a {
  text-decoration: none;
}
如此我们就实现了从产品列表跳转到单个产品页面的需求。
Switch
来看新的需求:
- 当用户访问上面没有定义的页面时,显示一个“未找到”页面
先为这个页面创建组件。新建pages/NotFoundPage.tsx:
import React, {FC} from 'react'

const NotFoundPage: FC = () => <div className="page-container">
  <h1>Sorry, this page cannot be found</h1>
</div>

export default NotFoundPage
然后在App.tsx的最后添加一条路由规则:
const App: FC = () => <Router>
  <Header />
  <Route path="/products" exact component={ProductsPage} />
  <Route path="/products/:id" component={ProductPage} />
  <Route path="/admin" component={AdminPage} />
  <Route path="/login" component={LoginPage} />
  <Route path="/" component={NotFoundPage} />
</Router>
很容易看出,当访问之前未定义的页面时,将会显示:
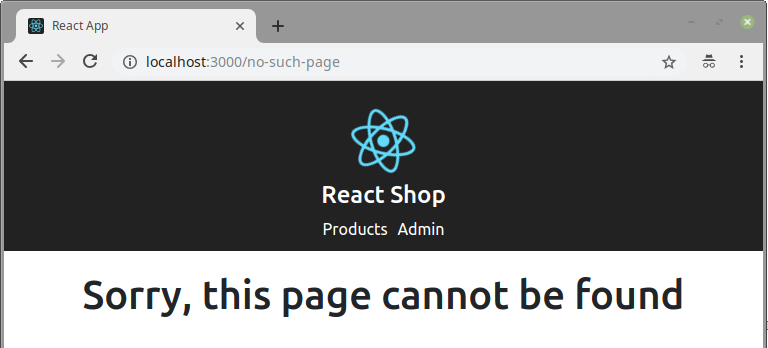
但如果现在访问之前定义的页面,未找到的信息也会显示在底部:
这是因为我们为了“兜底”所有未显式定义的路径,使用的匹配模式为"/",这样所有的页面都会与之匹配。这也是React Router中的Router组件的特点,它会展示所有与当前路径匹配的规则的组件。
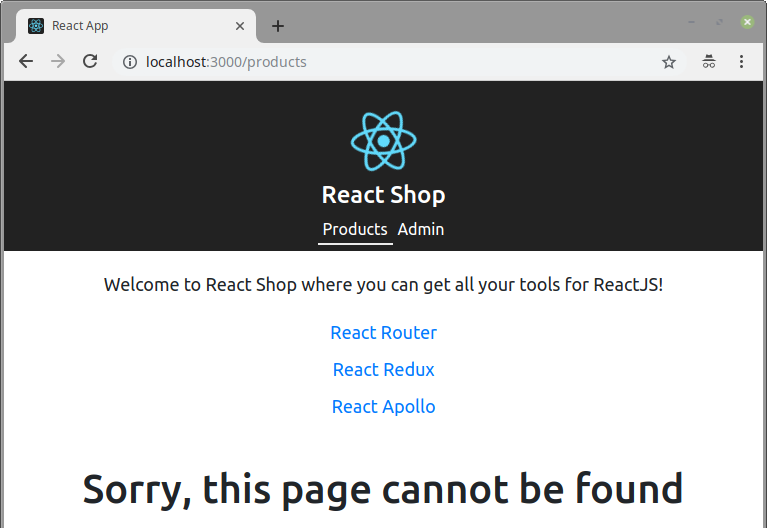
这时候,我们就需要用到React Router提供的Switch。它必须用在Router(BrowserRouter)之下,用来“框住”一组Route,且只会展示其中第一个与当前路径匹配的规则的组件。
修改App.tsx如下:
const App: FC = () => <Router>
  <Header />
  <Switch>
    <Route path="/products" exact component={ProductsPage} />
    <Route path="/products/:id" component={ProductPage} />
    <Route path="/admin" component={AdminPage} />
    <Route path="/login" component={LoginPage} />
    <Route component={NotFoundPage} />
  </Switch>
</Router>
注意到最后的Route组件去掉了path="/",这两种写法是等价的。
再打开产品列表等页面,就看不到“未找到页面”的信息了。
模拟登录
现在当我们访问Admin页面时,浏览器会最终跳转到登录页面。我们接下来想要在登录页面模拟登录的功能,好让用户可以正常访问Admin页面。
先在App.tsx里加入一个记录登录与否的状态:
const App: FC = () => {

  const [loggedIn, setLoggedIn] = React.useState(false)
  const logIn = () => setLoggedIn(true)

  return <Router>...</Router>
}
打开AdminPage.tsx,为props添加接口,并使用到组件的定义里:
interface IProps {
  loggedIn: boolean
}

class AdminPage extends Component<IProps, IState> {
  public constructor(props: IProps, private intervalId?: NodeJS.Timeout) {
    // ...
修改componentDidMount()方法,如果用户已经登录,则不用再倒计时:
public componentDidMount() {
  if (this.props.loggedIn) return
  this.intervalId = setInterval(this.countDown, 1000)
}
修改render()方法,如果用户已经登录,不再跳转:
public render() {
  return <div className="page-container">
    <h1>Admin Panel</h1>
    {this.props.loggedIn ?
        <p>Welcome</p> :
        <React.Fragment>
          <p>You should only be here if you have logged in</p>
          <p>You haven't logged in. Redirecting to the login page in {this.state.secondsLeft} seconds</p>
          {this.state.secondsLeft < 1 ? <redirect to="/login" /> : null}
        </React.Fragment>
    }
  </div>
}
AdminPage目前的实现有一个小问题,有可能会带来bug。现在不论用户登录与否,AdminPage都保有一个跳转前剩余秒数的状态。这不是最安全的情景:当用户已经登录,这个状态就应该不存在。我们可以把这个状态以及跳转的逻辑剥离成一个单独的组件。
新建components/CountDownRedirectNotice.tsx文件,内容为:
import React, {Component} from 'react'
import {Redirect} from 'react-router'

interface IProps {
  maxSeconds: number
  to: string
}

interface IState {
  secondsLeft: number
}

class CountDownRedirectNotice extends Component<IProps, IState> {

  public constructor(props: IProps, private intervalId?: NodeJS.Timeout) {
    super(props)

    this.state = {
      secondsLeft: this.props.maxSeconds,
    }
  }

  public componentDidMount() {
    this.intervalId = setInterval(this.countDown, 1000)
  }

  public componentWillUnmount() {
    if (this.intervalId) {
      clearInterval(this.intervalId)
    }
  }

  public render() {
    return <React.Fragment>
      <p>You will be redirected to "{this.props.to}" in {this.state.secondsLeft} seconds</p>
      {this.state.secondsLeft < 1 ? <redirect to={this.props.to} /> : null}
    </React.Fragment>
  }

  private countDown = () => {
    this.setState({
      secondsLeft: this.state.secondsLeft - 1,
    })
  }
}

export default CountDownRedirectNotice
回过头来,把AdminPage.tsx更改为:
import React, {FC} from 'react'

import CountDownRedirectNotice from '../components/CountDownRedirectNotice'

interface IProps {
  loggedIn: boolean
}

const AdminPage: FC<IProps> = ({loggedIn}) =>
    <div className="page-container">
      <h1>Admin Panel</h1>
      {loggedIn ?
          <p>Welcome</p> :
          <React.Fragment>
            <p>You should only be here if you have logged it</p>
            <countdownredirectnotice maxSeconds={3} to="/login" />
          </React.Fragment>
      }
    </div>

export default AdminPage
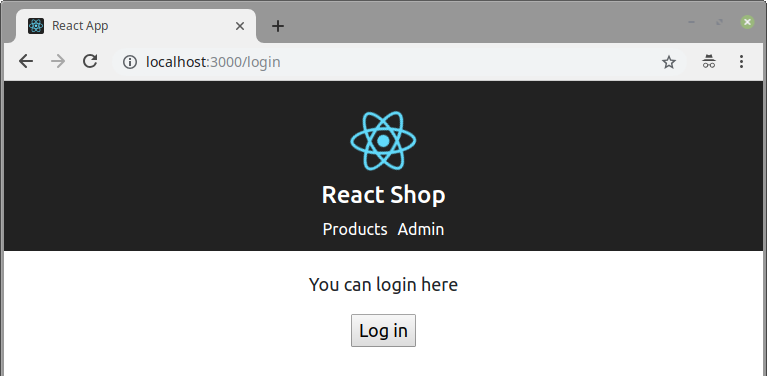
接下来把LoginPage.tsx整个修改为:
import React, {FC} from 'react'
import {Redirect} from 'react-router'

interface IProps {
  loggedIn: boolean
  onLogin: () => void
}

const LoginPage: FC<IProps> = (props) => <div className="page-container">
  {props.loggedIn ?
      <Redirect to="/admin" /> : <React.Fragment>
        <p>You can login here</p>
        <button onClick={props.onLogin}>Log in</button>
      </React.Fragment>
  }
</div>

export default LoginPage
最后就是在App.tsx里显示这两个页面了。我们会用到前面定义的loggedIn状态和setLoggedIn方法。
创建两个高阶组件:
const App: FC = () => {
  // ...
  const AdminPageEnhanced = () => <AdminPage loggedIn={loggedIn} />
  const LoginPageEnhanced = () => <LoginPage loggedIn={loggedIn} onLogin={logIn} />

  return <Router>...</Router>
}
然后修改下面这两个对应的Route:
return <Router>
  <Header />
  <Switch>
    // ...
    <Route path="/admin" component={AdminPageEnhanced} />
    <Route path="/login" component={LoginPageEnhanced} />
    // ...
  </Switch>
</Router>
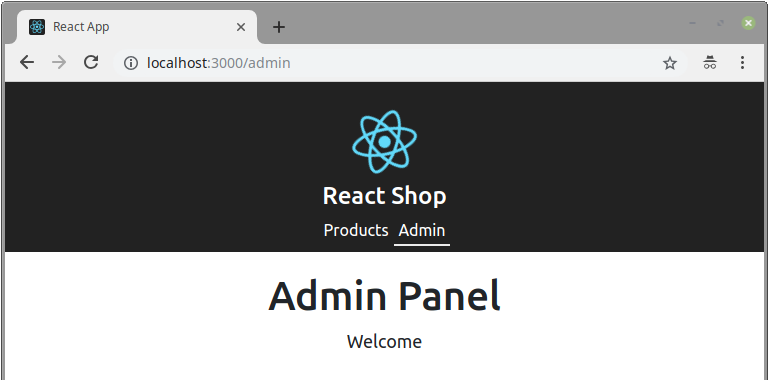
现在,我们因为未登录被Admin页面转到登录页面后,看到的是:
点击按钮,浏览器会立即跳转到Admin页面:
路由嵌套
登录后,我们需要在Admin页面管理用户和产品。具体的需求如下:
- Admin页面需展示两个链接:Users和Products
- 当用户点击Users,浏览器的地址栏应该显示路径为
/admin/users,页面应该展示一系列的用户名。每一个用户名也是一个链接。当用户点击任意一个用户名时,浏览器应切换为类似/admin/users/1的路径,其中1为该用户的ID,且页面应该显示该用户的信息 - 当用户通过地址栏直接访问形如
admin/user/:id的路径时,如果未登录,则应按照之前的方式处理;如果对应:id的用户不存在,则需给用户以合适的反馈;否则,展示对应用户的信息 - 类似地,用户点击Preducts时,路径应为
/admin/produts。因为已经有专门的产品列表信息,这里就不用再展示产品的信息了。
为了开发方便,我们先在App.tsx中把默认的登录状态改为true:
const [loggedIn, setLoggedIn] = React.useState(true)
首先,我们生成一些用户的信息。在data文件夹下新建文件users.ts,内容为:
export interface IUser {
  id: number
  name: string
  isAdmin: boolean
}

export const users: IUser[] = [
  {
    id: 1,
    name: 'Fred',
    isAdmin: true,
  },
  {
    id: 2,
    name: 'Bob',
    isAdmin: false,
  },
  {
    id: 3,
    name: 'Jane',
    isAdmin: true,
  },
]
Admin页面需要通过链接修改浏览器路径,需要为不同的路径展示不同的内容,所以我们在AdminPage.tsx中做相应的导入:
import {NavLink, Route, Switch} from 'react-router-dom'
把AdminPage的实现重构为:
const AdminPage: FC<IProps> = (props) => {

  const contentsForLoggedIn = () => {
    return <p>Welcome</p>
  }

  const contentsForNotLoggedIn = () =>
      <React.Fragment>
        <p>You should only be here if you have logged it</p>
        <CountDownRedirectNotice maxSeconds={3} to="/login" />
      </React.Fragment>

  return <div className="page-container">
    <h1>Admin Panel</h1>
    {props.loggedIn ?
        contentsForLoggedIn() :
        contentsForNotLoggedIn()
    }
  </div>

}
现在我们让Admin页面展示Users和Product两个链接:
  const contentsForLoggedIn = () => {
    return <ul className="admin-section-tabs">
      <li key="users">
        <NavLink to="/admin/users" activeClassName="admin-link-active">
          Users
        </NavLink>
      </li>
      <li key="products">
        <NavLink to="/admin/products" activeClassName="admin-link-active">
          Products
        </NavLink>
      </li>

      {adminSectionBody()}
    </ul>
  }

  const adminSectionBody = () => {
    return <p>Please select a tab</p>
  }
加入对应的样式到index.css:
.admin-section-tabs {
  list-style: none;
  margin: 0 0 20px 0;
  padding: 0;
}

.admin-section-tabs li {
  display: inline-block;
  margin-right: 10px;
}

.admin-section-tabs li a {
  color: #222;
  text-decoration: none;
}

.admin-link-active {
  border-bottom: #6f6e6e solid 2px;
}
现在点击这两个链接虽然可以改变地址栏,但是不会改变页面的显示。为了让页面随地址栏变化,显然我们应该用到Route。修改adminSectionBody如下:
  const adminSectionBody = () => {
    const DefaultComp = () => <p>Please select a tab</p>
    return <Switch>
      <Route path="/admin/users" component={AdminUsers} />
      <Route path="/admin/products" component={AdminProducts} />
      <Route component={DefaultComp} />
    </Switch>
  }
我们先解决简单的AdminProducts。新建components/AdminProducts.tsx文件,写入:
import React, {FC} from 'react'

const AdminProducts: FC = () => {
  return <div>Some options to administer products</div>
}

export default AdminProducts
然后是展示用户列表的AdminUsers。新建components/AdminUsers.tsx。它需要载入并记录用户信息,所以需要为它的state定义interface如下:
import {IUser, users as allUsers} from '../data/users'

interface IState {
  users?: IUser[]
}
AdminUsers的实现是:
class AdminUsers extends Component<{}, IState> {

  public constructor(props: {}) {
    super(props)
    this.state = {}
  }

  public componentDidMount() {
    this.setState({
      users: allUsers,
    })
  }

  public render() {
    return <div>
      <ul className="admin-section-tabs">
        {
          this.state.users ?
              this.usersSection(this.state.users) :
              <p>Loading users...</p>
        }
      </ul>
    </div>
  }

  private usersSection = (users: IUser[]) => {
    return <React.Fragment>
      {
        users.map(user => <li key={user.id}>
          <NavLink to={`/admin/users/${user.id}`}
                   activeClassName="admin-link-active">
            {user.name}
          </NavLink>
        </li>)
      }
      {/* Display the selected user below */}
    </React.Fragment>
  }

}
当所有的用户信息都加载后,usersSection会为每一个用户创建一个链接并动态生成对应的路径。
如果当前路径形如/admin/users/:id,则这些链接的下方应该显示对应用户的信息。所以我们应该加入下面的代码:
    {/* Display the selected user below */}
    <Route path="/admin/users/:id" render={() => <AdminUser users={users} />}</Route>
AdminUser负责展示用户信息的组件,它有一个users属性,接受现有全部用户的数据。很容易想见,在这个组件里我们需要通过以this.props.match.params.id的形式来从路径截取id的值,但是我们这里却没有传入相应的match值。那么我们要怎么获得这个值呢?
在components文件夹里新建AdminUser.tsx文件,先定义其props的结构:
import React, {FC} from 'react'
import {RouteComponentProps, withRouter} from 'react-router'
import {IUser} from '../data/users'

interface IProps extends RouteComponentProps<{id: string}> {
  users: IUser[]
}
如上面分析的,通过继承RouteComponentProps<{id: string}>,该组件的props可以访问match.params.id成员来获取路径中的相应部分。
下面是这个组件的实现:
const AdminUser: FC<IProps> = (props) => {

  const userInfo = (user: IUser) => <React.Fragment>
      <div>
        <b>Id: </b>
        <span>{user.id.toString()}</span>
      </div>
      <div>
        <b>Is Admin: </b>
        <span>{user.isAdmin.toString()}</span>
      </div>
  </React.Fragment>

  const id  =parseInt(props.match.params.id, 10)
  const userSelected = props.users.filter(u => u.id === id)[0]

  return <div>
    {userSelected ?
        userInfo(userSelected) :
        <p>No such user</p>
    }
  </div>
}
逻辑很好理解:当能够通过用户ID找到对应的用户时,则展示用户信息;否则,反馈给用户“未找到”信息。
现在要使用AdminUser的话,除了users,还必须传入history、location、match等RouteComponentProps所要求的属性。React Router为我们提供了一个名叫withRouter的方法,如果一个组件A需要RouteComponentProps所要求的属性,那么我们可以生成一个高阶组件const B = withRouter(A),当B赋值给Route组件的component时,它将自动地获取那些属性。
所以这里我们不是简单地导出AdminUser,而是:
// import {withRouter} from 'react-router'
...
export default withRouter(AdminUser)
这样,当一层层地选到某个用户信息时,应用会显示:

如果直接在地址栏指向一个不存在的用户,则会显示:

总结
以上就是用TypeScript使用React Router库的一个简单的示例。主要的知识点包括:
- React Router实现的原理和思路
- React新的Context API的使用
- React Router中的
BrowerRouter,Route,Link,NavLink,Switch等组件和withRouter方法的使用


 371
371


 被折叠的 条评论
为什么被折叠?
被折叠的 条评论
为什么被折叠?
 到【灌水乐园】发言


