


关于Android的标题栏,虽然Google提供了具有导航功能的Action Bar,但是因为Action Bar无法实现完全的自定义,因此在实际项目中使用的不多,用的比较多的是自定义的标题栏。本篇博文简单介绍自定义标题栏的实现,同时实现状态栏的沉浸式。
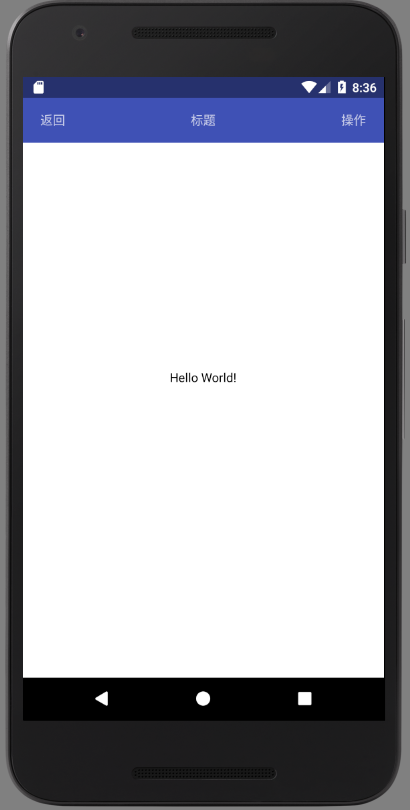
1.最终效果
首先来看一下最终的效果截图
下面开始介绍这种效果的实现方式,首先介绍自定义标题栏的实现,然后在自定义标题栏的基础上实现沉浸式。
2.自定义标题栏的实现
1)隐藏默认标题栏
实现自定义标题栏需要先隐藏默认的标题栏,这方面网上的答案很多,基本可归结为3种方式:
第一种,通过AndroidMainfest.xml设置,代码如下:
<application
    android:allowBackup="true"
    android:icon="@mipmap/ic_launcher"
    android:label="@string/app_name"
    android:roundIcon="@mipmap/ic_launcher_round"
    android:supportsRtl="true"
    android:theme="@style/Theme.AppCompat.NoActionBar"><!--隐藏默认标题栏-->
    <activity android:name=".MainActivity">
        <intent-filter>
            <action android:name="android.intent.action.MAIN" />

            <category android:name="android.intent.category.LAUNCHER" />
        </intent-filter>
    </activity>
</application>
关键代码只有一行,就是给AndroidMainfest.xml文件中的application节点添加属性:
android:theme="@style/Theme.AppCompat.NoActionBar"
通过这种方式设置后,整个应用的activity都没有了默认的标题栏;也可以只讲这行代码写在某个activity的布局文件的根节点,这样就是只有这个activity是没有默认标题栏的。
第二种,通过Java代码设置,关键代码也只有一行,在activity中的onCreate()方法的setContentView()的前面加上下面这行代码:
this.requestWindowFeature(Window.FEATURE_NO_TITLE);//去掉标题栏
如果需要实现整个应用都隐藏默认标题栏,可以增加一个BaseActivity,在BaseActivity的onCreate()方法中添加上面的代码,然后使其他activity 都继承BaseActivity。
第三种,通过styles.xml设置。
首先在res/values/styles.xml文件中新建样式:
<style name="MyNoActionBar" parent="Theme.AppCompat">
    <item name="windowActionBar">false</item>
    <item name="android:windowNoTitle">true</item>
</style>
然后在AndroidMainfest.xml的application节点中设置属性:
android:theme="@style/MyNoActionBar"
其实第一种和第三种方式是一样的,只不过一个是使用了系统提供的Theme样式,一个是使用了自定义的样式。本篇博文采用第一种方式来隐藏默认的标题栏。
2)添加自定义的标题栏
在布局文件中新建布局文件include_activity_title.xml,代码如下:
<?xml version="1.0" encoding="utf-8"?>
<RelativeLayout xmlns:android="http://schemas.android.com/apk/res/android"
    android:layout_width="match_parent"
    android:layout_height="50dp"
    android:gravity="center_vertical"
    android:background="@color/colorPrimary">

    <TextView
        android:id="@+id/tv_back"
        android:layout_width="wrap_content"
        android:layout_height="match_parent"
        android:layout_marginLeft="20dp"
        android:gravity="center_vertical"
        android:text="返回"/>
    <TextView
        android:id="@+id/tv_title"
        android:layout_width="wrap_content"
        android:layout_height="match_parent"
        android:layout_centerHorizontal="true"
        android:gravity="center_vertical"
        android:text="标题"/>
    <TextView
        android:id="@+id/tv_operation"
        android:layout_width="wrap_content"
        android:layout_height="match_parent"
        android:layout_alignParentRight="true"
        android:layout_marginRight="20dp"
        android:gravity="center_vertical"
        android:text="操作"/>

</RelativeLayout>
然后在activity的布局文件中include改文件:
<include android:id="@+id/activity_title"
    layout="@layout/include_activity_title"/>
最后,在activity中给标题栏的各个空间设置点击事件即可。
至此,自定义标题栏的功能就实现了,其中include_activity_title.xml的布局完全可以根据自己的需要进行自定义。
3.在自定义标题栏的基础上实现沉浸式
activity的onCreate()方法的setContentView()前添加如下代码:
//透明状态栏
if (Build.VERSION.SDK_INT >= Build.VERSION_CODES.KITKAT) {
    getWindow().setFlags(
            WindowManager.LayoutParams.FLAG_TRANSLUCENT_STATUS,
            WindowManager.LayoutParams.FLAG_TRANSLUCENT_STATUS);
}
这时如果直接运行,会发现自定义的标题栏一部分被状态栏覆盖了,这当然不是我们想要的结果。解决办法是给自定义的标题栏设置一个padding,使其等于状态栏的高度。通常Android状态栏的高度约为25dp,只需将include_activity_title.xml作如下修改:
<?xml version="1.0" encoding="utf-8"?>
<RelativeLayout xmlns:android="http://schemas.android.com/apk/res/android"
    android:layout_width="match_parent"
    android:layout_height="75dp"
    android:paddingTop="25dp"
    android:gravity="center_vertical"
    android:background="@color/colorPrimary">

    <TextView
        android:id="@+id/tv_back"
        android:layout_width="wrap_content"
        android:layout_height="match_parent"
        android:layout_marginLeft="20dp"
        android:gravity="center_vertical"
        android:text="返回"/>
    <TextView
        android:id="@+id/tv_title"
        android:layout_width="wrap_content"
        android:layout_height="match_parent"
        android:layout_centerHorizontal="true"
        android:gravity="center_vertical"
        android:text="标题"/>
    <TextView
        android:id="@+id/tv_operation"
        android:layout_width="wrap_content"
        android:layout_height="match_parent"
        android:layout_alignParentRight="true"
        android:layout_marginRight="20dp"
        android:gravity="center_vertical"
        android:text="操作"/>

</RelativeLayout>
这样,Android自定义标题栏并实现沉浸式的功能就实现了。


 8016
8016


 被折叠的 条评论
为什么被折叠?
被折叠的 条评论
为什么被折叠?
 到【灌水乐园】发言


