随着redis的应用场景的丰富,单点redis已经不能满足某些高可用场景,比如分布式session中,用来存储共享session.
今天来介绍一下redis官方提供的sentinel,以及高可用集群的搭建.
使用的redis版本号为 redis_version:3.0.6,在CentOS上安装redis的步骤在此不做赘述.注意安装过程中可能需要安装tcl和gcc.
redis可以多个slave连接到同一个master,也可以是slave继续连接到slave,本次分享是3台salve连接到一台master.
环境配置如下:
master 192.168.2.140 6379
salve1 192.168.2.141 6379
salve2 192.168.2.142 6379
salve3 192.168.2.143 6379
master的redis.config可以使用默认配置 slave1...slave3的redisconfig配置文件重点修改:
# Master-Slave replication. Use slaveof to make a Redis instance a copy of
# another Redis server. A few things to understand ASAP about Redis replication.
#
# 1) Redis replication is asynchronous, but you can configure a master to
#    stop accepting writes if it appears to be not connected with at least
#    a given number of slaves.
# 2) Redis slaves are able to perform a partial resynchronization with the
#    master if the replication link is lost for a relatively small amount of
#    time. You may want to configure the replication backlog size (see the next
#    sections of this file) with a sensible value depending on your needs.
# 3) Replication is automatic and does not need user intervention. After a
#    network partition slaves automatically try to reconnect to masters
#    and resynchronize with them.
#
slaveof 192.168.2.140 6379
其他配置也可以 使用默认配置
接下来要启动master, 进入redis的src目录,执行./redis-server即可启动master
继续启动slave1...slave3,同样进入各自的src目录,执行 ./redis-server ../redis.conf 启动salve时,要注意指定redis.conf配置文件
启动成功后,可以在master上,通过 ./redis-cli 进入客户端,执行set name maoxiaobian,然后再执行 get name
127.0.0.1:6379> set name maoxiaobian
OK
127.0.0.1:6379> get name
"maoxiaobian"
127.0.0.1:6379>
然后再随便选择一台salve,同样进入./redis-cli,执行 get name,当然,你可以执行info命令来确认一下集群信息
127.0.0.1:6379> get name
"maoxiaobian"
127.0.0.1:6379> info replication
# Replication
role:slave
master_host:192.168.2.140
到此,redis主备集群已经搭建完毕.接下来继续搭建sentinel,由于sentinel是监控redis的master服务,同样会存在单点问题,因此,本次测试搭建了3台sentinel的集群,分别是:salve1...slave3作为sentinel
sentinel.conf配置文件重点要修改的内容是:
# sentinel monitor <master-name> <ip> <redis-port> <quorum>
#
# Tells Sentinel to monitor this master, and to consider it in O_DOWN
# (Objectively Down) state only if at least <quorum> sentinels agree.
#
# Note that whatever is the ODOWN quorum, a Sentinel will require to
# be elected by the majority of the known Sentinels in order to
# start a failover, so no failover can be performed in minority.
#
# Slaves are auto-discovered, so you don't need to specify slaves in
# any way. Sentinel itself will rewrite this configuration file adding
# the slaves using additional configuration options.
# Also note that the configuration file is rewritten when a
# slave is promoted to master.
#
# Note: master name should not include special characters or spaces.
# The valid charset is A-z 0-9 and the three characters ".-_".
sentinel monitor mymaster 192.168.2.140 6379 2
其他配置可以暂时使用默认配置,详细配置可参考官方文档,或者配置文件中的注释
salve1...slave3分别对应sentinel1...sentinel3,配置文件修改完成后,就可以启动sentinel. 启动sentinel,同样进入 redis的src目录,执行 ./redis-sentinel ../sentinel.conf 此命令执行了sentinel的配置文件.
3台sentinel启动完成后,可以进入master,通过info replication命令查看集群状态
127.0.0.1:6379> info replication
# Replication
role:master
connected_slaves:3
slave0:ip=192.168.2.143,port=6379,state=online,offset=372897,lag=1
slave1:ip=192.168.2.142,port=6379,state=online,offset=372897,lag=1
slave2:ip=192.168.2.141,port=6379,state=online,offset=372897,lag=1
master_repl_offset:372897
repl_backlog_active:1
repl_backlog_size:1048576
repl_backlog_first_byte_offset:2
repl_backlog_histlen:372896
127.0.0.1:6379>
验证完成后,可以kill掉redis集群中的master,然后随机挑选一台salve,通过info replication命令查看集群中的master,猫小鞭运气不是一般的好,选中了一台被提升为master的salve,执行多次info命令后的结果如下:
127.0.0.1:6379> info replication
# Replication
role:slave
master_host:192.168.2.140
master_port:6379
master_link_status:down
master_last_io_seconds_ago:-1
master_sync_in_progress:0
slave_repl_offset:391470
master_link_down_since_seconds:23
slave_priority:100
slave_read_only:1
connected_slaves:0
master_repl_offset:0
repl_backlog_active:0
repl_backlog_size:1048576
repl_backlog_first_byte_offset:0
repl_backlog_histlen:0

127.0.0.1:6379> info replication
# Replication
role:master
connected_slaves:2
slave0:ip=192.168.2.143,port=6379,state=online,offset=4056,lag=1
slave1:ip=192.168.2.142,port=6379,state=online,offset=4056,lag=1
master_repl_offset:4056
repl_backlog_active:1
repl_backlog_size:1048576
repl_backlog_first_byte_offset:2
repl_backlog_histlen:4055
127.0.0.1:6379>
此时说明redis集群已经推举除了新的master,就是192.168.2.141,那么,原来的master如何恢复呢,灰常简单,只要重新启动master即可,启动过程中,不需要指定redis.conf配置文件.启动成功后,继续查看集群的状态:
127.0.0.1:6379> info replication
# Replication
role:master
connected_slaves:3
slave0:ip=192.168.2.143,port=6379,state=online,offset=49418,lag=0
slave1:ip=192.168.2.142,port=6379,state=online,offset=49418,lag=0
slave2:ip=192.168.2.140,port=6379,state=online,offset=49418,lag=1
master_repl_offset:49418
repl_backlog_active:1
repl_backlog_size:1048576
repl_backlog_first_byte_offset:2
repl_backlog_histlen:49417
127.0.0.1:6379>
原来的master现在变成slave了,如果时当前的master(初始配置中的slave1)也宕机,重启时,仍旧不需要指定配置文件.
那么我们在应用中如何使用sentinel呢.小鞭直接贴代码了: spring配置如下:
<?xml version="1.0" encoding="GBK"?>
<beans xmlns="http://www.springframework.org/schema/beans"
       xmlns:xsi="http://www.w3.org/2001/XMLSchema-instance"
       xmlns:context="http://www.springframework.org/schema/context"
       xmlns:aop="http://www.springframework.org/schema/aop" xmlns:tx="http://www.springframework.org/schema/tx"
       xsi:schemaLocation="http://www.springframework.org/schema/beans
           http://www.springframework.org/schema/beans/spring-beans-2.5.xsd
           http://www.springframework.org/schema/context http://www.springframework.org/schema/context/spring-context-2.5.xsd
           http://www.springframework.org/schema/aop http://www.springframework.org/schema/aop/spring-aop-2.5.xsd
           http://www.springframework.org/schema/tx http://www.springframework.org/schema/tx/spring-tx-2.5.xsd"
       default-autowire="byName">

    <bean id="jedisPoolConfig" class="redis.clients.jedis.JedisPoolConfig">
        <property name="maxTotal" value="1000"/>
        <property name="maxIdle" value="10"/>
        <property name="minIdle" value="1"/>
        <property name="maxWaitMillis" value="30000"/>
        <property name="testOnBorrow" value="true"/>
        <property name="testOnReturn" value="true"/>
        <property name="testWhileIdle" value="true"/>
    </bean>
    <bean id="shardedJedisPool" class="redis.clients.jedis.ShardedJedisPool" destroy-method="destroy">
        <constructor-arg ref="jedisPoolConfig"/>
        <constructor-arg>
            <list>
                <bean class="redis.clients.jedis.JedisShardInfo">
                    <constructor-arg value="192.168.2.142"/>
                    <constructor-arg type="int" value="6379"/>
                    <constructor-arg value="instance:03"/>
                </bean>
                <bean class="redis.clients.jedis.JedisShardInfo">
                    <constructor-arg value="192.168.2.140"/>
                    <constructor-arg type="int" value="6379"/>
                    <constructor-arg value="instance:01"/>
                </bean>
                <bean class="redis.clients.jedis.JedisShardInfo">
                    <constructor-arg value="192.168.2.141"/>
                    <constructor-arg type="int" value="6379"/>
                    <constructor-arg value="instance:02"/>
                </bean>
                <bean class="redis.clients.jedis.JedisShardInfo">
                    <constructor-arg value="192.168.2.143"/>
                    <constructor-arg type="int" value="6379"/>
                    <constructor-arg value="instance:04"/>
                </bean>
            </list>
        </constructor-arg>
    </bean>

    <bean id="redisSentinel" class="redis.clients.jedis.JedisSentinelPool">
        <constructor-arg index="0" value="mymaster"/>
        <constructor-arg index="1">
            <set>
                <value>192.168.2.141:26379</value>
                <value>192.168.2.142:26379</value>
                <value>192.168.2.143:26379</value>
            </set>
        </constructor-arg>
        <constructor-arg index="2" ref="jedisPoolConfig"/>
    </bean>
</beans>
测试代码:
    @Autowired
    private ShardedJedisPool shardedJedisPool;

    @Autowired
    private JedisSentinelPool jedisSentinelPool;

    @Test
    public void test_get() {
        ShardedJedis jedis = shardedJedisPool.getResource();
        String name = jedis.get("name");
        System.out.println(name);
    }

    @Test
    public void test_set() throws InterruptedException {
        for(int i = 0;i< 100;i++){
            try {
                Jedis jedis = jedisSentinelPool.getResource();
                jedis.set("key" + i, i + "");
                Thread.sleep(1000);
                String value = jedis.get("key" + i);
                System.out.println(value);
            }catch(Exception e){
                Thread.sleep(1000);
                System.out.println("链接失败!");
                continue;
            }
        }
    }
细心的你,可能会发现,有两种redispool,是的,去尝试一下两种的不同吧.JedisSentinelPool 才会获取到新选举的master链接呦.
    @Test
    public void test_set() throws InterruptedException {
        for(int i = 0;i< 100;i++){
                Jedis jedis = jedisSentinelPool.getResource();
            try {
                jedis.set("key" + i, i + "");
                Thread.sleep(1000);
                String value = jedis.get("key" + i);
                System.out.println(value);
            }catch(Exception e){
                Thread.sleep(1000);
                System.out.println("链接失败!");
                continue;
            }
        }
    }
再试试这段代码,你会发现,无法从新选举的master.
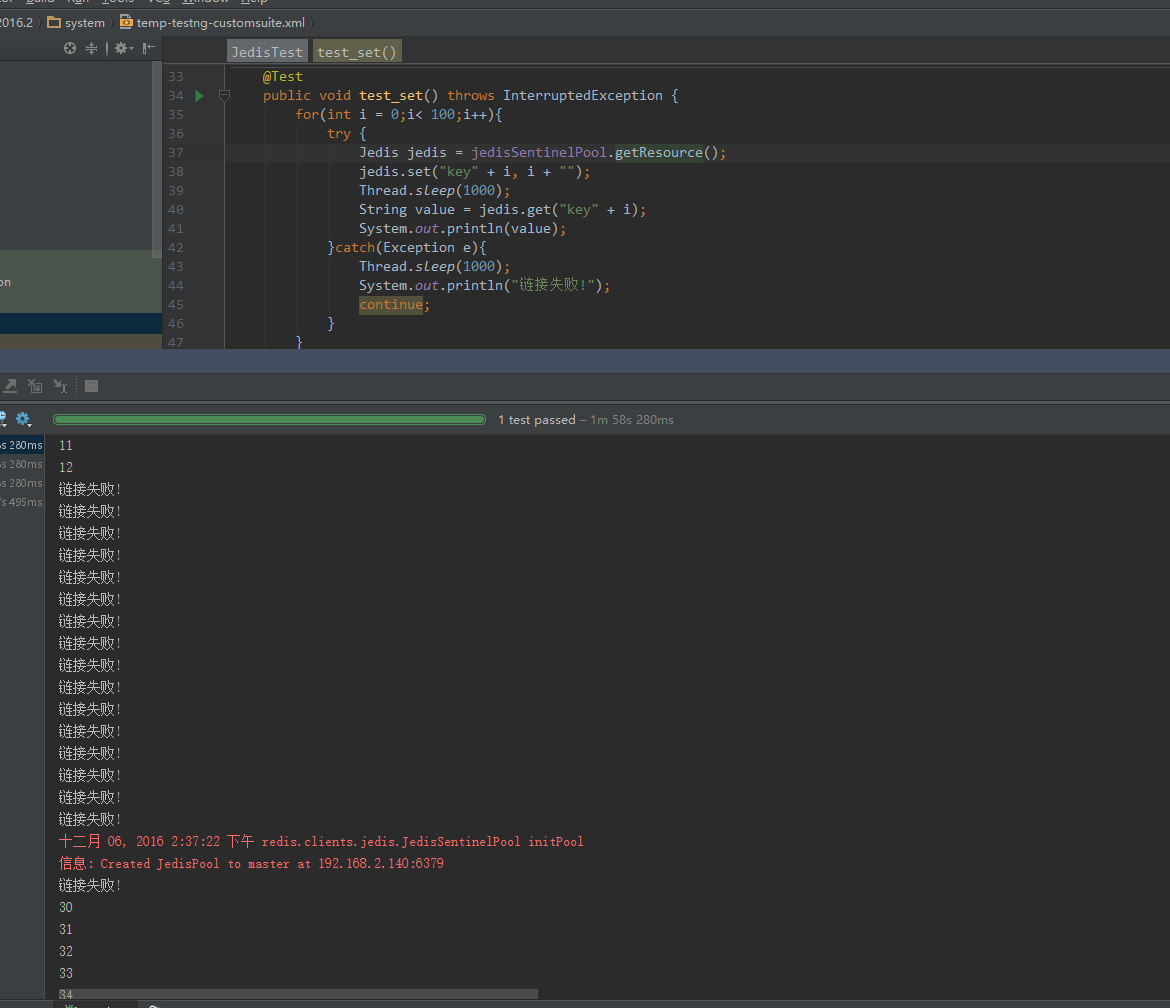
你问我怎么获取新选举的msater,简单,把master干掉.kill kill kill ... 献上我的测试结果:

作者:猫小鞭


 2528
2528

 被折叠的 条评论
为什么被折叠?


