


/ 作者简介 /
本篇文章来自史大拿的投稿,文章主要对setContentView方法中的源码进行解析,相信会对大家有所帮助!同时也感谢作者贡献的精彩文章。
史大拿的博客地址:
https://blog.csdn.net/weixin_44819566?type=blog
/ 前言 /
系统:mac
-
android studio:4.1.3
-
kotlin version:1.5.0
-
gradle:gradle-6.5-bin.zip
看完本篇你讲学会什么?
-
setContentView() 如何解析View
-
LayoutInflater 什么时候初始化,在什么地方?
-
LayoutInflater 如何加载View
-
Factory2和Factory的作用
-
Factory2什么时候初始化?
-
appcompat1.2 和 appcompat1.3的区别
-
AppCompatViewInflater 如何改变View
-
AppCompat主题和Material主题对普通View的区别
-
如何自己解析View(Activity / Fragment)
-
onCreate中不调用super.onCreate()为什么会报错
高温预警!
AppCompat主题

material主题
/ setContentView() 如何解析View /
这段源码在View生命周期中就有提到过,但是还不够细致,本篇带你完全理解!
从入口开始:
override fun onCreate(savedInstanceState: Bundle?) {
        super.onCreate(savedInstanceState)
        setContentView(R.layout.activity_custom_parse)
    }
代码块1.1:
#AppCompatActivity.java

@Override
public void setContentView(@LayoutRes int layoutResID) {
    getDelegate().setContentView(layoutResID);
}

@NonNull
public AppCompatDelegate getDelegate() {
  if (mDelegate == null) {
    // 执行到了这里,创建AppCompatDelegate
    mDelegate = AppCompatDelegate.create(this, this);
  }
  return mDelegate;
}
tips:其实不会执行AppCompatDelegate.create() 因为此时mDelegate已经!=null了,后面会说在什么时候初始化的,这里就先以他会null来说。
代码块1.2:
#abstract AppCompatDelegate.java
@NonNull
public static AppCompatDelegate create(@NonNull Activity activity,
        @Nullable AppCompatCallback callback) {
     // AppCompateDelegate 是一个抽象类
       // 实现类为 AppCompateDelegateImpl
    return new AppCompatDelegateImpl(activity, callback);
}
着执行代码块1.1的setContentView(),就会执行到AppCompateDelegateImpl.setContentView()方法。
代码块1.3:
# AppCompatDelegateImpl.java
@Override
public void setContentView(int resId) {
    // 解析主题属性等 并且调用Window#setContentView()方法
    ensureSubDecor();

    // android.R.id.content为screen_simple.xml中的id
    ViewGroup contentParent = mSubDecor.findViewById(android.R.id.content);

    contentParent.removeAllViews();

      // 解析View
    LayoutInflater.from(mContext).inflate(resId, contentParent);

    // 空方法代表解析View完成
    mAppCompatWindowCallback.getWrapped().onContentChanged();
}
这段代码有很多博主直接进入LayoutInflater#inflate中解释,直接略过了最精彩的 ensureSubDecor()方法,现在来看看吧~
代码块1.4:
# AppCompatDelegateImpl.java
private void ensureSubDecor() {
    if (!mSubDecorInstalled) {
        mSubDecor = createSubDecor();
                ...
    }
}
代码块1.5:
# AppCompatDelegateImpl.java
Window mWindow;

private ViewGroup createSubDecor() {
    TypedArray a = mContext.obtainStyledAttributes(R.styleable.AppCompatTheme);

    // 解析主题,设置样式
    if (a.getBoolean(R.styleable.AppCompatTheme_windowNoTitle, false))
      else if (a.getBoolean(R.styleable.AppCompatTheme_windowActionBar, false))
    if (a.getBoolean(R.styleable.AppCompatTheme_windowActionBarOverlay, false))
    if (a.getBoolean(R.styleable.AppCompatTheme_windowActionModeOverlay, false))
    a.recycle();
     ....

    // 初始化DecorView
    mWindow.getDecorView();
    final LayoutInflater inflater = LayoutInflater.from(mContext);
    ViewGroup subDecor = null;
      if (!mWindowNoTitle) {
      if (mIsFloating) {
        ...
      } else if (mHasActionBar) {
         // 会走这里.. 可以自行打断点看看.
         subDecor = (ViewGroup) LayoutInflater.from(themedContext)
                        .inflate(R.layout.abc_screen_toolbar, null);
      }
    }

      .... 省略了大量代码 ...
        // 初始化主界面
    mWindow.setContentView(subDecor);

    ...

    return subDecor;
}
这段代码前半部分主要是解析样式。
期间会创建一个ViewGroup,这个ViewGroup的布局为:
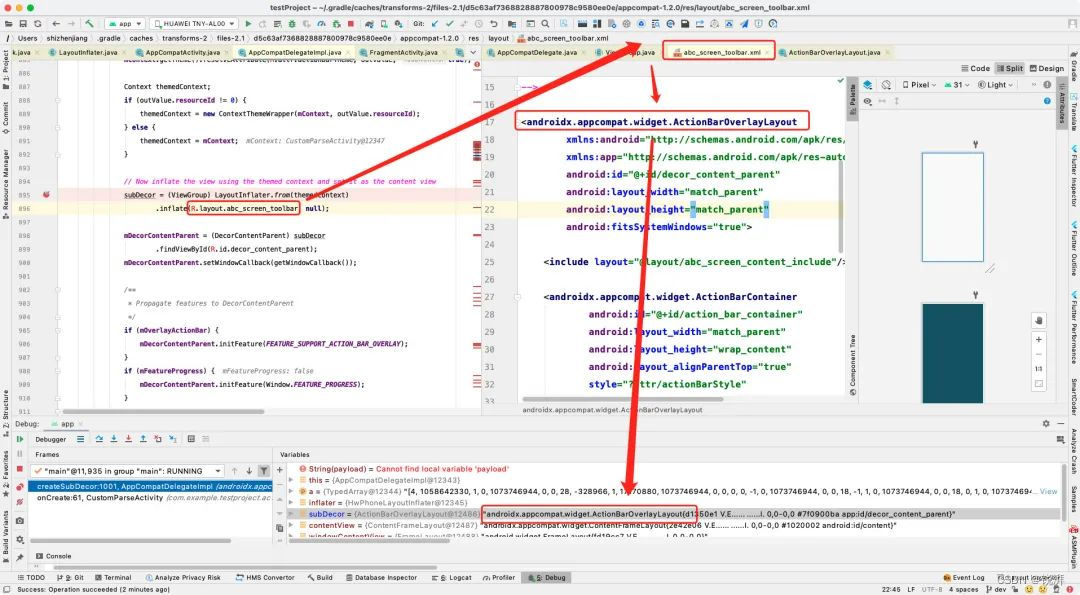
这个东西是什么不重要,重要的是往Window#setContentView()中传的布局不是自己的布局。
而是系用的布局!接下来主要代码是调用Window#setContentView()方法,来初始化主界面。众说周知,Window是PhoneWindow,在 Activity#attatch中初始化的。那么直接走到了PhoneWindow#setContentView()。
代码块1.6:
# PhoneWindow.java

@Override
public void setContentView(View view) {
  setContentView(view, new ViewGroup.LayoutParams(MATCH_PARENT, MATCH_PARENT));
}

@Override
public void setContentView(View view, ViewGroup.LayoutParams params) {
    if (mContentParent == null) {
        // szj加载DecorView 初始化 mContentParent
        installDecor();
    }
  ...
    mContentParent.addView(view, params);
  ...
}
这里要看仔细了,传过来的是View,所以执行的是setContentView(View)。千万别跑到setContentView(id)上!
代码块1.7:
# PhoneWindow.java

private void installDecor() {
    mForceDecorInstall = false;
    // 在代码块1.5中已经通过 mWindow.getDecorView();方法初始化过了,所以这里不执行
    if (mDecor == null) {
        // szj初始化DecorView
        mDecor = generateDecor(-1);
        ...
    } else {
        mDecor.setWindow(this);
    }

      // szj初始化主界面布局
    if (mContentParent == null) {
        mContentParent = generateLayout(mDecor);
    }
}
代码块1.8:
# PhoneWindow.java

public static final int ID_ANDROID_CONTENT = com.android.internal.R.id.content;

// 初始化主界面布局
protected ViewGroup generateLayout(DecorView decor) {
    TypedArray a = getWindowStyle();
    // 初始化Window样式等
    if (a.getBoolean(R.styleable.Window_windowNoTitle, false)) {
      requestFeature(FEATURE_NO_TITLE);
    }
    // 这里有很多初始化的方法..

    // 用来区分主界面布局
    int layoutResource;
      if(...){}else if(...){
    }else {
      // 一般没有设置的情况下,主界面都是这一个
      layoutResource = R.layout.screen_simple;
    }
    // 吧布局解析添加到DecorView上
    mDecor.onResourcesLoaded(mLayoutInflater, layoutResource);
    ViewGroup contentParent = (ViewGroup)findViewById(ID_ANDROID_CONTENT);
       return contentParent;
}
来看看 R.layout.screen_simple 布局是什么样子的:
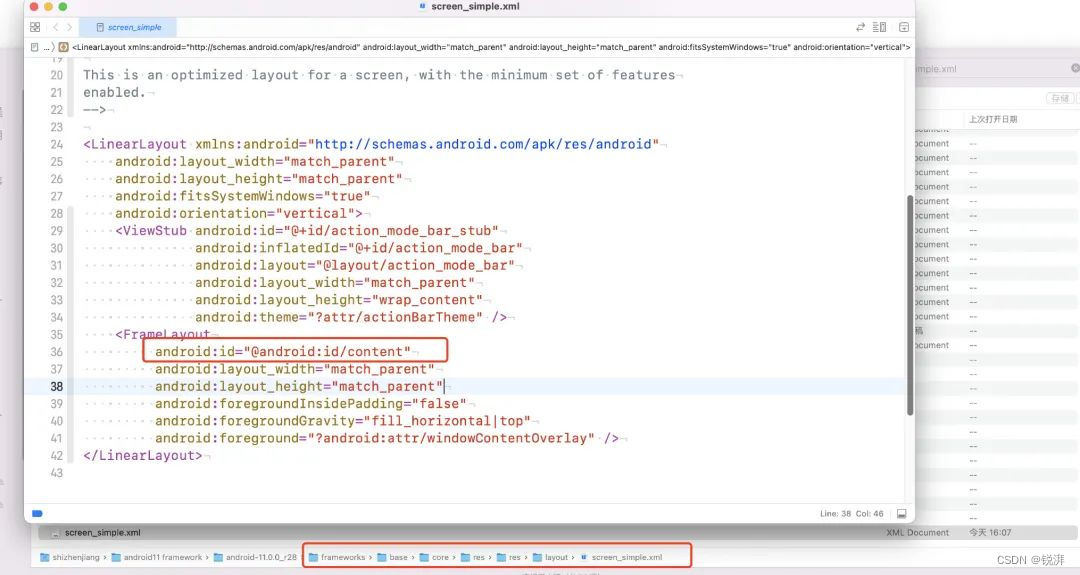
Tips:R.layout.screen_simple需要下载android源码,我是下载android11的源码。那么终于可以找到了id为content的了,到此时系统界面就初始化好了。接下来退回到起点,再来看看。
代码块1.9:
# AppCompatDelegateImpl.java
@Override
public void setContentView(int resId) {
    // 解析主题属性等 并且调用Window#setContentView()方法
    ensureSubDecor();

    // android.R.id.content为screen_simple.xml中的id
    ViewGroup contentParent = mSubDecor.findViewById(android.R.id.content);

    contentParent.removeAllViews();

      // 解析View
    LayoutInflater.from(mContext).inflate(resId, contentParent);

    // 空方法代表解析View完成
    mAppCompatWindowCallback.getWrapped().onContentChanged();
}
在ensureSubDecor() 方法中,我们会初始化系统的布局。初始化完系统的布局后,我们获取到 R.id.content 也就是screen_simple.xml中的FrameLayout。在由FrameLayout作为ViewGroup初始化我们的布局,开始执行 LayoutInflater.from(mContext).inflate(resId, contentParent);走到这里先停一下, 我们先看LayoutInflater在什么时候初始化,然后在进行布局解析!
/ LayoutInflater 什么时候初始化,在什么地方? /
代码块2.1:
// 通过form实例一个LayoutInflater
public static LayoutInflater from(Context context) {
    // szj 获取LayoutInflater实例
    LayoutInflater LayoutInflater =
            (LayoutInflater) context.getSystemService(Context.LAYOUT_INFLATER_SERVICE);
    if (LayoutInflater == null) {
        throw new AssertionError("LayoutInflater not found.");
    }
    return LayoutInflater;
}
这里通过context.getSystemService() 初始化LayoutInflater,我们知道 context实现类为ContextImpl,在ActivityThread.java 中初始化(这里就不展开了)。那么我们直接到ContextImpl去找getSystemService() 方法。
代码块2.2:
# ContextImpl.java
@Override
public Object getSystemService(String name) {
    if (vmIncorrectContextUseEnabled()) {

    //szj走到了这里。。
    return SystemServiceRegistry.getSystemService(this, name);
}
代码块2.3:
# SystemServiceRegistry.java
public static Object getSystemService(ContextImpl ctx, String name) {
    if (name == null) {
        return null;
    }
    // 在 SYSTEM_SERVICE_FETCHERS中找
    final ServiceFetcher<?> fetcher = SYSTEM_SERVICE_FETCHERS.get(name);
    if (fetcher == null) {return null;}

    // 然后在ServiceFetcher中去找服务
    final Object ret = fetcher.getService(ctx);
    if (ret == null) {return null;}
    return ret;
}
代码块2.4:
那我们只要看看SYSTEM_SERVICE_FETCHERS是什么就OK了。
# SystemServiceRegistry.java
private static final Map<String, ServiceFetcher<?>> SYSTEM_SERVICE_FETCHERS =
        new ArrayMap<String, ServiceFetcher<?>>();
SYSTEM_SERVICE_FETCHERS是一个全局静态map,并且是不可改变的。那么直接在静态代码块中找即可。
# SystemServiceRegistry.java

 static {
  // 注册LayoutInflater服务
  registerService(Context.LAYOUT_INFLATER_SERVICE, LayoutInflater.class,
                  new CachedServiceFetcher<LayoutInflater>() {
                    @Override
                    public LayoutInflater createService(ContextImpl ctx) {
                      return new PhoneLayoutInflater(ctx.getOuterContext());
                    }});

    // 注册window服务
   registerService(Context.WINDOW_SERVICE, WindowManager.class,
                   new CachedServiceFetcher<WindowManager>() {
                     @Override
                     public WindowManager createService(ContextImpl ctx) {
                       return new WindowManagerImpl(ctx);
                     }});
  ......
 }

private static <T> void registerService(@NonNull String serviceName,
            @NonNull Class<T> serviceClass, @NonNull ServiceFetcher<T> serviceFetcher) {
        SYSTEM_SERVICE_CLASS_NAMES.put(serviceName, serviceClass.getSimpleName());
    }
可以看到所有的服务都在这里注册的。那么就可以知道LayoutInflater是在SystemServiceRegistry静态代码块初始化的。好了,对LayoutInflater有一个基本的了解后,就接着代码块1.3开始解析布局吧。
代码块1.3:
# AppCompatDelegateImpl.java
@Override
public void setContentView(int resId) {
    // 解析主题属性等 并且调用Window#setContentView()方法
    ensureSubDecor();

    // android.R.id.content为screen_simple.xml中的id
    ViewGroup contentParent = mSubDecor.findViewById(android.R.id.content);

    contentParent.removeAllViews();

      // 解析View
    LayoutInflater.from(mContext).inflate(resId, contentParent);

    // 空方法代表解析View完成
    mAppCompatWindowCallback.getWrapped().onContentChanged();
}
LayoutInflater#.inflate(id, ViewGroup);
代码块1.3.1:
# LayoutInflater.java

public View inflate(@LayoutRes int resource, @Nullable ViewGroup root) {
    return inflate(resource, root, root != null);
}-
@param resource:自己布局的id(R.layout.activity_main)
-
@param root:系统的FrameLayout
代码块1.3.2:
# LayoutInflater.java
public View inflate(@LayoutRes int resource, @Nullable ViewGroup root, boolean attachToRoot) {
    final Resources res = getContext().getResources();

    View view = tryInflatePrecompiled(resource, res, root, attachToRoot);
    if (view != null) {
        return view;
    }
    // XmlResourceParser看名字就知道用来解析XML文件
    XmlResourceParser parser = res.getLayout(resource);
    try {
          // 接着执行这里
        return inflate(parser, root, attachToRoot);
    } finally {
        parser.close();
    }
}
代码块1.3.3:
# LayoutInflater.java

private static final String TAG_MERGE = "merge";
public View inflate(XmlPullParser parser, @Nullable ViewGroup root, boolean attachToRoot) {
    synchronized (mConstructorArgs) {
        ...
        // 保存传进来的view
        View result = root;

        try {
            // 找到root标签 如果找不到就直接报错
            advanceToRootNode(parser);

            // 获取到这个root标签name
            final String name = parser.getName();

            // 判断是否是 merge标签
            if (TAG_MERGE.equals(name)) {
                // 直接加载View,忽略merge标签
                rInflate(parser, root, inflaterContext, attrs, false);
            } else {
                // 通过标签来解析View
                final View temp = createViewFromTag(root, name, inflaterContext, attrs);

                ViewGroup.LayoutParams params = null;

                if (root != null) {
                    params = root.generateLayoutParams(attrs);
                    if (!attachToRoot) {
                       // 设置ViewLayoutParams
                        temp.setLayoutParams(params);
                    }
                }

                // 解析childView
                rInflateChildren(parser, temp, attrs, true);

                // 最终解析完成后添加到root中
                if (root != null && attachToRoot) {
                    root.addView(temp, params);
                }
            }

        }  catch (Exception e) {
          ...
        }

        return result;
    }
}
这里都好理解,传过来一个view,通过 createViewFromTag()解析,解析完成之后添加到View上就完成了。那么来看看createViewFromTag()解析View的方法。
代码块1.3.4:
# LayoutInflater.java

private View createViewFromTag(View parent, String name, Context context, AttributeSet attrs) {
    return createViewFromTag(parent, name, context, attrs, false);
}


View createViewFromTag(View parent, String name, Context context, AttributeSet attrs,
                           boolean ignoreThemeAttr) {

        try {
            // 尝试创建View
            View view = tryCreateView(parent, name, context, attrs);

            if (view == null)
              // 判断是不是自定义View
              // 1.自定义View在布局文件中是全类名
              // 2.而系统的View则不是全类名
              if (-1 == name.indexOf('.')) {
                // 自定义View
                view = onCreateView(context, parent, name, attrs);
              } else {
                // 系统View
                view = createView(context, name, null, attrs);
              }
            }
            return view;
        } catch (InflateException e) {
            ...
        }
    }
}
这段代码很好理解。先尝试获取View,如果获取不到,就判断当前View。是系统的,还是自己定义的。然后在创建View,来看看尝试创建View的方法。
代码块1.3.5:
# LayoutInflater.java

public final View tryCreateView(@Nullable View parent, @NonNull String name,
                                @NonNull Context context,
                                @NonNull AttributeSet attrs) {
    ...
    View view;

    if (mFactory2 != null) {
        view = mFactory2.onCreateView(parent, name, context, attrs);
    } else if (mFactory != null) {
        view = mFactory.onCreateView(name, context, attrs);
    } else {
        view = null;
    }
        ...
    return view;
}
这段代码很关键!先说结果:
-
如果自身Activity extends AppCompatActivity 那么 mFactory2 !=null 就会执行mFactory2.onCreateView(parent, name, context, attrs);
-
如果自身Activity extends Activity 那么view = null表示尝试获取view失败
那么再去判断是系统的View还是自定义的View,再去处理各自的逻辑操作。现在咋们假设view返回的是null,来看看view是创建的。回到代码块1.3.4,接着看。
# LayoutInflater#createViewFromTag()方法内代码

if (view == null) {
  // 判断是不是自定义View
  // 1.自定义View在布局文件中是全类名
  // 2.而系统的View则不是全类名
  if (-1 == name.indexOf('.')) {
    // 自定义View
    view = onCreateView(context, parent, name, attrs);
  } else {
    // 系统View
    view = createView(context, name, null, attrs);
  }
}
自定义View
代码块1.3.6:
# LayoutInflater.java

public View onCreateView(@NonNull Context viewContext, @Nullable View parent,
                         @NonNull String name, @Nullable AttributeSet attrs)
        throws ClassNotFoundException {
    return onCreateView(parent, name, attrs);
}

 protected View onCreateView(View parent, String name, AttributeSet attrs)
            throws ClassNotFoundException {
        return onCreateView(name, attrs);
 }

protected View onCreateView(String name, AttributeSet attrs)
            throws ClassNotFoundException {
        return createView(name, "android.view.", attrs);
}

// 会把咋们自定义的view前缀加上android.view.
 public final View createView(String name, String prefix, AttributeSet attrs)
            throws ClassNotFoundException, InflateException {
        ...
        return createView(context, name, prefix, attrs);
 }
最终都会走到createView()方法,那么系统创建view也是走的这个方法,来看看createView()方法吧。
系统创建View
代码块1.3.7:
public final View createView(@NonNull Context viewContext, @NonNull String name,
                             @Nullable String prefix, @Nullable AttributeSet attrs)
        throws ClassNotFoundException, InflateException {
     ...

    // 缓存
    Constructor<? extends View> constructor = sConstructorMap.get(name);
    if (constructor != null && !verifyClassLoader(constructor)) {
        constructor = null;
        sConstructorMap.remove(name);
    }
    Class<? extends View> clazz = null;

    try {
        // 先从缓存中拿 如果缓存中没有,那么反射创建View
        if (constructor == null) {
            // Class not found in the cache, see if it's real, and try to add it
            // 反射构建View
            clazz = Class.forName(prefix != null ? (prefix + name) : name, false,
                    mContext.getClassLoader()).asSubclass(View.class);

            ...
            // 加入缓存中
            sConstructorMap.put(name, constructor);
        }
      ...
        try {
            // 反射创建系统View
            final View view = constructor.newInstance(args);
            ...
            return view;
        }
    } catch (NoSuchMethodException e) {
      ...
    }
}
这里通过反射创建完成之后,就会一直返回,先返回到代码块1.3.4createViewFromTag()方法上。然后添加到屏幕上就完成了。
哦~ 怪不得很多同学说setContentView()的时候就是通过反射来创建view,布局复杂的情况下会很影响性能,原来说的就是这里啊。
but!
如果说尝试创建view成功了,那么他不就不会反射了么...
代码块1.3.4:
# LayoutInflater.java

private View createViewFromTag(View parent, String name, Context context, AttributeSet attrs) {
    return createViewFromTag(parent, name, context, attrs, false);
}


View createViewFromTag(View parent, String name, Context context, AttributeSet attrs,
                           boolean ignoreThemeAttr) {

        try {
            // 尝试创建View
            View view = tryCreateView(parent, name, context, attrs);

            // TODO 如果创建View成功,那么就不会反射!!!!!!!!!!!!!!
            if (view == null)
              // 判断是不是自定义View
              if (-1 == name.indexOf('.')) {
                // 自定义View
                view = onCreateView(context, parent, name, attrs);
              } else {
                // 系统View
                view = createView(context, name, null, attrs);
              }
            }
            return view;
        } catch (InflateException e) {
            ...
        }
    }
}
那么再来看一下尝试创建View的代码。
代码块1.3.8:
# LayoutInflater.java

private Factory mFactory;
private Factory2 mFactory2;

public final View tryCreateView(@Nullable View parent, @NonNull String name,
                                @NonNull Context context,

    View view;
    // 如果mFactory2 != null 就创建View
    if (mFactory2 != null) {
        view = mFactory2.onCreateView(parent, name, context, attrs);
    } else if (mFactory != null) {
       // 如果mFactory != null 就创建View
        view = mFactory.onCreateView(name, context, attrs);
    } else {
        view = null;
    }

    if (view == null && mPrivateFactory != null) {
        view = mPrivateFactory.onCreateView(parent, name, context, attrs);
    }

    return view;
}
那么先来看看mFactory2和mFactory是什么东西。
可以看出Factory2 和 Factory都是接口,并且Factory2继承Factory。而Factory2和Factory的区别为,Factory2比Factory多一个parent参数而已。刚才我也说过,如果你的Activity继承自 AppCompatActivity() 那么mFactory2 != null。现在要做的就是看一下mFactory2在什么地方初始化的。
/ mFactory2在什么地方初始化? /
这里我们需要注意的是,appcompat1.2 和 appcompat1.3稍微有一点不一样。现在最新版是appcompat1.4,appcompat1.4的代码基本和appcompat1.3是一样的,所以我们就先来看。
appcompat1.2中的mFactory2是在什么地方初始化吧
要看他的源码需要注意的是,自身的Activity继承自AppCompatActivity。现在已知的条件是:
在setContentView()中,我们去解析布局,然后用mFactory2去尝试创建view(代码块1.3.4),防止通过反射创建。那么在setContentView() 就已经初始化好了mFactory2,所以mFactory2一定是在setContentView() 之前就初始化的!那么我们就从AppCompatActivity.onCreate()方法看起。
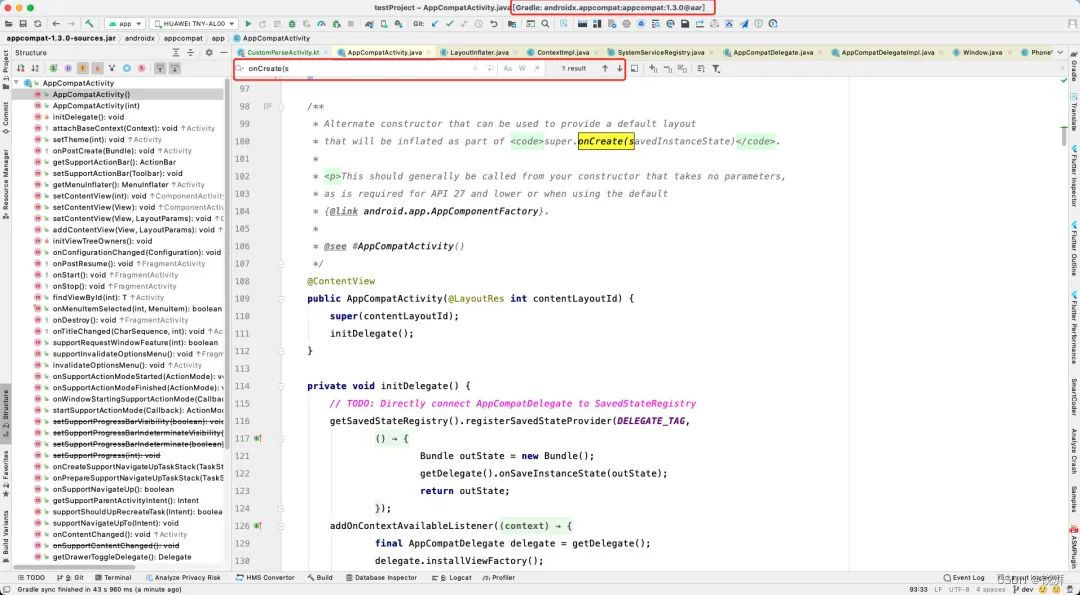
代码块3.1:
# AppCompatActivity.java (appcompat1.2)
@Override
protected void onCreate(@Nullable Bundle savedInstanceState) {
    final AppCompatDelegate delegate = getDelegate(); // 代码1
    delegate.installViewFactory(); // 代码2
    delegate.onCreate(savedInstanceState); //代码3
    super.onCreate(savedInstanceState); // 代码4

    // 正常情况下在这里加载布局..
    // setContentView();  // 代码5
    // findViewById()...
}
可以看出,在setContentView()之前还有一段代码。代码1在setContentView() 的时候聊的很清晰。那么就来看看代码2干了什么事情。
delegate.installViewFactory(); // 代码2他的实现类为AppCompatDelegateImpl,直接跳过去看看。
代码块3.2:
# AppCompatDelegateImpl.java

@Override
public void installViewFactory() {
    LayoutInflater layoutInflater = LayoutInflater.from(mContext);
    // 如果factory == null
    if (layoutInflater.getFactory() == null) {
      // 就设置factory2
        LayoutInflaterCompat.setFactory2(layoutInflater, this);
    } else {
        ...
    }
}
代码块3.3:
# AppCompatDelegateImpl.java

public static void setFactory2(
        @NonNull LayoutInflater inflater, @NonNull LayoutInflater.Factory2 factory) {
    inflater.setFactory2(factory);

    if (Build.VERSION.SDK_INT < 21) {
         // 这里代码不用看,现在android版本98% 都 > 21
    }
}
可以看出,这里就一行代码,设置factory2。刚才也看过factory2,他其实就是一个接口。
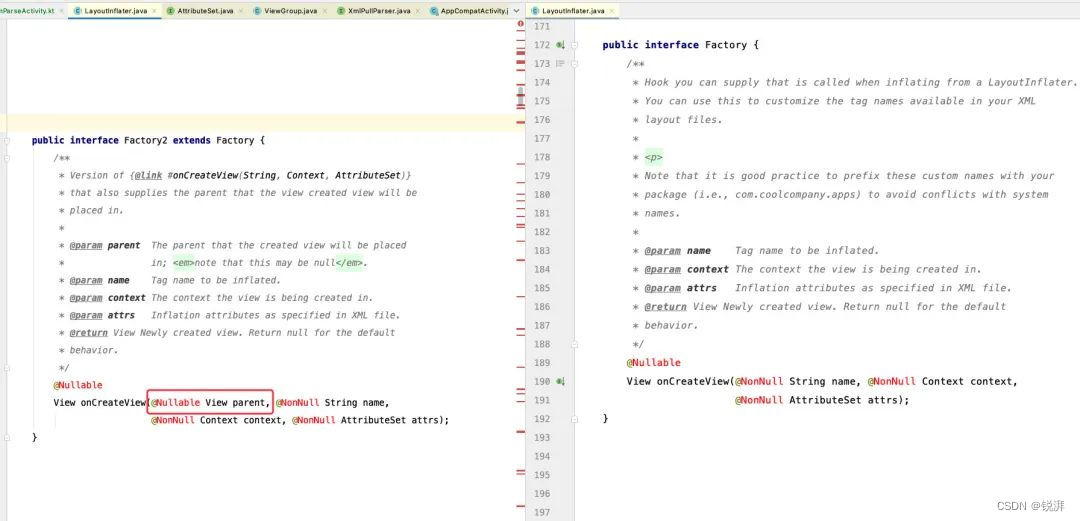
代码块3.4:
public interface Factory2 extends Factory {
    @Nullable
    View onCreateView(@Nullable View parent, @NonNull String name,
                      @NonNull Context context, @NonNull AttributeSet attrs);
}
咋们先不管创建的代码,先假设这里是可以创建成功的!在重新梳理一遍现在的流程:
-
当前activity继承自AppCompatActivity时
-
首先会执行onCreate()方法中的 getDelegate() 创建一个AppCompatDelegate,AppCompatDelegate的实现类为AppCompatDelegateImpl
-
紧接着就会调用AppCompatDelegateImpl#installViewFactory(),来初始化LayoutInflater.Factory2
-
LayoutInflater.Factory2最本质的作用就是创建view,(先假设能创建成功)
-
然后就会执行AppCompatDelegateImpl#onCreate()方法,在这个方法中都是一些判断,版本适配的东西,这个方法对于我们来说不重要,略过即可
-
最后才到了setContentView() 方法来加载整个界面布局
setContentView()还是会执行到AppCompatDelegateImpl中的setContentView()方法。先执行ensureSubDecor()方法来创建mSubDecor,在ensureSubDecor()中通过createSubDecor()创建mSubDecor,期间最重要的就是调用了PhoneWindow#setContentView(View)方法。在PhoneWindow#setContentView(View)中又会通过installDecor()->generateLayout()初始化主界面的布局。
走到这里,界面的布局就已经初始化完成了。界面的布局初始化完成之后就会初始化我们自己的布局,通过 LayoutInflater.from(mContext).inflate(resId, contentParent);LayoutInflater在ContextImpl.getSystemService() 中初始化。接着走到了SystemServiceRegistry.getSystemService()。最终在SystemServiceRegistry的静态代码块中注册了所有的服务,所以 LayoutInflater也是在这里初始化的。
初始化完成LayoutInflater后就调用 inflate来初始化咋们自己的View。最终在LayoutInflater#createViewFromTag()方法中初始化view,然后添加到系统view上即完成了初始化。在createViewFromTag()中我们会通过 tryCreateView()尝试创建View,并且在这里就调用了 mFactory2.onCreateView(parent, name, context, attrs)方法,mFactory2在AppCompatDelegateImpl#installViewFactory()方法中初始化的,他在AppCompatActivity#onCreate()中调用的!如果tryCreateView() 创建view不成功,我们在通过反射的办法创建出所有view即可!走到这里的时候,createViewFromTag()一定会返回一个view,无论是通过mFactory2.onCreateView()创建还是反射创建,都会返回一个view。最终添加到系统的view上即可!
走到这里,appcompat1.2中setContentView()的源码就差不多了!那么我们先不管LayoutInflater.Factory2是如何创建View的,先来看看appcompat1.3中有什么变化吧!
appcompat1.3中的mFactory2是在什么地方初始化吧
更新到appcompat1.3:
当更新到appcompat1.3后你就会惊奇的发现,在AppCompatActivity中已经没有onCreate()方法了,当在搜索AppCompatDelegate#installViewFactory()等方法的时候就变成了这样。
代码块4.1:
# AppCompatActivity.java (appcompat1.3)
private void initDelegate() {
   ...
    addOnContextAvailableListener(new OnContextAvailableListener() {
        @Override
        public void onContextAvailable(@NonNull Context context) {
            final AppCompatDelegate delegate = getDelegate();
            delegate.installViewFactory();
            delegate.onCreate(getSavedStateRegistry()
                    .consumeRestoredStateForKey(DELEGATE_TAG));
        }
    });
}
那么我们看看这个addOnContextAvailableListener()方法是什么。
代码块4.2:
# ComponentActivity.java

public final void addOnContextAvailableListener(
        @NonNull OnContextAvailableListener listener) {
    mContextAwareHelper.addOnContextAvailableListener(listener);
}
这里会执行到ComponentActivity中的方法,ComponentActivity又是什么鬼,首先我们先来捋清楚他的继承关系。
MainActivity -> AppCompatActivity -> FragmentActivity -> ComponentActivity -> androidx.core.app.ComponentActivity -> Activity
在AppCompatActivity中调用addOnContextAvailableListener()就是调用到他爷爷类的ComponentActivity()。那么这很显然是一个观察者设计模式,那就来看看他是什么时机分发的吧。
代码块4.3:
# ComponentActivity.java

@Override
protected void onCreate(@Nullable Bundle savedInstanceState) {
    ...
    // 分发
    mContextAwareHelper.dispatchOnContextAvailable(this);
    super.onCreate(savedInstanceState);
   ...
}
代码块4.4:
# ContextAwareHelper.java

 private final Set<OnContextAvailableListener> mListeners = new CopyOnWriteArraySet<>();

 // 监听
 public void addOnContextAvailableListener(@NonNull OnContextAvailableListener listener) {
    if (mContext != null) {
      listener.onContextAvailable(mContext);
    }
    mListeners.add(listener);
}

// 分发
public void dispatchOnContextAvailable(@NonNull Context context) {
    mContext = context;
    for (OnContextAvailableListener listener : mListeners) {
        listener.onContextAvailable(context);
    }
}
既然他可以这样,那么我们来试试这么写代码会不会报错:
可以看出,在appcompat1.3中,还是会在onCreate() 中调用AppCompatDelegate的那些方法!只不过他用了观察者设计模式,统一管理了起来!
/ AppCompatViewInflater 如何改变View /
那么接下来就趁热打铁,来看看Factory2.onCreateView() 方法是如何创建View的!Factory2在AppCompatDelegateImpl中实现的,所以就去找 AppCompatDelegateImpl#onCreateView() 方法。
代码块5.1:
# AppCompatDelegateImpl.java

public final View onCreateView(View parent, String name, Context context, AttributeSet attrs) {
    return createView(parent, name, context, attrs);
}
代码块5.2:
@Override
public View createView(View parent, final String name, @NonNull Context context,
@NonNull AttributeSet attrs) {
if (mAppCompatViewInflater == null) {
// 获取当前主题样式
TypedArray a = mContext.obtainStyledAttributes(R.styleable.AppCompatTheme);
String viewInflaterClassName =
a.getString(R.styleable.AppCompatTheme_viewInflaterClass);
if (viewInflaterClassName == null) {
mAppCompatViewInflater = new AppCompatViewInflater();
} else {
try {
// 通过主题样式反射创建AppCompatViewInflater
Class<?> viewInflaterClass = Class.forName(viewInflaterClassName);
mAppCompatViewInflater =
(AppCompatViewInflater) viewInflaterClass.getDeclaredConstructor()
.newInstance();
} catch (Throwable t) {
// 如果报错就直接new AppCompatViewInflater
mAppCompatViewInflater = new AppCompatViewInflater();
}
}
}
// 最终在这里创建view
return mAppCompatViewInflater.createView(parent, name, context, attrs, inheritContext,
IS_PRE_LOLLIPOP,
true,
VectorEnabledTintResources.shouldBeUsed()
);
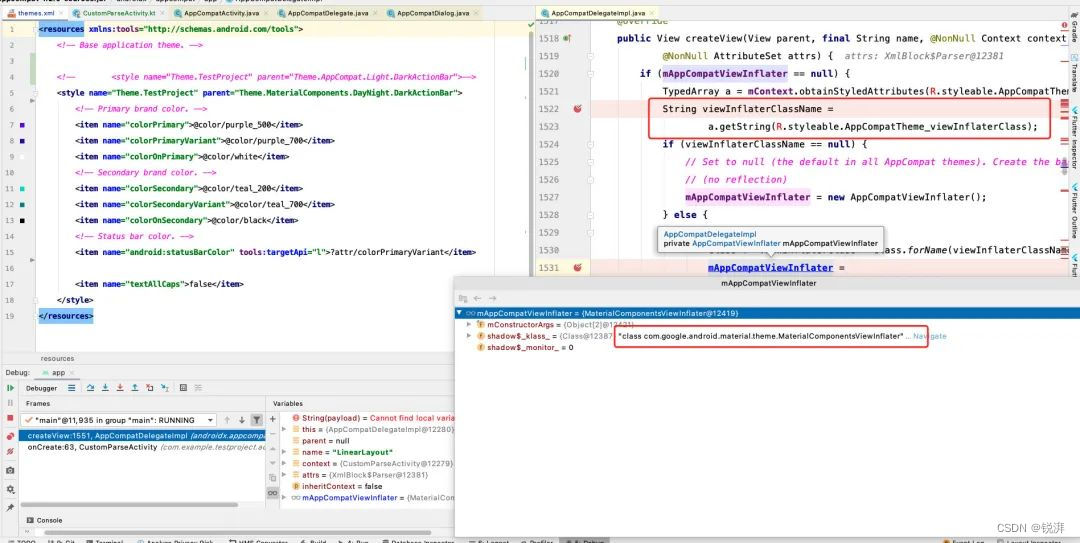
}tips:当前主题为 Theme.AppCompat.Light.DarkActionBar
代码块5.3:
final View createView(View parent, final String name, @NonNull Context context,
        @NonNull AttributeSet attrs, boolean inheritContext,
        boolean readAndroidTheme, boolean readAppTheme, boolean wrapContext) {
    final Context originalContext = context;
    ....

    View view = null;

    switch (name) {
        case "TextView":
            view = createTextView(context, attrs);
            verifyNotNull(view, name);
            break;
        case "ImageView":
            view = createImageView(context, attrs);
            verifyNotNull(view, name);
            break;
        case "Button":
            view = createButton(context, attrs);
            verifyNotNull(view, name);
            break;
        case "EditText":
            view = createEditText(context, attrs);
            verifyNotNull(view, name);
            break;
        case "Spinner":
            view = createSpinner(context, attrs);
            verifyNotNull(view, name);
            break;
        case "ImageButton":
            view = createImageButton(context, attrs);
            verifyNotNull(view, name);
            break;
        case "CheckBox":
            view = createCheckBox(context, attrs);
            verifyNotNull(view, name);
            break;
        case "RadioButton":
            view = createRadioButton(context, attrs);
            verifyNotNull(view, name);
            break;
        case "CheckedTextView":
            view = createCheckedTextView(context, attrs);
            verifyNotNull(view, name);
            break;
        case "AutoCompleteTextView":
            view = createAutoCompleteTextView(context, attrs);
            verifyNotNull(view, name);
            break;
        case "MultiAutoCompleteTextView":
            view = createMultiAutoCompleteTextView(context, attrs);
            verifyNotNull(view, name);
            break;
        case "RatingBar":
            view = createRatingBar(context, attrs);
            verifyNotNull(view, name);
            break;
        case "SeekBar":
            view = createSeekBar(context, attrs);
            verifyNotNull(view, name);
            break;
        case "ToggleButton":
            view = createToggleButton(context, attrs);
            verifyNotNull(view, name);
            break;
        default:
            view = createView(context, name, attrs);
    }

    if (view == null && originalContext != context) {
        // 反射创建view
        view = createViewFromTag(context, name, attrs);
    }
     ...

    return view;
}
可以看出,这里做了很多判断,最终都会调用到 createXXX上。
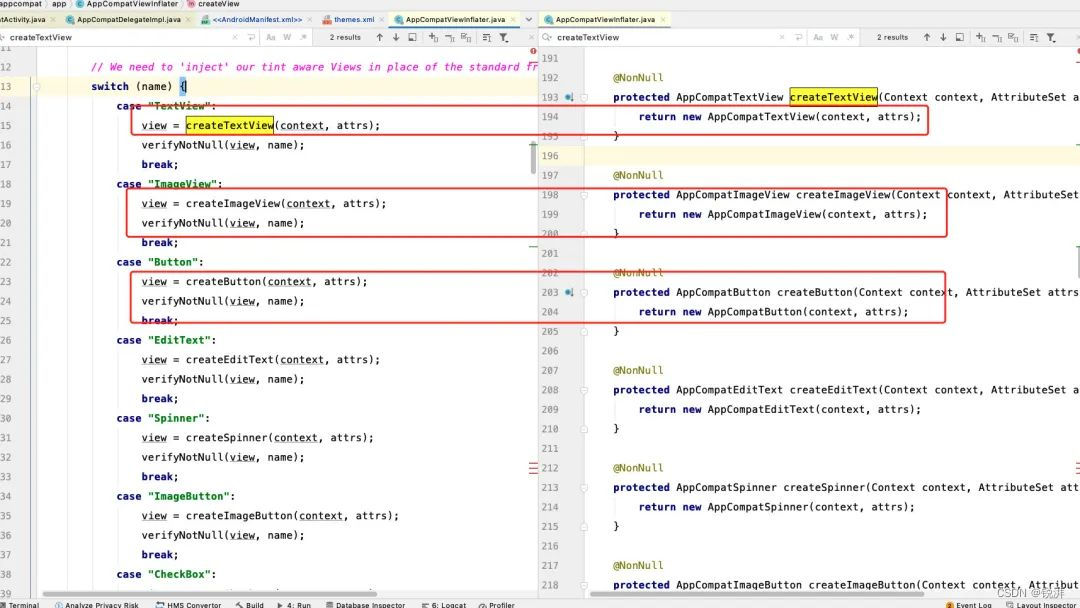
然后在对应的createXXX()中就会创建出来对应的AppCompatXXX。那么,是不是就会恍然大悟!原来普通系统的View,TextView,Button,ImageView等。
如果继承自AppCompatActivity那么就不会反射创建,而是直接new出来。那么也就解答了开头的一个问题。
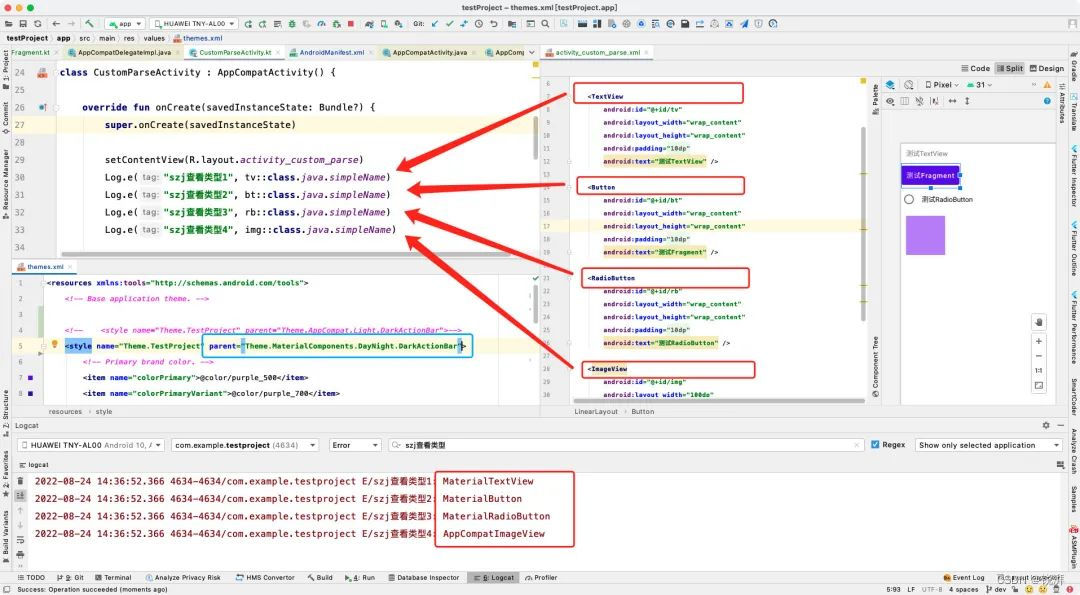
在xml布局中明明是TextView,但是用的时候他就给转换了!!恍然大悟,醍醐灌顶!但是问题又来了,这里只能将TextView转换成对应的AppComatTextView。如果切换成Material风格,为啥会转换成MaterialTextView呢?

并且这里为啥只有:
-
TextView转换为了MaterialTextView
-
Button转换为了MaterialButton
-
RadioButton转换成了MaterialRadioButton
但是ImageView为什么是转换成了AppComatImageView呢?
首先将主题风格切换成Material风格,在打个断点看一看!还记得刚调用AppCompatDelegateImpl$createView()的时候有一个主题判断,那么就在哪里打断点!
可以看出,在反射创建的时候,这里获取到的其实是MaterialComponentsViewInflater!那么就好理解了,来看看MaterialComponentsViewInflater的代码:
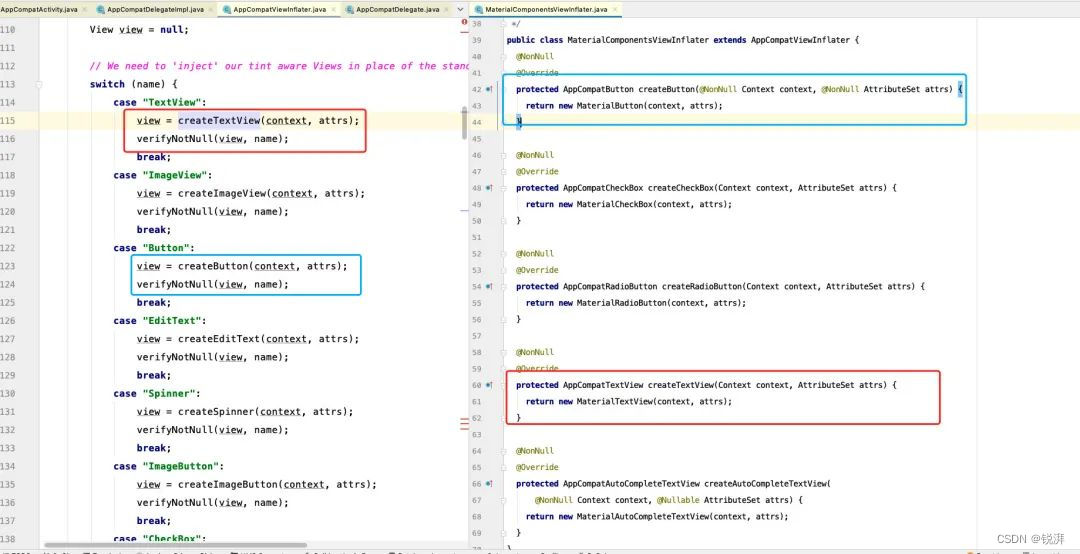
可以看出,在MaterialComponentsViewInflater中就有4个view的方法,那么现在应该没问题恍然大悟了吧?
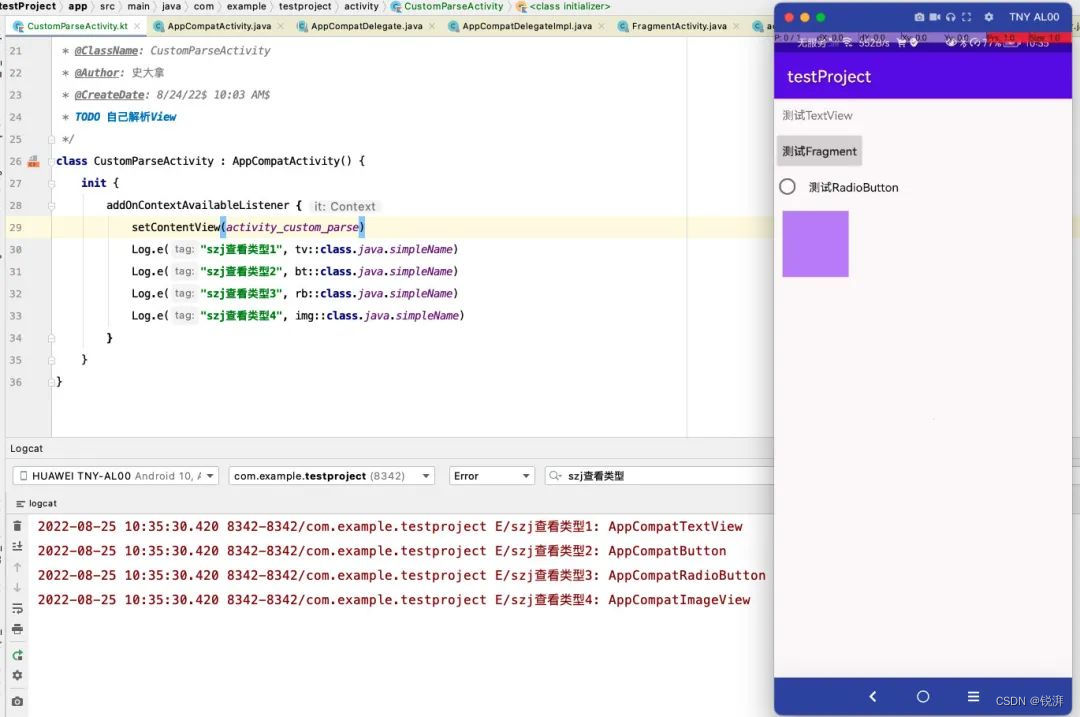
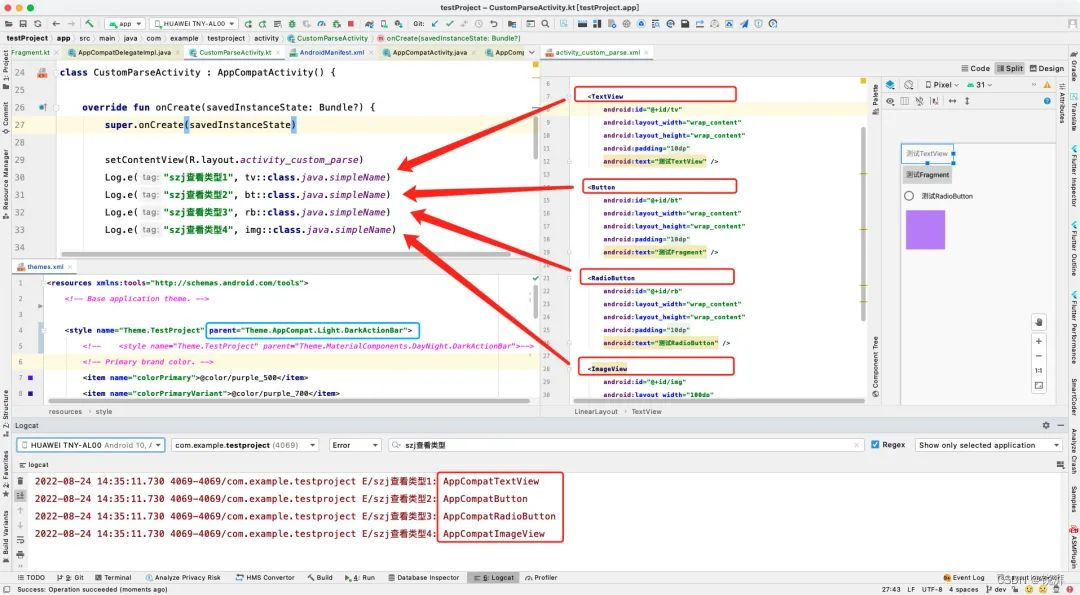
/ 如何自己解析View(Activity / Fragment) /
自己解析View-Activity
既然系统代码中可以通过Factory2拦截代码并且自己创建,那么我们是不是也可以呢…来尝试一下吧。
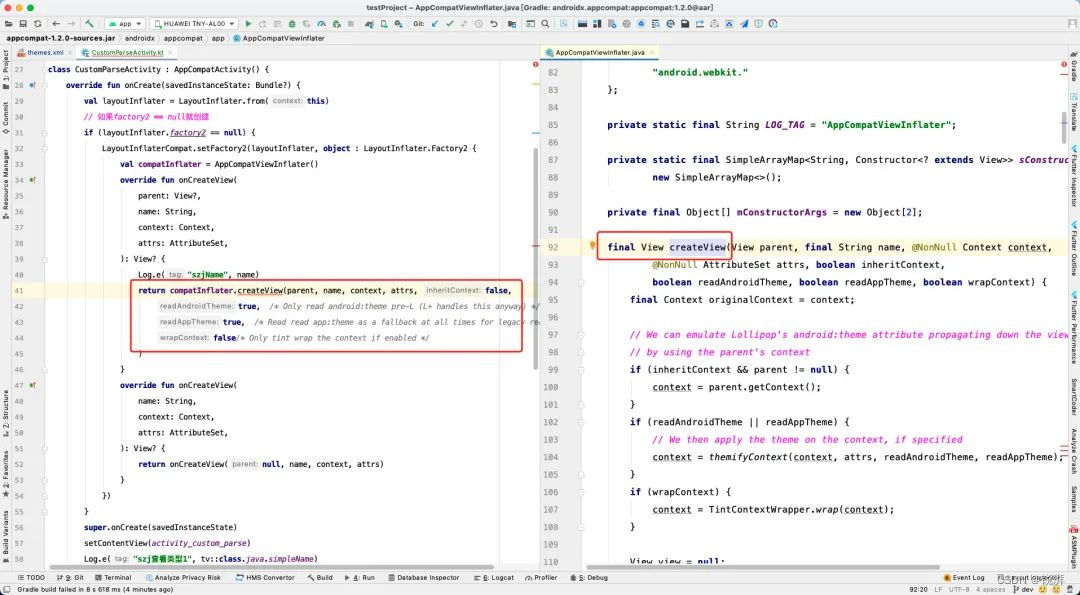
可以看出,如果就这么直接new AppCompatViewInflater()调用createView方法的话是不行的。因为AppCompatViewInflater.createView没有修饰符 (public),所以我们只能吧AppCompatViewInflater类复制出来一份。
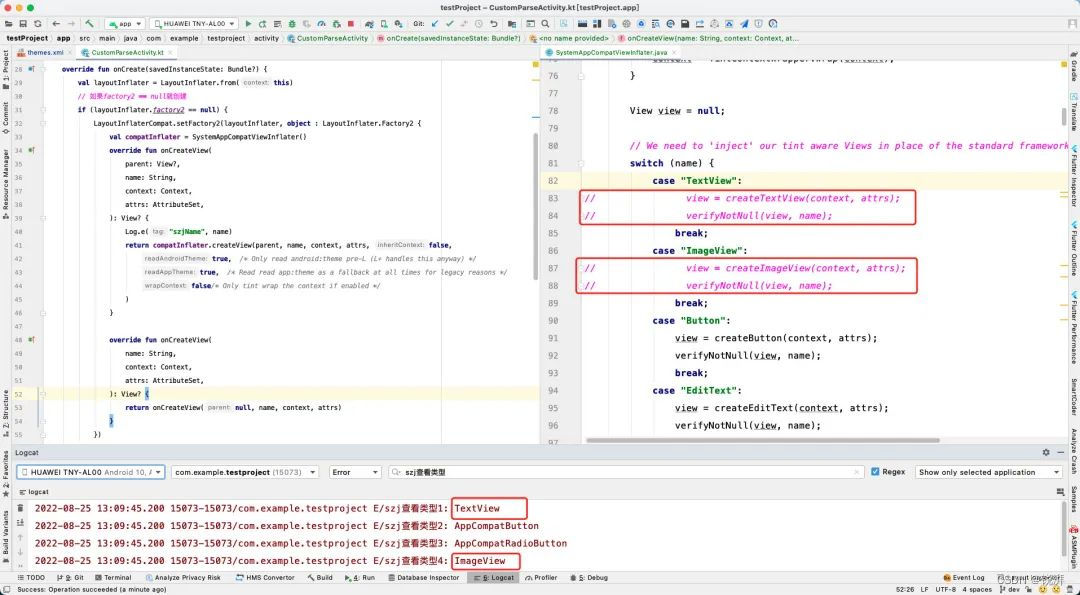
可以看出,我们复制出来一份,然后不让他去自己创建,而是就用系统原来的。事实证明确实可以!
自己解析View-Fragment
代码块6.1:
supportFragmentManager.beginTransaction()
// 替换系统的content来作为容器
.replace(android.R.id.content, CustomParseFragment())
.commit()
既然我们已经阅读了源码,知道系统是如何布局的,那么我们就用系统布局的id来替换Fragment即可。接着还是老套路,在framgnet中设置Factory2。
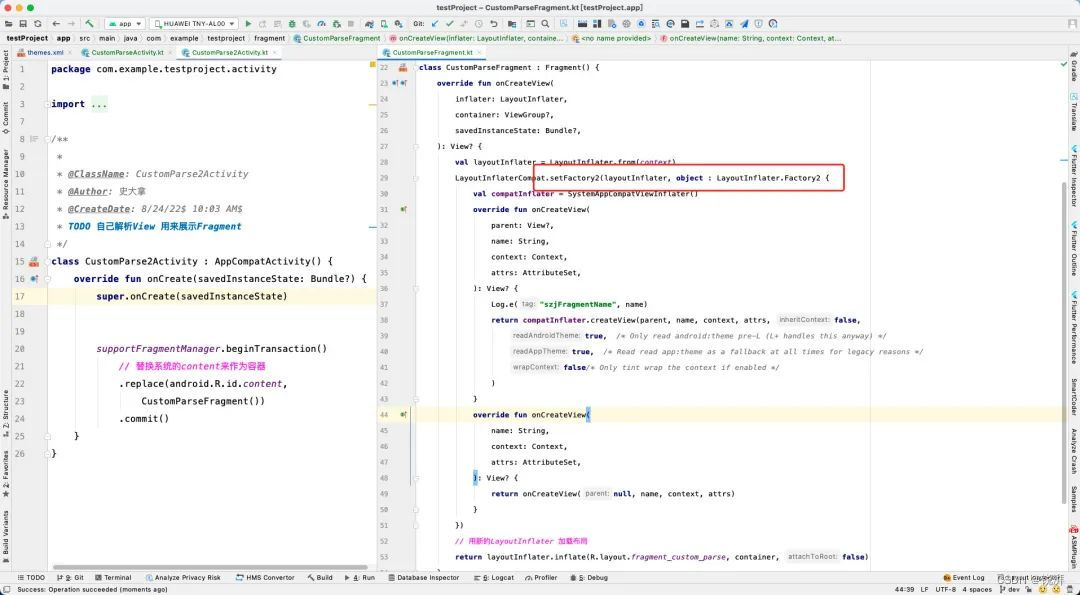
结果发现报错了!!
在设置Factory2的时候,报错。A factory has already been set on this LayoutInflater。表示已经设置过工厂了!那么我们点进去源码看一看他是怎么写的。
代码块6.2:
# LayoutInflaterCompat.java

public static void setFactory2(
        @NonNull LayoutInflater inflater, @NonNull LayoutInflater.Factory2 factory) {
        inflater.setFactory2(factory);
      ...
}
接着看。
代码块6.3:
public void setFactory2(Factory2 factory) {
// mFactorySet默认是false
if (mFactorySet) {
throw new IllegalStateException("A factory has already been set on this LayoutInflater");
}
if (factory == null) {
throw new NullPointerException("Given factory can not be null");
}
// 如果执行过就设置为true
mFactorySet = true;
...
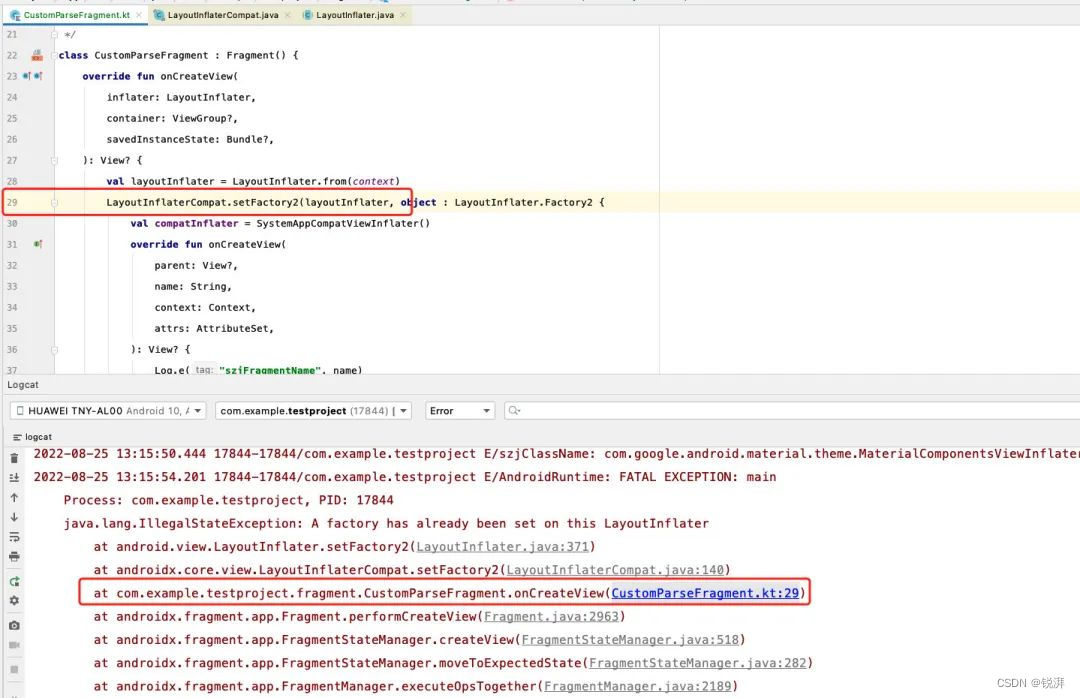
}原来如此,Factory2只能设置一个,那么在Fragment中如何自己解析View呢?既然不能设置多个Factory2那么只能看看LayoutInflater有没有提供一个“自我拷贝”的方法。在全局查找clone关键之后,找到了一个 cloneInContext,看着还可以,那么就试试吧~
可以看出,这样也可以自己创建View,而不是通过反射的方式!
/ onCreate中不调用super.onCreate()为什么会报错 /
既然说我们可以自己解析View,那么我们是不是就不用调用super.onCreate()方法了呢?那是不行的,先来看报什么错。
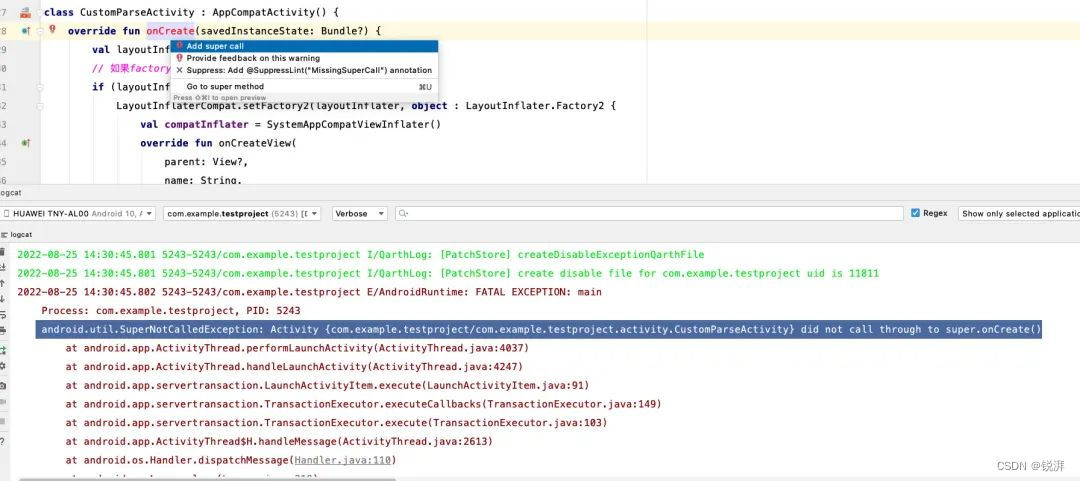
意思很清楚,就是说你没有调用super.onCreate()方法,并且as也会提示你。那么找到分发onCreate事件的地方ActivityThread#performLaunchActivity。
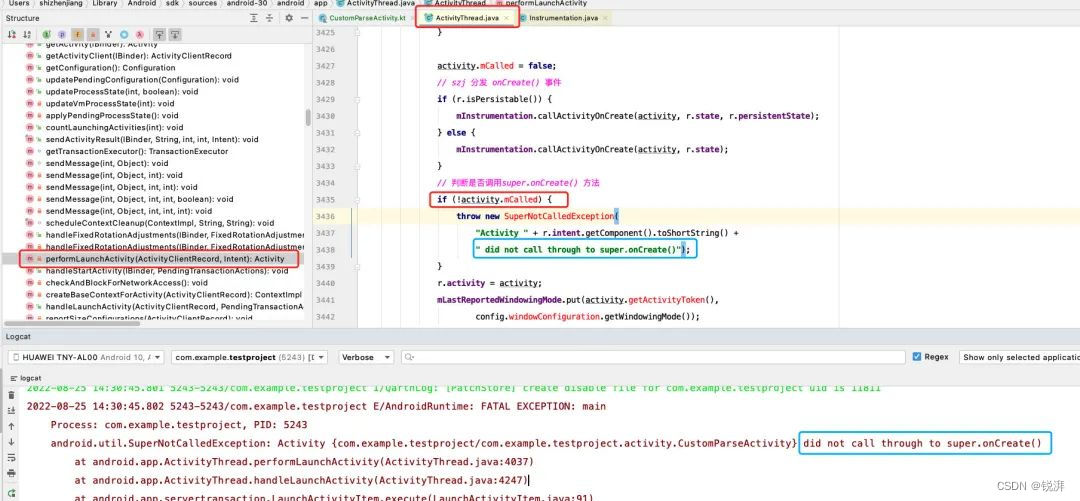
所有生命周期都是通过Instrumentation来分发的,这部分源码有时间再了解,这里的重点是调用了Activity#mCalled属性。分发事件之前为false,如果分发完属性还为false那么就报错。

很明显,在Activity#onCreate()中将这个标记改为了true,表示调用了super.onCreate()。其实他的所有生命周期都有这个判断,我猜他可能处理了其他东西吧。


 1万+
1万+


 被折叠的 条评论
为什么被折叠?
被折叠的 条评论
为什么被折叠?
 到【灌水乐园】发言


