


我们从 DisplayContent 的构造函数出发,看一下这棵以 DisplayContent 为根节点的 DisplayArea 树是如何生成的。
1. DisplayContent 构造函数分析
DisplayContent 类的构造函数:
// frameworks/base/services/core/java/com/android/server/wm/DisplayContent.java

   /**
     * Create new {@link DisplayContent} instance, add itself to the root window container and
     * initialize direct children.
     * @param display May not be null.
     * @param root {@link RootWindowContainer}
     */
    DisplayContent(Display display, RootWindowContainer root,
            @NonNull DeviceStateController deviceStateController) {
        // ......
        configureSurfaces(pendingTransaction);
        // ......
    }

    /**
     * Configures the surfaces hierarchy for DisplayContent
     * This method always recreates the main surface control but reparents the children
     * if they are already created.
     * @param transaction as part of which to perform the configuration
     */
    private void configureSurfaces(Transaction transaction) {
        // ......
        if (mDisplayAreaPolicy == null) {
            // Setup the policy and build the display area hierarchy.
            // Build the hierarchy only after creating the surface so it is reparented correctly
            mDisplayAreaPolicy = mWmService.getDisplayAreaPolicyProvider().instantiate(
                    mWmService, this /* content */, this /* root */,
                    mImeWindowsContainer);
        }
        // ......
    }
在 DisplayContent 的构造方法中,调用 DisplayAreaPolicy.Provider.instantiate 方法,去初始化一个 DisplayArea 层级结构。
DisplayAreaPolicy.Provider 只是一个接口,接口中 instantiate 方法的定义:
        /**
         * Instantiates a new {@link DisplayAreaPolicy}. It should set up the {@link DisplayArea}
         * hierarchy.
         *
         * @see DisplayAreaPolicy#DisplayAreaPolicy
         */
        DisplayAreaPolicy instantiate(WindowManagerService wmService, DisplayContent content,
                RootDisplayArea root, DisplayArea.Tokens imeContainer);
实际运行的代码是 DisplayAreaPolicy.Provider 的实现类 DisplayAreaPolicy.DefaultProvider 的 instantiate 方法:
// frameworks/base/services/core/java/com/android/server/wm/DisplayAreaPolicy.java

public DisplayAreaPolicy instantiate(WindowManagerService wmService,
                DisplayContent content, RootDisplayArea root,
                DisplayArea.Tokens imeContainer) {

            // new 一个 TaskDisplayArea 对象
            final TaskDisplayArea defaultTaskDisplayArea = new TaskDisplayArea(content, wmService, "DefaultTaskDisplayArea", FEATURE_DEFAULT_TASK_CONTAINER);

            // new 一个 List,然后把刚 new 的TaskDisplayArea 对象插入
            final List<TaskDisplayArea> tdaList = new ArrayList<>();
            tdaList.add(defaultTaskDisplayArea);

            // HierarchyBuilder 对应用于统筹管理整个树的构建过程
            // 传入的参数 root 就是窗口层级树的根节点 DisplayContent
            final HierarchyBuilder rootHierarchy = new HierarchyBuilder(root);

            // 将 imeContainer 以及刚创建的 list 保存到 HierarchyBuilder 对象的成员变量中
            rootHierarchy.setImeContainer(imeContainer).setTaskDisplayAreas(tdaList);

            if (content.isTrusted()) { // isTrusted 表示当前屏幕是否是主屏幕
                // Only trusted display can have system decorations.
                // 初始化好 feature
                configureTrustedHierarchyBuilder(rootHierarchy, wmService, content);
            }

                // 生成 DisplayArea 层级结构
             return new DisplayAreaPolicyBuilder().setRootHierarchy(rootHierarchy).build(wmService);
        }
instantiate 方法大致干了两件事:
-
初始化一个 HierarchyBuilder 对象,同时初始化好内部的三个成员变量
RootDisplayArea mRoot ArrayList<TaskDisplayArea> mTaskDisplayAreas DisplayArea.Tokens mImeContainer -
调用
configureTrustedHierarchyBuilder方法初始化好 Feature 列表 -
调用
new DisplayAreaPolicyBuilder().setRootHierarchy(rootHierarchy).build(wmService)生成 DisplayArea 层级结构
2. PendingArea 树构建过程初步
接下来我们就来看 configureTrustedHierarchyBuilder 方法的具体实现:
        // frameworks/base/services/core/java/com/android/server/wm/DisplayAreaPolicy.java

        private void configureTrustedHierarchyBuilder(HierarchyBuilder rootHierarchy,
                WindowManagerService wmService, DisplayContent content) {
            // WindowedMagnification should be on the top so that there is only one surface
            // to be magnified.
            rootHierarchy.addFeature(new Feature.Builder(wmService.mPolicy, "WindowedMagnification",
                    FEATURE_WINDOWED_MAGNIFICATION)
                    .upTo(TYPE_ACCESSIBILITY_MAGNIFICATION_OVERLAY)
                    .except(TYPE_ACCESSIBILITY_MAGNIFICATION_OVERLAY)
                    // Make the DA dimmable so that the magnify window also mirrors the dim layer.
                    .setNewDisplayAreaSupplier(DisplayArea.Dimmable::new)
                    .build());
            if (content.isDefaultDisplay) {
                // Only default display can have cutout.
                // See LocalDisplayAdapter.LocalDisplayDevice#getDisplayDeviceInfoLocked.
                rootHierarchy.addFeature(new Feature.Builder(wmService.mPolicy, "HideDisplayCutout",
                        FEATURE_HIDE_DISPLAY_CUTOUT)
                        .all()
                        .except(TYPE_NAVIGATION_BAR, TYPE_NAVIGATION_BAR_PANEL, TYPE_STATUS_BAR,
                                TYPE_NOTIFICATION_SHADE)
                        .build())
                        .addFeature(new Feature.Builder(wmService.mPolicy, "OneHanded",
                                FEATURE_ONE_HANDED)
                                .all()
                                // 24 25 33
                                .except(TYPE_NAVIGATION_BAR, TYPE_NAVIGATION_BAR_PANEL,
                                        TYPE_SECURE_SYSTEM_OVERLAY)
                                .build());
            }
            rootHierarchy
                    .addFeature(new Feature.Builder(wmService.mPolicy, "FullscreenMagnification",
                            FEATURE_FULLSCREEN_MAGNIFICATION)
                            .all()
                            .except(TYPE_ACCESSIBILITY_MAGNIFICATION_OVERLAY, TYPE_INPUT_METHOD,
                                    TYPE_INPUT_METHOD_DIALOG, TYPE_MAGNIFICATION_OVERLAY,
                                    TYPE_NAVIGATION_BAR, TYPE_NAVIGATION_BAR_PANEL)
                            .build())
                    .addFeature(new Feature.Builder(wmService.mPolicy, "ImePlaceholder",
                            FEATURE_IME_PLACEHOLDER)
                            .and(TYPE_INPUT_METHOD, TYPE_INPUT_METHOD_DIALOG)
                            .build());
        }
这里几段代码都是类似的:
-
通过 Feature.Builder 构造一个 Feature 对象
-
再调用 HierarchyBuilder 对象的 addFeature 方法,将构造好的 Feature 对象保存到 HierarchyBuilder 对象内部的
ArrayList<DisplayAreaPolicyBuilder.Feature> mFeatures成员中
我们以第一段代码为例看下具体的实现:
            rootHierarchy.addFeature(new Feature.Builder(wmService.mPolicy, "WindowedMagnification",
                    FEATURE_WINDOWED_MAGNIFICATION)
                    .upTo(TYPE_ACCESSIBILITY_MAGNIFICATION_OVERLAY)
                    .except(TYPE_ACCESSIBILITY_MAGNIFICATION_OVERLAY)
                    // Make the DA dimmable so that the magnify window also mirrors the dim layer.
                    .setNewDisplayAreaSupplier(DisplayArea.Dimmable::new)
                    .build());
在了解 Feature 的构建过程之前,我们先看一下 Feature 的定义:
    /**
     * A feature that requires {@link DisplayArea DisplayArea(s)}.
     */
    static class Feature {
        private final String mName;
        private final int mId;
        private final boolean[] mWindowLayers;
        private final NewDisplayAreaSupplier mNewDisplayAreaSupplier;
        // ......
    }
Feature 对象会和窗口层级树中的一个 DiaplayArea 对象相关联,用于表示 DiaplayArea 对象管理的显示区域拥有不同的特性。
看一下它的成员变量:
-
mName:Feature的名字,如
WindowedMagnification HideDisplayCutout之类的,后续 DisplayArea 层级结构建立起来后,每个 DisplayArea 的名字用的就是当前 DisplayArea 对应的那个 Feature 的名字。 -
mId,Feature 的 ID,如
FEATURE_WINDOWED_MAGNIFICATION FEATURE_HIDE_DISPLAY_CUTOUT,用于指定啊 Feature 的类型 -
mWindowLayers,一个 boolean 数组,代表了 Feature 关联的 DisplayArea 可以包含哪些层级对应的窗口
-
mNewDisplayAreaSupplier
前面说过成员 int mId 用于指定 Feature 的类型,目前系统有以下几类 feature:
        // frameworks/base/core/java/android/window/DisplayAreaOrganizer.java

    /**
     * Display area hosting the default task container.
     */
    // 拥有该 feature 的 DisplayArea 的子节点是 TaskDisPlayArea
    public static final int FEATURE_DEFAULT_TASK_CONTAINER = FEATURE_SYSTEM_FIRST + 1;

    /**
     * Display area hosting non-activity window tokens.
     */
    // // 拥有该 feature 的 DisplayArea 的子节点是 WindowToken
    public static final int FEATURE_WINDOW_TOKENS = FEATURE_SYSTEM_FIRST + 2;

   /**
     * Display area for one handed feature
     */
    // 拥有该 feature 的 DisplayArea 指代的区域支持单手模式
    public static final int FEATURE_ONE_HANDED = FEATURE_SYSTEM_FIRST + 3;

    /**
     * Display area that can be magnified in
     * {@link Settings.Secure.ACCESSIBILITY_MAGNIFICATION_MODE_WINDOW}. It contains all windows
     * below {@link WindowManager.LayoutParams#TYPE_ACCESSIBILITY_MAGNIFICATION_OVERLAY}.
     */
    // 在设置中了设置了 Settings.Secure.ACCESSIBILITY_MAGNIFICATION_MODE_WINDOW 属性后, 拥有该 feature 的 DisplayArea 指代的区域,可以放大
    public static final int FEATURE_WINDOWED_MAGNIFICATION = FEATURE_SYSTEM_FIRST + 4;

    /**
     * Display area that can be magnified in
     * {@link Settings.Secure.ACCESSIBILITY_MAGNIFICATION_MODE_FULLSCREEN}. This is different from
     * {@link #FEATURE_WINDOWED_MAGNIFICATION} that the whole display will be magnified.
     * @hide
     */

    // 在设置中了设置了 Settings.Secure.ACCESSIBILITY_MAGNIFICATION_MODE_FULLSCREEN 属性后, 拥有该 feature 的 DisplayArea 指代的区域,可以放大,与 FEATURE_WINDOWED_MAGNIFICATION 不同的
    public static final int FEATURE_FULLSCREEN_MAGNIFICATION = FEATURE_SYSTEM_FIRST + 5;


   /**
     * Display area for hiding display cutout feature
     * @hide
     */
    // 拥有该 feature 的 DisplayArea 指代的区域,拥有隐藏刘海屏的功能
    public static final int FEATURE_HIDE_DISPLAY_CUTOUT = FEATURE_SYSTEM_FIRST + 6;

    /**
     * Display area that the IME container can be placed in. Should be enabled on every root
     * hierarchy if IME container may be reparented to that hierarchy when the IME target changed.
     * @hide
     */

    // 拥有该 feature 的 DisplayArea 指代的区域,用于放置输入法
    public static final int FEATURE_IME_PLACEHOLDER = FEATURE_SYSTEM_FIRST + 7;


   /**
     * Display area hosting IME window tokens (@see ImeContainer). By default, IMEs are parented
     * to FEATURE_IME_PLACEHOLDER but can be reparented under other RootDisplayArea.
     *
     * This feature can register organizers in order to disable the reparenting logic and manage
     * the position and settings of the container manually. This is useful for foldable devices
     * which require custom UX rules for the IME position (e.g. IME on one screen and the focused
     * app on another screen).
     */

    // FEATURE_IME_PLACEHOLDER 的子节点,用于放置输入法
    public static final int FEATURE_IME = FEATURE_SYSTEM_FIRST + 8;

    //
接下来,我们就来看 Feature 对象的具体构建过程。
这里先使用 Feature.Builder 构建一个 Feature 对象:
 // frameworks/base/services/core/java/com/android/server/wm/DisplayAreaPolicyBuilder.java

        // 构造函数,初始化成员变量
        Builder(WindowManagerPolicy policy, String name, int id) {
                mPolicy = policy;
                mName = name;
                mId = id;
                mLayers = new boolean[mPolicy.getMaxWindowLayer() + 1];
        }
这里 new 了一个 Feature.Builder 对象,会调用到 Feature.Builder 的构造函数,在构造函数中对成员变量进行了赋值和初始化。
接着调用 Upto 方法:
 // frameworks/base/services/core/java/com/android/server/wm/DisplayAreaPolicyBuilder.java

            /**
             * Set that the feature applies window types that are layerd at or below the layer of
             * the given window type.
             */
            Builder upTo(int typeInclusive) {
                final int max = layerFromType(typeInclusive, false);
                for (int i = 0; i < max; i++) {
                    mLayers[i] = true;
                }
                set(typeInclusive, true);
                return this;
            }
前文我们说过在 WMS 中,把 Z 轴的纵向空间划分为 0 到 36 一共 37 个区间,这里传入的参数 TYPE_ACCESSIBILITY_MAGNIFICATION_OVERLAY 是窗口的类型,在 upTo 中会调用 layerFromType 方法将窗口类型转换为该窗口类型对应的 Z 轴区间层级。
// frameworks/base/services/core/java/com/android/server/wm/DisplayAreaPolicyBuilder.java

        private int layerFromType(int type, boolean internalWindows) {
                return mPolicy.getWindowLayerFromTypeLw(type, internalWindows);
        }

// 接着调用 getWindowLayerFromTypeLw 方法
// frameworks/base/services/core/java/com/android/server/policy/WindowManagerPolicy.java

        default int getWindowLayerFromTypeLw(int type, boolean canAddInternalSystemWindow) {
                return getWindowLayerFromTypeLw(type, canAddInternalSystemWindow,
                        false /* roundedCornerOverlay */);
        }

// 接着调用 getWindowLayerFromTypeLw 方法
// frameworks/base/services/core/java/com/android/server/policy/WindowManagerPolicy.java
default int getWindowLayerFromTypeLw(int type, boolean canAddInternalSystemWindow,
            boolean roundedCornerOverlay) {
        // Always put the rounded corner layer to the top most.
        if (roundedCornerOverlay && canAddInternalSystemWindow) {
            return getMaxWindowLayer();
        }
        if (type >= FIRST_APPLICATION_WINDOW && type <= LAST_APPLICATION_WINDOW) {
            return APPLICATION_LAYER;
        }

        switch (type) {
            case TYPE_WALLPAPER:
                // wallpaper is at the bottom, though the window manager may move it.
                return  1;
            case TYPE_PRESENTATION:
            case TYPE_PRIVATE_PRESENTATION:
            case TYPE_DOCK_DIVIDER:
            case TYPE_QS_DIALOG:
            case TYPE_PHONE:
                return  3;
            case TYPE_SEARCH_BAR:
                return  4;
            case TYPE_INPUT_CONSUMER:
                return  5;
            case TYPE_SYSTEM_DIALOG:
                return  6;
            case TYPE_TOAST:
                // toasts and the plugged-in battery thing
                return  7;
            case TYPE_PRIORITY_PHONE:
                // SIM errors and unlock.  Not sure if this really should be in a high layer.
                return  8;
            case TYPE_SYSTEM_ALERT:
                // like the ANR / app crashed dialogs
                // Type is deprecated for non-system apps. For system apps, this type should be
                // in a higher layer than TYPE_APPLICATION_OVERLAY.
                return  canAddInternalSystemWindow ? 12 : 9;
            case TYPE_APPLICATION_OVERLAY:
                return  11;
            case TYPE_INPUT_METHOD:
                // on-screen keyboards and other such input method user interfaces go here.
                return  13;
            case TYPE_INPUT_METHOD_DIALOG:
                // on-screen keyboards and other such input method user interfaces go here.
                return  14;
            case TYPE_STATUS_BAR:
                return  15;
            case TYPE_STATUS_BAR_ADDITIONAL:
                return  16;
            case TYPE_NOTIFICATION_SHADE:
                return  17;
            case TYPE_STATUS_BAR_SUB_PANEL:
                return  18;
            case TYPE_KEYGUARD_DIALOG:
                return  19;
            case TYPE_VOICE_INTERACTION_STARTING:
                return  20;
            case TYPE_VOICE_INTERACTION:
                // voice interaction layer should show above the lock screen.
                return  21;
            case TYPE_VOLUME_OVERLAY:
                // the on-screen volume indicator and controller shown when the user
                // changes the device volume
                return  22;
            case TYPE_SYSTEM_OVERLAY:
                // the on-screen volume indicator and controller shown when the user
                // changes the device volume
                return  canAddInternalSystemWindow ? 23 : 10;
            case TYPE_NAVIGATION_BAR:
                // the navigation bar, if available, shows atop most things
                return  24;
            case TYPE_NAVIGATION_BAR_PANEL:
                // some panels (e.g. search) need to show on top of the navigation bar
                return  25;
            case TYPE_SCREENSHOT:
                // screenshot selection layer shouldn't go above system error, but it should cover
                // navigation bars at the very least.
                return  26;
            case TYPE_SYSTEM_ERROR:
                // system-level error dialogs
                return  canAddInternalSystemWindow ? 27 : 9;
            case TYPE_MAGNIFICATION_OVERLAY:
                // used to highlight the magnified portion of a display
                return  28;
            case TYPE_DISPLAY_OVERLAY:
                // used to simulate secondary display devices
                return  29;
            case TYPE_DRAG:
                // the drag layer: input for drag-and-drop is associated with this window,
                // which sits above all other focusable windows
                return  30;
            case TYPE_ACCESSIBILITY_OVERLAY:
                // overlay put by accessibility services to intercept user interaction
                return  31;
            case TYPE_ACCESSIBILITY_MAGNIFICATION_OVERLAY:
                return 32;
            case TYPE_SECURE_SYSTEM_OVERLAY:
                return  33;
            case TYPE_BOOT_PROGRESS:
                return  34;
            case TYPE_POINTER:
                // the (mouse) pointer layer
                return  35;
            default:
                Slog.e("WindowManager", "Unknown window type: " + type);
                return 3;
        }
    }
layerFromType 方法层层调用,最后其实就是一个 switch 语句,switch 语句将窗口类型转换为该窗口类型对应的 Z 轴区间层级,此处的窗口类型是 TYPE_ACCESSIBILITY_MAGNIFICATION_OVERLAY,对应的 Z 轴区间层级是 32。
layerFromType 方法返会的窗口层级 32 保存到局部变量 max 中,接着把 Feature.Builder 的成员变量 boolean[] mLayers 中 [0,32) 区间的值设置为 true,当调用 Feature.Builder 对象的 build 方法的时候,会将 mLayers 输出拷贝到返回的 Feature 对象的 mWindowLayers 成员中。
接着调用 set(type, false) 方法:
        private void set(int type, boolean value) {
                mLayers[layerFromType(type, true)] = value;
                if (type == TYPE_APPLICATION_OVERLAY) {
                    mLayers[layerFromType(type, true)] = value;
                    mLayers[layerFromType(TYPE_SYSTEM_ALERT, false)] = value;
                    mLayers[layerFromType(TYPE_SYSTEM_OVERLAY, false)] = value;
                    mLayers[layerFromType(TYPE_SYSTEM_ERROR, false)] = value;
                }
            }
套路类似,调用 layerFromType 方法把窗口类型转换为层级,这里传入的窗口类型是 TYPE_ACCESSIBILITY_MAGNIFICATION_OVERLAY,layerFromType 返回 32,接着把 mLayers[32] 设置为 true。
到这里, mLayers 数组, [0,32] 区间为 true,表示关联该 feature 的 DisplayArea 涉及的纵向区间是 [0,32]。
同样的套路调用 except 方法:
            Builder except(int... types) {
                for (int i = 0; i < types.length; i++) {
                    int type = types[i];
                    set(type, false);
                }
                return this;
            }
传入的参数是 TYPE_ACCESSIBILITY_MAGNIFICATION_OVERLAY, set 方法中同样会调用到 getWindowLayerFromTypeLw 返回窗口类型对应的层级 32,接着将 mLayers[32] 设置为 false。
到这里, mLayers 数组, [0,32) 区间为 true,表示关联该 feature 的 DisplayArea 涉及的纵向区间是 [0,32)。
接着调用 .setNewDisplayAreaSupplier(DisplayArea.Dimmable::new) 方法:
            Builder setNewDisplayAreaSupplier(NewDisplayAreaSupplier newDisplayAreaSupplier) {
                mNewDisplayAreaSupplier = newDisplayAreaSupplier;
                return this;
            }
实际就是 new 一个 DisplayArea.Dimmable 保存在 Builder 的 mNewDisplayAreaSupplier 成员中。
最后调用 build 方法,new 一个 Feature 返回,前面准备好的数据都作为参数传入构造方法,然后保存到 Feature 中:
            Feature build() {
                if (mExcludeRoundedCorner) {
                    // Always put the rounded corner layer to the top most layer.
                    mLayers[mPolicy.getMaxWindowLayer()] = false;
                }
                return new Feature(mName, mId, mLayers.clone(), mNewDisplayAreaSupplier);
            }
这样就构造好了名为 WindowedMagnification 的 Feature 对象,接着调用 addFeature 将构造好的 Feature 对象保存到 HierarchyBuilder 对象内部的 ArrayList<DisplayAreaPolicyBuilder.Feature> mFeatures 成员中:
        HierarchyBuilder addFeature(DisplayAreaPolicyBuilder.Feature feature) {
            mFeatures.add(feature);
            return this;
        }
后面同样的套路,一共构造了 5 个 Feature 对象,构造完成后,将他们保存到 HierarchyBuilder 对象的 ArrayList<DisplayAreaPolicyBuilder.Feature> mFeatures 成员变量中。5 个 Feature 对象的具体情况如下:
|
| Feature.mName | Feature.mID | Feature.mWindowLayers 数组为 true 的区间 |
|---|---|---|
| WindowedMagnification | FEATURE_WINDOWED_MAGNIFICATION | [0,31] |
| HideDisplayCutout | FEATURE_HIDE_DISPLAY_CUTOUT | [0,14], 16, [18,23], [26,35] |
| OneHanded | FEATURE_ONE_HANDED | [0,23], [26,32],[34,35] |
| FullscreenMagnification | FEATURE_FULLSCREEN_MAGNIFICATION | [0,12], [15,23], [26,27], [29,31], [33,35] |
| ImePlaceholder | FEATURE_IME_PLACEHOLDER | [13,14] |
接着就会调用到 new DisplayAreaPolicyBuilder().setRootHierarchy(rootHierarchy).build(wmService);,生成 DisplayArea 层级结构:
// frameworks/base/services/core/java/com/android/server/wm/DisplayAreaPolicy.java

public DisplayAreaPolicy instantiate(WindowManagerService wmService,
                DisplayContent content, RootDisplayArea root,
                DisplayArea.Tokens imeContainer) {
            // ......

            return new DisplayAreaPolicyBuilder().setRootHierarchy(rootHierarchy).build(wmService);
        }
这里先 new 一个 DisplayAreaPolicyBuilder 对象,然后把前面构造好的 HierarchyBuilder 对象设置给 DisplayAreaPolicyBuilder 对象的成员变量,最后调用 build 来构建树结构:
        // frameworks/base/services/core/java/com/android/server/wm/DisplayAreaPolicyBuilder.java
    Result build(WindowManagerService wmService) {
        validate();

        // Attach DA group roots to screen hierarchy before adding windows to group hierarchies.

        // 构建树结构
        mRootHierarchyBuilder.build(mDisplayAreaGroupHierarchyBuilders);

        List<RootDisplayArea> displayAreaGroupRoots = new ArrayList<>(
                mDisplayAreaGroupHierarchyBuilders.size());

        // mDisplayAreaGroupHierarchyBuilders 是一个空列表
        for (int i = 0; i < mDisplayAreaGroupHierarchyBuilders.size(); i++) {
            HierarchyBuilder hierarchyBuilder = mDisplayAreaGroupHierarchyBuilders.get(i);
            hierarchyBuilder.build();
            displayAreaGroupRoots.add(hierarchyBuilder.mRoot);
        }
        // Use the default function if it is not specified otherwise.
        if (mSelectRootForWindowFunc == null) {
            mSelectRootForWindowFunc = new DefaultSelectRootForWindowFunction(
                    mRootHierarchyBuilder.mRoot, displayAreaGroupRoots);
        }
        return new Result(wmService, mRootHierarchyBuilder.mRoot, displayAreaGroupRoots,
                mSelectRootForWindowFunc, mSelectTaskDisplayAreaFunc);
    }
调用 HierarchyBuilder 对象的 build 方法构建树结构,方法比较长,我们分步查看:
        // frameworks/base/services/core/java/com/android/server/wm/DisplayAreaPolicyBuilder.java
        private void build(@Nullable List<HierarchyBuilder> displayAreaGroupHierarchyBuilders) {

            // 初始化一堆局部变量
            final WindowManagerPolicy policy = mRoot.mWmService.mPolicy;
            final int maxWindowLayerCount = policy.getMaxWindowLayer() + 1; // 37
            final DisplayArea.Tokens[] displayAreaForLayer =
                    new DisplayArea.Tokens[maxWindowLayerCount];
            final Map<Feature, List<DisplayArea<WindowContainer>>> featureAreas =
                    new ArrayMap<>(mFeatures.size());
            for (int i = 0; i < mFeatures.size(); i++) {
                featureAreas.put(mFeatures.get(i), new ArrayList<>());
            }

                 // 初始化 PendingArea 数组
            PendingArea[] areaForLayer = new PendingArea[maxWindowLayerCount];
            final PendingArea root = new PendingArea(null, 0, null);
            // areaForLayer 数组全部填充为 root
            Arrays.fill(areaForLayer, root);
在分析代码之前,我们需要先知道,代码中是先构建一个 PendingArea 对象组层的树,在使用这个树构建出我们的目标窗口容器树。PendingArea 树中的节点与目标窗口容器树中的节点一一对应。
PendingArea 类的定义如下:
// frameworks/base/services/core/java/com/android/server/wm/DisplayAreaPolicyBuilder.java

static class PendingArea {

        final int mMinLayer;
        // 子节点
        final ArrayList<PendingArea> mChildren = new ArrayList<>();
        // 当前节点的 feature
        final Feature mFeature;
        // 父节点
        final PendingArea mParent;
        int mMaxLayer;
        @Nullable DisplayArea mExisting;
        boolean mSkipTokens = false;
        // ......
}
-
PendingArea 是一个树的节点,mParent 代表当前节点的父节点,mChildren 表示的是当前节点的子节点。
-
在 PendingArea 树转换为窗口容器树的过程中,会将 PendingArea 中 mFeature 中的信息传递给对应的 DisplayArea 节点
-
mMinLayer 和 mMaxLayer 代表的是当前 PendingArea 对应的 DisplayArea 可以容纳的窗口层级值的一个范围。
为了接下来的分析,根据 PendingArea 的成员变量,可以将 PendingArea 表述为以下形式:
mFeature.mName:mMinLayer:mMaxLayer
比如:OneHanded:0:1,表示名为 OneHanded 的 PendingArea,对应的 DisplayArea 可以容纳层级值从 0 到 1 的窗口。
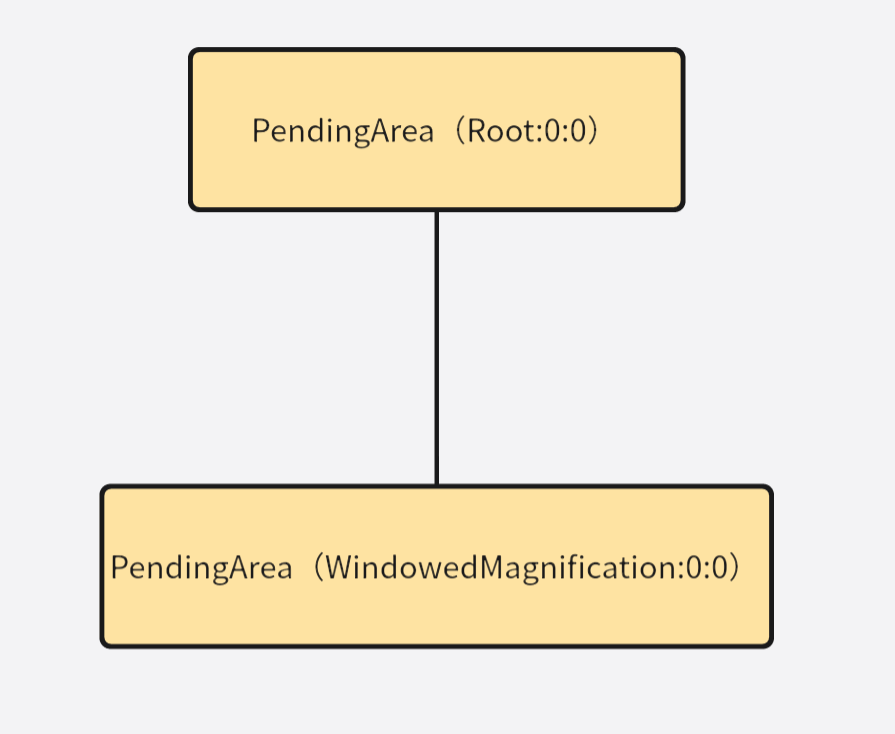
root 现在没有一个Feature,因此名字暂时认为是 Root,此时为 Root:0:0
有了这些准备工作后,我们就可以分析后续的代码了:
这部分代码主要是初始化一些局部变量,其中:
-
PendingArea[] areaForLayer,其长度为 maxWindowLayerCount,maxWindowLayerCount 的值为 36 + 1 = 37
-
Arrays.fill(areaForLayer, root);会将数组中的成员全部初始化为Root:0:0
目前,reaForLayer 数组初始化后,所有的成员均为 Root:0:0:
| areaForLayer[37] | 初始 |
|---|---|
| areaForLayer[0] | Root:0:0 |
| areaForLayer[1] | Root:0:0 |
| areaForLayer[2] | Root:0:0 |
| areaForLayer[3] | Root:0:0 |
| areaForLayer[4] | Root:0:0 |
| areaForLayer[5] | Root:0:0 |
| areaForLayer[6] | Root:0:0 |
| areaForLayer[7] | Root:0:0 |
| areaForLayer[8] | Root:0:0 |
| areaForLayer[9] | Root:0:0 |
| areaForLayer[10] | Root:0:0 |
| areaForLayer[11] | Root:0:0 |
| areaForLayer[12] | Root:0:0 |
| areaForLayer[13] | Root:0:0 |
| areaForLayer[14] | Root:0:0 |
| areaForLayer[15] | Root:0:0 |
| areaForLayer[16] | Root:0:0 |
| areaForLayer[17] | Root:0:0 |
| areaForLayer[18] | Root:0:0 |
| areaForLayer[19] | Root:0:0 |
| areaForLayer[20] | Root:0:0 |
| areaForLayer[21] | Root:0:0 |
| areaForLayer[22] | Root:0:0 |
| areaForLayer[23] | Root:0:0 |
| areaForLayer[24] | Root:0:0 |
| areaForLayer[25] | Root:0:0 |
| areaForLayer[26] | Root:0:0 |
| areaForLayer[27] | Root:0:0 |
| areaForLayer[28] | Root:0:0 |
| areaForLayer[29] | Root:0:0 |
| areaForLayer[30] | Root:0:0 |
| areaForLayer[31] | Root:0:0 |
| areaForLayer[32] | Root:0:0 |
| areaForLayer[33] | Root:0:0 |
| areaForLayer[34] | Root:0:0 |
| areaForLayer[35] | Root:0:0 |
| areaForLayer[36] | Root:0:0 |
我们接着看 build 方法后续的代码:
            // Create DisplayAreas to cover all defined features.
            // 遍历每一个 Feature
            final int size = mFeatures.size();
            for (int i = 0; i < size; i++) {
                // Traverse the features with the order they are defined, so that the early defined
                // feature will be on the top in the hierarchy.
                final Feature feature = mFeatures.get(i);
                PendingArea featureArea = null;
                // maxWindowLayerCount 值为 37
                for (int layer = 0; layer < maxWindowLayerCount; layer++) {
                    if (feature.mWindowLayers[layer]) {
                        // This feature will be applied to this window layer.
                        //
                        // We need to find a DisplayArea for it:
                        // We can reuse the existing one if it was created for this feature for the
                        // previous layer AND the last feature that applied to the previous layer is
                        // the same as the feature that applied to the current layer (so they are ok
                        // to share the same parent DisplayArea).
                        if (featureArea == null || featureArea.mParent != areaForLayer[layer]) {
                            // No suitable DisplayArea:
                            // Create a new one under the previous area (as parent) for this layer.
                            featureArea = new PendingArea(feature, layer, areaForLayer[layer]);
                            areaForLayer[layer].mChildren.add(featureArea);
                        }
                        areaForLayer[layer] = featureArea;
                    } else {
                        // This feature won't be applied to this window layer. If it needs to be
                        // applied to the next layer, we will need to create a new DisplayArea for
                        // that.
                        featureArea = null;
                    }
                }
            }
这里会将之前初始化好的 5 个 Feature 对象遍历一次,每个 Feature 对象都会走相同的一次流程。
我们先看名为 WindowedMagnification 的 Feature 对象:
-
在 for 循环中, layer 为 0,此时 feature.mWindowLayers[0] 为 true,featureArea 为 null,那么创建一个 PendingArea 对象
WindowedMagnification:0:0,这个新创建的WindowedMagnification:0:0对象的 parent 是构造方法的第三个参数 areaForLayer[0]Root:0:0,接着将这个新创建的WindowedMagnification:0:0添加到areaForLayer[0] Root:0:0的子节点中,最后将 areaForLayer[0] 指向这个新创建的WindowedMagnification:0:0。 -
下一次 for 循环,layer为 1,feature.mWindowLayers[1] 为 true,featureArea 为上一次循环创建的
WindowedMagnification:0:0,featureArea.mParent 为Root:0:0,areaForLayer[1] 也是Root:0:0,那么不新创建 PendingArea 对象,将 areaForLayer[1] 指向上一次循环创建的WindowedMagnification:0:0 -
后续直到 layer 为 32 之前,都是如此。当 layer 为 32 时,feature.mWindowLayers[32] 为 false,不会走到这些逻辑中。
for 循环完成后,areaForLayer 数组的情况是:
| areaForLayer[37] | 初始 | WindowedMagnification |
|---|---|---|
| areaForLayer[0] | Root:0:0 | WindowedMagnification:0:0 |
| areaForLayer[1] | Root:0:0 | WindowedMagnification:0:0 |
| areaForLayer[2] | Root:0:0 | WindowedMagnification:0:0 |
| areaForLayer[3] | Root:0:0 | WindowedMagnification:0:0 |
| areaForLayer[4] | Root:0:0 | WindowedMagnification:0:0 |
| areaForLayer[5] | Root:0:0 | WindowedMagnification:0:0 |
| areaForLayer[6] | Root:0:0 | WindowedMagnification:0:0 |
| areaForLayer[7] | Root:0:0 | WindowedMagnification:0:0 |
| areaForLayer[8] | Root:0:0 | WindowedMagnification:0:0 |
| areaForLayer[9] | Root:0:0 | WindowedMagnification:0:0 |
| areaForLayer[10] | Root:0:0 | WindowedMagnification:0:0 |
| areaForLayer[11] | Root:0:0 | WindowedMagnification:0:0 |
| areaForLayer[12] | Root:0:0 | WindowedMagnification:0:0 |
| areaForLayer[13] | Root:0:0 | WindowedMagnification:0:0 |
| areaForLayer[14] | Root:0:0 | WindowedMagnification:0:0 |
| areaForLayer[15] | Root:0:0 | WindowedMagnification:0:0 |
| areaForLayer[16] | Root:0:0 | WindowedMagnification:0:0 |
| areaForLayer[17] | Root:0:0 | WindowedMagnification:0:0 |
| areaForLayer[18] | Root:0:0 | WindowedMagnification:0:0 |
| areaForLayer[19] | Root:0:0 | WindowedMagnification:0:0 |
| areaForLayer[20] | Root:0:0 | WindowedMagnification:0:0 |
| areaForLayer[21] | Root:0:0 | WindowedMagnification:0:0 |
| areaForLayer[22] | Root:0:0 | WindowedMagnification:0:0 |
| areaForLayer[23] | Root:0:0 | WindowedMagnification:0:0 |
| areaForLayer[24] | Root:0:0 | WindowedMagnification:0:0 |
| areaForLayer[25] | Root:0:0 | WindowedMagnification:0:0 |
| areaForLayer[26] | Root:0:0 | WindowedMagnification:0:0 |
| areaForLayer[27] | Root:0:0 | WindowedMagnification:0:0 |
| areaForLayer[28] | Root:0:0 | WindowedMagnification:0:0 |
| areaForLayer[29] | Root:0:0 | WindowedMagnification:0:0 |
| areaForLayer[30] | Root:0:0 | WindowedMagnification:0:0 |
| areaForLayer[31] | Root:0:0 | WindowedMagnification:0:0 |
| areaForLayer[32] | Root:0:0 | |
| areaForLayer[33] | Root:0:0 | |
| areaForLayer[34] | Root:0:0 | |
| areaForLayer[35] | Root:0:0 | |
| areaForLayer[36] | Root:0:0 |
根据前面的分析,当前状态下,PendingArea 树的情况如下:
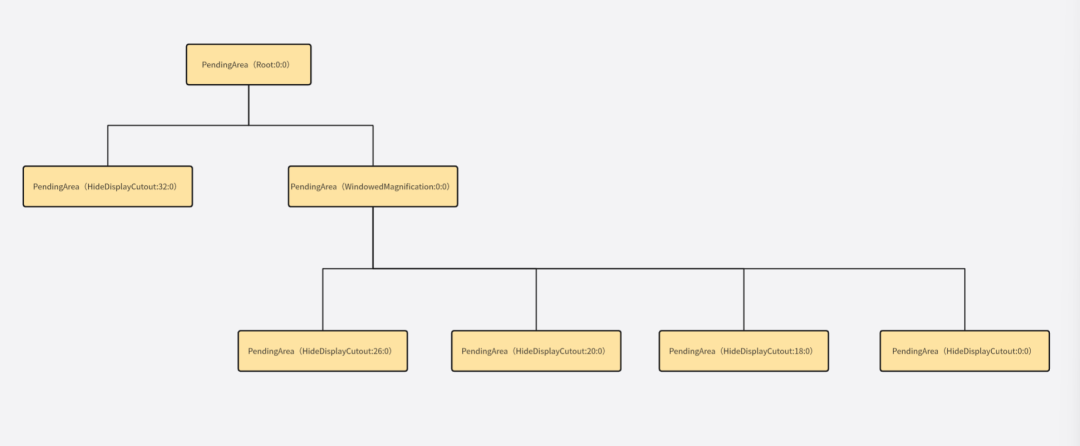
我们接着看名为 HideDisplayCutout 的 Feature 对象对应的循环过程:
            // Create DisplayAreas to cover all defined features.
            // 遍历每一个 Feature
            final int size = mFeatures.size();
            for (int i = 0; i < size; i++) {
                // Traverse the features with the order they are defined, so that the early defined
                // feature will be on the top in the hierarchy.
                final Feature feature = mFeatures.get(i);
                PendingArea featureArea = null;
                // maxWindowLayerCount 值为 37
                for (int layer = 0; layer < maxWindowLayerCount; layer++) {
                    if (feature.mWindowLayers[layer]) {
                        // This feature will be applied to this window layer.
                        //
                        // We need to find a DisplayArea for it:
                        // We can reuse the existing one if it was created for this feature for the
                        // previous layer AND the last feature that applied to the previous layer is
                        // the same as the feature that applied to the current layer (so they are ok
                        // to share the same parent DisplayArea).
                        if (featureArea == null || featureArea.mParent != areaForLayer[layer]) {
                            // No suitable DisplayArea:
                            // Create a new one under the previous area (as parent) for this layer.
                            featureArea = new PendingArea(feature, layer, areaForLayer[layer]);
                            areaForLayer[layer].mChildren.add(featureArea);
                        }
                        areaForLayer[layer] = featureArea;
                    } else {
                        // This feature won't be applied to this window layer. If it needs to be
                        // applied to the next layer, we will need to create a new DisplayArea for
                        // that.
                        featureArea = null;
                    }
                }
            }
-
在第一次 for 循环,layer 为 0,此时 feature.mWindowLayers[0] 为 true,featureArea 为 null,那么创建一个 PendingArea 对象
HideDisplayCutout:0:0,这个新创建的HideDisplayCutout:0:0,parent 设置为 areaForLayer[0],但是经过第一个 Feature 对象的处理,areaForLayer[0] 此时已经从Root:0:0被替换为了WindowedMagnification:0:0。接着将这个新创建的HideDisplayCutout:0:0添加到WindowedMagnification:0:0的子节点中,最后将 areaForLayer[0] 指向这个新创建的HideDisplayCutout:0:0 -
layer 为 1,此时 feature.mWindowLayers[1] 为 true,featureArea 为
HideDisplayCutout:0:0,featureArea.mParent 为WindowedMagnification:0:0,areaForLayer[1] 也是WindowedMagnification:0:0,那么不创建 PendingArea 对象,将 areaForLayer[1] 指向HideDisplayCutout:0:0 -
后续直到 layer 为 14,都是如此
-
layer 为 15,此时 feature.mWindowLayers[15] 为 false,将 featureArea 重置为 null
-
layer 为 16,此时 feature.mWindowLayers[16] 为 true,重新创建了一个 PendingArea
HideDisplayCutout:16:0,接着将这个新创建的HideDisplayCutout:16:0添加到WindowedMagnification:0:0的子节点中,最后将 areaForLayer[16] 指向这个新创建的HideDisplayCutout:16:0。 -
layer 为 17,此时 feature.mWindowLayers[17] 为 false,将 featureArea 重置为 null。
-
laye 为 18,此时 feature.mWindowLayers[18] 为 true,重新创建了一个 PendingArea
HideDisplayCutout:18:0,接着将这个新创建的HideDisplayCutout:18:0添加到WindowedMagnification:0:0的子节点中,最后将 areaForLayer[18] 指向这个新创建的HideDisplayCutout:18:0。 -
后续直到 layer 为 23,都是复用的
HideDisplayCutout:18:0。 -
layer 为 24,此时 feature.mWindowLayers[24] 为 false,将 featureArea 重置为 null。
-
layer 为 25,此时 feature.mWindowLayers[25] 为 false,将 featureArea 重置为 null。
-
layer为 26,此时 feature.mWindowLayers[26] 为 true,重新创建了一个 PendingArea:
HideDisplayCutout:26:0,接着将这个新创建的HideDisplayCutout:26:0添加到WindowedMagnification:0:0的子节点中,最后将 areaForLayer[26] 指向这个新创建的HideDisplayCutout:26:0。 -
直到 layer 为 31,都是复用的
HideDisplayCutout:26:0 -
layer 为 32,此时 feature.mWindowLayers[32] 为 true,此时 featureArea 为
HideDisplayCutout:26:0,featureArea 的 parent 为WindowedMagnification:0:0,但是此时 areaForLayer[32] 是Root:0:0,那么此时会重新创建一个 PendingAreaHideDisplayCutout:32:0,接着将这个新创建的HideDisplayCutout:32:0添加到Root:0:0的子节点中,最后将 areaForLayer[32] 指向这个新创建的HideDisplayCutout:32:0。 -
后续直到 layer 为 35,都是复用的
HideDisplayCutout:32 -
layer 为 36,此时 feature.mWindowLayers[36] 为 false,将 featureArea 重置为 null
areaLayer 数组的结构如下:
| areaForLayer[37] | 初始 | WindowedMagnification | HideDisplayCutout |
|---|---|---|---|
| areaForLayer[0] | Root:0:0 | WindowedMagnification:0:0 | HideDisplayCutout:0:0 |
| areaForLayer[1] | Root:0:0 | WindowedMagnification:0:0 | HideDisplayCutout:0:0 |
| areaForLayer[2] | Root:0:0 | WindowedMagnification:0:0 | HideDisplayCutout:0:0 |
| areaForLayer[3] | Root:0:0 | WindowedMagnification:0:0 | HideDisplayCutout:0:0 |
| areaForLayer[4] | Root:0:0 | WindowedMagnification:0:0 | HideDisplayCutout:0:0 |
| areaForLayer[5] | Root:0:0 | WindowedMagnification:0:0 | HideDisplayCutout:0:0 |
| areaForLayer[6] | Root:0:0 | WindowedMagnification:0:0 | HideDisplayCutout:0:0 |
| areaForLayer[7] | Root:0:0 | WindowedMagnification:0:0 | HideDisplayCutout:0:0 |
| areaForLayer[8] | Root:0:0 | WindowedMagnification:0:0 | HideDisplayCutout:0:0 |
| areaForLayer[9] | Root:0:0 | WindowedMagnification:0:0 | HideDisplayCutout:0:0 |
| areaForLayer[10] | Root:0:0 | WindowedMagnification:0:0 | HideDisplayCutout:0:0 |
| areaForLayer[11] | Root:0:0 | WindowedMagnification:0:0 | HideDisplayCutout:0:0 |
| areaForLayer[12] | Root:0:0 | WindowedMagnification:0:0 | HideDisplayCutout:0:0 |
| areaForLayer[13] | Root:0:0 | WindowedMagnification:0:0 | HideDisplayCutout:0:0 |
| areaForLayer[14] | Root:0:0 | WindowedMagnification:0:0 | HideDisplayCutout:0:0 |
| areaForLayer[15] | Root:0:0 | WindowedMagnification:0:0 | |
| areaForLayer[16] | Root:0:0 | WindowedMagnification:0:0 | HideDisplayCutout:16:0 |
| areaForLayer[17] | Root:0:0 | WindowedMagnification:0:0 | |
| areaForLayer[18] | Root:0:0 | WindowedMagnification:0:0 | HideDisplayCutout:18:0 |
| areaForLayer[19] | Root:0:0 | WindowedMagnification:0:0 | HideDisplayCutout:18:0 |
| areaForLayer[20] | Root:0:0 | WindowedMagnification:0:0 | HideDisplayCutout:18:0 |
| areaForLayer[21] | Root:0:0 | WindowedMagnification:0:0 | HideDisplayCutout:18:0 |
| areaForLayer[22] | Root:0:0 | WindowedMagnification:0:0 | HideDisplayCutout:18:0 |
| areaForLayer[23] | Root:0:0 | WindowedMagnification:0:0 | HideDisplayCutout:18:0 |
| areaForLayer[24] | Root:0:0 | WindowedMagnification:0:0 | |
| areaForLayer[25] | Root:0:0 | WindowedMagnification:0:0 | |
| areaForLayer[26] | Root:0:0 | WindowedMagnification:0:0 | HideDisplayCutout:26:0 |
| areaForLayer[27] | Root:0:0 | WindowedMagnification:0:0 | HideDisplayCutout:26:0 |
| areaForLayer[28] | Root:0:0 | WindowedMagnification:0:0 | HideDisplayCutout:26:0 |
| areaForLayer[29] | Root:0:0 | WindowedMagnification:0:0 | HideDisplayCutout:26:0 |
| areaForLayer[30] | Root:0:0 | WindowedMagnification:0:0 | HideDisplayCutout:26:0 |
| areaForLayer[31] | Root:0:0 | WindowedMagnification:0:0 | HideDisplayCutout:26:0 |
| areaForLayer[32] | Root:0:0 | HideDisplayCutout:32:0 | |
| areaForLayer[33] | Root:0:0 | HideDisplayCutout:32:0 | |
| areaForLayer[34] | Root:0:0 | HideDisplayCutout:32:0 | |
| areaForLayer[35] | Root:0:0 | HideDisplayCutout:32:0 | |
| areaForLayer[36] | Root:0:0 |
到目前为止,PendingArea 树的结构如下:
后续一个 Feature 处理的分析类似,这里就不重复了,最后 areaLayer 数组的结构如下:
| areaForLayer[37] | 初始 | WindowedMagnification | HideDisplayCutout | OneHanded | FullscreenMagnification | ImePlaceholder |
|---|---|---|---|---|---|---|
| areaForLayer[0] | Root:0:0 | WindowedMagnification:0:0 | HideDisplayCutout:0:0 | OneHanded:0:0 | FullscreenMagnification:0:0 | |
| areaForLayer[1] | Root:0:0 | WindowedMagnification:0:0 | HideDisplayCutout:0:0 | OneHanded:0:0 | FullscreenMagnification:0:0 | |
| areaForLayer[2] | Root:0:0 | WindowedMagnification:0:0 | HideDisplayCutout:0:0 | OneHanded:0:0 | FullscreenMagnification:0:0 | |
| areaForLayer[3] | Root:0:0 | WindowedMagnification:0:0 | HideDisplayCutout:0:0 | OneHanded:0:0 | FullscreenMagnification:0:0 | |
| areaForLayer[4] | Root:0:0 | WindowedMagnification:0:0 | HideDisplayCutout:0:0 | OneHanded:0:0 | FullscreenMagnification:0:0 | |
| areaForLayer[5] | Root:0:0 | WindowedMagnification:0:0 | HideDisplayCutout:0:0 | OneHanded:0:0 | FullscreenMagnification:0:0 | |
| areaForLayer[6] | Root:0:0 | WindowedMagnification:0:0 | HideDisplayCutout:0:0 | OneHanded:0:0 | FullscreenMagnification:0:0 | |
| areaForLayer[7] | Root:0:0 | WindowedMagnification:0:0 | HideDisplayCutout:0:0 | OneHanded:0:0 | FullscreenMagnification:0:0 | |
| areaForLayer[8] | Root:0:0 | WindowedMagnification:0:0 | HideDisplayCutout:0:0 | OneHanded:0:0 | FullscreenMagnification:0:0 | |
| areaForLayer[9] | Root:0:0 | WindowedMagnification:0:0 | HideDisplayCutout:0:0 | OneHanded:0:0 | FullscreenMagnification:0:0 | |
| areaForLayer[10] | Root:0:0 | WindowedMagnification:0:0 | HideDisplayCutout:0:0 | OneHanded:0:0 | FullscreenMagnification:0:0 | |
| areaForLayer[11] | Root:0:0 | WindowedMagnification:0:0 | HideDisplayCutout:0:0 | OneHanded:0:0 | FullscreenMagnification:0:0 | |
| areaForLayer[12] | Root:0:0 | WindowedMagnification:0:0 | HideDisplayCutout:0:0 | OneHanded:0:0 | FullscreenMagnification:0:0 | |
| areaForLayer[13] | Root:0:0 | WindowedMagnification:0:0 | HideDisplayCutout:0:0 | OneHanded:0:0 | ImePlaceholder:13:0 | |
| areaForLayer[14] | Root:0:0 | WindowedMagnification:0:0 | HideDisplayCutout:0:0 | OneHanded:0:0 | ImePlaceholder:13:0 | |
| areaForLayer[15] | Root:0:0 | WindowedMagnification:0:0 | OneHanded:15:0 | FullscreenMagnification:15:0 | ||
| areaForLayer[16] | Root:0:0 | WindowedMagnification:0:0 | HideDisplayCutout:16:0 | OneHanded:16:0 | FullscreenMagnification:16:0 | |
| areaForLayer[17] | Root:0:0 | WindowedMagnification:0:0 | OneHanded:17:0 | FullscreenMagnification:17:0 | ||
| areaForLayer[18] | Root:0:0 | WindowedMagnification:0:0 | HideDisplayCutout:18:0 | OneHanded:18:0 | FullscreenMagnification:18:0 | |
| areaForLayer[19] | Root:0:0 | WindowedMagnification:0:0 | HideDisplayCutout:18:0 | OneHanded:18:0 | FullscreenMagnification:18:0 | |
| areaForLayer[20] | Root:0:0 | WindowedMagnification:0:0 | HideDisplayCutout:18:0 | OneHanded:18:0 | FullscreenMagnification:18:0 | |
| areaForLayer[21] | Root:0:0 | WindowedMagnification:0:0 | HideDisplayCutout:18:0 | OneHanded:18:0 | FullscreenMagnification:18:0 | |
| areaForLayer[22] | Root:0:0 | WindowedMagnification:0:0 | HideDisplayCutout:18:0 | OneHanded:18:0 | FullscreenMagnification:18:0 | |
| areaForLayer[23] | Root:0:0 | WindowedMagnification:0:0 | HideDisplayCutout:18:0 | OneHanded:18:0 | FullscreenMagnification:18:0 | |
| areaForLayer[24] | Root:0:0 | WindowedMagnification:0:0 | ||||
| areaForLayer[25] | Root:0:0 | WindowedMagnification:0:0 | ||||
| areaForLayer[26] | Root:0:0 | WindowedMagnification:0:0 | HideDisplayCutout:26:0 | OneHanded:26:0 | FullscreenMagnification:26:0 | |
| areaForLayer[27] | Root:0:0 | WindowedMagnification:0:0 | HideDisplayCutout:26:0 | OneHanded:26:0 | FullscreenMagnification:26:0 | |
| areaForLayer[28] | Root:0:0 | WindowedMagnification:0:0 | HideDisplayCutout:26:0 | OneHanded:26:0 | ||
| areaForLayer[29] | Root:0:0 | WindowedMagnification:0:0 | HideDisplayCutout:26:0 | OneHanded:26:0 | FullscreenMagnification:29:0 | |
| areaForLayer[30] | Root:0:0 | WindowedMagnification:0:0 | HideDisplayCutout:26:0 | OneHanded:26:0 | FullscreenMagnification:29:0 | |
| areaForLayer[31] | Root:0:0 | WindowedMagnification:0:0 | HideDisplayCutout:26:0 | OneHanded:26:0 | FullscreenMagnification:29:0 | |
| areaForLayer[32] | Root:0:0 | HideDisplayCutout:32:0 | OneHanded:32:0 | |||
| areaForLayer[33] | Root:0:0 | HideDisplayCutout:32:0 | FullscreenMagnification:33:0 | |||
| areaForLayer[34] | Root:0:0 | HideDisplayCutout:32:0 | OneHanded:34:0 | FullscreenMagnification:34:0 | ||
| areaForLayer[35] | Root:0:0 | HideDisplayCutout:32:0 | OneHanded:34:0 | FullscreenMagnification:34:0 | ||
| areaForLayer[36] | Root:0:0 |
对应的 PendingArea 树的结构如下:
3. 叶子节点生成
接下来的 build 方法的代码生成叶子节点:
            // Create Tokens as leaf for every layer.
            PendingArea leafArea = null;
            int leafType = LEAF_TYPE_TOKENS;
            for (int layer = 0; layer < maxWindowLayerCount; layer++) {
                // 获取叶子节点类型
                int type = typeOfLayer(policy, layer);
                // Check whether we can reuse the same Tokens with the previous layer. This happens
                // if the previous layer is the same type as the current layer AND there is no
                // feature that applies to only one of them.
                if (leafArea == null || leafArea.mParent != areaForLayer[layer]
                        || type != leafType) {
                    // Create a new Tokens for this layer.
                    leafArea = new PendingArea(null /* feature */, layer, areaForLayer[layer]);
                    areaForLayer[layer].mChildren.add(leafArea);
                    leafType = type;
                    if (leafType == LEAF_TYPE_TASK_CONTAINERS) {
                        // We use the passed in TaskDisplayAreas for task container type of layer.
                        // Skip creating Tokens even if there is no TDA.
                        addTaskDisplayAreasToApplicationLayer(areaForLayer[layer]);
                        addDisplayAreaGroupsToApplicationLayer(areaForLayer[layer],
                                displayAreaGroupHierarchyBuilders);
                        leafArea.mSkipTokens = true;
                    } else if (leafType == LEAF_TYPE_IME_CONTAINERS) {
                        // We use the passed in ImeContainer for ime container type of layer.
                        // Skip creating Tokens even if there is no ime container.
                        leafArea.mExisting = mImeContainer;
                        leafArea.mSkipTokens = true;
                    }
                }
                leafArea.mMaxLayer = layer;
            }
这里给 PendingArea 树生成叶子节点。
首先调用 typeOfLayer 方法,获取叶子节点类型:
        private static int typeOfLayer(WindowManagerPolicy policy, int layer) {
            if (layer == APPLICATION_LAYER) { // 2
                return LEAF_TYPE_TASK_CONTAINERS;
            } else if (layer == policy.getWindowLayerFromTypeLw(TYPE_INPUT_METHOD)
                    || layer == policy.getWindowLayerFromTypeLw(TYPE_INPUT_METHOD_DIALOG)) { // 13 14
                return LEAF_TYPE_IME_CONTAINERS;
            } else { // 其他
                return LEAF_TYPE_TOKENS;
            }
        }
-
layer 等于 2,叶子节点类型是 LEAF_TYPE_TASK_CONTAINERS
-
layer 等于 13 14,叶子节点类型是 LEAF_TYPE_IME_CONTAINERS
-
layer 不等于 2,13,14,叶子节点类型是 LEAF_TYPE_TOKENS
接着 new 一个 PendingArea 对象,然后添加到 areaForLayer[layer] 的子节点中,成为叶子节点。
如果叶子节点类型是 LEAF_TYPE_IME_CONTAINERS,也就是 layer 等于 2,则做以下处理:
                if (leafType == LEAF_TYPE_TASK_CONTAINERS) {
                        // We use the passed in TaskDisplayAreas for task container type of layer.
                        // Skip creating Tokens even if there is no TDA.
                        addTaskDisplayAreasToApplicationLayer(areaForLayer[layer]);
                        // displayAreaGroupHierarchyBuilders是一个空的列表,这个方法就不用管了
                        addDisplayAreaGroupsToApplicationLayer(areaForLayer[layer],
                                displayAreaGroupHierarchyBuilders);
                        leafArea.mSkipTokens = true;
                }
接着调用 addTaskDisplayAreasToApplicationLayer 方法,给 areaForLayer[layer] 再添加一个叶子节点。
        private void addTaskDisplayAreasToApplicationLayer(PendingArea parentPendingArea) {
            final int count = mTaskDisplayAreas.size();
            for (int i = 0; i < count; i++) {
                PendingArea leafArea =
                        new PendingArea(null /* feature */, APPLICATION_LAYER, parentPendingArea);
                leafArea.mExisting = mTaskDisplayAreas.get(i);
                leafArea.mMaxLayer = APPLICATION_LAYER;
                parentPendingArea.mChildren.add(leafArea);
            }
        }
此时的 mTaskDisplayAreas 中只有一个元素,即名为 DefaultTaskDisplayArea 的 TaskDisplayArea 对象,这里是为该对象创建了一个对应的 PendingArea 对象,并且将创建的 PendingArea 添加到 areaForLayer[2] 节点之下,然后将 PendingArea.mExisting 设置为 DefaultTaskDisplayArea。后续根据 PendingArea 生成 DisplayArea.Tokens 的时候,如果 mExisting 不为空,那么直接用 mExisting,而不会再重新创建一个 DisplayArea.Tokens 对象。接着将叶子节点 leafArea 的 mSkipTokens 设置为 true,那么后续在根据PendingArea 树生成 DisplayArea 层级结构的时候,就不会为这个 PendingArea 对象生成一个 DisplayArea 对象了。
如果叶子节点类型是 LEAF_TYPE_TASK_CONTAINERS,也就是 layer 等于 13 或者 14,则做以下处理:
                else if (leafType == LEAF_TYPE_IME_CONTAINERS) {
                        // We use the passed in ImeContainer for ime container type of layer.
                        // Skip creating Tokens even if there is no ime container.
                        leafArea.mExisting = mImeContainer;
                        leafArea.mSkipTokens = true;
                }
和上面分析类似,后续根据 PendingArea 生成 DisplayArea.Tokens 的时候,不再为当前节点生成 DisplayArea.Tokens,而是用之前保存在 HierarchyBuilder.mImeContainer 的 ImeContainer
树节点生成完成后,PendingArea 树的结构如下:

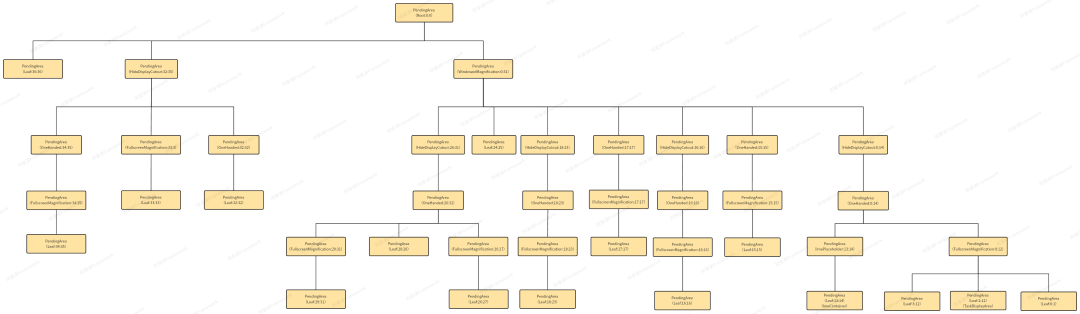
接着调用 computeMaxLayer 计算非叶子节点的 mMaxLayer。
root.computeMaxLayer();
在此之前,非叶子节点的 mMaxLayer 都是 0,这里调用 computerMaxLayer 方法,将这些值计算出来:
        // frameworks/base/services/core/java/com/android/server/wm/DisplayAreaPolicyBuilder.java
        int computeMaxLayer() {
            for (int i = 0; i < mChildren.size(); i++) {
                mMaxLayer = Math.max(mMaxLayer, mChildren.get(i).computeMaxLayer());
            }
            return mMaxLayer;
        }
一个递归调用,以当前节点为起点,向下查找最大的那个节点 mMaxLayer 作为当前节点的 mMaxLayer,递归到叶子节点,然后逐级返回。这样每一个的 mMaxLayer 就计算出来了。
至此,PendingArea 树就构造好了,其结构如下:
4. 生成 DisplayArea 层级结构
PendingArea 树就构造好以后,就会调用下面的方法,基于 PendingArea 树生成 DisplayArea 层级结构
root.instantiateChildren(mRoot, displayAreaForLayer, 0, featureAreas);
instantiateChildren 方法具体实现如下:
        void instantiateChildren(DisplayArea<DisplayArea> parent, DisplayArea.Tokens[] areaForLayer,
                int level, Map<Feature, List<DisplayArea<WindowContainer>>> areas) {
            mChildren.sort(Comparator.comparingInt(pendingArea -> pendingArea.mMinLayer));
            for (int i = 0; i < mChildren.size(); i++) {
                final PendingArea child = mChildren.get(i);
                final DisplayArea area = child.createArea(parent, areaForLayer);
                if (area == null) {
                    // TaskDisplayArea and ImeContainer can be set at different hierarchy, so it can
                    // be null.
                    continue;
                }
                parent.addChild(area, WindowContainer.POSITION_TOP);
                if (child.mFeature != null) {
                    areas.get(child.mFeature).add(area);
                }
                // 递归调用
                child.instantiateChildren(area, areaForLayer, level + 1, areas);
            }
        }
当前 root 是上面的生成的 PendingArea 层级结构的根节点,传入的 parent 则是一个 DisplayContent 对象,那么这里按照 root 的 mChildren 的层级结构,以 parent 为根节点,递归调用的方式生成一个 DisplayArea 层级结构。
重点看一下这里创建 DisplayArea 的 DisplayAreaPolicyBuilder.PendingArea.createArea 方法:
        private DisplayArea createArea(DisplayArea<DisplayArea> parent,
                DisplayArea.Tokens[] areaForLayer) {
            // 当mExisting不为null,前面分析的 TaskDisplayArea 和 ImeContainer 的情况,此时不需要再创建 DisplayArea 对象,直接用mExisting
            if (mExisting != null) {
                if (mExisting.asTokens() != null) {
                    // Store the WindowToken container for layers
                    fillAreaForLayers(mExisting.asTokens(), areaForLayer);
                }
                return mExisting;
            }

            // mSkipTokens 为 true,直接 return,mSkipTokens 是和 mExisting 是同一个逻辑下设置的。
            if (mSkipTokens) {
                return null;
            }

            // DisplayArea 的类型
            DisplayArea.Type type;
            if (mMinLayer > APPLICATION_LAYER) {
                type = DisplayArea.Type.ABOVE_TASKS;
            } else if (mMaxLayer < APPLICATION_LAYER) {
                type = DisplayArea.Type.BELOW_TASKS;
            } else {
                type = DisplayArea.Type.ANY;
            }

            // Leaf 节点处理
            if (mFeature == null) {
                final DisplayArea.Tokens leaf = new DisplayArea.Tokens(parent.mWmService, type,
                        "Leaf:" + mMinLayer + ":" + mMaxLayer);
                fillAreaForLayers(leaf, areaForLayer);
                return leaf;
            } else { // 创建 DisplayArea 对象
                return mFeature.mNewDisplayAreaSupplier.create(parent.mWmService, type,
                        mFeature.mName + ":" + mMinLayer + ":" + mMaxLayer, mFeature.mId);
            }
        }
-
当 mExisting 不为 null,就是前面分析的 TaskDisplayArea 和 ImeContainer 的情况,此时不需要再创建 DisplayArea 对象,直接用 mExisting
-
mSkipTokens 为 true,直接 return,mSkipTokens 是和 mExisting 是同一个逻辑下设置的
-
这里根据mMinLayer和mMaxLayer的值,将DisplayArea分为三种:
-
mMaxLayer 小于 APPLICATION_LAYER,即2,这类 DisplayArea 类型为 ABOVE_TASKS
-
mMinLayer 大于 APPLICATION_LAYER,这类 DisplayArea 类型为 BELOW_TASKS。
-
剩余情况下的 DisplayArea 类型为 ANY。
-
-
mFeature 为 null,那么创建一个 DisplayArea.Tokens 对象,也就是 Leaf 节点的情况
-
如果 mFeature不为 null,那么创建一个 DisplayArea 对象,注意这里构造函数 name 参数传入的是
mFeature.mName + ":" + mMinLayer + ":" + mMaxLayer,包含了 Feature 名,纵向层级范围信息。
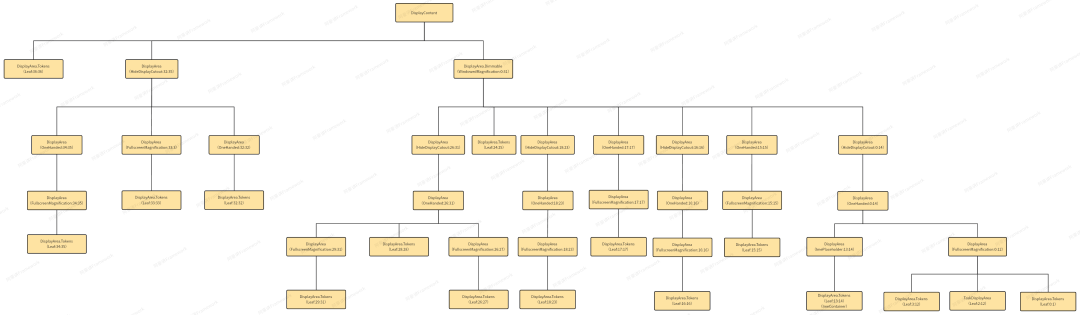
至此,整个窗口层级树就构造好了:
接下来我们就可以向这颗树添加窗口了。
参考资料
-
3【Android 12】DisplayArea层级结构(一) —— DisplayArea层级结构的生成
-
Android T 窗口层级其二 —— 层级结构树的构建
-
android 13 WMS/AMS系统开发-窗口层级相关DisplayArea,WindowContainer第二节
-
Android 12 - WMS 层级结构 && DisplayAreaGroup 引入


 990
990


 被折叠的 条评论
为什么被折叠?
被折叠的 条评论
为什么被折叠?
 到【灌水乐园】发言


