


安装Pytorch
# 安装 Pytorch
!pip3 install install torch==1.10.1+cu113 torchvision==0.11.2+cu113 torchaudio==0.10.1+cu113 -f https://download.pytorch.org/whl/cu113/torc
用MIM安装MMCV
!pip install -U openmim
!mim install mmengine
!mim install mmcv
!mim install mmdet
安装其它工具包
!pip install opencv-python pillow matplotlib seaborn tqdm pycocotools -i https://pypi.tuna.tsinghua.edu.cn/simple下载 MMPose
# 从 github 上下载最新的 mmpose 源代码
!git clone https://github.com/open-mmlab/mmpose.git -b tutorial2023
# 进入主目录
cd mmpose
#安装 MMPose
!mim install -e .
检查安装成功
# 检查 mmcv
import mmcv
from mmcv.ops import get_compiling_cuda_version, get_compiler_version
print('MMCV版本', mmcv.__version__)
print('CUDA版本', get_compiling_cuda_version())
print('编译器版本', get_compiler_version())
# 检查 mmpose
import mmpose
print('mmpose版本', mmpose.__version__)
下载 MMDetection
# 从 github 上下载最新的 mmdetection 源代码
!git clone https://github.com/open-mmlab/mmdetection.git -b 3.x
# 进入主目录
import os
os.chdir('mmdetection')
命令行安装
!pip install -v -e .
下载预训练模型权重文件和视频素材
#从 刚刚git的mmpose目录下出发
import os

# 创建 checkpoint 文件夹,用于存放预训练模型权重文件
os.mkdir('checkpoint')

# 创建 outputs 文件夹,用于存放预测结果
os.mkdir('outputs')

# 创建 data 文件夹,用于存放图片和视频素材
os.mkdir('data')

os.mkdir('data/test')
# 多人图片,来源:https://www.pexels.com/zh-cn/photo/2168292/
!wget https://zihao-openmmlab.obs.cn-east-3.myhuaweicloud.com/20220610-mmpose/images/multi-person.jpeg -O data/test/multi-person.jpeg
# 单人视频-唱跳篮球
!wget https://zihao-openmmlab.obs.myhuaweicloud.com/20220610-mmpose/videos/cxk.mp4 -P data/test
# 妈妈和女儿跳舞,经微信压缩
!wget https://zihao-openmmlab.obs.myhuaweicloud.com/20220610-mmpose/videos/mother_wx.mp4 -P data/test
# 两个女生跳舞视频,来源:https://mixkit.co/free-stock-video/two-girls-having-fun-in-a-retro-restaurant-42298/
!wget https://zihao-openmmlab.obs.cn-east-3.myhuaweicloud.com/20220610-mmpose/videos/two-girls.mp4 -O data/test/two-girls.mp4预测单张图像
# HRNet
!python demo/topdown_demo_with_mmdet.py \
        demo/mmdetection_cfg/faster_rcnn_r50_fpn_coco.py \ #目标检测模型配置文件
        https://download.openmmlab.com/mmdetection/v2.0/faster_rcnn/faster_rcnn_r50_fpn_1x_coco/faster_rcnn_r50_fpn_1x_coco_20200130-047c8118.pth \ #目标检测模型checkpoint权重文件
        configs/body_2d_keypoint/topdown_heatmap/coco/td-hm_hrnet-w32_8xb64-210e_coco-256x192.py \ #关键点检测congfig文件
        https://download.openmmlab.com/mmpose/top_down/hrnet/hrnet_w32_coco_256x192-c78dce93_20200708.pth \ #关键点检测模型权重文件
        --input data/test/multi-person.jpeg \ # 指定的输入图像
        --output-root outputs/B1_HRNet_1 \ #输出保存路径
        --device cuda:0 \
        --bbox-thr 0.5 \ #目标检测阈值
        --kpt-thr 0.2 \ #关键点检测阈值
        --nms-thr 0.3 \ #框交并比极大值阈值
        --radius 8 \ #可视化关键点半径
        --thickness 4 \ #线宽
        --draw-bbox \ #是否画框
        --draw-heatmap \ #是否画关键点热力图
        --show-kpt-idx #是否标注关键点序号
使用Pyhton API 预训练MMpose模型预测
#进入 mmpose 主目录
import os
os.chdir('mmpose')
#导入工具包
import cv2
import numpy as np
from PIL import Image

import matplotlib.pyplot as plt
%matplotlib inline

import torch

import mmcv
from mmcv import imread
import mmengine
from mmengine.registry import init_default_scope

from mmpose.apis import inference_topdown
from mmpose.apis import init_model as init_pose_estimator
from mmpose.evaluation.functional import nms
from mmpose.registry import VISUALIZERS
from mmpose.structures import merge_data_samples

from mmdet.apis import inference_detector, init_detector

# 有 GPU 就用 GPU,没有就用 CPU
device = torch.device('cuda:0' if torch.cuda.is_available() else 'cpu')
print('device', device)
#载入待测图像
img_path = 'data/test/multi-person.jpeg’
#构建目标检测模型
# Faster R CNN
detector = init_detector(
    'demo/mmdetection_cfg/faster_rcnn_r50_fpn_coco.py',
    'https://download.openmmlab.com/mmdetection/v2.0/faster_rcnn/faster_rcnn_r50_fpn_1x_coco/faster_rcnn_r50_fpn_1x_coco_20200130-047c8118.pth',
    device=device
)
#构建人体姿态估计模型
pose_estimator = init_pose_estimator(
    'configs/body_2d_keypoint/topdown_heatmap/coco/td-hm_hrnet-w32_8xb64-210e_coco-256x192.py',
    'https://download.openmmlab.com/mmpose/top_down/hrnet/hrnet_w32_coco_256x192-c78dce93_20200708.pth',
    device=device,
    cfg_options={'model': {'test_cfg': {'output_heatmaps': True}}}
)
#预测-目标检测
init_default_scope(detector.cfg.get('default_scope', 'mmdet'))
# 获取目标检测预测结果
detect_result = inference_detector(detector, img_path)
detect_result.keys()

# 预测类别
detect_result.pred_instances.labels

# 置信度
detect_result.pred_instances.scores
# 框坐标:左上角X坐标、左上角Y坐标、右下角X坐标、右下角Y坐标
# detect_result.pred_instances.bboxes
# 置信度阈值,置信度阈值过滤,获得最终目标检测预测结果
CONF_THRES = 0.5

pred_instance = detect_result.pred_instances.cpu().numpy()
bboxes = np.concatenate((pred_instance.bboxes, pred_instance.scores[:, None]), axis=1)
bboxes = bboxes[np.logical_and(pred_instance.labels == 0, pred_instance.scores > CONF_THRES)]
bboxes = bboxes[nms(bboxes, 0.3)][:, :4]

bboxes
#预测-关键点
# 获取每个 bbox 的关键点预测结果
pose_results = inference_topdown(pose_estimator, img_path, bboxes)
len(pose_results)

# 把多个bbox的pose结果打包到一起
data_samples = merge_data_samples(pose_results)

data_samples.keys()

# 每个人 17个关键点 坐标
data_samples.pred_instances.keypoints.shape

# 索引为 0 的人,每个关键点的坐标
data_samples.pred_instances.keypoints[0,:,:]
# 每一类关键点的预测热力图
data_samples.pred_fields.heatmaps.shape

idx_point = 13
heatmap = data_samples.pred_fields.heatmaps[idx_point,:,:]
heatmap.shape
# 索引为 idx 的关键点,在全图上的预测热力图
plt.imshow(heatmap)
plt.show()

#MMPose官方可视化工具visualizer
# 半径
pose_estimator.cfg.visualizer.radius = 10
# 线宽
pose_estimator.cfg.visualizer.line_width = 8
visualizer = VISUALIZERS.build(pose_estimator.cfg.visualizer)
# 元数据
visualizer.set_dataset_meta(pose_estimator.dataset_meta)
# 元数据
# pose_estimator.dataset_meta

#展示可视化效果
img = mmcv.imread(img_path)
img = mmcv.imconvert(img, 'bgr', 'rgb')

img_output = visualizer.add_datasample(
            'result',
            img,
            data_sample=data_samples,
            draw_gt=False,
            draw_heatmap=True,
            draw_bbox=True,
            show_kpt_idx=True,
            show=False,
            wait_time=0,
            out_file='outputs/B2.jpg'
)
plt.figure(figsize=(10,10))
plt.imshow(img_output)
plt.show()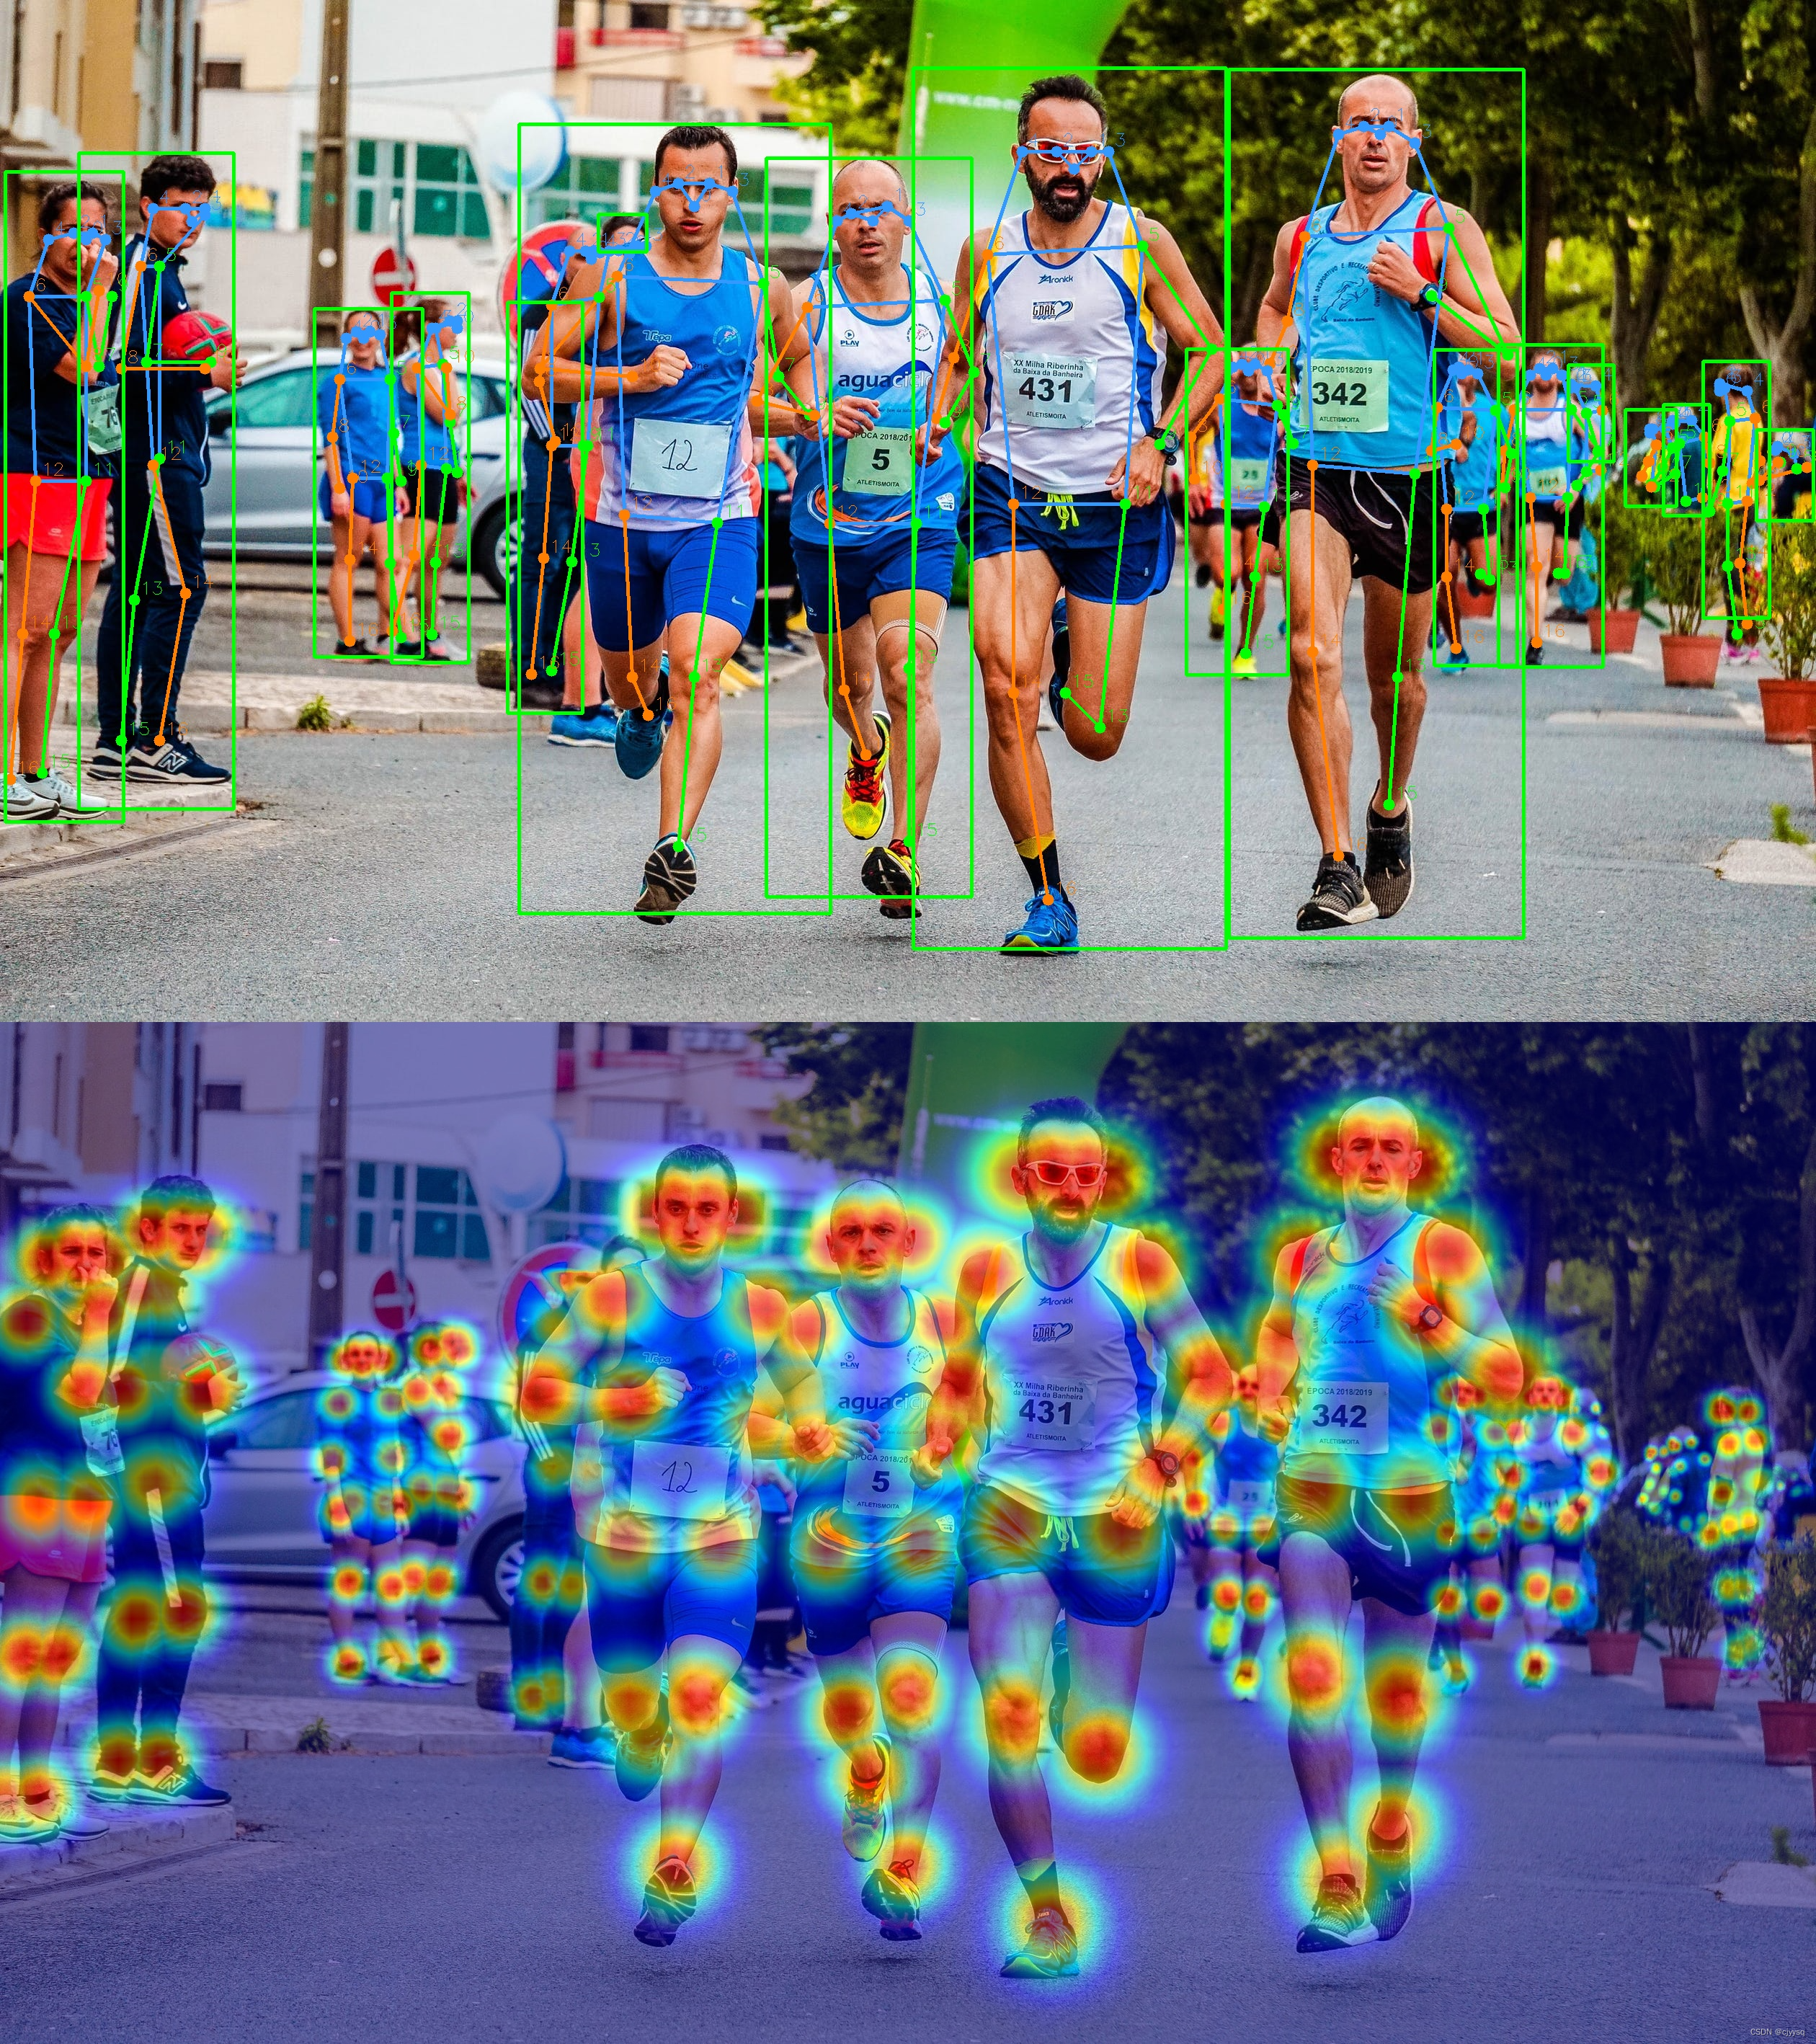


 6517
6517


 被折叠的 条评论
为什么被折叠?
被折叠的 条评论
为什么被折叠?
 到【灌水乐园】发言


