1.期望目标

微服务和VUE入门教程(8):前端主页的编写_导航栏

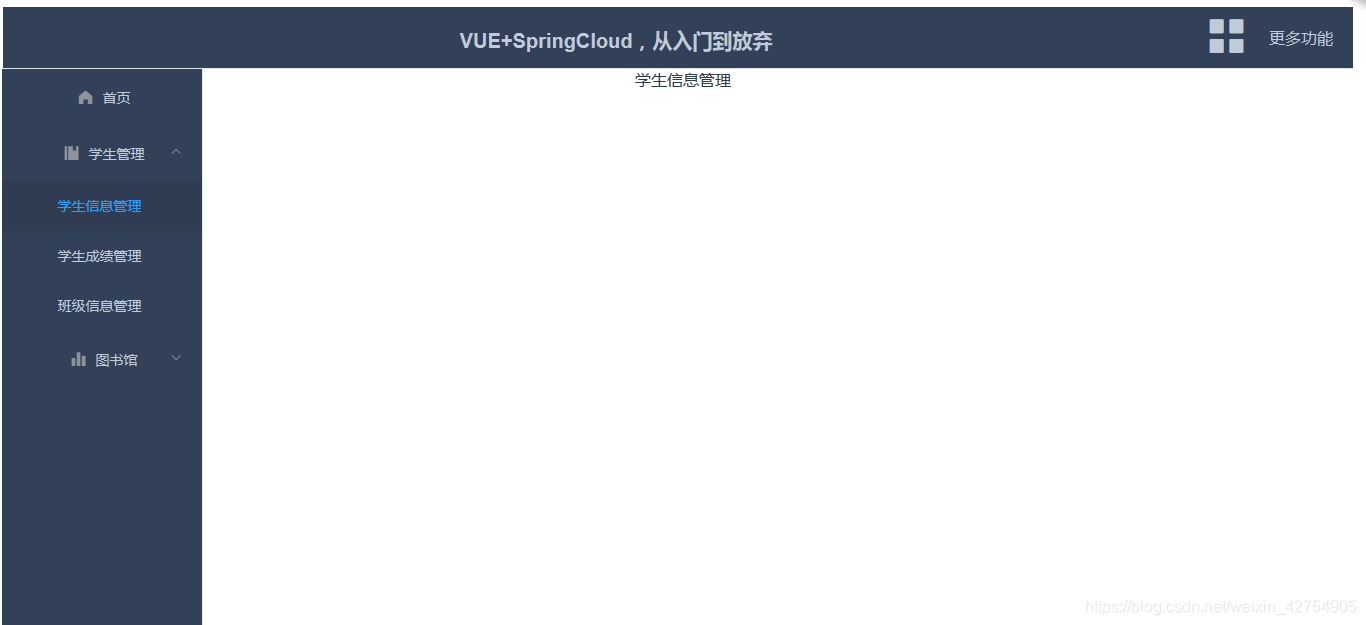
如图,我们的前端页面很简单,头部导航栏,左侧导航栏,主体待填的内容。管理后台的常用布局。

2. 前端项目结构

微服务和VUE入门教程(8):前端主页的编写_导航栏_02

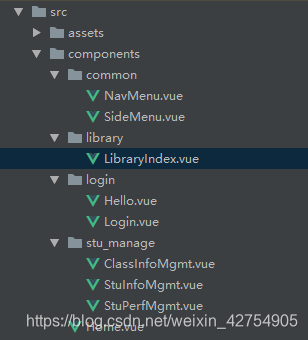
我们编写的前端项目结构如上图,最底部的Home.vue作为主页,导航栏和其他内容作为home的组件。common文件夹存放了头部导航栏和侧边栏。library文件夹暂时只放了一个LinbraryIndex.vue。login文件夹还是一个登陆页面和hello页面。stu_manage文件夹存放了三个文件,班级信息管理,学生信息管理。学生成绩管理。

3.编写Home.vue

看完整理结构,我们先来看一个Home.vue。代码很简单,在

路由嵌套,会在接下来的开发体会到的。

<template>
    <div>
      <!--使用组件-->
      <nav-menu></nav-menu>
      <side-menu></side-menu>
      <!-- 路由嵌套,路由匹配到的组件将显示在这里 -->
      <router-view/>
    </div>
</template>

<script>
  // 引入两个导航栏作为组件
  import NavMenu from './common/NavMenu'
  import SideMenu from './common/SideMenu'
    export default {
      name: "Home",
      // 挂载组件
      components:{
        NavMenu,
        SideMenu
      }
    }
</script>

<style scoped>

</style>
  • 1.
  • 2.
  • 3.
  • 4.
  • 5.
  • 6.
  • 7.
  • 8.
  • 9.
  • 10.
  • 11.
  • 12.
  • 13.
  • 14.
  • 15.
  • 16.
  • 17.
  • 18.
  • 19.
  • 20.
  • 21.
  • 22.
  • 23.
  • 24.
  • 25.
  • 26.
  • 27.

4.编写头部导航栏NavMenu.vue

在elementUI官网上复制的,稍微改了改。没有什么技巧。

<template>
  <el-menu
    style="width: 100%;left: -5px;"
    class="el-menu-demo"
    mode="horizontal"
    background-color="#324157"
    text-color="#bfcbd9"
    active-text-color="#ffd04b">

    <span style="color: #bfcbd9;position: absolute;padding-top: 20px;right: 43%;font-size: 20px;font-weight: bold">
      VUE+SpringCloud,从入门到放弃
    </span>
    <a href="#nowhere" style="color: #bfcbd9;float: right;padding: 20px;">更多功能</a>
    <i class="el-icon-menu" style="float:right;font-size: 45px;color: #bfcbd9;padding-top: 8px"></i>
  </el-menu>
</template>

<script>
  export default {
    name: 'NavMenu',
    data () {
      return {
      }
    }
  }
</script>

<style scoped>
  a{
    text-decoration: none;
  }
  span {
    pointer-events: none;
  }
</style>
  • 1.
  • 2.
  • 3.
  • 4.
  • 5.
  • 6.
  • 7.
  • 8.
  • 9.
  • 10.
  • 11.
  • 12.
  • 13.
  • 14.
  • 15.
  • 16.
  • 17.
  • 18.
  • 19.
  • 20.
  • 21.
  • 22.
  • 23.
  • 24.
  • 25.
  • 26.
  • 27.
  • 28.
  • 29.
  • 30.
  • 31.
  • 32.
  • 33.
  • 34.
  • 35.

5.编写侧边导航栏

侧边导航栏看起来挺复杂的,就是一些循环而已。没有什么值得说的,都是套路。

有一个router关键词,它代表着:是否使用 vue-router 的模式,启用该模式会在激活导航时以 index 作为 path 进行路由跳转

<template>
  <div class="sidebar">
    <el-menu class="sidebar-el-menu" :default-active="onRoutes" :collapse="collapse" background-color="#324157"
             text-color="#bfcbd9" active-text-color="#20a0ff" unique-opened router>
      <template v-for="item in items">
        <template v-if="item.subs">
          <el-submenu :index="item.index" :key="item.index">
            <template slot="title">
              <i :class="item.icon"></i><span slot="title">{{ item.title }}</span>
            </template>
            <template v-for="subItem in item.subs">
              <el-submenu v-if="subItem.subs" :index="subItem.index" :key="subItem.index">
                <template slot="title">{{ subItem.title }}</template>
                <el-menu-item v-for="(threeItem,i) in subItem.subs" :key="i" :index="threeItem.index">
                  {{ threeItem.title }}
                </el-menu-item>
              </el-submenu>
              <el-menu-item v-else :index="subItem.index" :key="subItem.index">
                {{ subItem.title }}
              </el-menu-item>
            </template>
          </el-submenu>
        </template>
        <template v-else>
          <el-menu-item :index="item.index" :key="item.index">
            <i :class="item.icon"></i><span slot="title">{{ item.title }}</span>
          </el-menu-item>
        </template>
      </template>

    </el-menu>
  </div>
</template>

<script>
  export default {
    data() {
      return {
        collapse: false,
        items: [{
          icon: 'el-icon-s-home',
          index: 'dashboard',
          title: '首页',

        },
          {
            icon: 'el-icon-s-management',
            index: '1',
            title: '学生管理',
            subs: [
              {
                index: 'stuInfoMgmt',
                title: '学生信息管理'
              },
              {
                index: 'stuPerfMgmt',
                title: '学生成绩管理'
              },
              {
                index: 'classInfoMgmt',
                title: '班级信息管理'
              }

            ]
          },
          {
            icon: 'el-icon-s-data',
            index: '2',
            title: '图书馆',
            subs: [
              {
                index: 'serviceCodeRegister',
                title: '图书浏览'
              },
              {
                index: 'serviceMenu',
                title: '我的收藏'
              }
            ]
          }
        ]
      }
    },
    computed: {
      onRoutes() {
        return this.$route.path.replace('/', '')
      }
    }
  }
</script>

<style scoped>
  .sidebar {
    display: block;
    position: absolute;
    left: 2px;
    top: 70px;
    bottom: 0;
    /*overflow-y: scroll;*/
  }
  .sidebar::-webkit-scrollbar {
    width: 0;
  }
  .sidebar-el-menu:not(.el-menu--collapse) {
    width: 200px;
  }
  .sidebar>ul {
    height: 100%;
  }
</style>
  • 1.
  • 2.
  • 3.
  • 4.
  • 5.
  • 6.
  • 7.
  • 8.
  • 9.
  • 10.
  • 11.
  • 12.
  • 13.
  • 14.
  • 15.
  • 16.
  • 17.
  • 18.
  • 19.
  • 20.
  • 21.
  • 22.
  • 23.
  • 24.
  • 25.
  • 26.
  • 27.
  • 28.
  • 29.
  • 30.
  • 31.
  • 32.
  • 33.
  • 34.
  • 35.
  • 36.
  • 37.
  • 38.
  • 39.
  • 40.
  • 41.
  • 42.
  • 43.
  • 44.
  • 45.
  • 46.
  • 47.
  • 48.
  • 49.
  • 50.
  • 51.
  • 52.
  • 53.
  • 54.
  • 55.
  • 56.
  • 57.
  • 58.
  • 59.
  • 60.
  • 61.
  • 62.
  • 63.
  • 64.
  • 65.
  • 66.
  • 67.
  • 68.
  • 69.
  • 70.
  • 71.
  • 72.
  • 73.
  • 74.
  • 75.
  • 76.
  • 77.
  • 78.
  • 79.
  • 80.
  • 81.
  • 82.
  • 83.
  • 84.
  • 85.
  • 86.
  • 87.
  • 88.
  • 89.
  • 90.
  • 91.
  • 92.
  • 93.
  • 94.
  • 95.
  • 96.
  • 97.
  • 98.
  • 99.
  • 100.
  • 101.
  • 102.
  • 103.
  • 104.
  • 105.
  • 106.
  • 107.
  • 108.
  • 109.
  • 110.

6.添加路由

import Home from '@/components/Home'
  • 1.
{
  path: '/home',
  name: 'Home',
  component: Home
 }
  • 1.
  • 2.
  • 3.
  • 4.
  • 5.

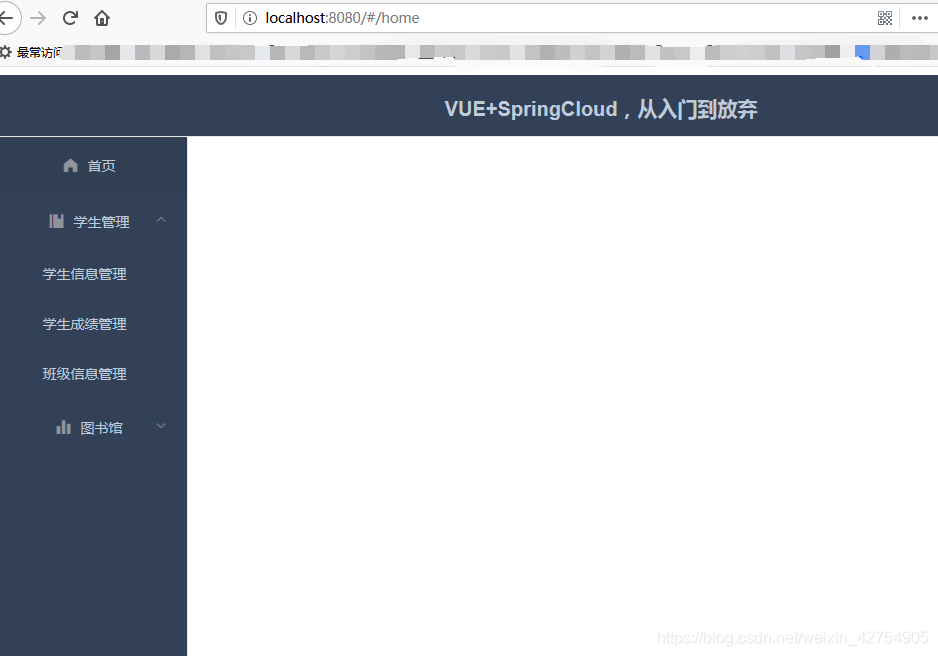
这时我们访问:http://localhost:8080/#/home

微服务和VUE入门教程(8):前端主页的编写_导航栏_03

7. 编写其他页面

ClassInfoMgmt.vue,StuInfoMgmt.vue,StuPerfMgmt.vue三个页面,因为现在还没填什么内容,故而不写什么东西。

<template>
    <div>
      学生成绩管理
    </div>
</template>

<script>
    export default {
        name: "StuPerfMgmt"
    }
</script>

<style scoped>

</style>
  • 1.
  • 2.
  • 3.
  • 4.
  • 5.
  • 6.
  • 7.
  • 8.
  • 9.
  • 10.
  • 11.
  • 12.
  • 13.
  • 14.
  • 15.

只写一个div,展示一下内容即可。

8. 修改路由

修改我们刚才写的home路由

{
  path: '/home',
  name: 'Home',
  component: Home,
  //home页面不需要被访问
  redirect: '/stuInfoMgmt',
  children:[
    {
      path: '/stuInfoMgmt',
      component: resolve => require(['@/components/stu_manage/StuInfoMgmt.vue'], resolve),
      meta: {
        title: 'stuInfoMgmt'
      }
    },
    {
      path: '/stuPerfMgmt',
      component: resolve => require(['@/components/stu_manage/StuPerfMgmt.vue'], resolve),
      meta: {
        title: 'stuPerfMgmt'
      }
    },
  • 1.
  • 2.
  • 3.
  • 4.
  • 5.
  • 6.
  • 7.
  • 8.
  • 9.
  • 10.
  • 11.
  • 12.
  • 13.
  • 14.
  • 15.
  • 16.
  • 17.
  • 18.
  • 19.
  • 20.
  • 21.

加上children里面的内容即可,整个页面的结构就算搭建完成。接下来我们就分别去相应页面中填充相应信息。

9.总结

VUE的前端代码比较散碎,组件化代码的好处与缺点吧。刚开始接触挺晕乎的,后面见多了,其实都一样了。