


前些日子做了个实时业务作业大屏,效果还不错。
虽然都是些业务数据,但是外面人员看了始终还是不好。
所有我决定在这里加个auth_basic认证。
一、安装htpasswd工具和配置nginx
最初加这个后,返回了403,再后来又返回了401。最后有正常了。
RedHat系
Debian系
这样系统就有了htpasswd 工具了。
nbigscreenweb.imddy.top.conf
server{
        listen 80;

        server_name nbigscreenweb.imddy.top;

        charset utf-8;


        #ssl_session_timeout 5m;
        #ssl_protocols TLSv1 TLSv1.1 TLSv1.2;
        #ssl_ciphers ECDHE-RSA-AES128-GCM-SHA256:HIGH:!aNULL:!MD5:!RC4:!DHE;
        #ssl_prefer_server_ciphers on;

        #ssl_session_timeout 5m;
        #ssl_protocols TLSv1 TLSv1.1 TLSv1.2;
        #ssl_ciphers HIGH:!aNULL:!eNULL:!EXPORT:!CAMELLIA:!DES:!MD5:!PSK:!RC4:!RSA;
        #ssl_prefer_server_ciphers on;

            #设定本虚拟主机的访问日志
        access_log  logs/nbigscreenweb.cqsym.top.log ;

        error_page  404              /404.html;

        # redirect server error pages to the static page /50x.html
        #
            #定义错误提示页面
        error_page   500 502 503 504  /50x.html;


        #root /root/chanpushweb/dist/;
        #index index.html;

        #auth_basic "Welcome to nbigscreenweb.imddy.top! Please input password:";  # 启用认证
        #auth_basic_user_file /usr/local/nginx/config/vhost/nbigscreenweb.passwd.user;  # 配置认证用户密码文件


       location / {
               root /root/nbigscreenweb/dist/;
               #alias /root/bigscreenweb/dist;
               allow all;
               autoindex on;
               index index.html;

               auth_basic "Welcome to nbigscreenweb.imddy.top Please input password:";  # 启用认证
               auth_basic_user_file /usr/local/nginx/conf/vhost/nbigscreenweb.passwd.user;  # 配置认证用户密码文件
       }

}- 1.
- 2.
- 3.
- 4.
- 5.
- 6.
- 7.
- 8.
- 9.
- 10.
- 11.
- 12.
- 13.
- 14.
- 15.
- 16.
- 17.
- 18.
- 19.
- 20.
- 21.
- 22.
- 23.
- 24.
- 25.
- 26.
- 27.
- 28.
- 29.
- 30.
- 31.
- 32.
- 33.
- 34.
- 35.
- 36.
- 37.
- 38.
- 39.
- 40.
- 41.
- 42.
- 43.
- 44.
- 45.
- 46.
- 47.
- 48.
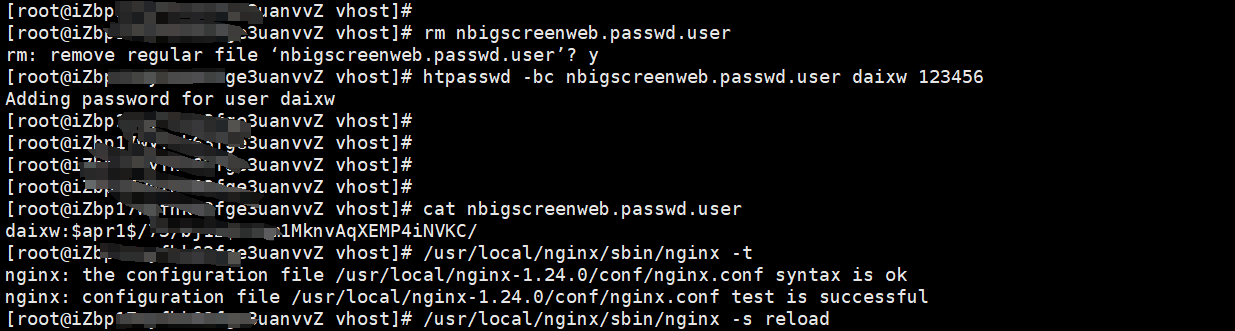
第一次 带参数c创建文件
后面不需要
二、htpasswd工具介绍
# htpasswdUsage:
	htpasswd [-cimB25dpsDv] [-C cost] [-r rounds] passwordfile username
	htpasswd -b[cmB25dpsDv] [-C cost] [-r rounds] passwordfile username password

	htpasswd -n[imB25dps] [-C cost] [-r rounds] username
	htpasswd -nb[mB25dps] [-C cost] [-r rounds] username password
 -c  Create a new file.
 -n  Don't update file; display results on stdout.
 -b  Use the password from the command line rather than prompting for it.
 -i  Read password from stdin without verification (for script usage).
 -m  Force MD5 encryption of the password (default).
 -2  Force SHA-256 crypt() hash of the password (secure).
 -5  Force SHA-512 crypt() hash of the password (secure).
 -B  Force bcrypt aencryption of the password (very secure).
 -C  Set the computing time used for the bcrypt algorithm
     (higher is more secure but slower, default: 5, valid: 4 to 31).
 -r  Set the number of rounds used for the SHA-256, SHA-512 algorithms
     (higher is more secure but slower, default: 5000).
 -d  Force CRYPT encryption of the password (8 chars max, insecure).
 -s  Force SHA-1 encryption of the password (insecure).
 -p  Do not encrypt the password (plaintext, insecure).
 -D  Delete the specified user.
 -v  Verify password for the specified user.
On other systems than Windows and NetWare the '-p' flag will probably not work.
The SHA-1 algorithm does not use a salt and is less secure than the MD5 algorithm.- 1.
- 2.
- 3.
- 4.
- 5.
- 6.
- 7.
- 8.
- 9.
- 10.
- 11.
- 12.
- 13.
- 14.
- 15.
- 16.
- 17.
- 18.
- 19.
- 20.
- 21.
- 22.
- 23.
- 24.
- 25.
- 26.
让AI简单翻译了下:
htpasswd 是一个用于创建和管理.htpasswd 文件的工具,该文件用于存储用户名和密码,以便进行 HTTP 基本认证。以下是 htpasswd 命令的使用方法及各选项的说明:

常用命令格式
创建新用户和密码:
htpasswd [-cimB25dpsDv] [-C cost] [-r rounds] passwordfile username
htpasswd -b[cmB25dpsDv] [-C cost] [-r rounds] passwordfile username password
仅显示加密后的密码:
htpasswd -n[imB25dps] [-C cost] [-r rounds] username
htpasswd -nb[mB25dps] [-C cost] [-r rounds] username password
选项说明
-c: 创建一个新的文件。如果文件已存在,则会覆盖原有内容。
-n: 不更新文件;而是在标准输出(stdout)显示加密后的密码。
-b: 从命令行直接使用提供的密码,而不是提示用户输入。
-i: 从标准输入(stdin)读取密码而不进行验证(适用于脚本使用)。
-m: 强制使用 MD5 加密算法对密码进行加密(默认选项)。
-2: 强制使用 SHA-256 的 crypt() 函数对密码进行哈希处理(安全)。
-5: 强制使用 SHA-512 的 crypt() 函数对密码进行哈希处理(安全)。
-B: 强制使用 bcrypt 算法对密码进行加密(非常安全)。
-C: 设置 bcrypt 算法使用的计算时间(更高值更安全但更慢,默认值为 5,有效范围为 4 到 31)。
-r: 设置 SHA-256 和 SHA-512 算法使用的迭代轮数(更高值更安全但更慢,默认值为 5000)。
-d: 强制使用 CRYPT 加密算法对密码进行加密(最多支持 8 个字符,不安全)。
-s: 强制使用 SHA-1 加密算法对密码进行加密(不安全)。
-p: 不对密码进行加密(明文存储,非常不安全)。注意,在非 Windows 和 NetWare 系统上,此选项可能无法正常工作。
-D: 删除指定的用户。
-v: 验证指定用户的密码是否正确。
注意事项
使用 -p 选项时,在非 Windows 和 NetWare 系统上可能不起作用。
SHA-1 算法不使用盐值,因此相比 MD5 算法来说安全性较低。
示例
创建新用户:
htpasswd -cm /etc/nginx/htpasswd.users newuser
这条命令会创建或修改 /etc/nginx/htpasswd.users 文件,并提示输入密码来创建新用户 newuser。
添加新用户和密码:
htpasswd -bm /etc/nginx/htpasswd.users newuser password
这条命令直接使用 password 作为 newuser 的密码,并将其加密后保存到 /etc/nginx/htpasswd.users 文件中。
只显示加密后的密码:
htpasswd -nbm /etc/nginx/htpasswd.users newuser password
这条命令将输出加密后的密码,但不会将其保存到文件中。
删除用户:
htpasswd -D /etc/nginx/htpasswd.users user_to_delete
这条命令将从 /etc/nginx/htpasswd.users 文件中删除 user_to_delete 用户。
以上就是 htpasswd 命令的使用方法及其各个选项的含义。希望这能帮助你更好地理解和使用 htpasswd。- 1.
- 2.
- 3.
- 4.
- 5.
- 6.
- 7.
- 8.
- 9.
- 10.
- 11.
- 12.
- 13.
- 14.
- 15.
- 16.
- 17.
- 18.
- 19.
- 20.
- 21.
- 22.
- 23.
- 24.
- 25.
- 26.
- 27.
- 28.
- 29.
- 30.
- 31.
- 32.
- 33.
- 34.
- 35.
- 36.
- 37.
- 38.
- 39.
- 40.
- 41.
- 42.
我这里没有使用m参数,前面已经介绍了。
自己配置是需要注意权限和错误日志去定位。


 1212
1212

 被折叠的 条评论
为什么被折叠?
被折叠的 条评论
为什么被折叠?
 到【灌水乐园】发言


