


涉及到shardingsphere不懂的可以私聊博主,集成,改造,动态数据源,动态分片规则,shardingsphere大数据量优化
1.pom文件
shardingsphere选择5.2.0版本
        <dependency>
            <groupId>org.apache.shardingsphere</groupId>
            <artifactId>shardingsphere-jdbc-core-spring-boot-starter</artifactId>
            <version>5.2.0</version>
        </dependency>
除开shardingsphere本身的依赖,需要使用dynamic多数据源辅助shardings的使用
        <dependency>
            <groupId>com.baomidou</groupId>
            <artifactId>dynamic-datasource-spring-boot-starter</artifactId>
            <version>3.3.2</version>
        </dependency>
2.启动项配置
在将两种依赖引入到项目中后,开始对shardingsphere进行配置
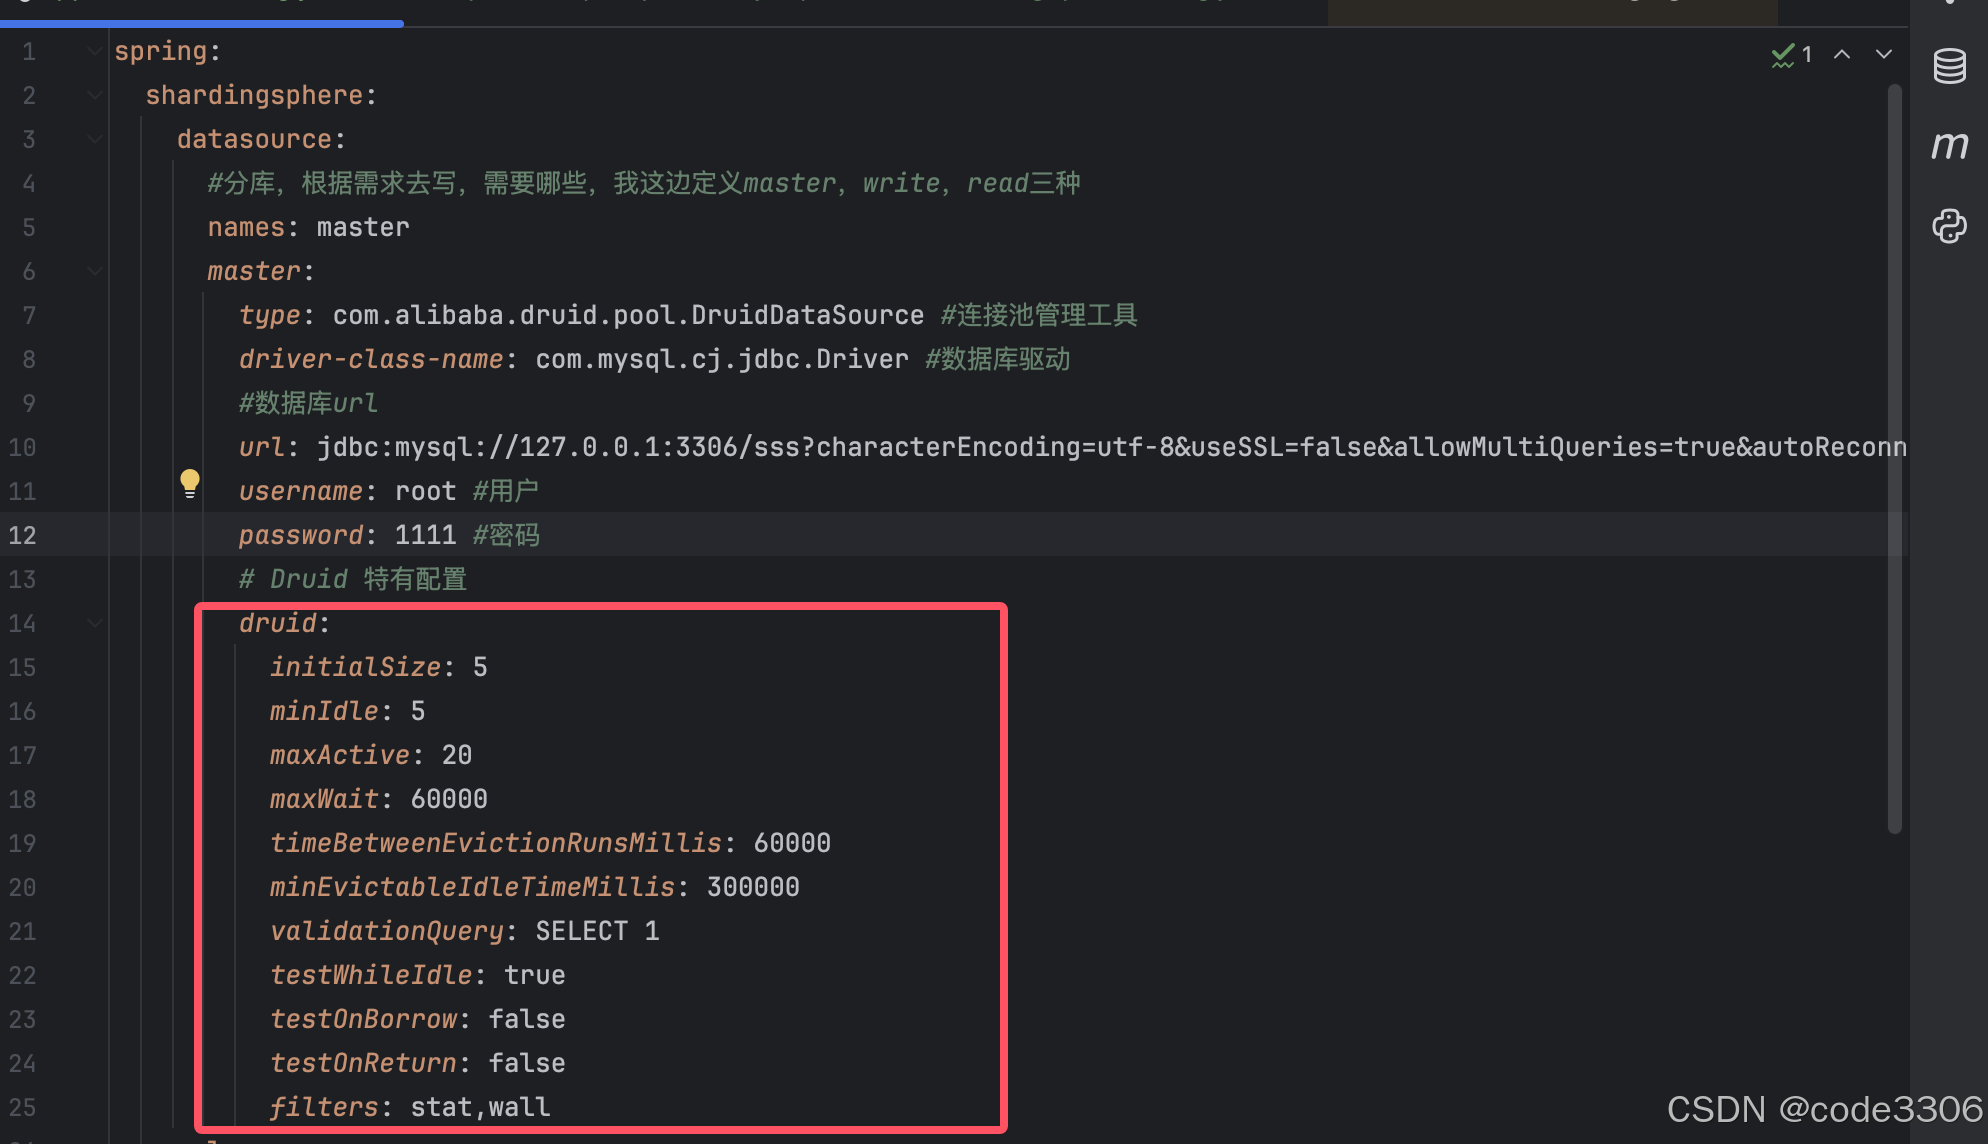
2.1 shardingsphere数据源配置
spring:
  shardingsphere:
    datasource:
      #分库,根据需求去写,需要哪些,我这边定义master,write,read三种
      names: master,read
      master:
        type: com.alibaba.druid.pool.DruidDataSource #连接池管理工具
        driver-class-name: com.mysql.cj.jdbc.Driver #数据库驱动
        #数据库url
        url: jdbc:mysql://127.0.0.1:3306/shardingdatabase?characterEncoding=utf-8&useSSL=false&allowMultiQueries=true&autoReconnect=true&serverTimezone=Asia/Shanghai
        username: root #用户
        password: 123456 #密码
      read:
        type: com.alibaba.druid.pool.DruidDataSource #连接池管理工具
        driver-class-name: com.mysql.cj.jdbc.Driver #数据库驱动
        #数据库url
        url: jdbc:mysql://127.0.0.1:3306/shardingdatabase?characterEncoding=utf-8&useSSL=false&allowMultiQueries=true&autoReconnect=true&serverTimezone=Asia/Shanghai
        username: root #用户
        password: 123456 #密码
上面的代码部分是属于shardingsphere的数据源配置
spring.shardingsphere.datasource.names=master,read,master和read是属于数据源名称,因为是多数据源,所以数据源需要进行自定义名称,不能在和spring.datasource一样直接定义,在这两个数据源中,默认数据源是master,在底层代码中也是master,如果在之后进行mybatis,jdbc,jpa等数据库操作时没有进行数据源切换,使用的数据源默认是master
注意:如果spring.shardingsphere.datasource.names=master,read,但是在底下的数据源配置中,少了read的数据源配置,在启动时会报数据源缺失的错,如果多了一个数据源,则不会影响正常启动,但是多出来的数据源并不会注册到多数据源管理下
在写数据源时,可以使用和spring.datasource一样的写法,如spring.datasource.druid,或者切换数据源管理池,都可以实现
2.2 dynamic数据源配置
在配置shardingsphere数据源后,dynamic可以通过java代码进行配置,也可以通过配置文件重新配置一遍,但是我这里用的是java代码配置,配置文件相当于重写一份shardingsphere的数据源,具体需要的可以看别的资料
import com.baomidou.dynamic.datasource.DynamicRoutingDataSource;
import com.baomidou.dynamic.datasource.provider.AbstractDataSourceProvider;
import com.baomidou.dynamic.datasource.provider.DynamicDataSourceProvider;
import com.baomidou.dynamic.datasource.spring.boot.autoconfigure.DynamicDataSourceAutoConfiguration;
import com.baomidou.dynamic.datasource.spring.boot.autoconfigure.DynamicDataSourceProperties;
import org.apache.commons.lang3.StringUtils;
import org.springframework.beans.factory.annotation.Autowired;
import org.springframework.beans.factory.annotation.Value;
import org.springframework.boot.SpringBootConfiguration;
import org.springframework.boot.autoconfigure.AutoConfigureBefore;
import org.springframework.context.annotation.Bean;
import org.springframework.context.annotation.Configuration;
import org.springframework.context.annotation.Lazy;
import org.springframework.context.annotation.Primary;

import javax.annotation.Resource;
import javax.sql.DataSource;
import java.util.Arrays;
import java.util.HashMap;
import java.util.Map;

@Configuration
@AutoConfigureBefore({DynamicDataSourceAutoConfiguration.class, SpringBootConfiguration.class})
public class MyDataSourceConfiguration {

    /**
     * mybatisplus动态数据源配置项
     */
    @Autowired
    private DynamicDataSourceProperties properties;

    /**
     * shardingjdbc数据源
     */
    @Lazy
    @Resource(name = "shardingSphereDataSource")
    private DataSource shardingSphereDataSource;

    @Value("${spring.sharding-sphere.datasource.names}")
    private String shardingDataSourceNames;

    /**
     * 注册动态数据源  这里非常关键,因为我们需要用到@DS注解配置动态选择数据源,同上又要让选择的数据源使用shardingjdbc的数据源
     * 所以,这里需要动态的把所有的数据源都注册为  shardingjdbc的数据源
     */
    @Bean
    public DynamicDataSourceProvider dynamicDataSourceProvider() {
        if (StringUtils.isBlank(shardingDataSourceNames)) {
            throw new RuntimeException("配置 spring.sharding-sphere.datasource.names 不能为空");
        }
        String[] names = shardingDataSourceNames.split(",");
        return new AbstractDataSourceProvider() {
            @Override
            public Map<String, DataSource> loadDataSources() {
                Map<String, DataSource> dataSourceMap = new HashMap<>();
                Arrays.stream(names).forEach(name -> dataSourceMap.put(name, shardingSphereDataSource));
                return dataSourceMap;
            }
        };
    }

    /**
     * 将动态数据源设置为首选数据源
     */
    @Primary
    @Bean
    public DataSource dataSource(DynamicDataSourceProvider dynamicDataSourceProvider) {
        DynamicRoutingDataSource dataSource = new DynamicRoutingDataSource();
        dataSource.setPrimary(properties.getPrimary()); //默认是master,所以多数据源在不进行数据源切换时默认使用的都是master
        dataSource.setStrict(properties.getStrict());
        dataSource.setStrategy(properties.getStrategy());
        dataSource.setProvider(dynamicDataSourceProvider);
        dataSource.setP6spy(properties.getP6spy());
        dataSource.setSeata(properties.getSeata());
        return dataSource;
    }
}
2.3 application-sharding.yml配置文件
spring:
  shardingsphere:
    datasource:
      names: master,write,read
      master:
        type: com.alibaba.druid.pool.DruidDataSource
        driver-class-name: com.mysql.cj.jdbc.Driver
        url: jdbc:mysql://127.0.0.1:3306/arm?characterEncoding=utf-8&useSSL=false&allowMultiQueries=true&autoReconnect=true&serverTimezone=Asia/Shanghai
        username: root
        password: roottest
      write:
        type: com.alibaba.druid.pool.DruidDataSource
        driver-class-name: com.mysql.cj.jdbc.Driver
        url: jdbc:mysql://127.0.0.1:3306/arm?characterEncoding=utf-8&useSSL=false&allowMultiQueries=true&autoReconnect=true&serverTimezone=Asia/Shanghai
        username: root
        password: roottest
      read:
        type: com.alibaba.druid.pool.DruidDataSource
        driver-class-name: com.mysql.cj.jdbc.Driver
        url: jdbc:mysql://127.0.0.1:3306/arm?characterEncoding=utf-8&useSSL=false&allowMultiQueries=true&autoReconnect=true&serverTimezone=Asia/Shanghai
        username: root
        password: roottest
    rules:
      sharding:
        tables:
          r_config_directory:
            ## 这里的customer-ds是下面配置的读写分离的数据源名称
            actual-data-nodes: customer-ds.r_config_directory_${1..10}
            table-strategy:
              standard:
                sharding-column: id
                sharding-algorithm-name: r-config-directory-id # 对应下面的sharding-algorithms
        sharding-algorithms:
          ## 注意这里名称(例如msg-id)不能用下划线,会加载不了下面的参数导致启动报错
          r-config-directory-id:
            type: INLINE
            props:
              ## 使用id取模算法
              algorithm-expression: r_config_directory_${id}
      ## 读写分离相关
      readwrite-splitting:
        data-sources:
          customer-ds:
            load-balancer-name: customer-lb
            static-strategy:
              write-data-source-name: master
              read-data-source-names: read,read2,write
        load-balancers:
          customer-lb:
            ## 使用自定义的复杂均衡算法
            type: CUSTOM
    props:
      #      system-log-level: INFO
      max-connections-size-per-query: 1
      kernel-executor-size: 16  # Infinite by default.
      proxy-frontend-flush-threshold: 128  # The default value is 128.
      # sql-show is the same as props in logger ShardingSphere-SQL, and its priority is lower than logging rule
      sql-show: false
      check-table-metadata-enabled: false
      # Proxy backend query fetch size. A larger value may increase the memory usage of ShardingSphere Proxy.
      # The default value is -1, which means set the minimum value for different JDBC drivers.
      proxy-backend-query-fetch-size: 1024 #影响批量插入的效率,越大越好
      proxy-frontend-executor-size: 32 # Proxy frontend executor size. The default value is 0, which means let Netty decide.本机16核
      proxy-frontend-max-connections: 0 # Less than or equal to 0 means no limitation.
      proxy-default-port: 3307 # Proxy default port.
      proxy-netty-backlog: 1024 # Proxy netty backlog.
      cdc-server-port: 33071 # CDC server port
      proxy-frontend-ssl-enabled: false
      proxy-frontend-ssl-cipher: ''
      proxy-frontend-ssl-version: TLSv1.2,TLSv1.3
2.3.1分表配置
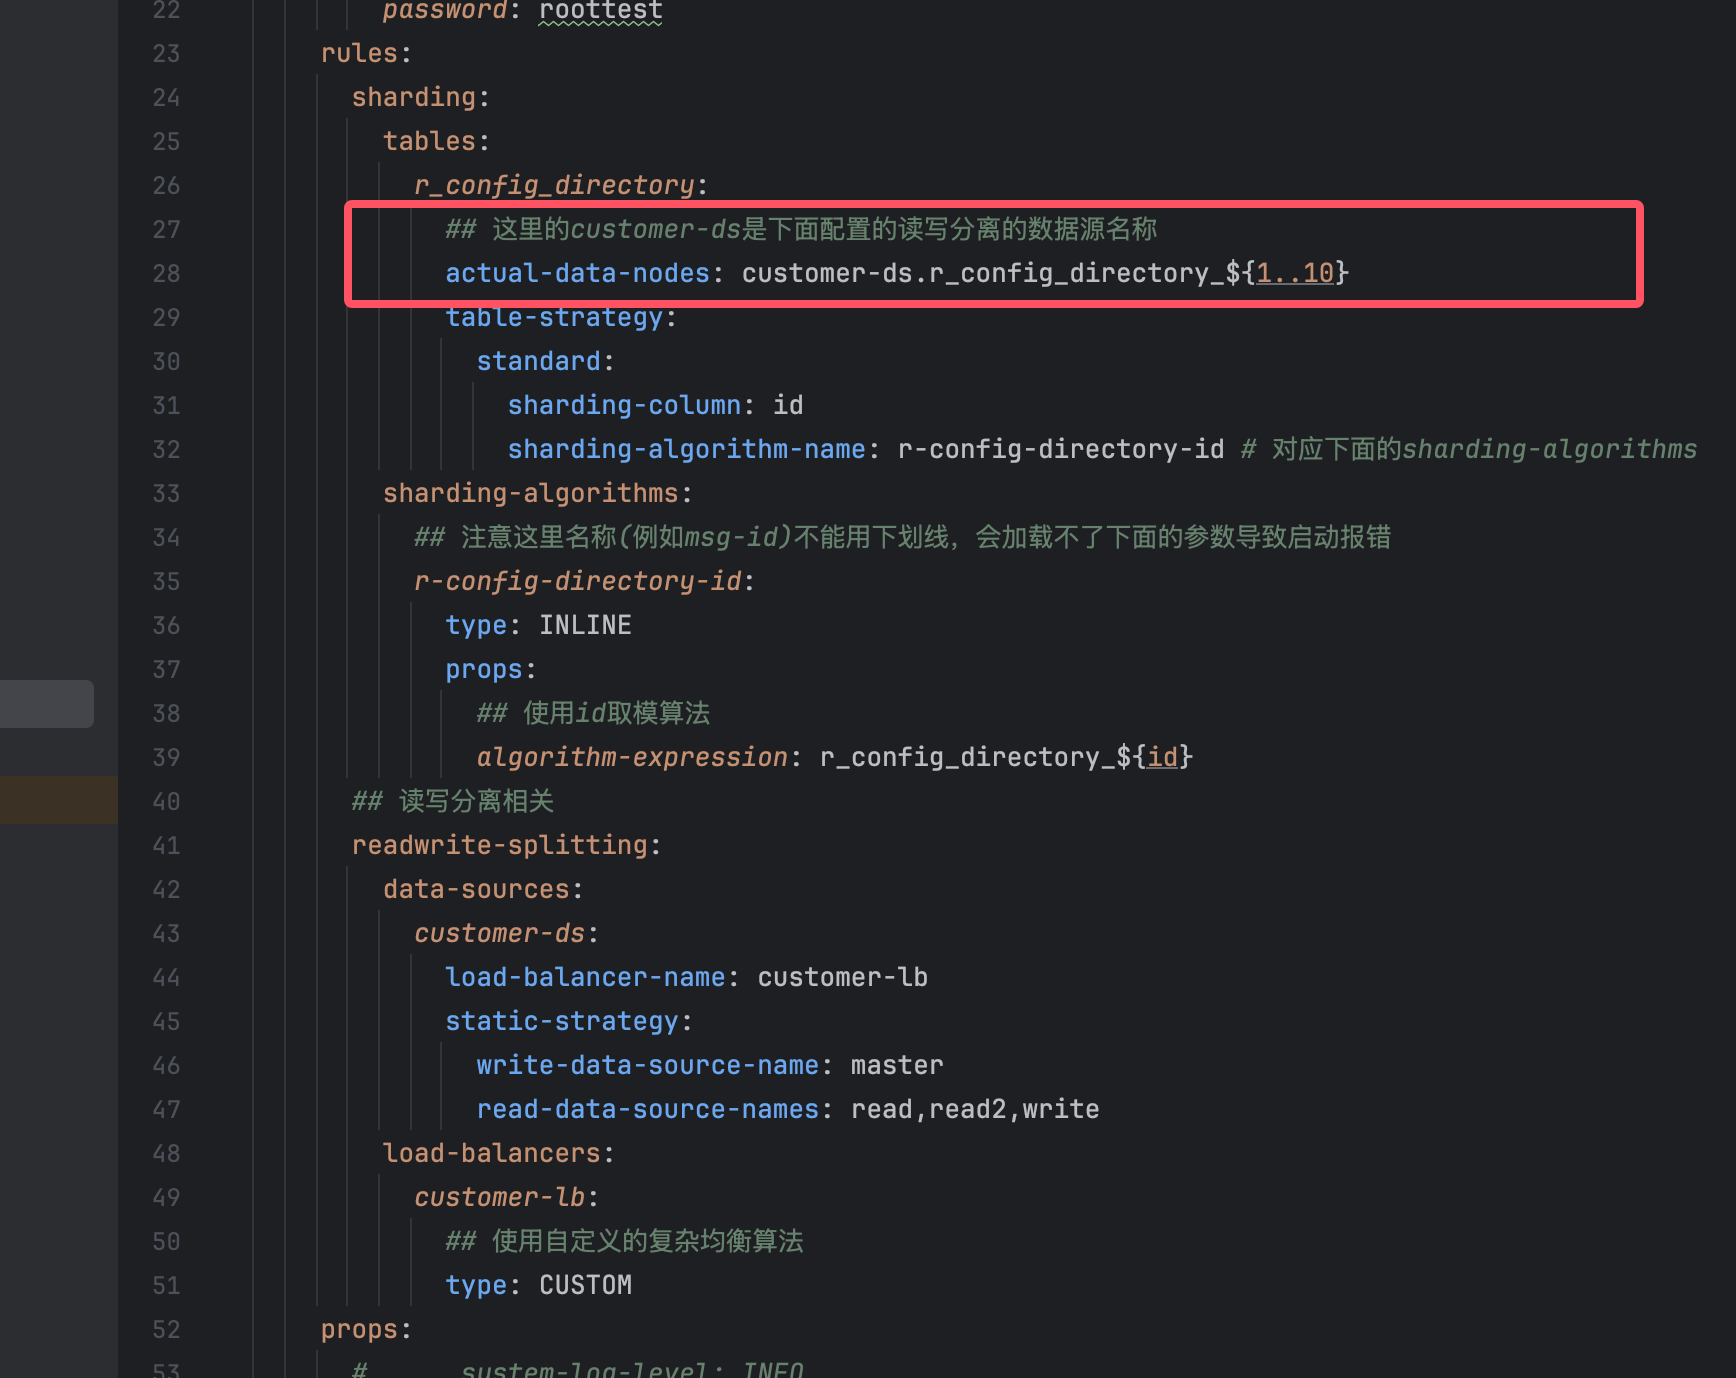
在rules.table下可以配置多个分表,在使用分表时,如截图中,r_config_directory属于是主表,在mybatis中调用时,会根据其配置的分表策略使用
如actucal-data-nodes底下,customer-ds属于shardingsphere中读写分离配置的自定义名称,这部分可以写死掉,不会影响太多
全部代码是r_config_directory_${1..10}属于是分表,意思是在数据库中有着10张表,分别是r_config_directory_1,r_config_directory_2,r_config_directory_3,r_config_directory_4,r_config_directory_5,r_config_directory_6,r_config_directory_7,r_config_directory_8,r_config_directory_9,r_config_directory_10四张表的配置,如果配1..15,就相当于配置了1-15的表
2.3.2 分表策略配置
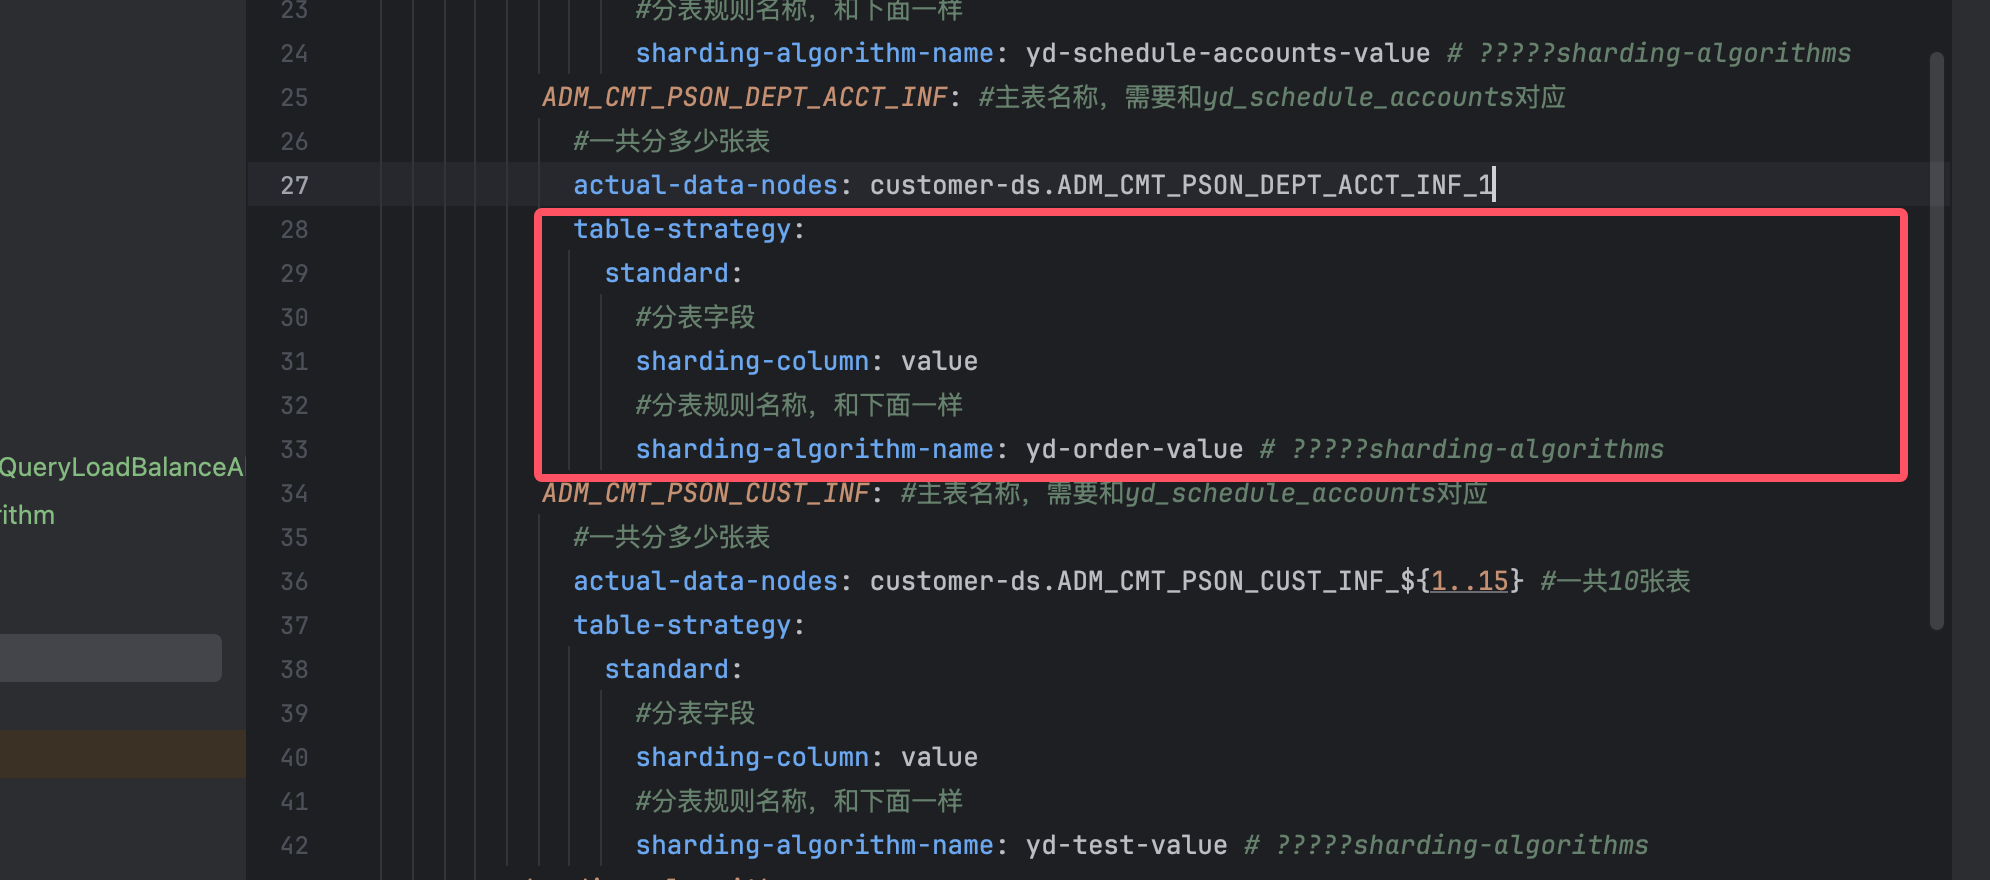
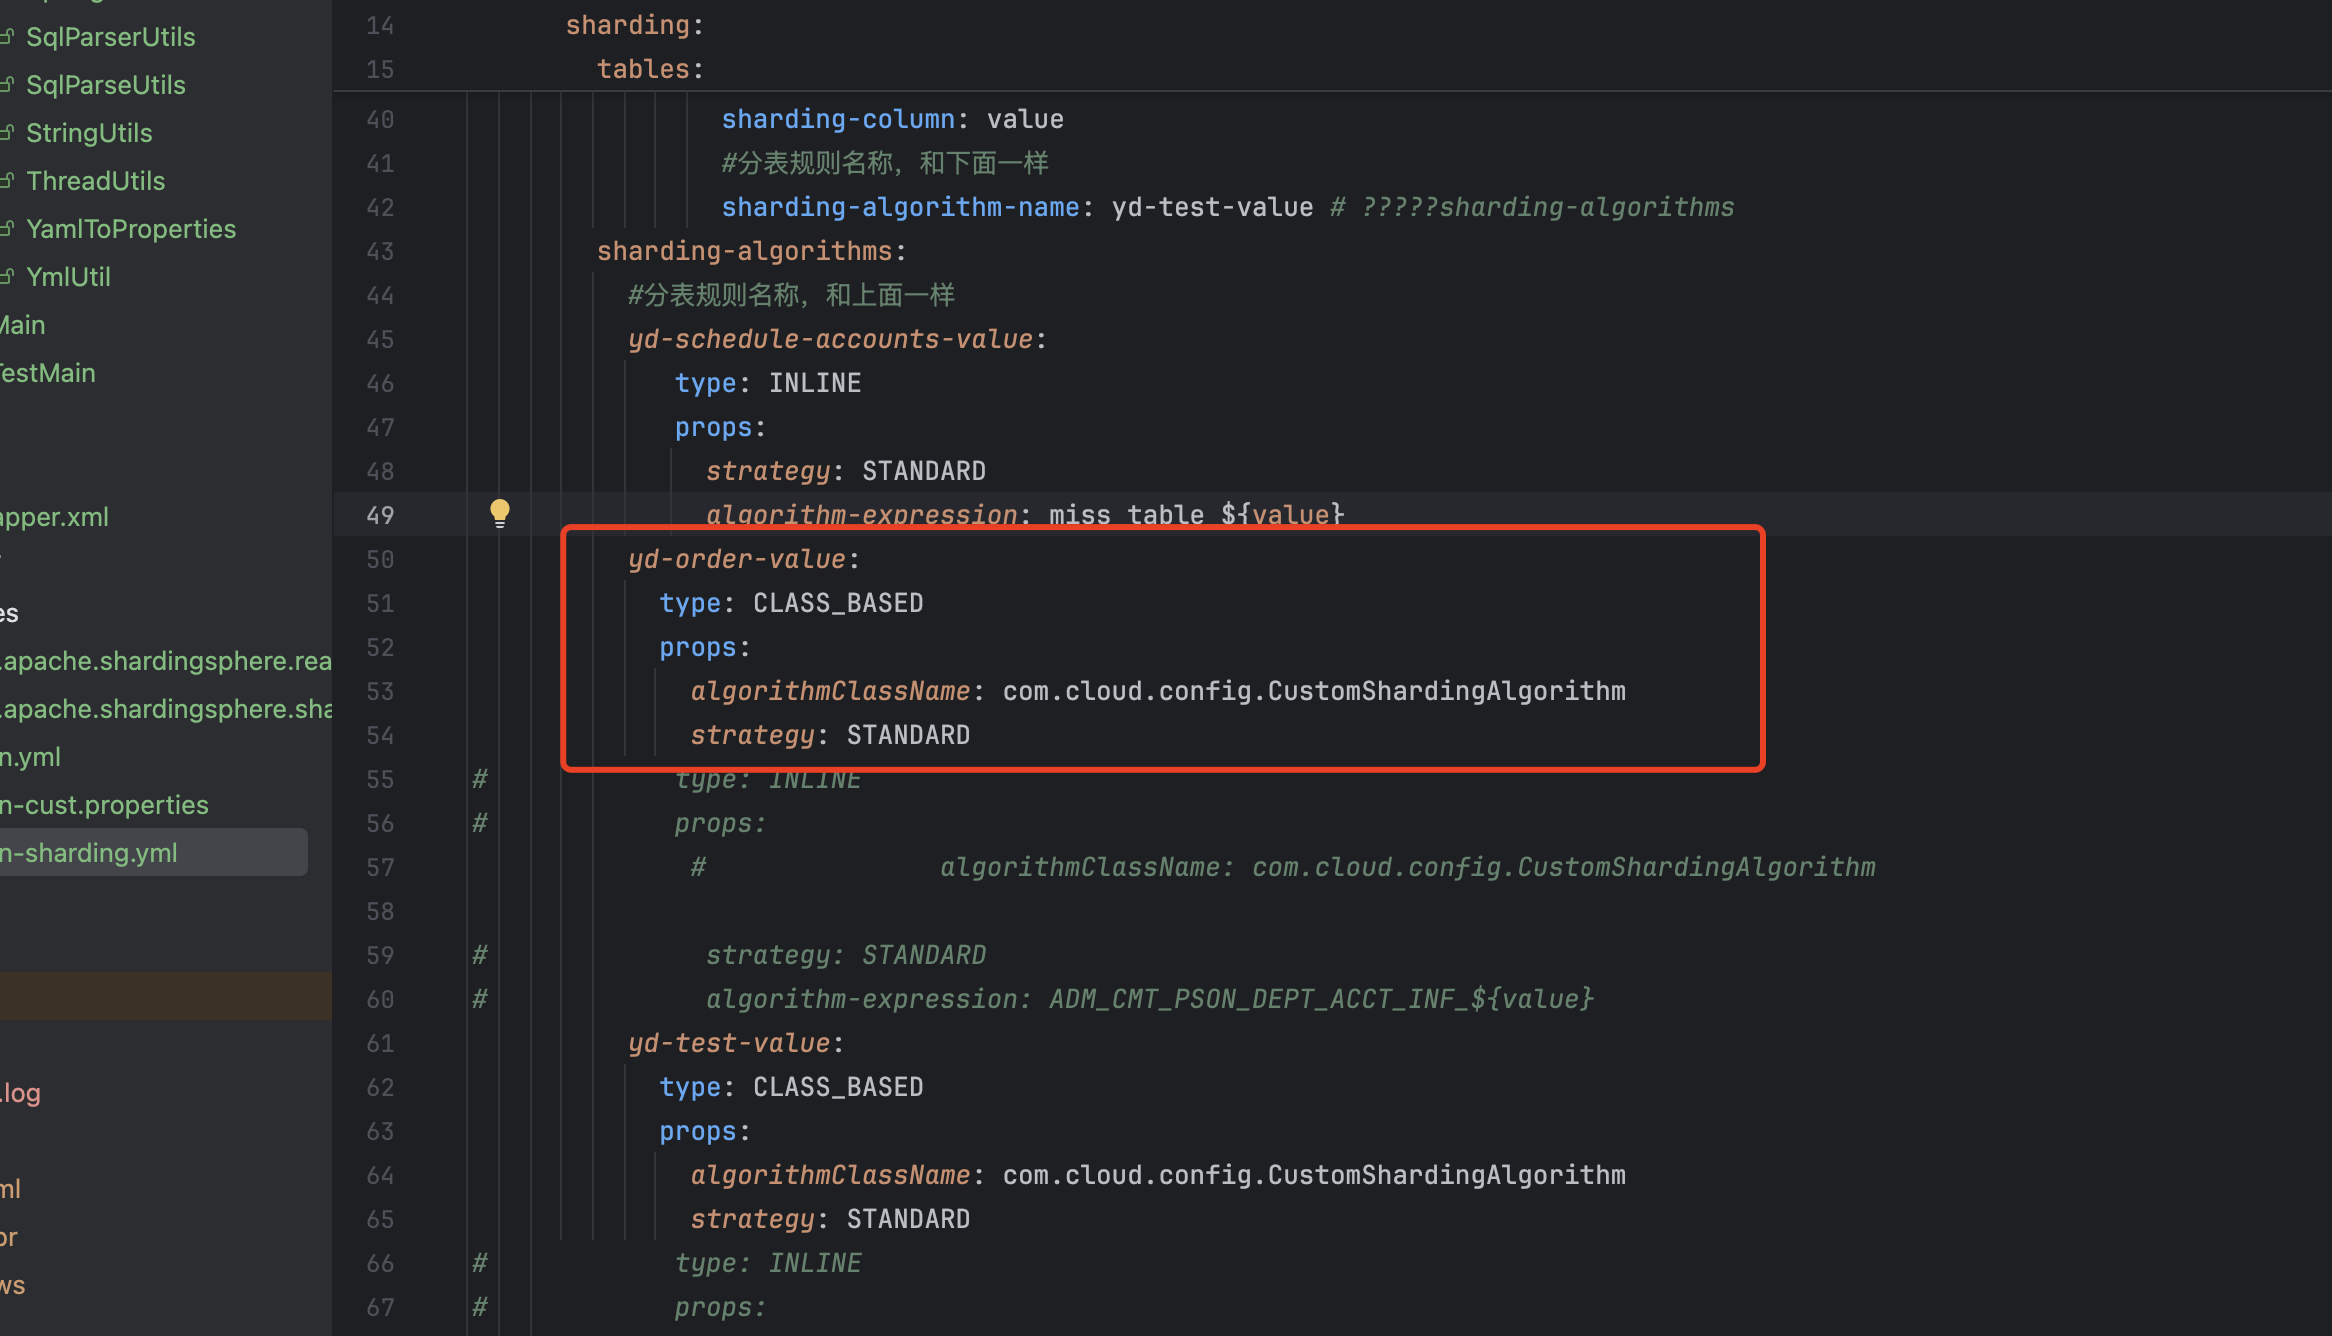
sharding-column是定义表中哪个字段为分片键,截图中是value,那么在底下使用shardingsphere的时候就会将value设置会分片键
sharding-algorithm-name: yd-order-value是定义该表的分片策略的名称,分片策略名称不能出现下划线_,目前最新的shardingsphere版本不支持_进行分片策略的命名
分片策略分为两种,第一是配置文件中进行分片策略的定义,这种只能出现单纯/ * - + %这种形式的,属于精准分片策略,还有一种是通过代码来实现的自定义分片策略
2.3.2.1配置文件分片策略
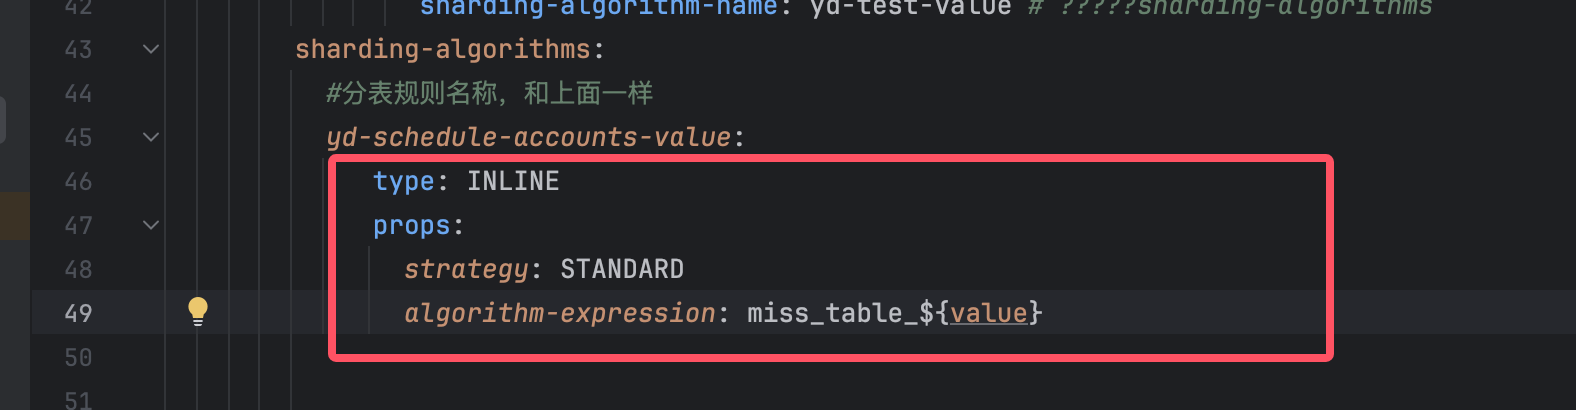
type: INLINE是一般来说正常使用的,这个一般配置文件都会使用,这个不需要动
strategy:STANDARD也是一样
这两项配置如果配置文件去指定表一般是不需要进行改动的
algorithm-expression:miss_table_${value}
value就是我们的之前设置的分片键
比如我们现在引入shardingsphere后,我们现在对该主表设置了分表且设置了该分片策略
我们在执行sql时,如select * from miss_table where value = 1
那么在进入执行层时,shardingsphere就会将该sql处理为select * from miss_table_1 where value = 1
如果在执行sql时没有对该分片键进行赋值,如select * from miss_table
shardingsphere识别不到,那么在进入到执行层时,shardindsphere会对该主表下的所有表全部查询一遍
比如该主表下分了15张主表,那么就会对15张主表全部查询一遍,然后再将查询出的数据的结果集一起返回回来
注:配置文件范围分片
配置文件也可以做范围分片,但是不推荐
2.3.2.2自定义分片规则
部分配置文件在进行配置分片规则时,shardingsphere可能识别不到
也或者分片规则较为繁琐,通过配置文件的方式无法实现分表功能
需要通过代码去实现分片规则
配置文件中的写法,全限定类名,该类需要注册spi
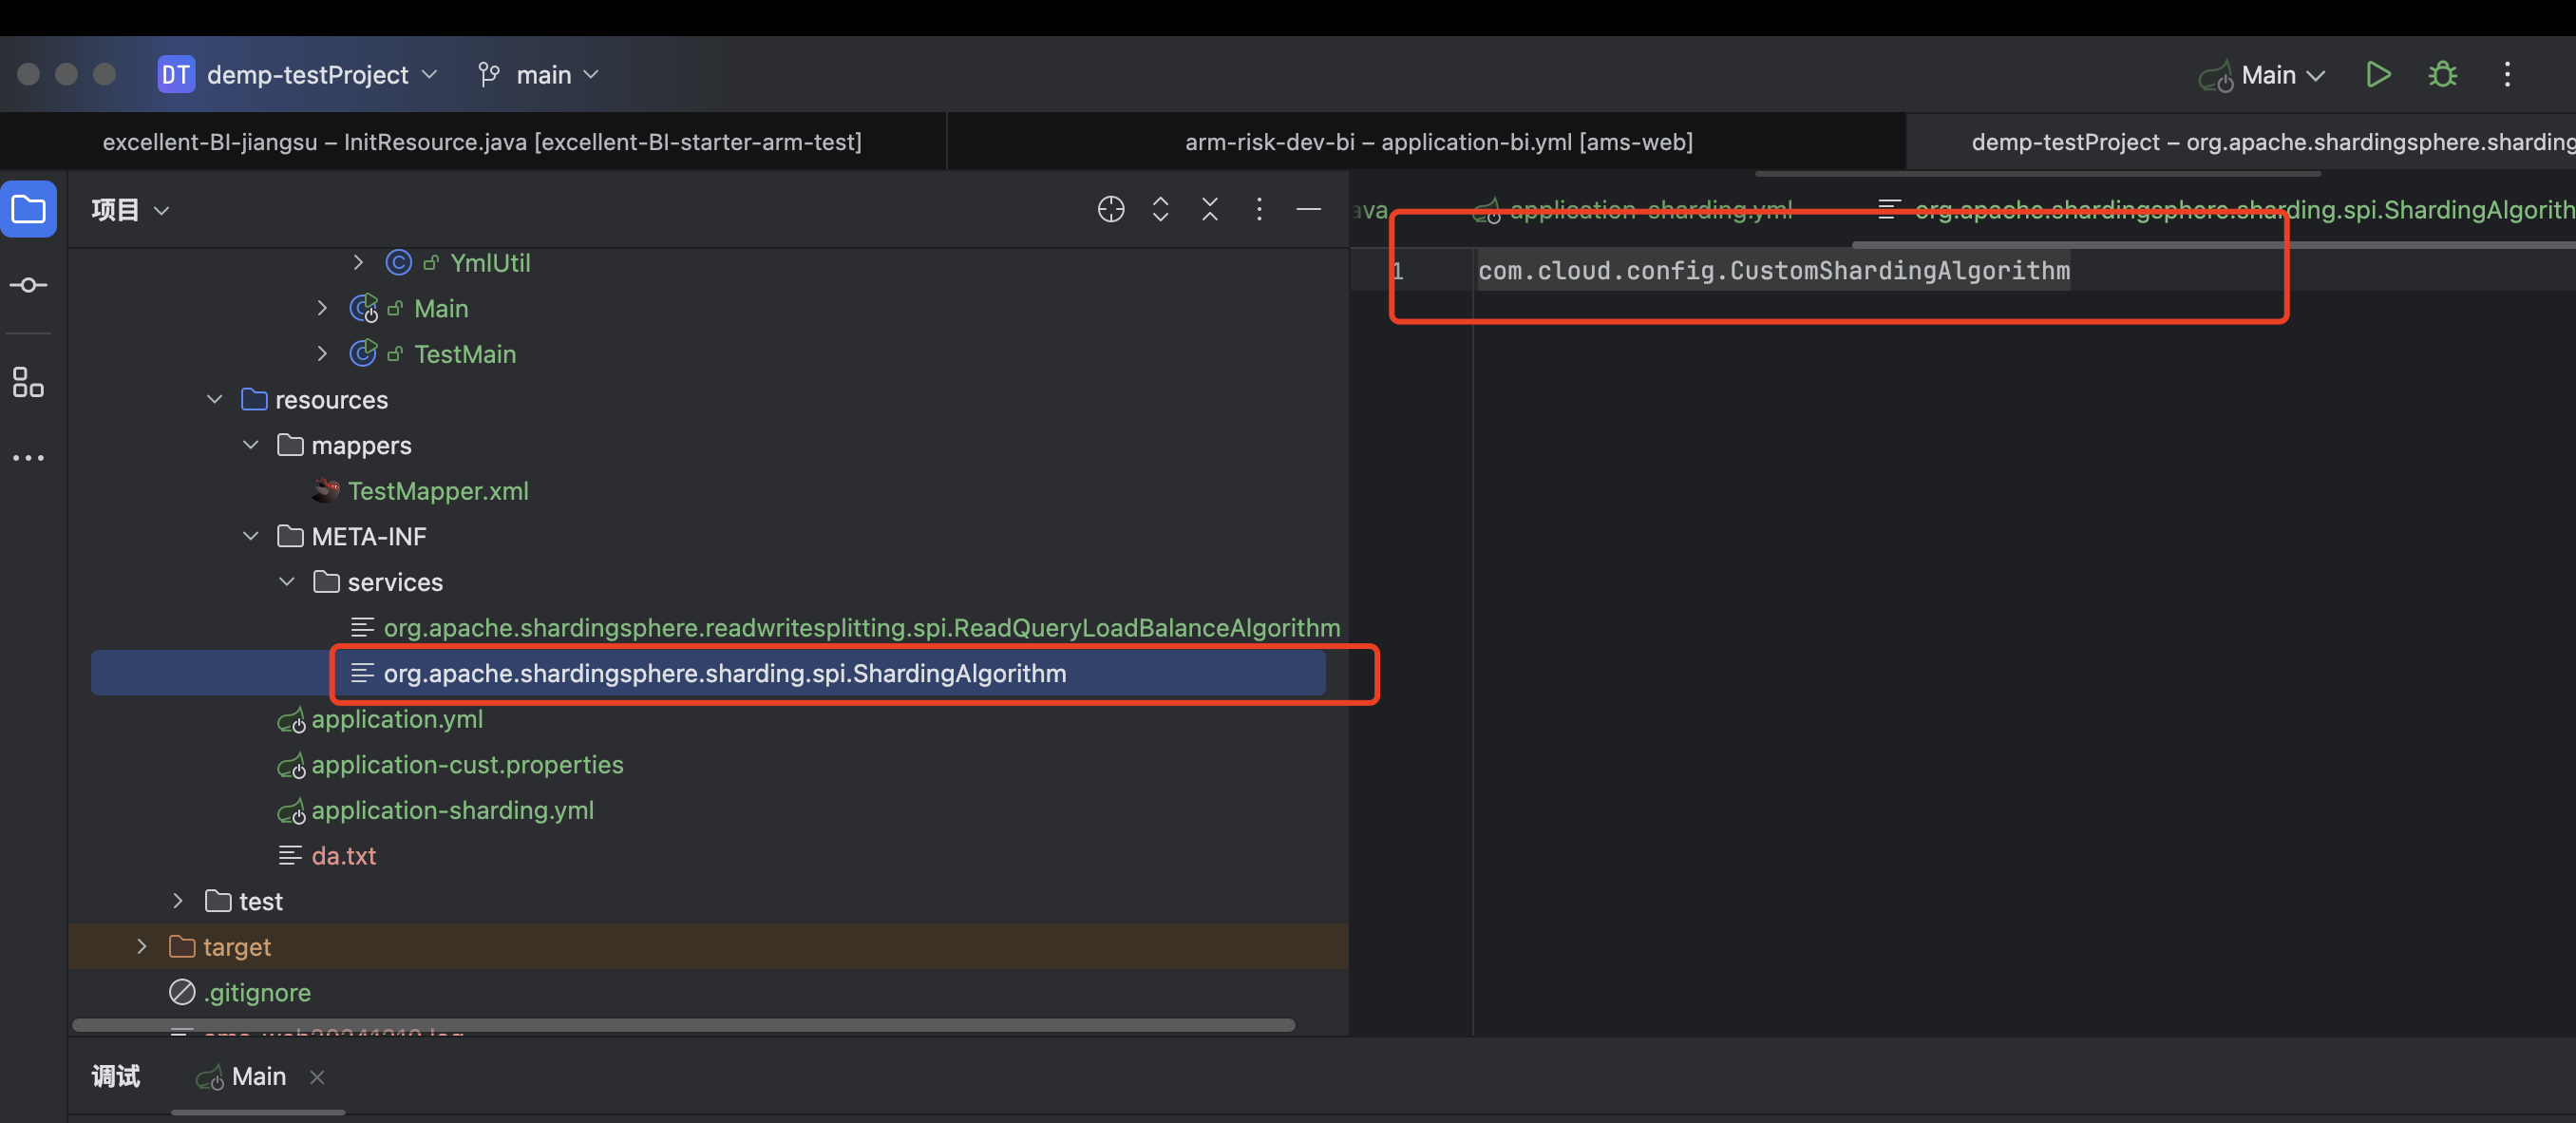
spi的写法
全限定类中,需要将该类注册到spring中以及该类需要实现org.apache.shardingsphere.sharding.api.sharding.standard.StandardShardingAlgorithm类
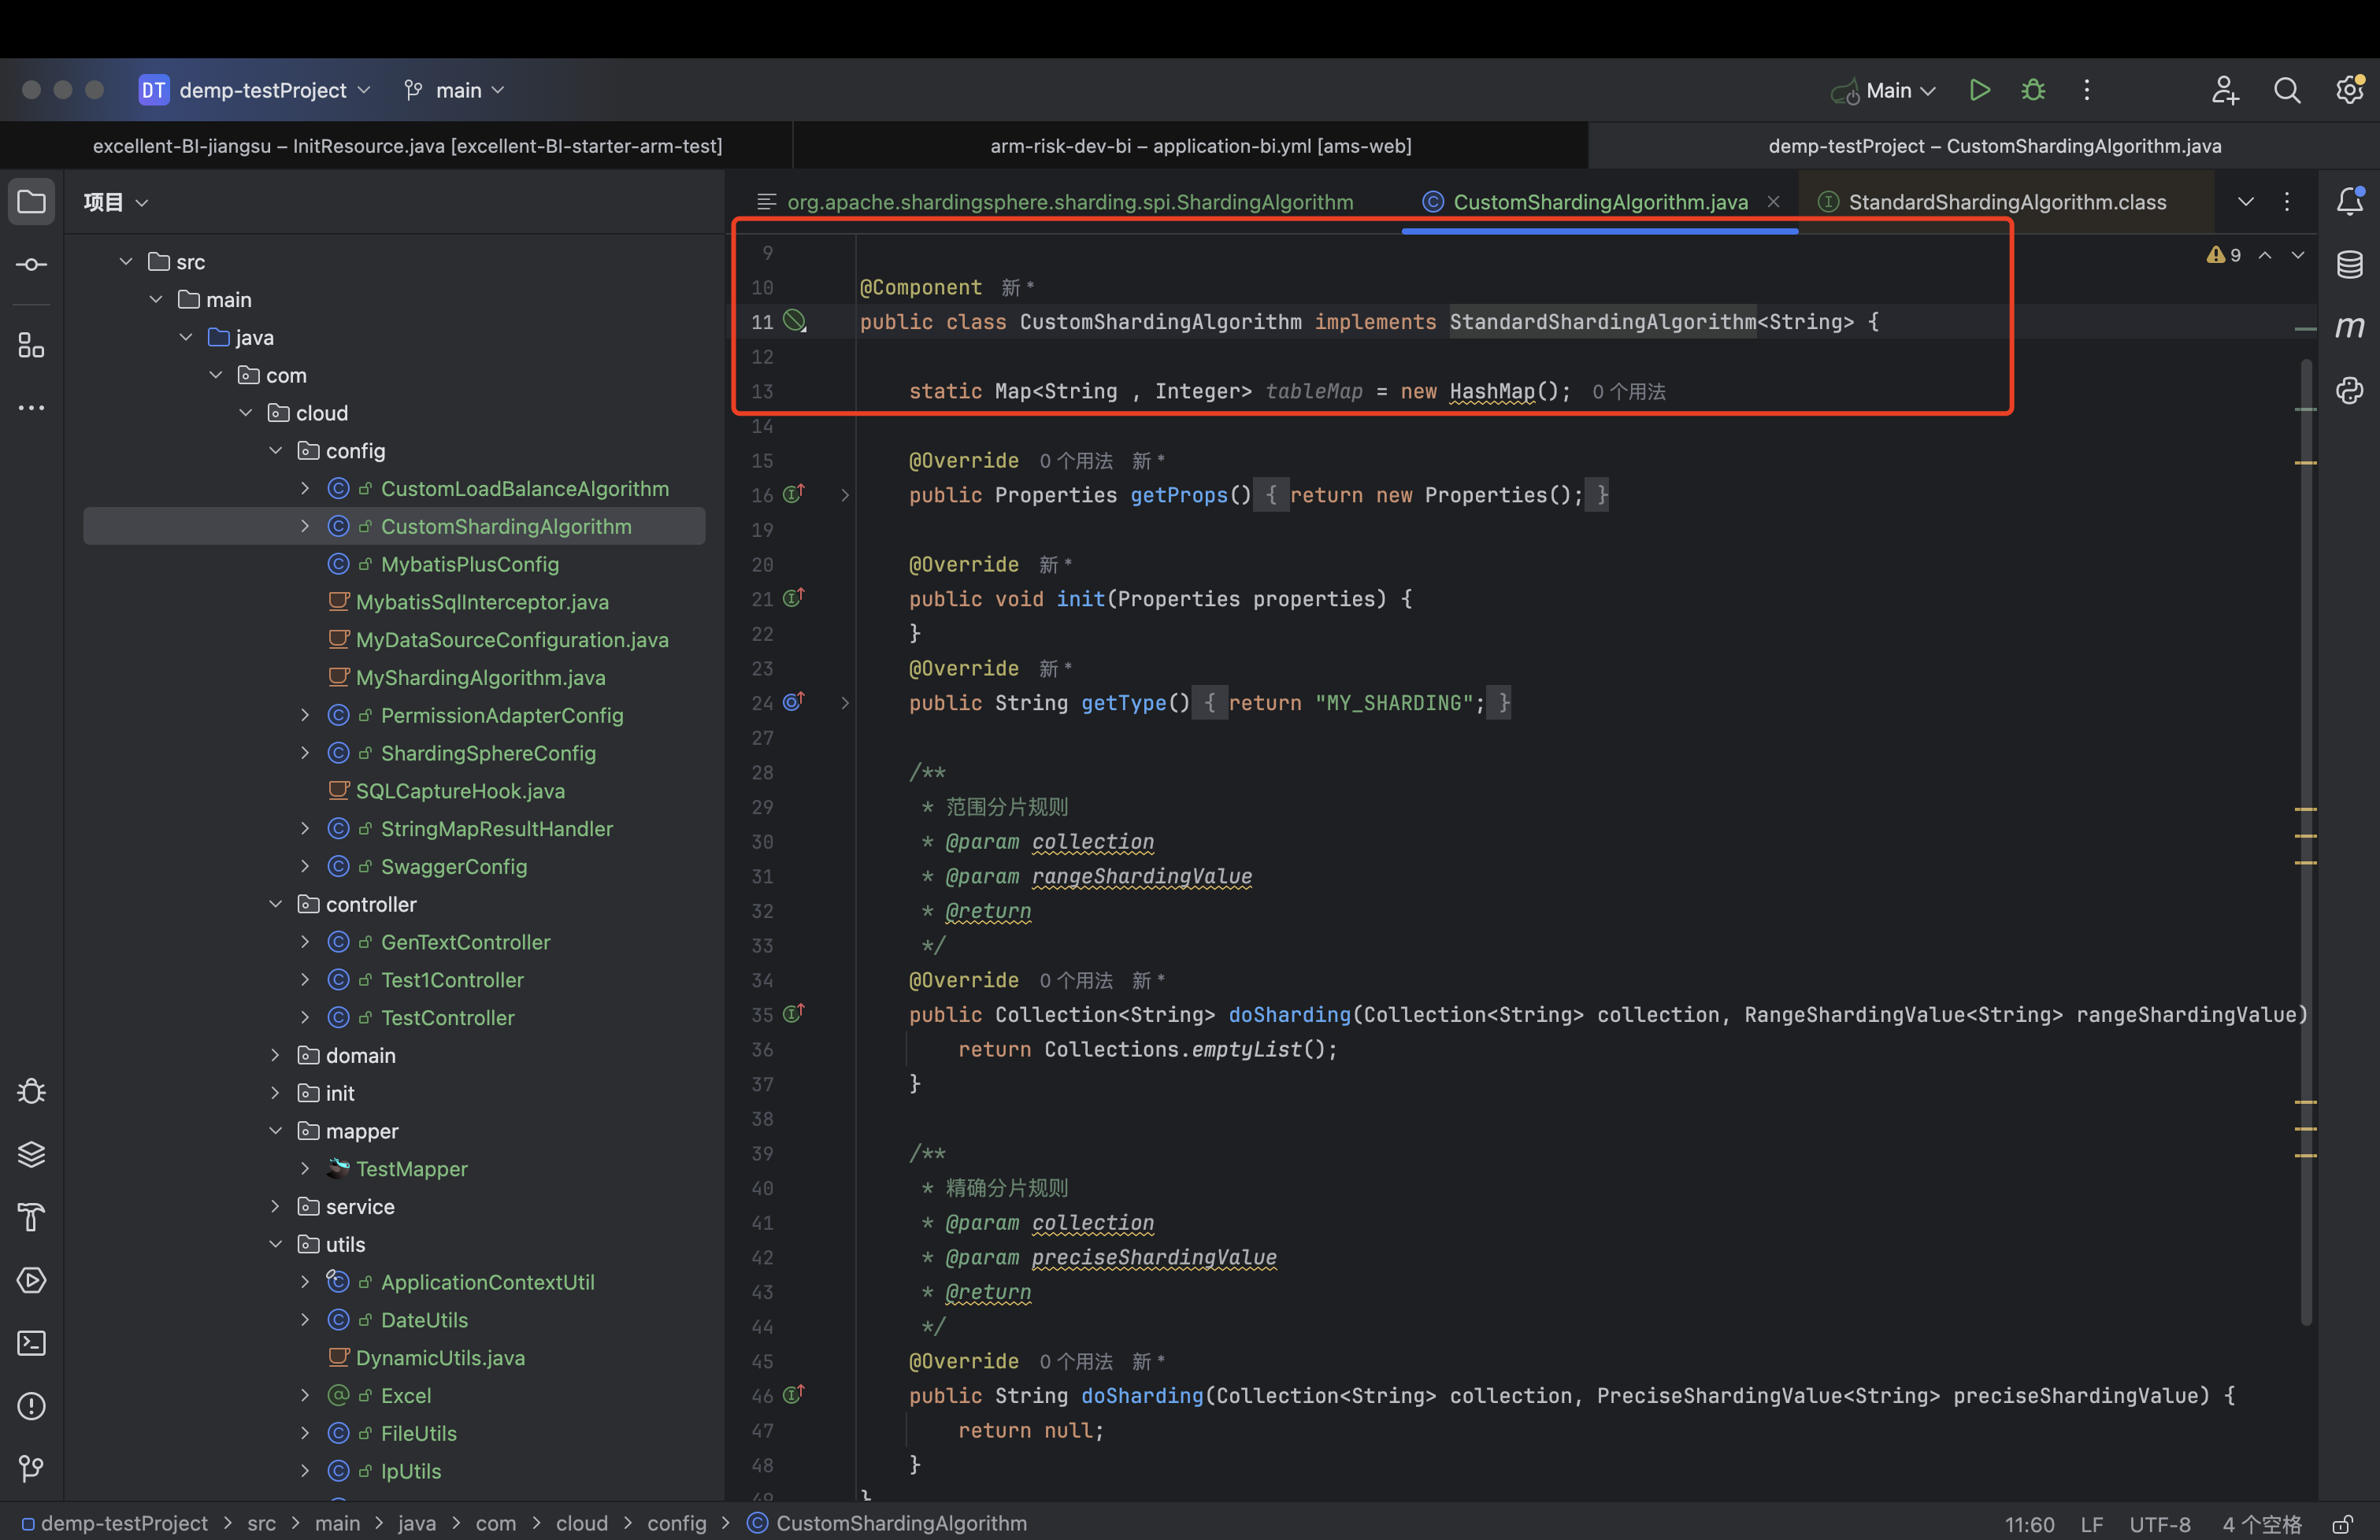
实现后,重写两个doSharding方法
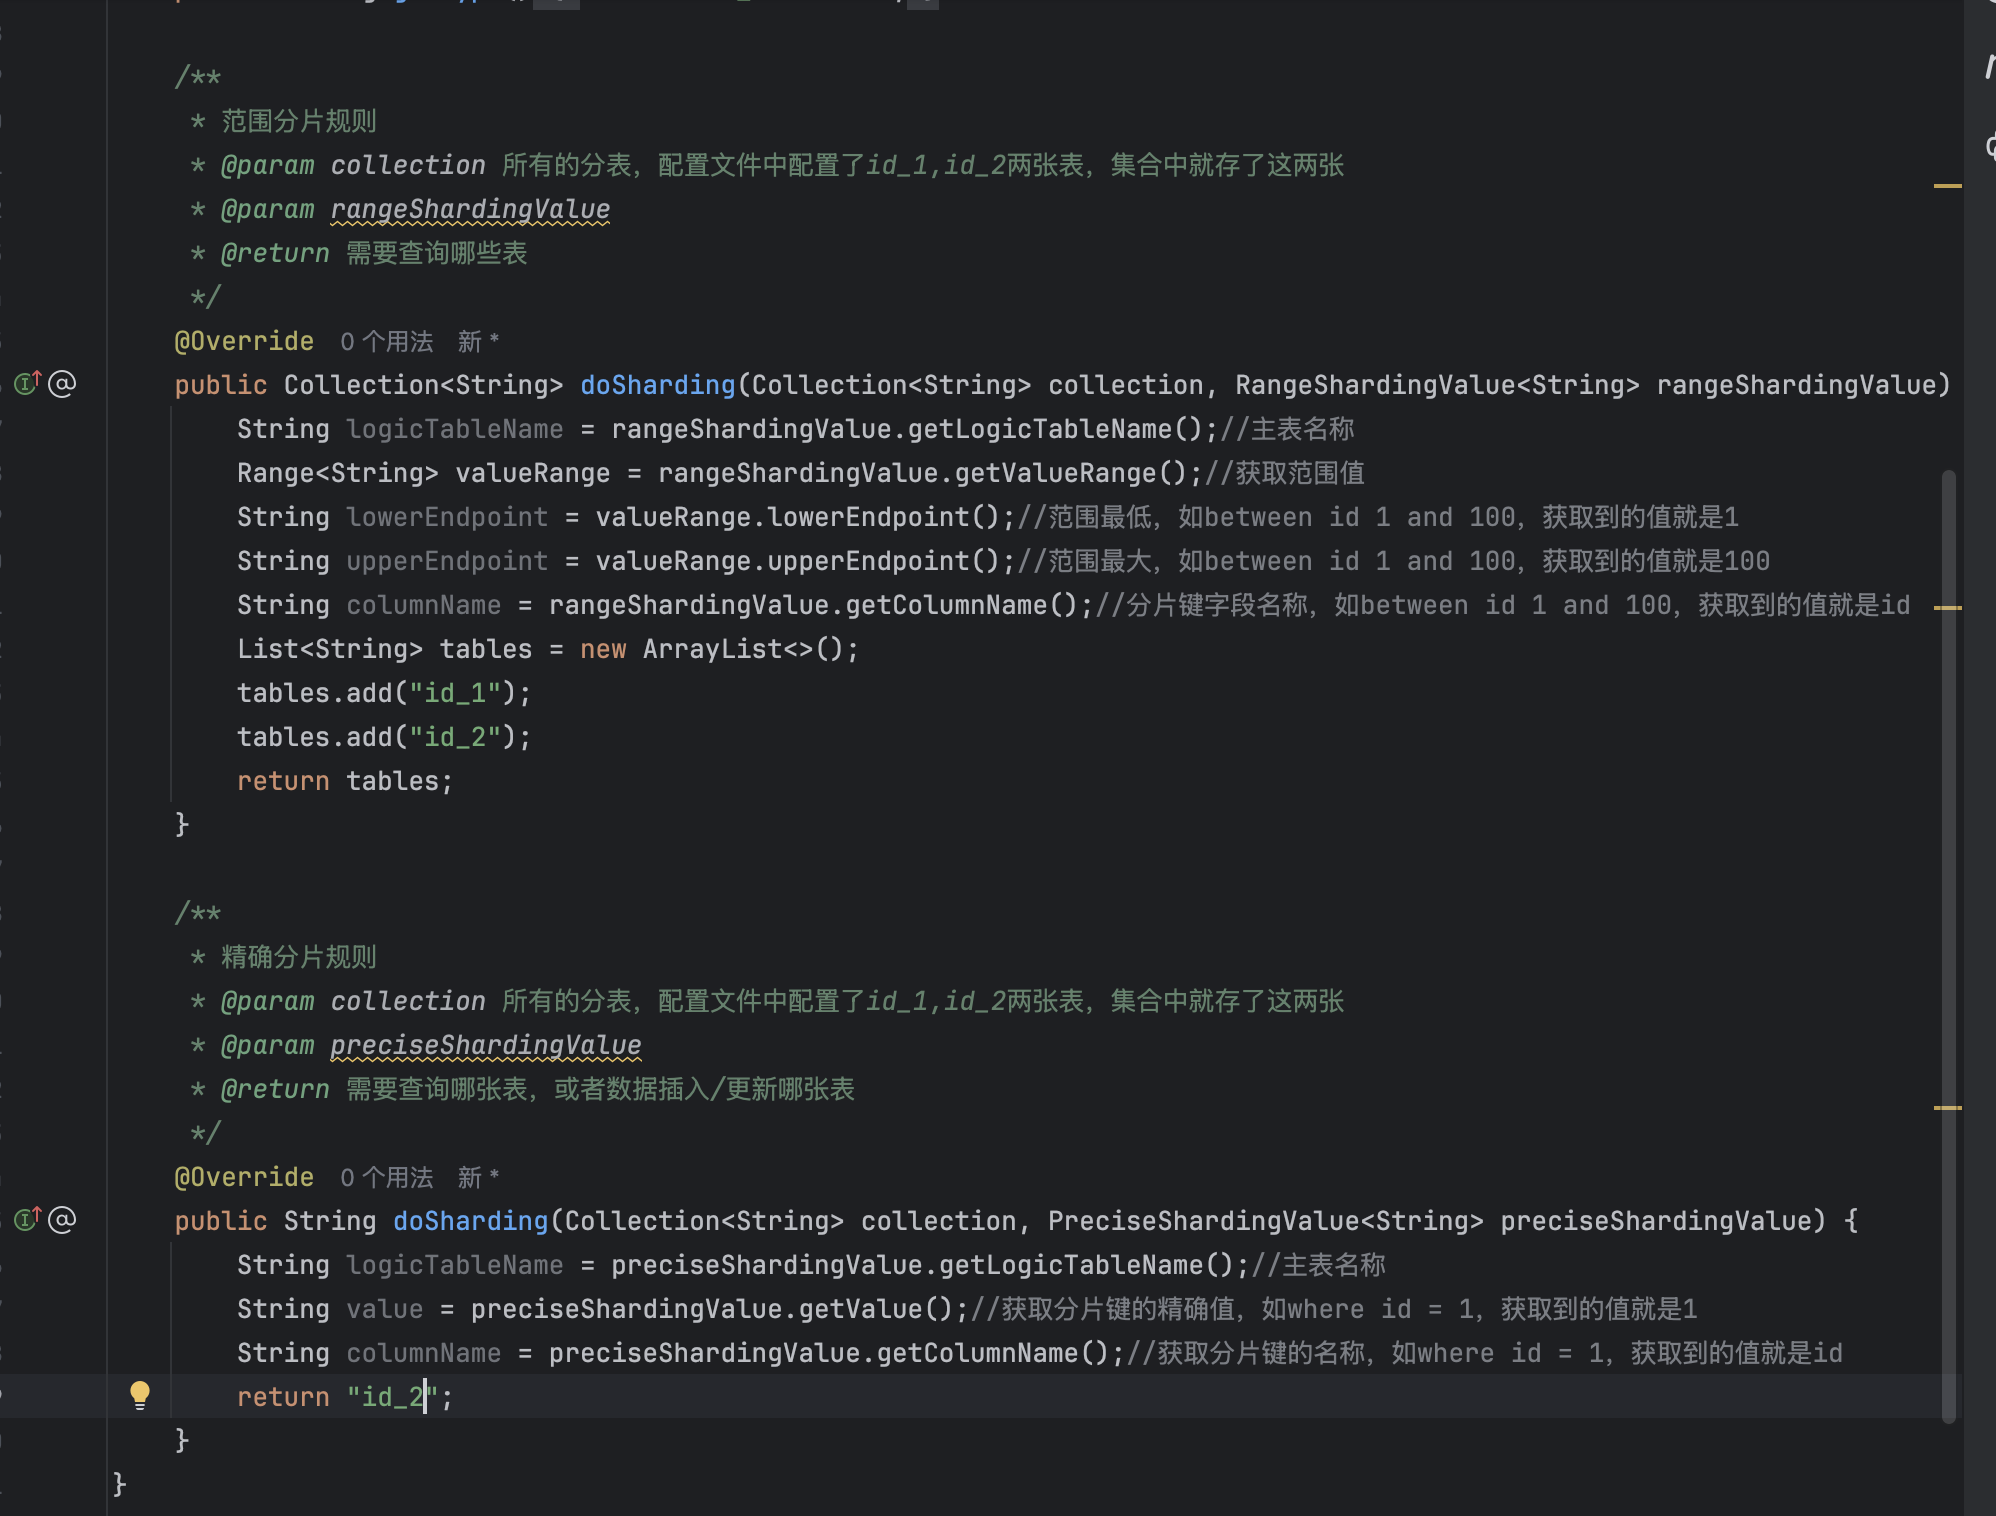
在进行shardingsphere分表时
如sql是
select * from table where id between 1 and 2 时,是范围分片,则会触发第一个返回值是
Collection<String>的方法,会,返回的数组需要每一个页面都是表名,如table_1,table2
如sql是
select * from table where id = 2时,是精确分片,则会触发第二个返回值是String的方法,返回的值需要是单一的表名
自定义类实现类的注释
2.3.3 props配置
props配置是shardingsphere组件的优化项
如,sql.show,在使用shardingsphere执行sql后,会将该sql打印在控制台上
sql.simple在使用sql打印后,会将简易sql打印在控制器上,不是整个sql,而是简易版的
每一个shardingsphere的版本都不一样,配置项也不一样,但是由于本身props的配置在shardingsphere不是通过ConfiguartionProperties/Value的方式获取配置项的,所以props所有的配置都被存在了一个类中
org.apache.shardingsphere.infra.config.props.ConfigurationPropertyKey
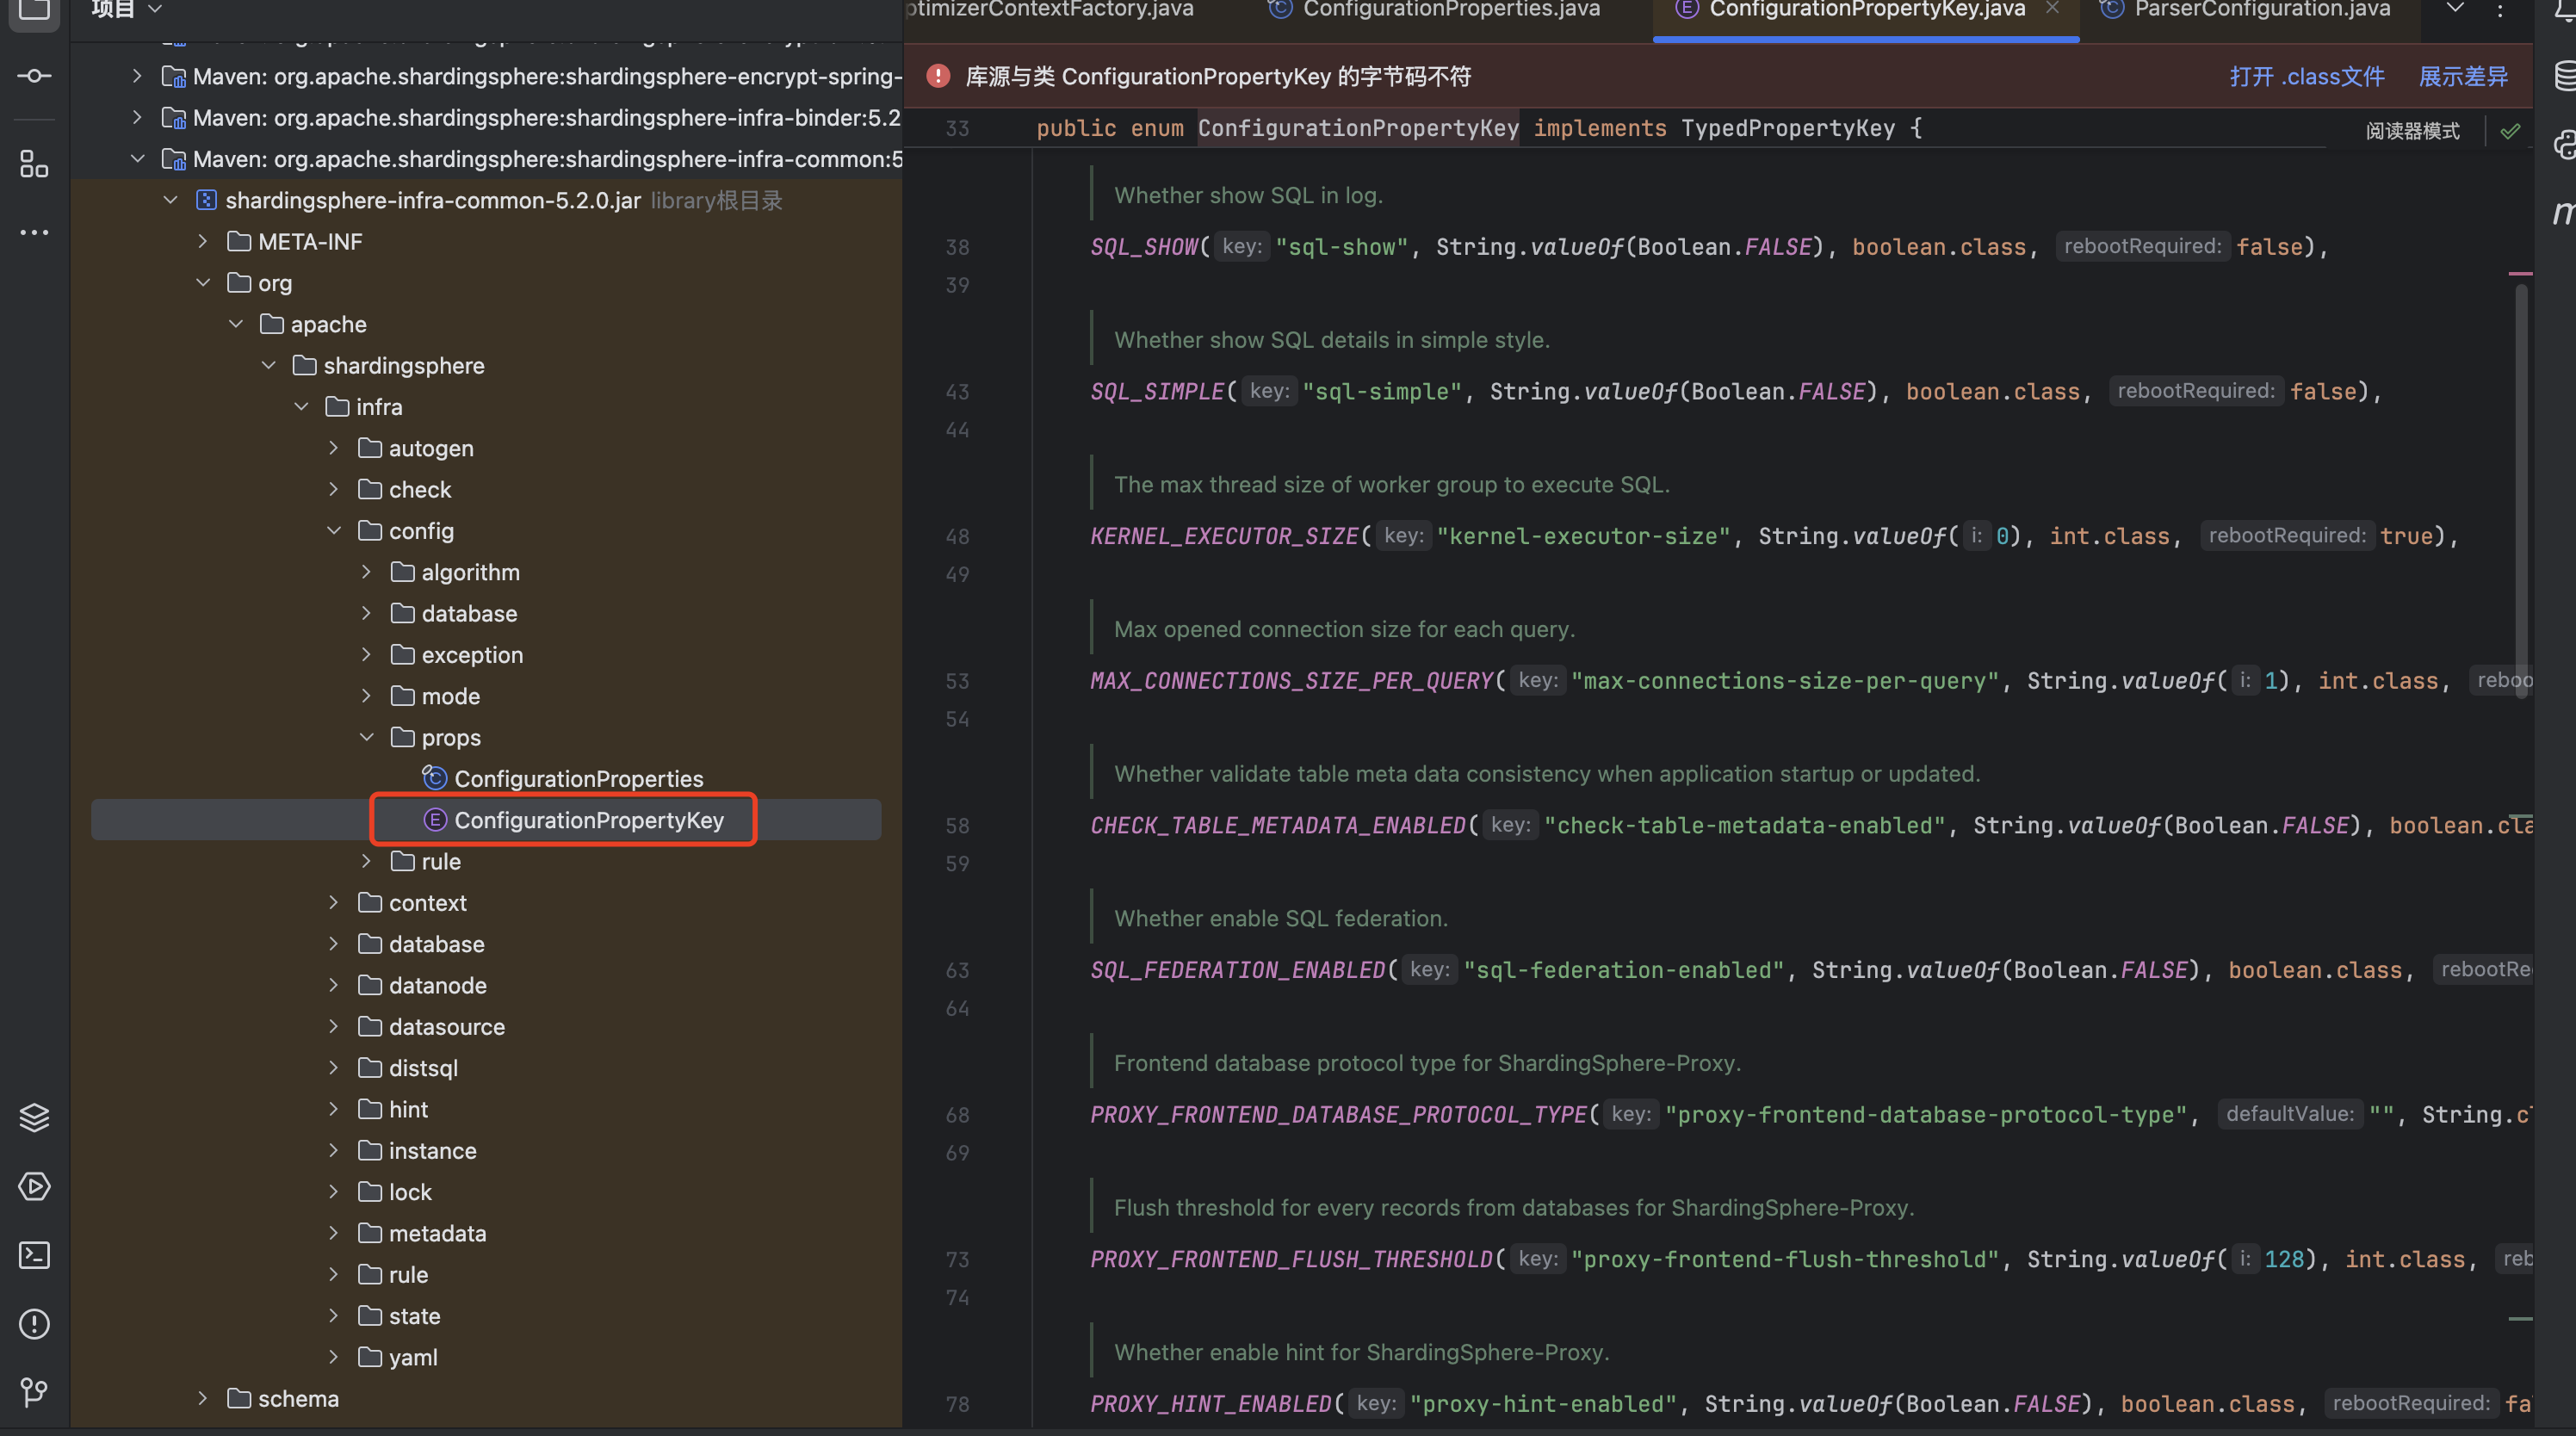
参数名称和对应的类型都有,可以在百度上查询后在写


 2738
2738

 被折叠的 条评论
为什么被折叠?
被折叠的 条评论
为什么被折叠?
 到【灌水乐园】发言


