


这就是个Material Design效果总汇,后面会给demo,代码比较简单,具体的哪个看不懂随便搜下都是,就只简单记录下

首先加引用
compile 'com.android.support:appcompat-v7:24.1.1'
compile 'com.android.support:cardview-v7:24.1.1'
compile 'com.android.support:recyclerview-v7:24.1.1'
compile 'com.android.support:design:24.1.1'
compile 'com.android.support:support-v4:24.1.1'
1.AppTheme
<style name="AppTheme" parent="Theme.AppCompat.Light.NoActionBar">
    <!-- Customize your theme here. -->
    <item name="colorPrimary">@color/colorPrimary</item>
    <item name="colorPrimaryDark">@color/colorPrimaryDark</item>
    <item name="colorAccent">@color/colorAccent</item>
</style>
上面那三个主要来设置标题状态栏颜色
然后要实现那种沉浸式的,就是布局连到最上面的,就是用下面这个
<style name="AppTheme.TranStatusBar">
    <item name="android:windowTranslucentStatus">true</item>
    <item name="android:windowTranslucentNavigation">true</item>
    <item name="android:windowContentOverlay">@null</item>
</style>
在xml布局文件里通过fitsSystemWindows来控制是不是能无视状态栏布局
2,Transition的使用,主要在跳转动画上,两种,一种就是平移/减淡/分裂的方式,效果不怎么地,还没之前的windowEnterAnimation的style方式效果好,不过很简单
一种就是共享元素的转场动画,比较炫,主要就是在A、B两个activity中共享的控件上加android:transitionName="xxx"这句,然后启动跳转的时候用
		Intent intent = new Intent(LoadingActivity.this, HomeActivity.class);
                ActivityOptions option = ActivityOptions
                        .makeSceneTransitionAnimation(LoadingActivity.this, baseView, "xxx");
                startActivity(intent, option.toBundle());
多个共享控件用下面的
Intent intent = new Intent(LoadingActivity.this, HomeActivity.class);ActivityOptions option = ActivityOptions.makeSceneTransitionAnimation(MainActivityA.this, Pair.create(imageView, "share_image"), Pair.create(button, "share_button"));startActivity(intent, option.toBundle());
3.Toolbar
xml文件中写上
<android.support.v7.widget.Toolbar
    android:id="@+id/toolbar"
    android:layout_width="match_parent"
    android:layout_height="wrap_content"
    android:background="@color/colorPrimary"
    android:transitionName="share_image"
    app:layout_scrollFlags="scroll|enterAlways"
    app:navigationIcon="@mipmap/app_icon"
    app:title="@string/app_name" />
Toolbar toolbar = (Toolbar) findViewById(R.id.toolbar);
setSupportActionBar(toolbar);
4.Toolbar + DrawerLayout+ViewPager
就是新式的抽屉布局+滑动布局 再加上滑动隐藏上部标题
<?xml version="1.0" encoding="utf-8"?>
<android.support.v4.widget.DrawerLayout xmlns:android="http://schemas.android.com/apk/res/android"
    xmlns:app="http://schemas.android.com/apk/res-auto"
    xmlns:tools="http://schemas.android.com/tools"
    android:id="@+id/drawer"
    android:layout_width="match_parent"
    android:layout_height="match_parent"
    android:background="@color/colorPrimaryDark"
    tools:context="com.c2hw.ckitchen.page.HomeActivity">

    <!-- 内容界面 -->
    <LinearLayout
        android:layout_width="match_parent"
        android:layout_height="match_parent"
        android:fitsSystemWindows="true"
        android:orientation="vertical">

        <android.support.design.widget.CoordinatorLayout
            android:layout_width="match_parent"
            android:layout_height="match_parent">


            <android.support.design.widget.AppBarLayout
                android:id="@+id/appbar"
                android:layout_width="match_parent"
                android:layout_height="wrap_content">

                <android.support.v7.widget.Toolbar
                    android:id="@+id/toolbar"
                    android:layout_width="match_parent"
                    android:layout_height="wrap_content"
                    android:background="@color/colorPrimary"
                    android:transitionName="share_image"
                    app:layout_scrollFlags="scroll|enterAlways"
                    app:navigationIcon="@mipmap/app_icon"
                    app:title="@string/app_name" />

                <android.support.design.widget.TabLayout
                    android:id="@+id/tabLayout"
                    android:layout_width="match_parent"
                    android:layout_height="wrap_content"
                    app:tabGravity="fill"
                    app:tabMode="fixed" />

            </android.support.design.widget.AppBarLayout>

            <android.support.v4.view.ViewPager
                android:id="@+id/viewPager"
                android:layout_width="match_parent"
                android:layout_height="match_parent"
                android:background="#f4f4f4"
                app:layout_behavior="@string/appbar_scrolling_view_behavior" />

        </android.support.design.widget.CoordinatorLayout>

    </LinearLayout>

    <!-- 侧滑菜单内容 -->
    <include layout="@layout/include_home_drawer" />

</android.support.v4.widget.DrawerLayout>
不多说了详细看源码
5.RecyclerView + CardView
用CardView做RecyclerView的item
<android.support.v7.widget.CardView xmlns:card_view="http://schemas.android.com/apk/res-auto"
    android:id="@+id/cardView"
    android:layout_width="match_parent"
    android:layout_height="200dp"
    android:background="@android:color/white"
    android:clickable="true"
    android:foreground="?android:attr/selectableItemBackgroundBorderless"
    android:stateListAnimator="@drawable/anim_touch_raise"
    card_view:cardCornerRadius="5dp"
    card_view:cardElevation="3dp"
    card_view:cardPreventCornerOverlap="true"
    card_view:cardUseCompatPadding="true"
    card_view:contentPadding="0dp">

    <ImageView
        android:id="@+id/imageView"
        android:layout_width="match_parent"
        android:layout_height="match_parent"
        android:scaleType="centerCrop" />

</android.support.v7.widget.CardView>
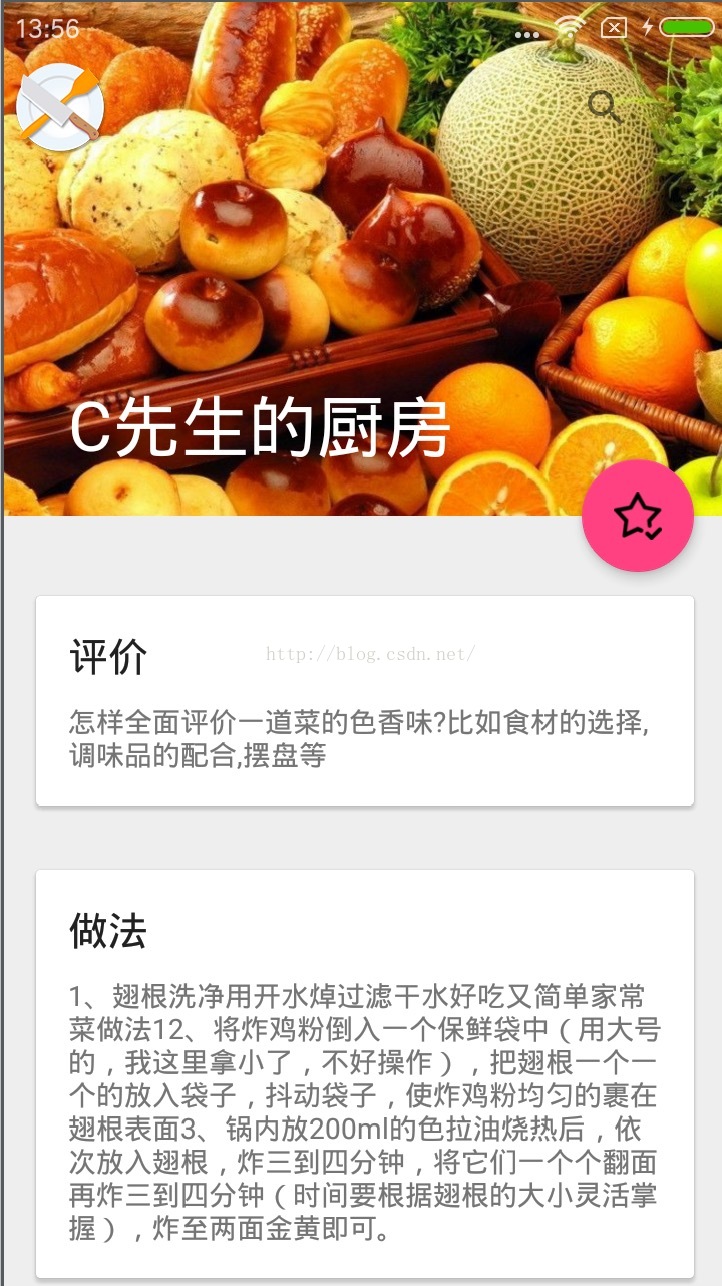
6.CollapsingToolbarLayout + FloatingActionButton
滑动可“变态”的Toolbar加上FloatingActionButton跟随滑动隐藏显示
<android.support.design.widget.CoordinatorLayout xmlns:android="http://schemas.android.com/apk/res/android"
    xmlns:app="http://schemas.android.com/apk/res-auto"
    xmlns:tools="http://schemas.android.com/tools"
    android:id="@+id/baseView"
    android:layout_width="match_parent"
    android:layout_height="match_parent"
    tools:context="com.c2hw.ckitchen.page.InfoActivity">

    <android.support.design.widget.AppBarLayout
        android:id="@+id/appbar"
        android:layout_width="match_parent"
        android:layout_height="256dp"
        android:fitsSystemWindows="true">

        <android.support.design.widget.CollapsingToolbarLayout
            android:id="@+id/collapsing_toolbar"
            android:layout_width="match_parent"
            android:layout_height="match_parent"
            app:contentScrim="?attr/colorPrimary"
            app:layout_scrollFlags="scroll|exitUntilCollapsed"
            app:title="@string/app_name">

            <ImageView
                android:id="@+id/img_top"
                android:layout_width="match_parent"
                android:layout_height="match_parent"
                android:fitsSystemWindows="true"
                android:scaleType="centerCrop"
                android:transitionName="share_image2"
                app:layout_collapseMode="parallax" />

            <android.support.v7.widget.Toolbar
                android:id="@+id/toolbar"
                android:layout_width="match_parent"
                android:layout_height="56dp"
                app:layout_collapseMode="pin"
                app:navigationIcon="@mipmap/app_icon" />

        </android.support.design.widget.CollapsingToolbarLayout>

    </android.support.design.widget.AppBarLayout>

    <android.support.v4.widget.NestedScrollView
        android:layout_width="match_parent"
        android:layout_height="match_parent"
        app:layout_behavior="@string/appbar_scrolling_view_behavior">
xxxxxxxxx</android.support.v4.widget.NestedScrollView><android.support.design.widget.FloatingActionButton android:layout_width="wrap_content" android:layout_height="wrap_content" android:layout_margin="16dp" android:clickable="true" android:src="@mipmap/favourite_icon" app:layout_anchor="@id/appbar" app:layout_anchorGravity="bottom|right|end" /> </android.support.design.widget.CoordinatorLayout>
demo地址:http://download.csdn.net/detail/code_cc/9622165


 597
597


 被折叠的 条评论
为什么被折叠?
被折叠的 条评论
为什么被折叠?
 到【灌水乐园】发言


