


IDEA+Maven 整合SSM框架实现简单的增删改查
- 工具集
- IDEA新建项目
- SSM环境搭建
工具集
maven3.6,IDEA2018.2.5,mysql5.5,tomcat7.0.9
IDEA新建项目
-
打开IDEA->new->project

-
添加公司名和项目名,第三个选项为版本号

-
选择maven版本位置,以及setting配置,一般默认的仓库为用户文件夹下的.m2文件夹里

-
填写项目名和地址后,一路next+finish,完成创建。
SSM项目搭建
首先浏览一下建成的项目文件结构

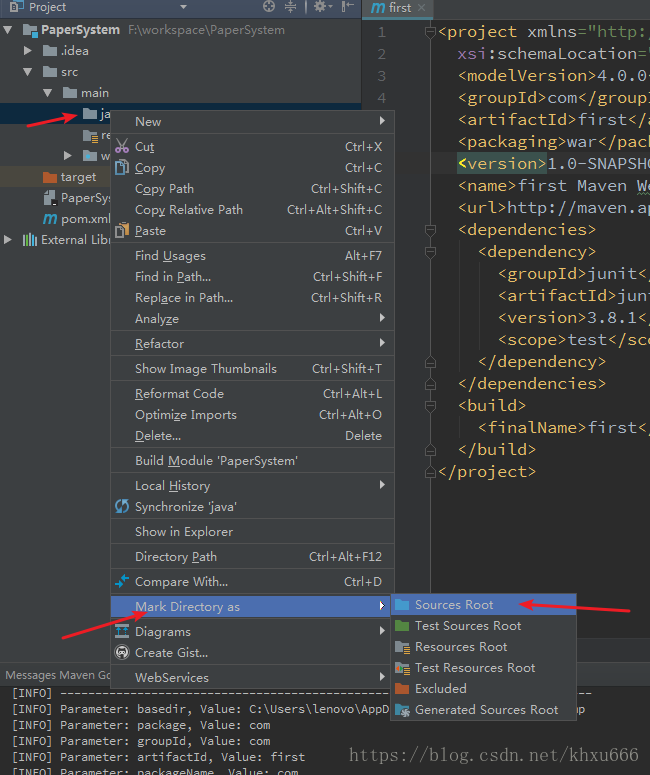
- 在项目的src/main目录中添加java,resources目录,并分别指定为sources root和resourcesroot
- 在java目录下新建包名,如com.example,然后在包下面新建bean,controller,dao,service,在resources下面新建mapper文件夹

- 在bean中封装对象
package com.example.bean;

public class Userinfo {
    private int id;
    private String username;
    private String password;

    public int getId() {
        return id;
    }

    public void setId(int id) {
        this.id = id;
    }

    public String getName() {
        return username;
    }

    public void setName(String name) {
        this.username = name;
    }

    public String getPassword() {
        return password;
    }

    public void setPassword(String password) {
        this.password = password;
    }

    @Override
    public String toString() {
        return "Userinfo{" +
                "id=" + id +
                ", name='" + username + '\'' +
                ", password='" + password + '\'' +
                '}';
    }
}
- 封装dao层
dao的接口代码:
package com.zhongruan.dao;

import com.zhongruan.bean.Userinfo;

import java.util.List;

public interface IUserDao {
    public List<Userinfo> findAll();
}
- 在mapper中配置mybatis
package com.example.service;

import com.zhongruan.bean.Userinfo;
import com.zhongruan.dao.IUserDao;
import org.springframework.beans.factory.annotation.Autowired;
import org.springframework.stereotype.Service;

import java.util.List;

@Service
public class UserService implements IUserService {
    @Autowired
    private IUserDao userDao;

    @Override
    public List<Userinfo> findAll() {
        List<Userinfo> temp = userDao.findAll();
        return userDao.findAll();
    }
}
db.properties文件
jdbc.driver=com.mysql.jdbc.Driver
jdbc.url=jdbc:mysql://localhost:3306/tb1?useSSL=true&characterEncoding=utf-8
jdbc.username=****
jdbc.password=******
applicationContext.xml
<?xml version="1.0" encoding="UTF-8"?>
<beans xmlns="http://www.springframework.org/schema/beans"
       xmlns:xsi="http://www.w3.org/2001/XMLSchema-instance"
       xmlns:context="http://www.springframework.org/schema/context"
       xmlns:aop="http://www.springframework.org/schema/aop"
       xmlns:tx="http://www.springframework.org/schema/tx"
       xsi:schemaLocation="http://www.springframework.org/schema/beans
		http://www.springframework.org/schema/beans/spring-beans-4.3.xsd
		http://www.springframework.org/schema/context
		http://www.springframework.org/schema/context/spring-context-4.3.xsd
		http://www.springframework.org/schema/aop
		http://www.springframework.org/schema/aop/spring-aop-4.3.xsd
		http://www.springframework.org/schema/tx
		http://www.springframework.org/schema/tx/spring-tx-4.3.xsd">
    <!-- 1.配置数据库相关参数properties的属性:${url} -->
    <context:property-placeholder location="classpath:db.properties"/>

    <!-- 2.配置数据源 -->
    <bean id="dataSource" class="com.mchange.v2.c3p0.ComboPooledDataSource">
        <property name="driverClass" value="${jdbc.driver}"/>
        <property name="jdbcUrl" value="${jdbc.url}"/>
        <property name="user" value="${jdbc.username}"/>
        <property name="password" value="${jdbc.password}"/>
        <property name="maxPoolSize" value="30"/>
        <property name="minPoolSize" value="2"/>
    </bean>

    <!-- 3.配置SqlSessionFactory对象 -->
    <bean id="sqlSessionFactory" class="org.mybatis.spring.SqlSessionFactoryBean">
        <!-- 注入数据库连接池 -->
        <property name="dataSource" ref="dataSource"/>
        <!-- 扫描bean包 使用别名 -->
        <property name="typeAliasesPackage" value="com.zhongruan.bean"></property>

        <!--配置加载映射文件 UserMapper.xml-->
        <property name="mapperLocations" value="classpath:mapper/*.xml"/>

    </bean>

    <!-- 自动生成dao,mapper-->
    <!-- 4.配置扫描Dao接口包,动态实现Dao接口,注入到spring容器中 -->
    <bean class="org.mybatis.spring.mapper.MapperScannerConfigurer">
        <!-- 给出需要扫描Dao接口包 -->
        <property name="basePackage" value="com.zhongruan.dao"/>
        <!-- 注入sqlSessionFactory -->
        <property name="sqlSessionFactoryBeanName" value="sqlSessionFactory"/>
    </bean>


    <!--自动扫描-->
    <context:component-scan base-package="com.zhongruan"/>


    <!-- 配置事务-->
    <!-- 5.配置事务管理器 -->
    <bean id="transactionManager" class="org.springframework.jdbc.datasource.DataSourceTransactionManager">
        <property name="dataSource" ref="dataSource"/>
    </bean>
    <!-- 6.开启事务注解-->
    <tx:annotation-driven></tx:annotation-driven>

</beans>
- spring-mvc配置
<?xml version="1.0" encoding="UTF-8"?>
<beans xmlns="http://www.springframework.org/schema/beans"
       xmlns:xsi="http://www.w3.org/2001/XMLSchema-instance"
       xmlns:mvc="http://www.springframework.org/schema/mvc"
       xmlns:context="http://www.springframework.org/schema/context"
       xmlns:aop="http://www.springframework.org/schema/aop"
       xmlns:tx="http://www.springframework.org/schema/tx"
       xsi:schemaLocation="http://www.springframework.org/schema/beans
      http://www.springframework.org/schema/beans/spring-beans-4.3.xsd
      http://www.springframework.org/schema/mvc
      http://www.springframework.org/schema/mvc/spring-mvc-4.3.xsd
      http://www.springframework.org/schema/context
      http://www.springframework.org/schema/context/spring-context-4.3.xsd
      http://www.springframework.org/schema/aop
      http://www.springframework.org/schema/aop/spring-aop-4.3.xsd
      http://www.springframework.org/schema/tx
      http://www.springframework.org/schema/tx/spring-tx-4.3.xsd">

    <!-- 1.注解扫描位置-->
    <context:component-scan base-package="com.zhongruan.controller" />

    <!-- 2.配置映射处理和适配器-->
    <bean class="org.springframework.web.servlet.mvc.method.annotation.RequestMappingHandlerMapping"/>
    <bean class="org.springframework.web.servlet.mvc.method.annotation.RequestMappingHandlerAdapter"/>

    <!-- 3.视图的解析器-->
    <bean class="org.springframework.web.servlet.view.InternalResourceViewResolver">
        <property name="prefix" value="/jsp/" />
        <property name="suffix" value=".jsp" />
    </bean>
</beans>
后面的业务代码
allUser.jsp
<%@ page language="java" contentType="text/html; charset=UTF-8"
         pageEncoding="UTF-8" isELIgnored="false"%>
<%@ taglib prefix="c" uri="http://java.sun.com/jsp/jstl/core" %>

<html>
<head>
    <title>user列表</title>
    <meta name="viewport" content="width=device-width, initial-scale=1.0">
    <!-- 引入 Bootstrap -->
    <link href="https://cdn.bootcss.com/bootstrap/3.3.7/css/bootstrap.min.css" rel="stylesheet">
</head>
<body>
<div class="container">
    <div class="row clearfix">
        <div class="col-md-12 column">
            <div class="page-header">
                <h1>
                    基于SSM框架的管理系统:简单实现增、删、改、查。
                </h1>
            </div>
        </div>
    </div>

    <div class="row clearfix">
        <div class="col-md-12 column">
            <div class="page-header">
                <h1>
                    <small>用户列表 —— 显示所有用户</small>
                </h1>
            </div>
        </div>
    </div>
    <div class="row">
        <div class="col-md-4 column">
            <a class="btn btn-primary" href="${pageContext.request.contextPath}/user/toAddUser.do">新增</a>
        </div>
    </div>
    <div class="row clearfix">
        <div class="col-md-12 column">
            <table class="table table-hover table-striped">
                <thead>
                <tr>
                    <th>id</th>
                    <th>用户名</th>
                    <th>密码</th>
                    <th>操作</th>
                </tr>
                </thead>
                <tbody>
                <c:forEach items="${userinfos}" var="userInfo">
                    <tr>
                        <td>${userInfo.id}</td>
                        <td>${userInfo.name}</td>
                        <td>${userInfo.password}</td>
                        <td>
                            <a href="${pageContext.request.contextPath}/user/toUpdate.do?id=${userInfo.id}">更改</a> |
                            <a href="${pageContext.request.contextPath}/user/delete.do?id=${userInfo.id}">删除</a>
                        </td>
                    </tr>
                </c:forEach>
                </tbody>
            </table>
        </div>
    </div>
</div>
最后总结
-
SpringMVC:
1.客户端发送请求到DispacherServlet(分发器)
2.由DispacherServlet控制器查询HanderMapping,找到处理请求的 Controller
3.Controller调用业务逻辑处理后,返回ModelAndView
4.DispacherSerclet查询视图解析器,找到ModelAndView指定的视图
5.视图负责将结果显示到客户端 -
Spring
-
1.我们平时开发接触最多的估计就是IOC容器,它可以装载bean(也就是我们Java中的类,当然也包括service dao里面的),有了这个机制,我们就不用在每次使用这个类的时候为它初始化,很少看到关键字new。另外spring的aop,事务管理等等都是我们经常用到的。
-
mybatis
- mybatis是对jdbc的封装,它让数据库底层操作变的透明。mybatis的操作都是围绕一个sqlSessionFactory实例展开的。mybatis通过配置文件关联到各实体类的Mapper文件,Mapper文件中配置了每个类对数据库所需进行的sql语句映射。在每次与数据库交互时,通过sqlSessionFactory拿到一个sqlSession,再执行sql命令。


 253
253


 被折叠的 条评论
为什么被折叠?
被折叠的 条评论
为什么被折叠?
 到【灌水乐园】发言


