


转自:http://blog.csdn.net/liuzhengkang/article/details/2916620
| V get(Object key, int hash) { if (count != 0) { // read-volatile HashEntry e = getFirst(hash); while (e != null) { if (e.hash == hash && key.equals(e.key)) { V v = e.value; if (v != null) return v; return readValueUnderLock(e); // recheck } e = e.next; } } return null; } |
| V readValueUnderLock(HashEntry e) { lock(); try { return e.value; } finally { unlock(); } } |
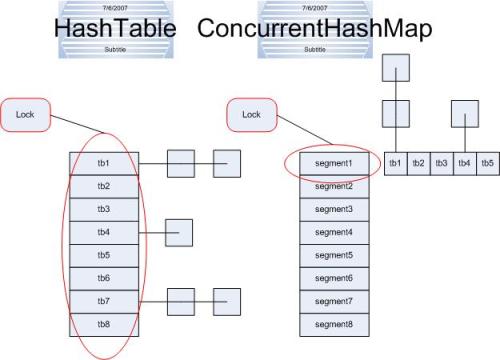
put操作一上来就锁定了整个segment,这当然是为了并发的安全,修改数据是不能并发进行的,必须得有个判断是否超限的语句以确保容量不足时能够rehash,而比较难懂的是这句int index = hash & (tab.length - 1),原来segment里面才是真正的hashtable,即每个segment是一个传统意义上的hashtable,如上图,从两者的结构就可以看出区别,这里就是找出需要的entry在table的哪一个位置,之后得到的entry就是这个链的第一个节点,如果e!=null,说明找到了,这是就要替换节点的值(onlyIfAbsent == false),否则,我们需要new一个entry,它的后继是first,而让tab[index]指向它,什么意思呢?实际上就是将这个新entry插入到链头,剩下的就非常容易理解了。
| V put(K key, int hash, V value, boolean onlyIfAbsent) { V oldValue; |
remove操作非常类似put,但要注意一点区别,中间那个for循环是做什么用的呢?(*号标记)从代码来看,就是将定位之后的所有entry克隆并拼回前面去,但有必要吗?每次删除一个元素就要将那之前的元素克隆一遍?这点其实是由entry的不变性来决定的,仔细观察entry定义,发现除了value,其他所有属性都是用final来修饰的,这意味着在第一次设置了next域之后便不能再改变它,取而代之的是将它之前的节点全都克隆一次。至于entry为什么要设置为不变性,这跟不变性的访问不需要同步从而节省时间有关,关于不变性的更多内容,请参阅之前的文章《线程高级---线程的一些编程技巧》
| V remove(Object key, int hash, Object value) { V oldValue = null; |
| static final class HashEntry { HashEntry(K key, int hash, HashEntry next, V value) { |
以上,分析了几个最简单的操作,限于篇幅,这里不再对rehash或iterator等实现进行讨论,有兴趣可以参考src。
接下来实际上还有一个疑问,ConcurrentHashMap跟HashMap相比较性能到底如何。这在Brian Goetz的文章中已经有过评测http://www.ibm.com/developerworks/cn/java/j-jtp07233/。
HashMap与ConcurrentHashMap的测试报告
日期:2008-9-10
测试平台:
CPU:Intel Pentium(R) 4 CPU 3.06G
内存:4G
操作系统:window server 2003
一、HashMap与ConcurrentHashMap简单put操作的时间对比
1、HashMap测试
A、程序代码:
package test0908;
import java.util.Map;
import java.util.HashMap;
public class HashmapTest {
public static void main(String []args){
Map<Integer,Integer> hashmap = new HashMap<Integer,Integer>();
int tt=13;
| 而循环100万 Hashmap.put(i,”aaa”), 用时time = 2563ms |
long begin1 = System.currentTimeMillis();
for(int i=0; i<1000000; i++){
tt = Math.abs(tt*(tt-i)-119);
hashmap.put(tt, tt);
//System.out.println(hashmap.get(tt));
}
System.out.println("time="+(System.currentTimeMillis() - begin1)+"ms.");
}
}
B、测试结果截图(循环100万次):

当put操作循环10万次时,得到time = 344ms,
循环50万次时,得到time = 1657ms,
循环100万次时,得到time =4094ms。
2、ConcurrentHashMap测试
A、程序代码:
package test0908;
import java.util.concurrent.ConcurrentHashMap;
public class conHashmapTest{
public static void main(String []args){
ConcurrentHashMap<Integer,Integer> chashmap = newConcurrentHashMap<Integer,Integer>();
int tt=13;
long begin1 = System.currentTimeMillis();
for(int i=0; i<1000000; i++){
tt = Math.abs(tt*(tt-i)-119);
chashmap.put(tt, tt);
//System.out.println(hashmap.get(tt));
}
System.out.println("time="+(System.currentTimeMillis() - begin1)+"ms.");
}
}
B、测试结果截图(循环100万次):

当put操作循环10万次时,得到time =281ms,
循环50万次时,得到time = 1376ms,
循环100万次时,得到time =3625ms,
二、HashMap与ConcurrentHashMap put操作的最多个数对比(即内存溢出)
1、 HashMap测试
测试结果截图:
运行程序,内存初值为:846M,内存峰值为:931M,put计数=1,030,604

2、 ConcurrentHashMap 测试
测试结果截图:
运行程序,内存初值为:847M,内存峰值为:931M,put计数=1,030,238

三、HashMap与ConcurrentHashMap 多线程操作的测试
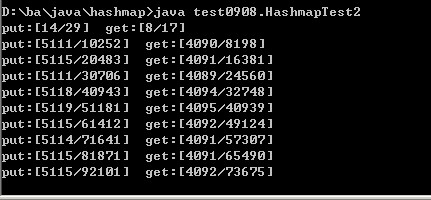
1、 HashMap测试结果截图:(10个put线程,8个get线程)
| 平均每秒的get次数/总get次数
|
| 平均每秒的put次数/总Put次数 |
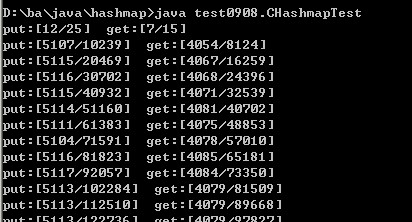
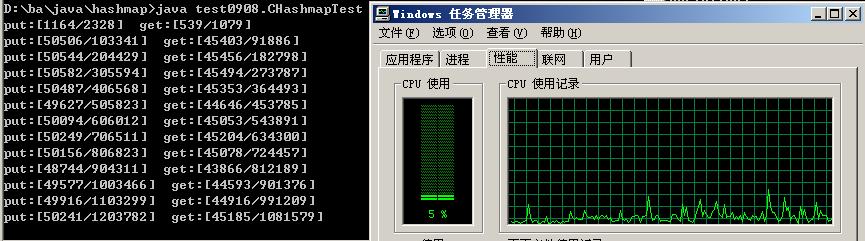
2、 ConcurrentHashMap 测试结果截图 :(10个put线程,8个get线程)
3、 以上均设置睡眠1ms时, 平均每个线程达到510多;
每秒平均put的次数随线程的个数增加而增加,
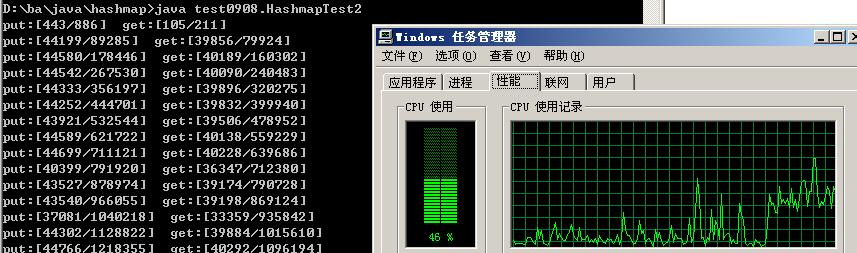
4、注:当put线程数量为100,get线程数量为90时,HashMap就开始出现性能下降的情形,CPU使用率达到45%左右,且put、get的个数要明显少于ConcurrentHashMap的个数;
而使用ConcurrentHashMap时,则线程很稳定,CPU使用率不超过12%时。
测试结果截图:
| 与concurrenthashmap相比,Put,get线程达到100个条件下,hashmap要少5500左右 |
A、HashMap测试图:
B、 ConcurrentHashMap测试图:
5、经反复测试发现,只要创建的put和get的线程总数达到180个以上时,HashMap的性能就开始下降。而当创建的put和get的线程总数达到256个以上时,ConcurrentHsahMap的性能也开始下降。
性能下降:CPU的使用率开始增加,平均每秒put和get的个数开始下降,即出现若线程再增加,而put和get反而减少。
发一篇原贴文章真不容易啊,尤其是还这么多图片的。嘻嘻!搞了我半个多钟头。这个测试报告是写给项目经理看的,但是很多同志说看不懂这个报告里面有什么../? 所以发上来希望各位高手狠狠的给点意见,小弟在此谢了!
最后贴上第三个测试中concurrenthashmap的源程序:
package test0908;
import java.util.concurrent.ConcurrentHashMap;
public class CHashmapTest {
public static void main(String []args){
try{
count c = new count();
ConcurrentHashMap<Integer,Integer> chm = new ConcurrentHashMap<Integer,Integer>();
for(int i=0; i<50; i++){
new putCHashmapThread(chm,c).start();//put操作
}
for(int i =0 ; i<45; i++){
new getCHashmapThread(chm,c).start(); //get操作
}
ProbeThread pt = new ProbeThread(c); //监听线程
pt.start();
}catch(Exception e){
System.out.println(e.getMessage());
}
}
}
class putCHashmapThread extends Thread{ //put操作线程
private ConcurrentHashMap<Integer,Integer> chm = null;
private count c = null;
public putCHashmapThread(ConcurrentHashMap<Integer,Integer> chm,count c){
this.chm = chm;
this.c = c;
}
public void run(){
int tt = 13;
int i = 1;
try{
while(true){
tt = Math.abs(tt*(tt-i)-119);
chm.put(tt, tt);
c.addcount1(); //put操作计数
i++;
Thread.sleep(1);
//System.out.println(i);
}
}catch(Exception e){
System.out.println(e.getMessage());
}
}
}
class getCHashmapThread extends Thread{ //get操作线程
private ConcurrentHashMap<Integer,Integer> chm = null;
private count c = null;
public getCHashmapThread(ConcurrentHashMap<Integer,Integer> chm,count c){
this.chm = chm;
this.c = c;
}
public void run(){
int tt = 13;
int i = 1;
try{
while(true){
tt = Math.abs(tt*(tt-i)-119);
chm.get(tt);
c.addcount2(); //get操作计数
i++;
Thread.sleep(1);
//System.out.println(i);
}
}catch(Exception e){
System.out.println(e.getMessage());
}
}
}
class count{ //计数器
private static int count1 = 1, count2 = 1;
public int getcount1() {
return count1;
}
public int getcount2(){
return count2;
}
public void addcount1(){
count1++;
}
public void addcount2(){
count2++;
}
}
class ProbeThread extends Thread { //监听线程
private boolean run = true;
count cc;
public ProbeThread(count cc) {
this.cc = cc;
}
@SuppressWarnings("static-access")
public void run() {
int c1=0, c2=0;
int cc1 = 0, cc2 = 0;
while(this.run) {
c2 = cc.getcount1();
cc2 =cc.getcount2();
System.out.println("put:"+"["+(c2-c1)/2+"/"+c2+"]"+" get:"+"["+(cc2-cc1)/2+"/"+cc2+"]");
c1 = c2;
cc1 = cc2;
try {
Thread.sleep(1000*2-1);
} catch(Exception ex) {
System.out.println("Error[ProbeThread.run]:"+ex.getMessage());
}
}
}
}


 1280
1280

 被折叠的 条评论
为什么被折叠?
被折叠的 条评论
为什么被折叠?
 到【灌水乐园】发言


